Tag Archives: Tutorial

buttonhole loop; a tutorial

Aaaages ago, Susan asked me for more information about the buttonhole loop used in this top, and I totally forgot!  I’m so sorry! right up until yesterday when Pencil Girl asked the same thing about Cassie’s top.  Ladies, thank you so much for asking!  I hopped to and wrote up my method… and if you dislike sewing tutorials then please skip over this… we’ll just pretend that this isn’t even here and we can still be friends, yeah?  winkwink ;D

The buttonhole loop is a quick, easy and very unobtrusive button closure, made using thread alone.  It is most often used for a short slit opening at the top centre back of a dress, blouse or a top, where two finished edges abut each other with no overlap; it is practically invisible as well as a quicker alternative to a rouleau loop.  My grandmother used it aaallll the time, and taught me how to make one…

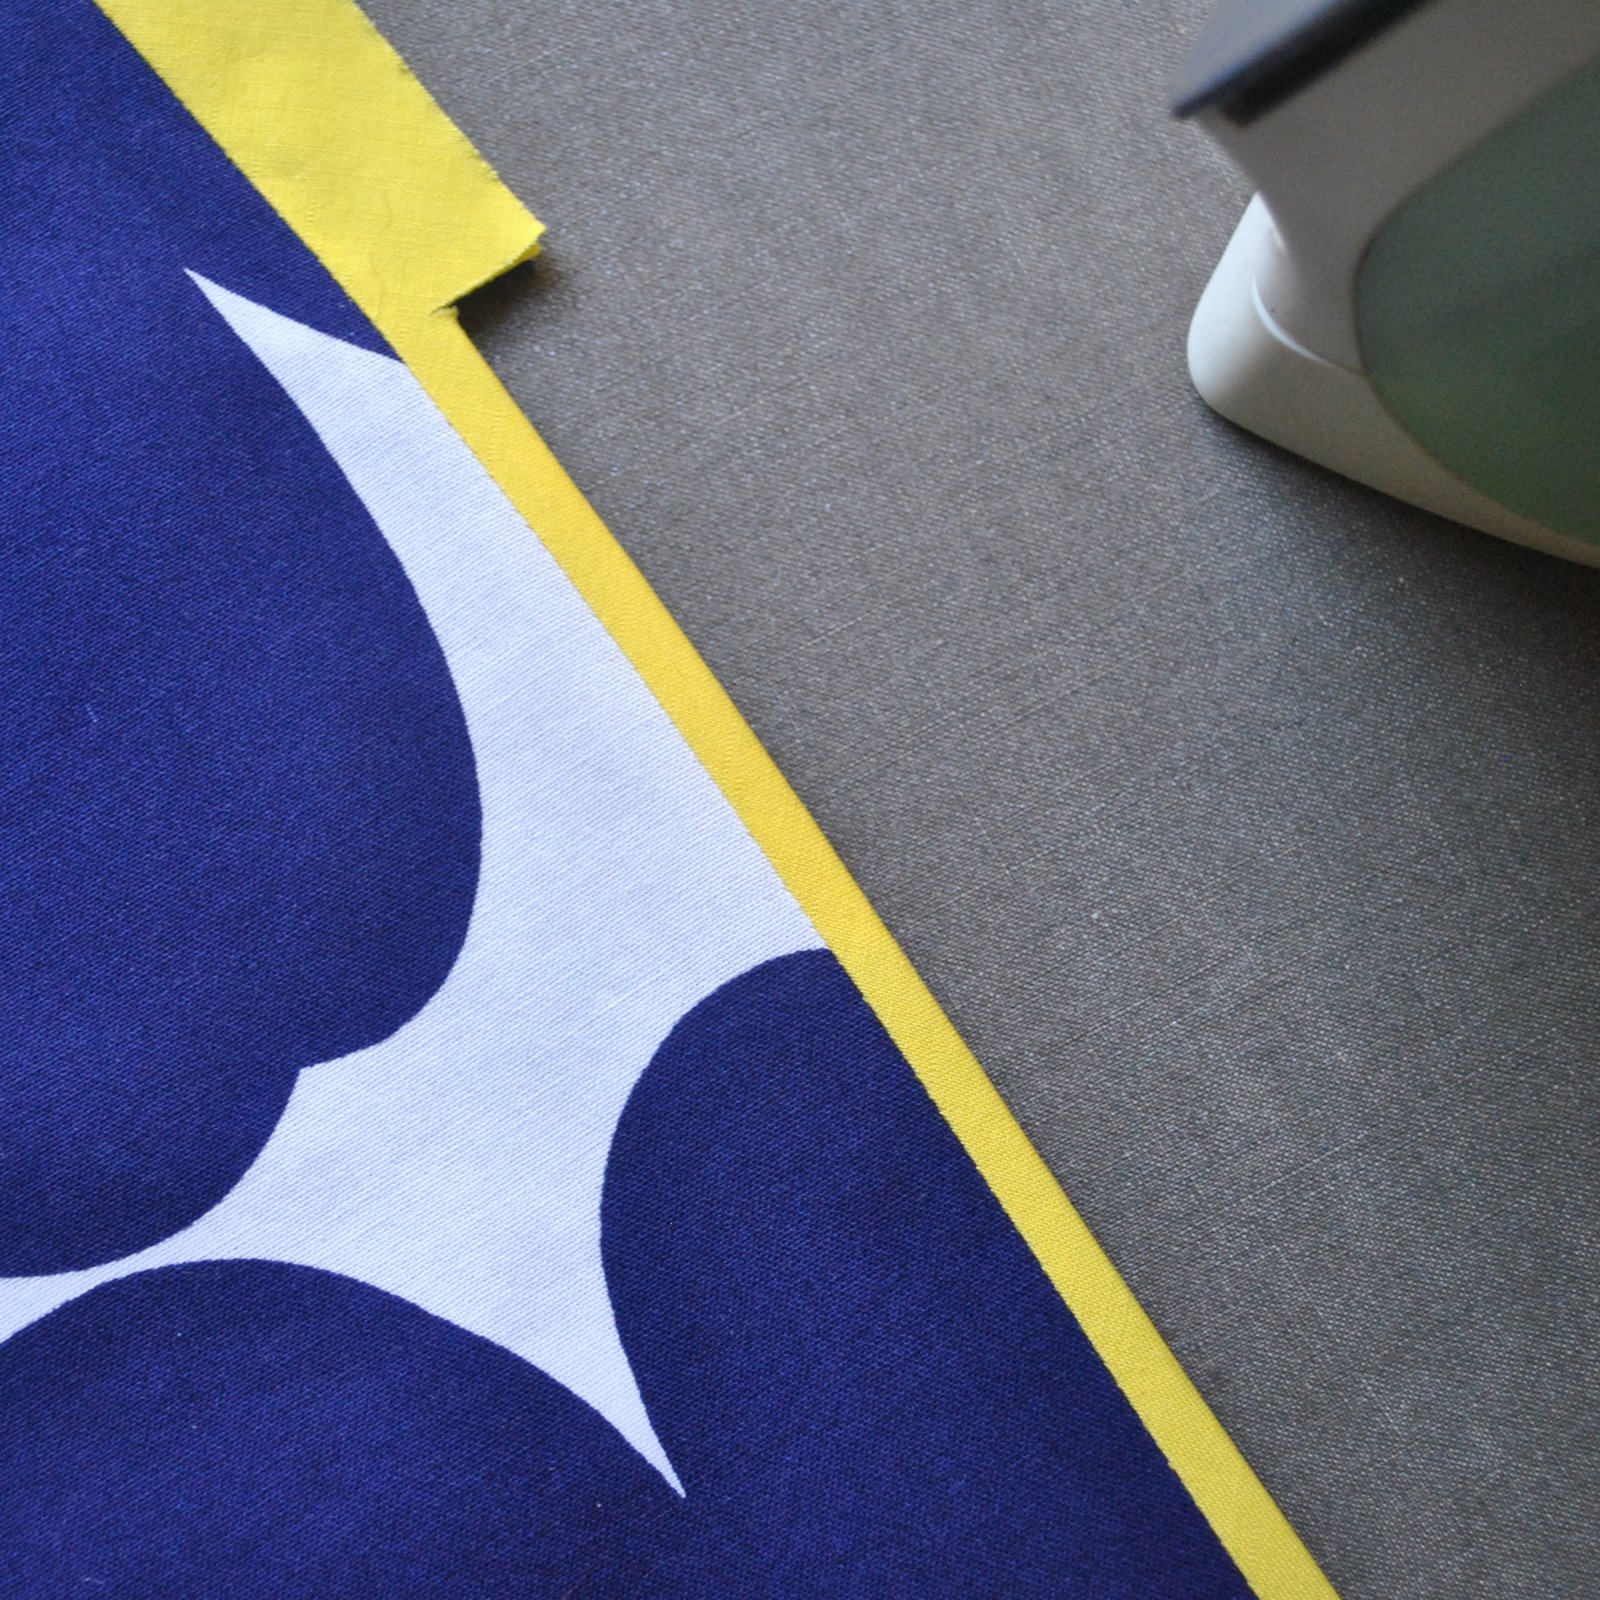
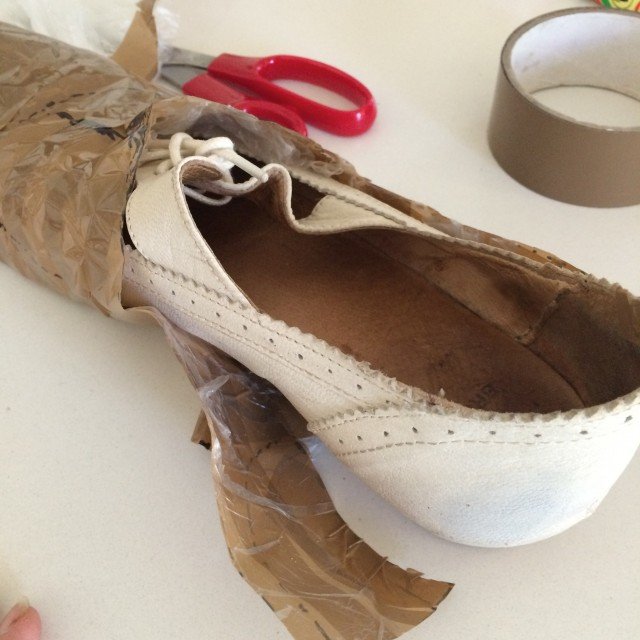
also, please let’s just pretend that this is the back of a divine little blouse made of Liberty lawn or something, and not what it is.  Which is two measly scraps of  leftover upholstery fabric from my recently made duffle bags… #notliberty #notsilk #ohtheshame

Stitch the button in place.  Which side is up to your personal preference… although to have the button on the right hand side is conventional

Cut about 30cm (12″) of the thread you’re going to use.  Buttonhole twist is traditional and the best if you are lucky enough to get hold of it, I am using upholstery thread here which is an excellent substitute.  You can also just use regular, all-purpose thread or even embroidery thread if you like, it will probably be just fine if a little more difficult to work with.  Reason being, regular thread is thinner and twists and tangles more easily, so is more likely to develop knots, and also results in a flimsier loop, naturally; and embroidery thread, being stranded, is more difficult to pull firmly into the knots you are forming with each stitch.  But either would work out ok, in a pinch.  There are no rules in sewing!

Secure the thread at the top of the left hand side of the opening.  This should be at a level with the top of the button.

Lay it over the button so the thread lies around the button shank/stitching, and pull firmly until thread and two garment sides are sitting in the desired position.  It’s more neat to have the sides abutting each other closely, although if you want a bit of a gap between the sides make the loop longer.

Stitch the thread once in the left hand side, level with the bottom of the button.

Lay the thread back around the button again, and stitch back in the top edge.

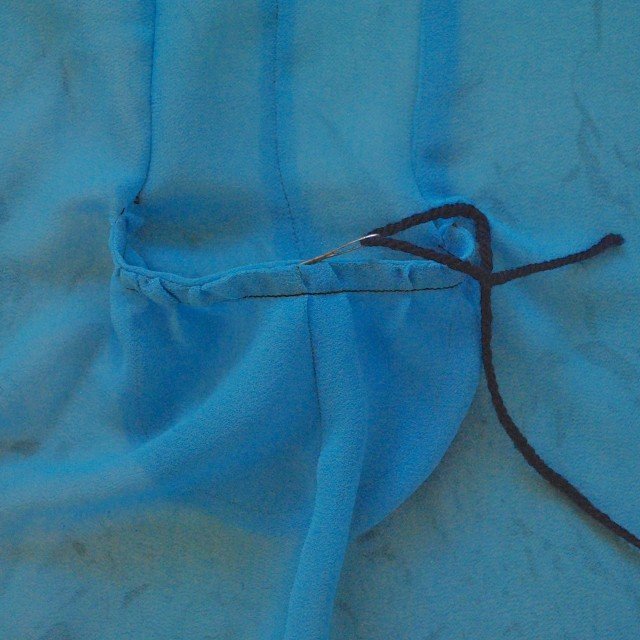
Being careful not to pull the loop out any looser or tighter, undo the button… now you’re going to work buttonhole stitch to totally cover up that two-stranded loop…

Bring the needle over the loop, insert it back under the loop and over the working thread on the other side… this is the buttonhole stitch.  It’s basically the same as blanket stitch, but instead of doing it into the edge of fabric, you’re doing it over a thread in mid air, so to speak.

please excuse my dodgy drawing skills…

Pull it down firmly, and repeat; just keep going, going, going; pulling each stitch firm and trying to keep it all flat and even and straight; and not to rotate around the loop as you’re going along.

When you get to the end, secure the thread into the bottom of the loop by sewing three tiny stitches  into the same spot three times.

aaand; done!

pinterestmail

white inari

white-inari

named-inariMum and I went shopping together on my birthday; her for my birthday present, and me for her birthday present!  yes, our birthdays are just a few days apart so this is a bit of a tradition.  We went to Fabulous Fabrics.  Haha… well how unexpected!  *wink*

After much lengthy and highly enjoyable hunting, comparisons and consultations with each other, Mum chose this really beautiful fabric for me.  it is thick but very light and airy, has a nubbly, ultra slubby texture and is as pure white as the driven snow.  I absolutely adore it, in fact I’d been salivating over it whenever I saw it, ever since it came in.  Getting a little bit to give me is extra thoughtful of Mum when you take into account that she doesn’t think white really suits me at all.  I kind of agree with her up to a point… however!  I still totally adore it, because I’m a dreadfully contrary soul… no not really, I just have this thing for white clothing, particularly for summer, I love it with a fierce and burning passion…even a white-hot passion!  Mum knows I do, so I thought it pretty sweet that she overrode her feelings to give me something I really love.

white-inari-back

Pattern is the Named patterns Inari tee dress.  This is my “real” Inari, for which I ran up my previously blogged red striped “muslin”! though of course they are both wearable since I found I needed to make only minor changes to the pattern for it to be perfect.

sleeve-cuff

Something I mentioned in my red-striped inari post, the dress made as per the pattern rides up a bit when you lift your arms, so for this version I made the following simple modification to the sleeves to help reduce the problem:

What I’m doing here is adding width to and reducing the height of the sleeve cap slightly, and doing so without altering the armscye.  Diddling about with both the sleeve and the armscye is possible if you really know what you’re doing #idonot; however can be quite complicated and so I tend to not go there…  I would prefer to substitute an entirely different, tried-and-true sleeve cap and armscye from another pattern if it came to that!!

inari-sleeve-altfrom L to R, top to bottom:

1) Trace the sleeve, and draw a line from the shoulder seam junction mark near the apex of the sleeve cap down to the lower edge, parallel to the grain line.
2) Cut from the lower edge up, leaving a scant few mm at the upper edge still attached.  Pivot the two halves open; I allowed a gap of 4cm (2″) in width, although you could stand to go a little wider, if desired.
3) Tape a piece of paper to fill and fix the gap
4) redraw that lower hem to curve smoothly in a similar line to how the sleeve was previously, and trim
5) Original sleeve and new sleeve, juxtaposed.  You can see how the sleeve is wider; and not seen, but the height of the sleeve cap has been reduced by 2.5cm (1″).
6) Very important!!!  remember to measure the length of the new lower edge and cut the sleeve cuffs accordingly!  They’ll be a bit longer than the sum of the original width and the width of the gap created in step 2.

Demonstration of results (below); The dress does still ride up a little bit however not nearly as much as previously, at right.  To lessen the ride-up even more, you could go even further with widening the sleeve and “flattening” the curve of the sleeve cap even more.  Or alternatively of course, you could always substitute an armscye and sleeve cap from another pattern, at a pinch!

I’m pretty happy with this though  🙂

whiteinari-arms-up

Finishing details:

I still didn’t use the neckline facing, but turned in the seam allowance and finished with a piece of bias-cut white linen.  Similarly at the lower hemline, the raw edge inside is bound with bias-cut white linen and then handstitched, this looks nice if anyone happens to catch a glimpse of that back hem inside.. which lets face it, is quite possible because of that low-hanging back edge,  and also eliminates the bulk that you’d get if you turned the fabric under twice.

binding binding2

Bonus picture, photobombing daughter…

dsc_0021

Fun fact, she made the dress she is wearing here; it is a cute and interesting tank dress with tucking up one side and side split detail on the other, made in blue marl jersey that she bought in Japan.   She’s wearing it over the skirt that I made for her, here.  Honestly, she makes the most lovely things, but doesn’t really share them on any social media.  Occasionally I persuade her to pose in something she’s made, like the time she made this really divinely beautiful ivory cut-out lace top

cassies-lace-top

Gorgeous, isn’t it?

Details:

Dress; Inari tee dress by Named patterns, white slubby cotton mix
Shoes; designed and made by me, details here
Sandals in top picture;designed and made by me here.    this picture taken on Cable Beach during our recent holiday

and hmmmm, I’m sorry that I’m closing with my dress here… bit of an anticlimax after Cassie’s top!!

dsc_0035

pinterestmail

side seam with inset strip and bound-edge inseam pocket; a tutorial

pocket

btw this fabric here is fulfilling a long held dream of mine…. a Marimekko dress!!  print is Pieni Unikko 2, 100% cotton, available here… yes, you can get Marimekko fabric in Australia!  More details on the dress in a future post to come…  🙂

Also, sorry for the unwieldy title but it’s the most accurate way of describing this technique, I reckon…

Anyway, recently I was putting in some inseam side pockets but I wanted to have a contrasting coloured strip set into the seam and carrying on seamlessly to incorporate a neatly bound edge to the pocket opening also…  how to do it? well here is my method…

This is illustrated for a dress but works equally well in a skirt, trousers or shorts as well, obviously.  pocket1

You have your dress (or skirt/trouser/shorts) front and back, the under pocket piece cut from the fashion fabric and a pocket liner piece cut from either lining fabric or the fashion fabric, and 1 1/2″ (4cm) bias cut fabric in a contrasting colour for the inset strip/pocket edging.  btw the measurements given here are for a garment cut with 1/2″ (1.2cm) seam allowances and will resulting in a 1/4″(6mm) wide contrasting strip, but the measurements can be varied accordingly for different dimensions as desired.

Stitch the bias strip to the skirt front, using a 6/8″ (2cm) seam allowance.  Press the strip to the side edge.

pocket2
From the underside, make two 1/2″ (1.3cm) snips (seam allowance width) through all layers at the top and bottom opening edge of the pocket.  Take care to not snip all the way to the previous stitching, but ONLY  the width of the seam allowance.

pocket3

Stitch the lining pocket piece to the bias strip in a narrow 1/4″(6mm) seam allowance.

pocket5
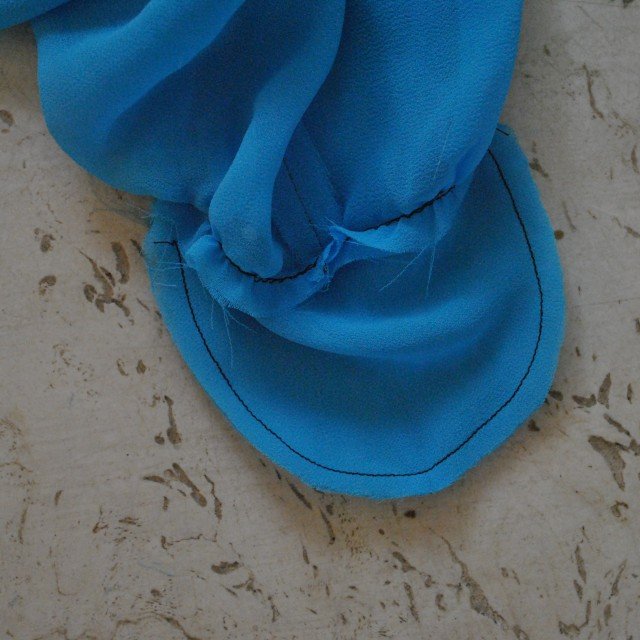
Press the pocket lining out, then turn it under the front piece and press, forming the 1/4″ (6mm) wide bound edge of the pocket.

pocket6pocket7

Use a matching thread and stitch in the ditch along the joining seam from the right side through all layers, securing the pocket lining to the front.

pocket8

Underneath, pin the pocket piece to the pocket lining piece around all inner edges, stitch,  Finish the edge as desired… I chose to finish the edges in a HongKong seam using the same yellow voile.

pocket9 pocket10from the right side (with some irrelevant (white) basting along the side edge… not really necessary for this method)

pocket10a

Pin the back piece to the front piece at the side seams, marking the pocket opening points exactly with a pin.  Have the front piece uppermost, so you can use the previous, bias attachment seam as a guide while stitching; this is so you can ensure your contrasting bias strip comes out as a nice perfectly even width all the way down the side seam.  Stitch side seams in a 1/2″ (1.3mm) seam, passing exactly through those pin-marked points.  Reinforce the pocket opening edges with a few backward and forward passes with the machine at these points. Take great care to keep the pocket opening edge free between the two layers.

pocket11

And done!  When you turn it out, you will have a nice side-edge strip, which seamlessly goes on to edge your side inseam pocket.  Nice, yes?

As always, if you find this a useful and/or helpful tutorial, please do leave a comment saying so…  🙂

pocket12

pinterestmail

gathered pocket; a tutorial

gathered pocketThis gathered pocket sits inside and at the side edge of a loose-fitting garment such as an unfitted dress or tunic top, and can be adapted to go in a loose, flowy skirt also.  It is best suited to lightweight fabrics.

Firstly, making the pattern pieces…  start with an A-line dress pattern.  I used dress R from the Stylish Dress Book by Yoshiko Tsukiori; which has gently A-line side seams that curve outwards towards the lower hemline, but this design would work equally well for a straight, diagonal side edge too.

gp1

For both front and back pieces, both sides, draw in the above, straight lines;

blue line:  starting from the the innermost point of the armscye curve, vertically straight down to finish at the level where you wish for the top edge of the pocket to hit.  As a rough guide I find around 5cm (2″) above hip level to be generally a pretty good upper pocket point.

green line: horizontally, at the level where you wish for the top edge of the pocket to hit.  The “bagginess” of your pocket is a personal choice; as a guide; my green line is 15cm (6″) in length which coincided with the degree of “flare” of the dress at the hemline.

red line: vertical line from the outer edge of green line, straight down.  This is the new side edge of the dress/top.

orange curve; from the blue green intersection, draw a gentle pocket curve to intersect with the original side of the dress edge.  As a guide, I made my pockets 20cm deep.

purple line: vertical line from the lower edge of the pocket, up to the green line.  This is the centre fold on which you will cut the pocket piece.

The grey lines of the side front and side back represent the original lines of the pattern pieces.

gp1a

These lines define the new pattern pieces as show above; at left is the new side edge of the dress front and back, now defined by the blue line, green line and red line.  Only one side is pictured, if you want the pocket to be on both sides then obviously cut this profile both sides of the garment.  Side fronts ( 2), and side backs (cut 2) are defined by the blue line, orange curve and the original side edge (grey curve), and pocket pieces (cut 2) as defined by the orange curve, with a centre fold along purple line.  Remember to add seam allowances!

warning; hideous fabric alert… my apologies.  This blue stuff was a handy small scrap,  I also used black thread because I didn’t bother to change the thread in my machine  it stands out and can be clearly seen against the blue fabric…   🙂


gp2

Also, for the drawstring ties cut 4 strips of lightweight fabric on the bias; Mine are each 41cm (15 1/2″) long by 2.5cm (1″) wide.

Construction:

ties

Pocket drawstring ties;  stitch the long edge and turn right side out.  My tips and method for turning out skinny spaghetti strap ties can be found here

(below L) Stitch front and back together along the red line, press open.  Stitch side fronts to side backs along side edges, press seam allowances open.

gp3gp4

(above R)  Stitch side front piece to front along the blue line, finishing at the top edge of the pocket.  Repeat for side back piece to back.  Clip to end of stitching, press seam allowances to front/back.

(below L) Run a long, gathering stitch along the pocket opening stitching line (green line).

gp5gp6

(above R) Pulling up this gathering stitch slightly to fit, stitch a pocket piece along the pocket top edge in two separate lines of stitching, leaving a short 2cm (7/8″) gap in the centre between the two.

(below L) Turn pocket piece to the inside and gently press along stitching line.

gp7gp8

(above R) Inside, line up pocket lining and side front/back piece along the curved lower edge and stitch together.  Finish pocket seam allowances and side front/back seam allowances if desired.

(below L) Pin the pocket piece to the dress along the top edge of the seam; and, keeping the side front/side back free, stitch together with a row of stitching 1cm (3/8″) in from the top edge.  Effectively creating a 1cm width channel  between dress and pocket.  Insert a tie into each side of the channel, starting from the gap and coming out at each end.  Apologies for the scraps of yarn used in this little blue sample pocket, for the real thing I did make proper turned out bias strips, really!

gp8gp9

(above R)  Secure the tie ends in place by stitching a few passes of back and forward stitching on the outside of the dress, through all layers.

With the ties, pull up the excess width of the pocket edge to fit and tie in a sweet bow or whatever.

And done!

gp12

Thank you to everyone who expressed an interest in how I made these pockets;  I hope this is a useful and/or interesting tutorial.  If you find it so then please leave a comment and let me know.  🙂

floatytop3

pinterestmail

how to make your own shoe pattern

shoepattern

I thought I’d share my method for making my own shoe pattern, in case it helps anyone else interested in self-cobbling? is that even a word??   This is for if you don’t have access to a last or haven’t bought any special equipment yet but are just experimenting, trying shoe-making on for size, dipping your toes into it so to speak… 🙂  It’s the same principle as those custom-fit duct-taped dummies that everyone was making about four years ago (remember those?)  except for your feet!

Anyway…

Materials; a thin plastic bag, masking tape, permanent marker, scissors, and a shoe with a fit you really like.  And paper for drawing the pattern on.

shoepatternsp

Put the shoe in the bag, your foot in the shoe, or in the other order!  and commence cutting lengths of masking tape and wrapping them tightly around your plastic-bagged, shod foot all the way around to underneath and all over, covering the toe too.  You don’t have to have your foot in the shoe of course, but it helps the shoe to keep its shape without collapsing in on itself… you’re trying to tape it up TIGHT! and also I actually found it a tonne easier to do the taping with the shoe on; meant I didn’t have to hold it to keep it steady, for one thing…

sp2 sp3

Overlap the tape by at least half its width with each “pass”, and cut the tape short and start a new bit rather than having “folds” or uneven bumpy bits.  Or at least keep any folds in the tape at a minimum.  The important thing is to keep everything as smooth and as flat as possible, and to have total, solid and smooth coverage.  A good amount of overlap is to ensure there are no weak bits that could split apart when it’s taken off.

Once you’ve got a firm, smooth, fully taped-up shoe-foot, carefully wriggle off the shoe (not easy) and inspect it for any weak or un-taped bits that you might have missed, like below right.  Fix these up now.

sp4sp5

With a felt-tip permanent marker, feel around the lower edge of the shoe, determining where the ridge of the sole meets the upper, and mark it in as accurately as possible using small dashes or dots.  Also draw in the upper line of the shoe, the centre back seam, and the desired seam lines of your shoes.   I spent a pleasant few hours researching different shoe styles and there are many many many varieties of lace-ups alone!  so hard to choose just one.  I went for an easy style and imitated the seam lines on a pair of Cassie’s Converse which I now know (thank YOU Wikipedia) is actually the classic Oxford shoe design.

p6 sp7 IMG_0764

Now it’s time to carefully snip the taped “mummy” shoe away from your real shoe.  Take great care not to damage your shoe! Snip along the lower line where the upper joins the sole, and separate the two.  Once you’ve cut the central back seam of the shoe it should be easier to ease the shoe out of its “mummy” a little, to lessen the danger of scratching it with the scissors.

sp8sp9

Cut along all the marked seam lines.

sp10

The toe of the shoe is usually a 3D rounded curve, snip into the curve so the piece can be laid flat.  When you cut this piece in fabric to make your shoe, the excess will need to be eased into the sole lining.

sp11 sp12

Lay the tape pattern pieces down and trace around them onto paper and bob’s your uncle!!  The tongue is just a simple U-shape, cut to the same length as the lace up section.  By the way those two long curved pieces that go on either side of your foot are called the vamp.  This pattern has no seam allowances of course, they can be added at this stage or not, a personal choice, just be sure to mark on the pattern pieces whether it is there or not.

shoepattern


I used my right shoe so marked all my pieces with a big R to show which side up they go together as a set.  Obviously, the same pieces will be used for my left shoe as well, just that they will all be laid upside down.

And that’s it! pretty simple really.   I have to add, this pattern should be thought of as a starting point, and it’s well worth making a mock up pair of shoes in not-very precious fabric to test it out before you launch into cutting into a precious piece of leather or something… you may well find that the shape of it is not exactly what you want for your shoes and shave off a fraction here, add on a slight wedge there.   It’s always better to be safe than sorry!

Anyway,  I certainly  hope this method proves useful to someone else too.  Happy self-cobbling!

pinterestmail

buttonholes in shearling; a tutorial

P1130091
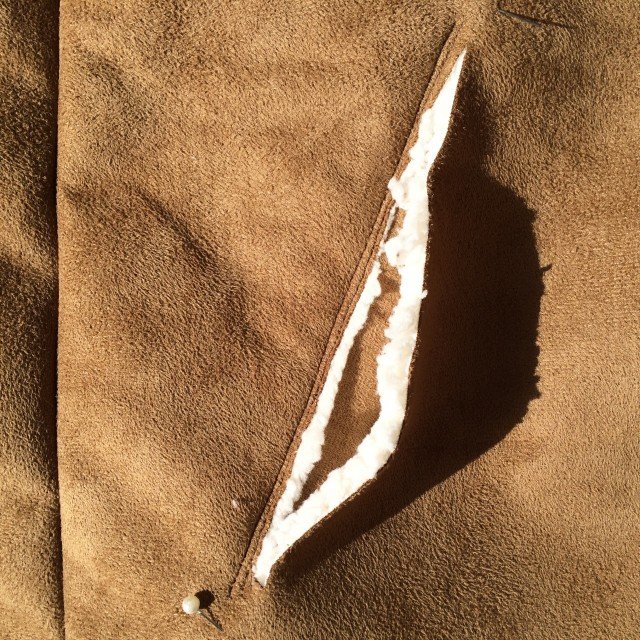
When making my shearing jacket I came up to the important matter of buttonholes… what to have?  I’d googled and pinned a few shearling jackets when planning the details and features that I wanted to have in my new jacket, but it’s not always easy to make out the finer construction details of the nitty gritty like buttonholes in far-away, full-length pictures on the net.  As usual, it came down to knuckling down and working out how to do it myself.

I trialled several different types of buttonholes but am only sharing here the details of my two “finalists”, the two types I eventually decided upon using for my jacket.

Sewing details: I’m using a faux shearling, but this technique would be fine for real shearling too, as well as for thick leather or other thick and bulky, non-frayable fabrics.  For real leathers which can be very thick and tough, use a leather needle and sturdy threads like upholstery or topstitching thread.

The first buttonhole, pictured above; is designed to look well-finished and to look identical from both sides of the fabric, meaning, both the suede outside and the woolly inside of the shearling fabric.  I used this technique for down the front opening edges of my jacket and on the buttoned wrist bands.  It is like the shearling version of a bound buttonhole, if you like.

IMG_9943

Mark the buttonholes on the suede right side to be the same length as the buttons; in this case 2.5cm (1″), and cut two rectangular, self-fabric “bindings” per buttonhole, each the same width as the buttonhole – 2.5cm (1″) wide, and 2cm (6/8″) long.  Trim away the shearling from the wrong side of the bindings as closely as possible, and cut the buttonhole slit in the fabric between the marking pins.  I used a rotary cutter for the middle bit, for straightness and for a clean cut, then clipped into the ends with small sharp scissors.

IMG_9944

Trim away the wool from around the buttonhole slit on the wrong side out to a width of 1cm (3/8″) each side

Wrap the bindings around the buttonhole edges and align edges top and underneath as neatly and as evenly as possible; pin.  Stitch carefully along the long edge just inside the cut edges.  Also, stitch-in-the-ditch along the short edges of the buttonhole also, to strengthen the slit and help prevent it from ripping out.  Truth be told, I wouldn’t think ripping is all that likely in a tough fabric like shearling, but not impossible of course, so I reckoned it was better to be safe rather than sorry!

IMG_9946IMG_9950

It’s more important for the stitching to be perfectly neat and even on the right side of the jacket than the wrong side, obviously.  If the inside shows uneven edges, they can be trimmed off with small, sharp scissors.

IMG_9952

And that’s it! pretty simple really.  Apart from the fact that it looks almost smart and sorta polished as much as a raw-edged rustic technique can look, the beauty of this buttonhole is also that it looks identical from both right and wrong side of the fabric.. also I think the suede wrapped edges looks quite attractive against the woolly insides too!

IMG_9955

The second type of buttonhole I devised is an easier, more workmanlike, “invisible” buttonhole, which is situated on the lapels and collars of my jacket.  I wanted this one to be less obtrusive; to still look acceptably nice if seen from the outside of the coat, but more importantly to be as invisible as possible on the wrong, woolly side of the fabric.  Reason; I wanted to have the option to wear the coat sometimes with the lapels and collar fully buttoned up, and also sometimes unbuttoned; and when unbuttoned I didn’t want them to show at all.

IMG_9956

This one is like a letterbox-on-a-door, with an outside facing to reinforce and strengthen it on the right side.  Cut a rectangle of shearling, 4cm (1 1/2″) wide and 1.5cm(5/8″) long, for each buttonhole, and trim away most of the wool from the wrong side.  You can trim away the wool as completely as possible if desired, or if you want a frame of wool to fluff out around the edges,  leave a slim border untrimmed around the edge.  I decided a lightly woolly frame looks pretty cute, and couldn’t resist having it for my buttonholes.

fluffy edges are cute!!!
IMG_9960IMG_9962

Pin the trimmed rectangle to the right side of the fabric where the buttonhole will be, and stitch just inside each edge.  Remember to use white or ivory thread in the bobbin!  Cut the buttonhole through both layers, using a rotary cutter for the middle bit, and snipping out to the edges with small sharp embroidery scissors.

IMG_9971

I think it looks nice from the outside, but the best bit is that it is almost completely invisible on the wrong side!

For the button inside the collar, I needed something matching the woolly interior; and found the perfect, ivory tweed, covered button, originally from my grandmother’s stash and, knowing my grandmother, I expect it was salvaged from off of an old coat or skirt or something.  Waste not want not! and I’m glad she did because it has finally found the perfect home  🙂

IMG_9967

I hope my tutorial proves useful to someone… as always if it is helpful then please do leave a comment saying so.  Thank you!

pinterestmail

welt pocket in a shearling coat

IMG_8284SO!  I’m currently making a shearling jacket to take to our much anticipated trip to snowier climes, coming up v v soon… eeeeeeeeeeeeeee! I can’t wait!!

Anyway, I’ve put a couple of welt-like pockets in, and found it necessary to devise a method just a tiny bit different from the usual.  So, I took a few pictures to show how I did it…

First, cut two pocket pieces in the shearling, two pocket pieces in a lining fabric, and two welts in shearling.  Cut the pieces biggish, at least a little bigger than you think you will need, just in case.  Remember the golden rule, you can always trim a little extra away, but you can never ever add it!  For the pocket lining I used an ivory cotton denim from the leftovers of my favourite flared jeans.

IMG_8242IMG_8243

Try on the coat and determine the position of the pockets, mark with pins.  Lay the two fronts together to transfer markings to the other front piece, and measure several times to ensure the markings are symmetrical.

Cut pocket opening between the marks, no less than 3cm shorter than the welt piece.  To give an idea of lengths; my welt is 20cm long and my pocket opening is 16.5cm… but my hands are pretty big and a small handed person may not need quite so big an opening  🙂

IMG_8244

Lay the shearling pocket piece underneath the top edge of the pocket opening, pinning the pieces together with an overlap of 1cm (below L).  Stitch from the top side, in a a double row of closely-spaced stitching. (below R)

IMG_8246IMG_8248

Finish the raw top edge of the pocket lining with overlocking stitch, then lay over the shearling pocket piece, aligning all raw edges and pinning the pieces roughly together near the top (below L).  From the outside of the coat, turn in the top edge of the pocket lining piece and pin to the pocket opening edge (below R).  From the outside of the coat and keeping the shearling pocket piece free, topstitch in a double row of closely spaced stitching

IMG_8249IMG_8250

Now stitch a few backward/forward passes of stitching along the two short edges of the pocket opening through all thicknesses.(below)


IMG_8254

Unpin pocket pieces from each other, and lay shearling pocket piece away from the welt, pin it up well out of the way… likewise, pin the pocket lining piece in position to the coat (below L).  Lay the welt piece, right sides together to the coat, underneath the pocket opening and pin; stitch together catching the pocket lining piece in underneath  (below R)   Note; it’s better to lay the welt closer to the pocket opening edge than pictured below right, as in with the welt raw edge hard up against the pocket opening… but I neglected to take a picture in the correct position, sorry!)

IMG_8256IMG_8257

Turn up the welt, pin in position, and again keeping the shearling pocket piece free but the pocket lining piece pinned in position; topstitch 6mm outside the previous stitching (below L)  Unpin the shearling pocket piece and lay it back against the pocket lining.  Now is the time to determine the finished, desired size of the pocket… try the coat on, measure and trim pocket pieces as desired; finish the raw edge of the pocket lining with overlocking stitch, and stitch pocket and pocket lining pieces together, right sides together.  (below R)

IMG_8262IMG_8263

Pin the welt up into position.  At this point, determine if it needs trimming or neatening up; I eyeballed mine and decided to trim 1cm off the long free edge; a purely aesthetic choice.  Once you’re satisfied with its proportions, topstitch it in position along both short edges with two evenly spaced rows of topstitching.

IMG_8264

And… pocket done!  At this point, I actually decided the pocket itself was still a little too big, and trimmed and re-stitched the curved edges… no biggie, it’s pretty easy to do this, even at this late stage since it’s tucked away inside the coat.  That’s a personal choice!  Also, technically this is not a pure welt pocket but a sort of faux-welt pocket really… maybe you could call it a sort of patch cover over a welt-less pocket?!  😀

I hope this tutorial is useful to someone, please do leave me a comment to let me know if you have found it helpful.  Like everyone, I do love comments!

IMG_8266

pinterestmail

3 hoodies

DSC_2629

In other Christmas “making” I also made hoodies for my three menfolk; Craig, and for Tim and Sam.  For the last few years I’ve made summer shirts for them, but this year I wanted to do something different.  And all of them love wearing hoodies! so bam! easy decision really.

Hmmm, yes, I had to get Bessie to model them, who is shaped very differently from each of my guys, of course!! but I took these pictures before I wrapped them up to pop under the tree and haven’t had the opportunity to get the boys to model them for pictures.  Not to mention that it’s been 30C+ every day… phew! so no one wants to wear them just yet! Pictures with them actually IN their new Christmas stuff will have to wait for a little while…

I used my pattern taken from an old hoodie of Craig’s, that had a really cool style of hood/collar combined; it sits really nicely and looks a bit more stylish than the regular two-piece no-frills hood.  If anyone’s interested I once wrote a tutorial on this collar/hood, with pictures of the pieces if you’d like to have a go at it.

DSC_2623Over the years since I first drew the pattern out I’ve had to slightly alter it and custom fit to each of my boys each time I’ve made it.  They keep doing annoying things like working out and growing taller with longer arms and gaining a bit here, losing a bit there as time goes on.  So it’s always a bit more of an exercise than just whipping out a pattern and zooming it up with the greatest of ease…. NOT!

Anyway, I’m not complaining.  I love making stuff for my family  🙂

I went to Spotlight and bought up big on stripe-y, fluffy jerseys in a winter weight.  And the beanies in the previous post? I chose the colours to match so that each man’s hoodie/beanie is a nicely toning ensemble in their colours.

Sam’s hoodie, at top; is light grey and white, with a grey beanie to match, because I think he looks great in grey.  I bought some pale grey marled lightweight jersey to do the hood and the kangaroo pockets, because I feared it would look a little too pyjama-y, or sort of juvenile or something.  I don’t know what it is about the pale grey stripe that made me worry about this, because… it’s funny, can’t logically explain why I have this thought, but I reckon you get away with a full hoodie in a blue stripe whereas in pale grey not so much, looks bit cheap or something.  Can’t explain it.  In any case I just intuited having a contrast in this particular colour would be a good decision and I’m glad I did it.

For Craig, I chose a muted air-force blue, with a small white pin-stripe.  And with a red beanie for him, because he likes red and blue in winter and tends to wear them together a lot.

DSC_2628The air force blue looked pretty cool and right up his alley and it’s a very nice weight, I loved it upon first sight.  However, after washing it and hanging it out to dry, then laying it out for cutting, I discovered to my amazement that the “stripe” actually was more of a gentle, slight “wave” of stripes across the fabric looking like this ” ~ “, NOT a straight horizontal stripe.  AAAAUGH!!  and being “slight” of course, means it really comes across like a bit of a boo-boo, rather than look like an intentional wave, which I could work into the design somehow.  Nope, this just looked OFF.

Grrr.  Anyway, I did my absolute best with it, pulled it into shape in some places, cut out a wee bit dodgily in other places where it didn’t matter, like the kangaroo pocket.  I know the pocket appears to be not drastically far off straight in the picture but trust me, that’s an optical illusion created by clever cutting and placement!!  Also the side seam stripes don’t match, the most obvious area where the fault can be seen.  He really likes it though, so I’m putting aside my dumb perfectionist tendencies and just enjoying that he enjoys it  🙂

For Tim, I chose a navy blue with ivory stripe and his beanie is the matching navy blue.  This fabric was the thickest of the lot, slightly ribbed, and is toasty warm.  For the drawstring in the hood, the fabric was too thick to work and so I used a strip of Craig’s hoodie fabric, folded outwards so the solid coloured blue is on the outside.

DSC_2630Oh, the hoodie strings… in each case I made a self-fabric drawstring for the hoodies, bar Tim’s, as explained.  To make a drawstring in the jersey, I cut a 1-2cm strip of fabric across the grain.  Most jerseys have a natural tendency to roll or curl up across the grain, and you can use this to full advantage while making your drawstring.

IMG_7459IMG_7460

Just allow the fabric to curl up just like it wants to, and stitch it with a zig-zag stitch in a width set to just under the width of your finished strip.  Start from the centre, because it looks neater that way with the central start/stop point hidden inside the hood casing, and finish at each end.  IMG_7461IMG_7467

Thread the flat drawstring through a wool needle and pull it through the hood casing; cut both ends equally to size, then tie off in a simple knot, so they won’t slip back through the eyelet at all.  Easy peasy, and colourwise looks like it was tailor-made to go with the hoodie perfectly, which it was, of course, haha.  Well, by that I mean that we all know how difficult, if not impossible it can be to get drawstrings to colour-match our fabrics perfectly?  mm hmmm.

Problem solved!

IMG_7468

The first three hoodies that I made from this pattern can be seen here, here and here; hoodie tutorial here

pinterestmail
Switch to mobile version
↓