
 hello!
I’ve been making a few more things lately…
first up; a dress! I bought this screen printed linen a few years ago from the Injalak Arts Centre, the design is Mandem (Water Lily) by the indigenous artist Eva Nganjmirra. The pattern I used is an old favourite by now, Vogue 2900.
Something charming about this screenprint, I discovered; was the designer’s “signature” of sorts…of course, I had to carefully cut around this and place it some where semi-prominent.
I decided the pieces had to be highlighted in some way more than just mere seamlines, and utilised a method I have written about previously here… namely this is a bias cut strip that is inlaid over the pieces before joining together. I had a small length of mustard linen, leftover from this dress, that I used for this purpose.
 Unfortunately there wasn’t enough to do every single seam and edge like I have done in previous examples of this method but I just did as many of the more prominent bodice seams before I ran out of it.
 I know I’ve used this pattern quite frequently but it really is such a beautiful dress design that I don’t see myself every tiring of it any time soon. Of course I really should branch out more and I’m resolving to try more new patterns this year and not fall back so often on the old favourites. In the meantime though, some of my recent as yet unblogged projects have failed this resolution already whoops.
I think my only, somewhat trivial criticism of this design is its lack of shape in the waist area. I have a pretty high waist to hip ratio that isn’t really suited to this drop-waist design however I still stubbornly persist in wearing it. Sometimes I think I should try to modify it to look less “boxy” but the bodice pieces are so beautifully proportioned in themselves I’m not really game to fiddle about with it.
 I wore this along with my me-made mustard clogs out to a meeting with friends recently and managed to grab a quick street shot. I’ve always liked to get a real world photo the things I’ve made if possible, but it’s sometimes difficult. If the coast is clear, like this time, I can quickly prop my phone up against my bag on the footpath and take a sneaky timed photo!

My little grandson G randomly ran up to join my while I was taking my more staged photos, which was happily fortuitous since he happened to be wearing a little T-shirt I made for him recently using leftovers from another, s yet unblogged, project to appear here soon. Once I get my act together!


I used Butterick 5510, a great little pattern that I should probably buy in a bigger size now! The blue and white striped jersey was tossed out by my friend N during her fabric purge recently. It’s quite nice stuff, if you don’t mind the suffering that comes with matching stripes in cutting and piecing. Fortunately I don’t mind this toooooo much. Maybe just a little, but only if it’s just every now and then.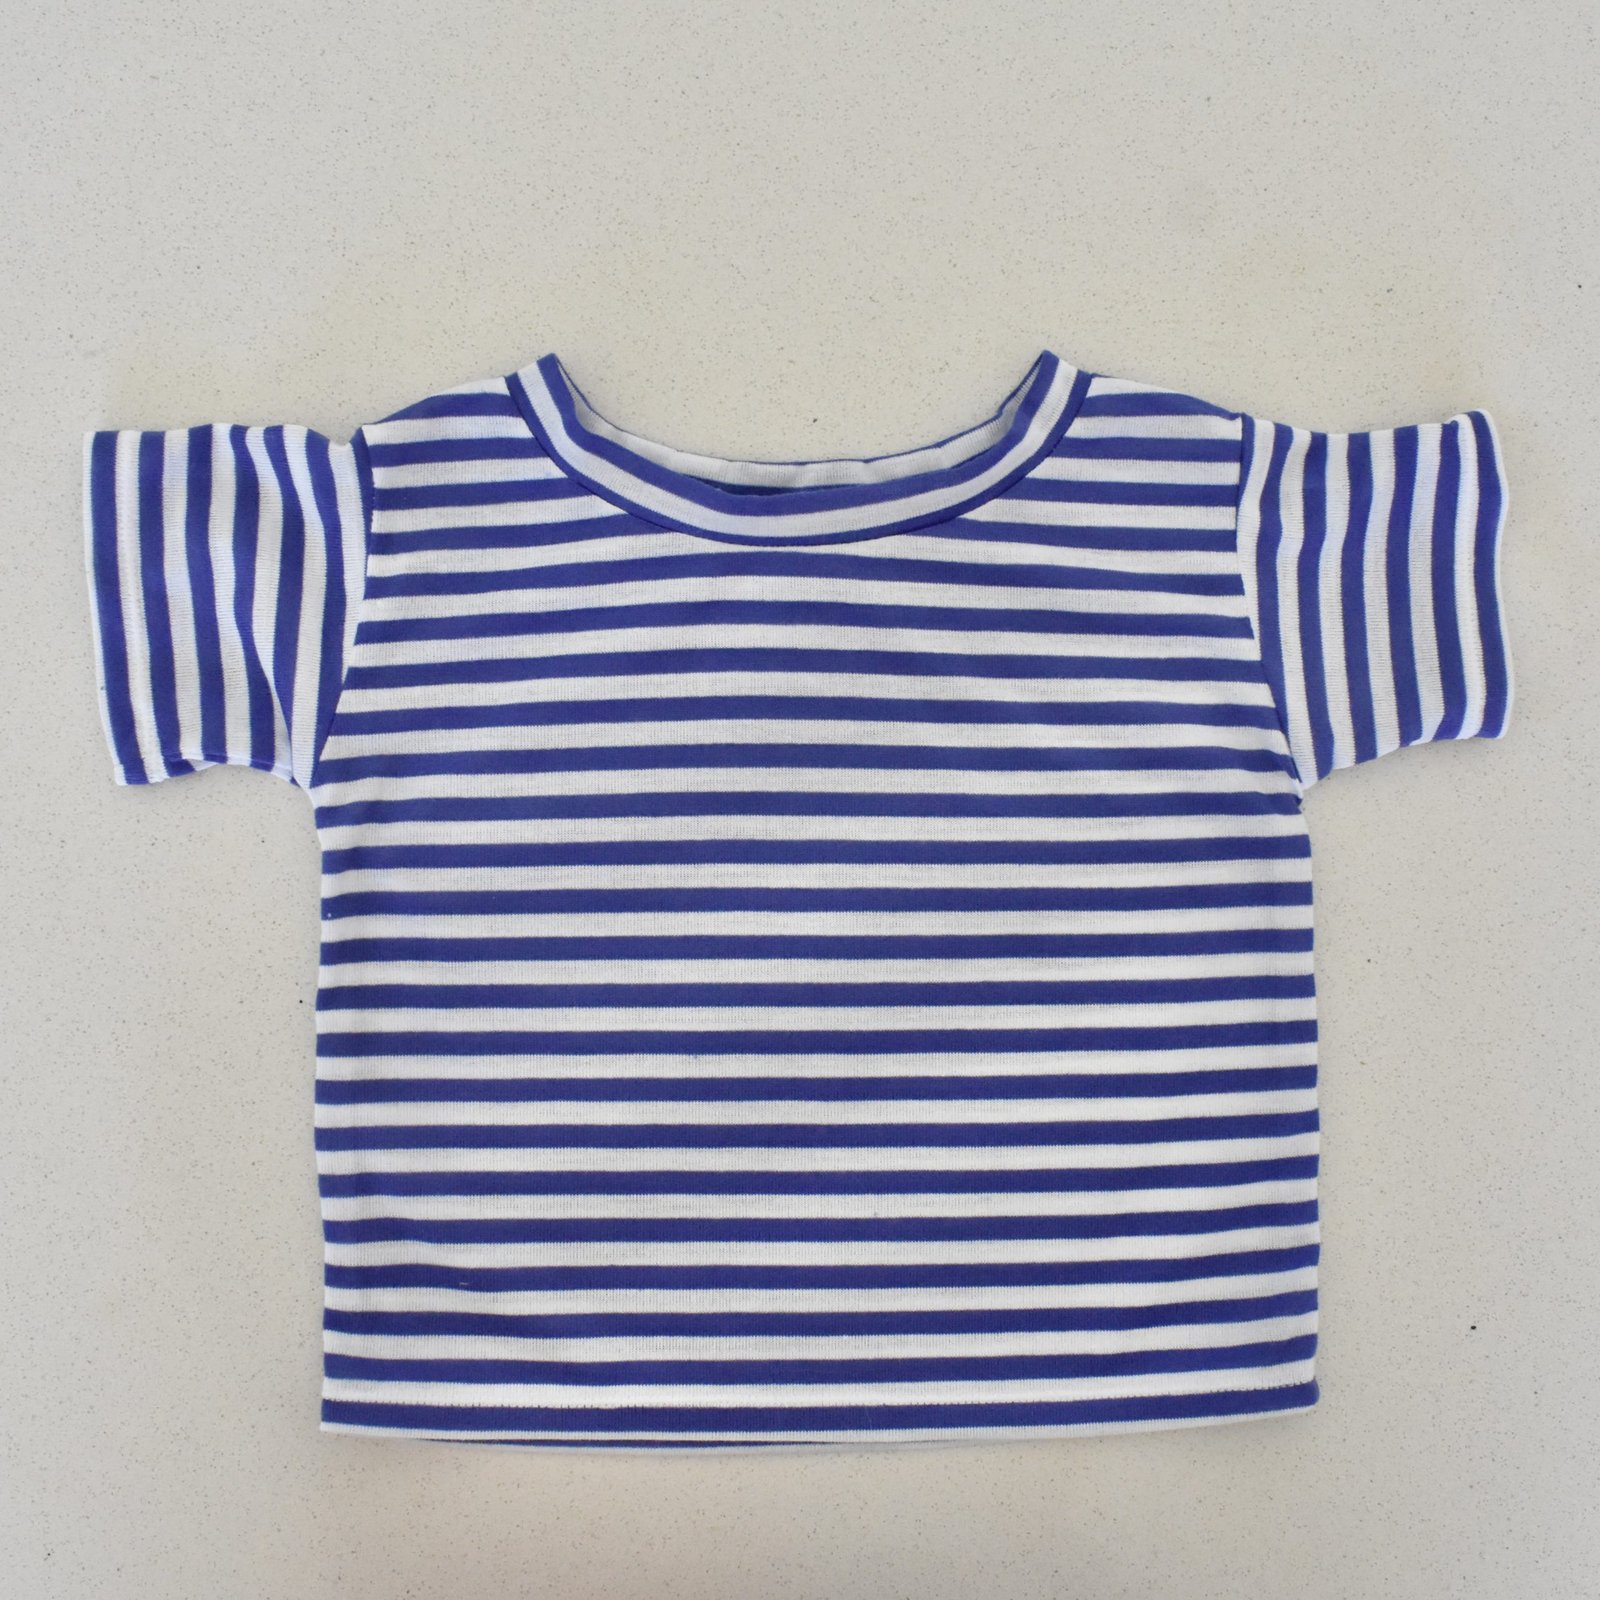
I lenthened the T-shirt considerably because it’s really way too short otherwise. I don’t know if all my kiddies are just super tall or not but I’ve always found commercial patterns to be ridiculously short and wide. 
Please note careful stripe matching. Oh, another problem with this pattern was the rather small neckline. After cutting it and subsequently realising it was actually pretty tiny, I recut the neckline, cut some extra neckline edging and pieced it. One join is pretty good, the other less so… I’m pointing the two out here. Hopefully they’re not too terrible! I’m pretty sure G doesn’t mind though, and at least it fits over his head!

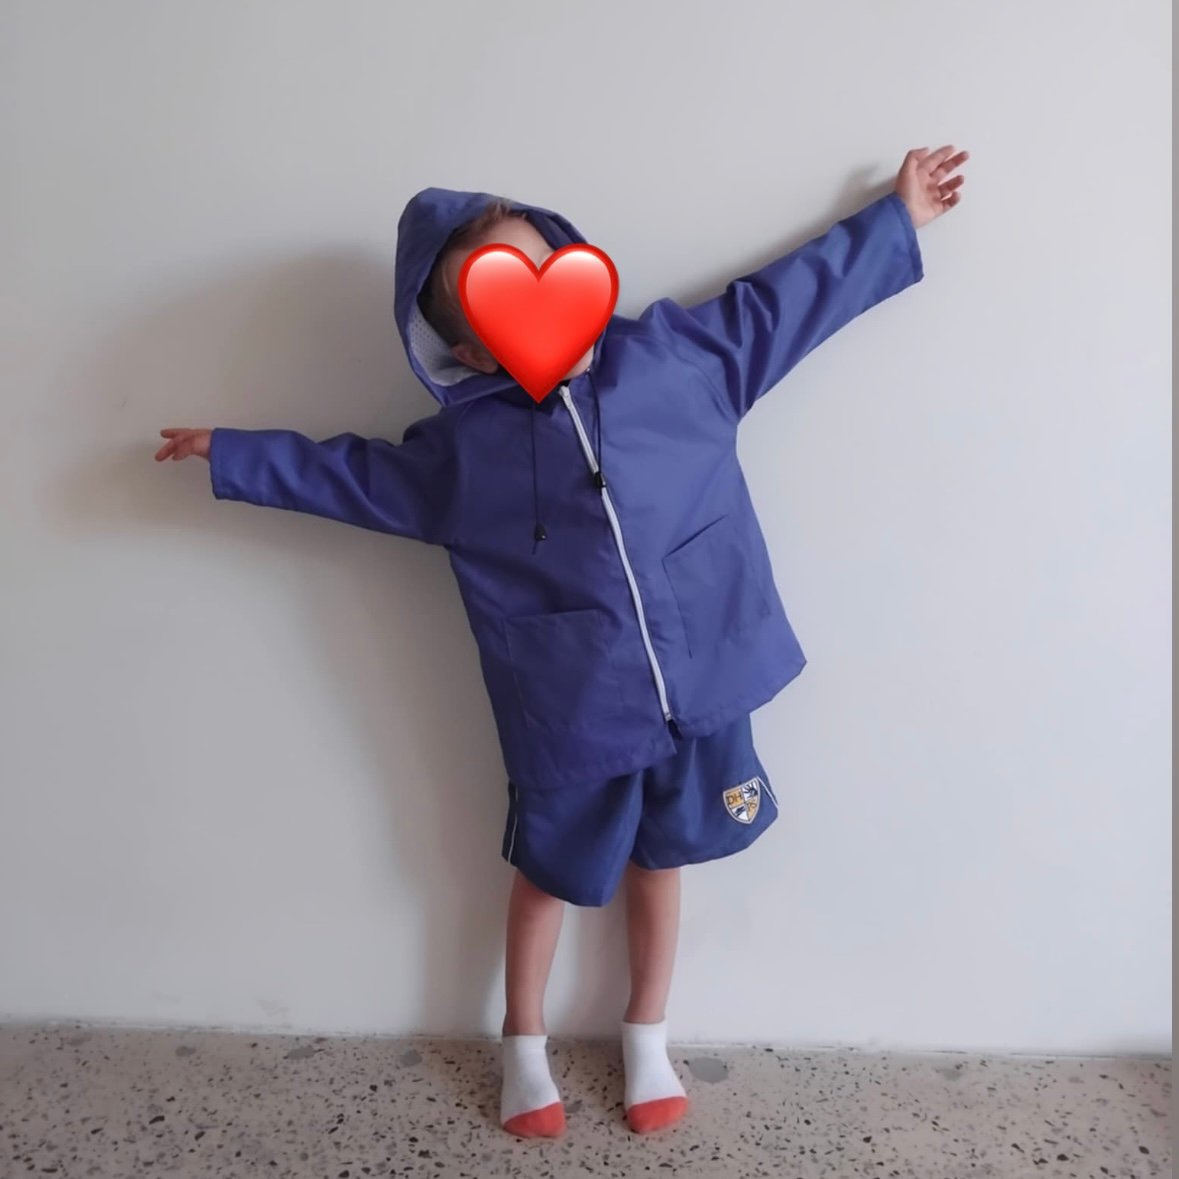
I also some leftover raincoat fabric from when I made my sister in law Sandi’s Mundering raincoat, back here; so I drafted and ran up a new raincoat for T. He’s grown out of his yellow one, blogged here, which will be passed on to G this year. I lined it with the breathable sporting fabric, a length of which I bought for raincoat vents years ago. The zip, cord and eyelets happened to be in my stash already too, hurrah.


The pockets are just patch pockets. All seams are sealed on the underside using seam sealing wax that I bought for this purpose years ago from the camping and outdoor outfitter store, BCF.
I think he likes it! He looks pretty cute in it anyway, and I think it turned out a pretty good fit considering I drafted it just using one of his T-shirts. Phew!


 hello! I’ve made a new outfit by refashioning some other previously worn old things… from a skirt and old jeans, I’ve made a new/old tunic top and some new/old shorts. I realise I probably I should be using some of the new fabric already in my stash instead of “already used” fabric – truthfully I am not very sensible a lot of the time – however if I really like a fabric but not the garment so much then I do feel like it just makes sense to reuse the latter if I can. Actually, I have been making a number of things lately, and from my stash! but just haven’t got around to taking photos or blogging them yet. For some reason, I’m finding taking photos to be the biggest challenge now.


 Taking off all those long (long) lengths of bias cut channelling took quite a long time, made even more painful with the memory of how carefully I had stitched them on in the first place to perfectly line up the channels with the lines of checks, as well as switching up threads depending on whether I was stitching on a black row or a cream row, this additionally making it more difficult to see the stitches I was unpicking. I know, I wonder about my own sanity too, sometimes…
 Anyway. Iteration Number Two was essentially the same dress sans the elasticated channels. I reused the same shoulder straps to be a halter neckline and allowed the otherwise unaltered dress to hang like so. I actually quite liked it like this and wore it with a little T-shirt underneath a few times.


 please excuse the totally gratuitous Clara pic…
 hurrah! I’ve just finished my knitted project for December, aka the last monthly knit for the year! and possibly the last made thing for the year, depends whether I can get my already cut-out thing done in the next day or so. 🙂
 I have to admit I was quite excited about this one, but it was definitely the most time consuming of the knitted projects for the year, just because it’s the biggest that I started from scratch… I had quite a diverse collection of random whites/creams and blacks/charcoal and decided to attempt the classic black and white stripes. There was quite a lot more of the whites than black so the white stripes are a shade wider than the black ones. Also the sleeve and bottom hem sections are in the white colour way too. There is just a very tiny amount of leftovers, nothing to speak of really, which makes me pretty happy.
 As previously I made the design up myself, it’s a topdown, knitted-in-one piece, just like
  Speaking of the rib finish, I tried something new I’d seen on instagram, and I’m truly sorry I cannot for the life of me remember who it was who posted it so I can’t give credit for the idea. Basically, they said that rib is often uneven in appearance and that’s due to the difference in the way the wool goes around the needle in knit and purl stitches. They suggested the following; for knit stitches, knit through the back of the loop… and for purl stitches, wrap the wool clockwise around the needle – which is the opposite from normal. Apparently it uses a little less wool, anyway I gave it a go and I think the rib does look a little bit neater than my usual efforts.
 I’m really happy with this one! the classic white/black stripes will be so easy to wear and I’m looking forward to giving it lots of outings in winter. I was a little worried about the bobbly cream coloured wool – are the bobbles going to be too hideous?! scary! but in the end they’re not twee to an unbearable extent and I’m ok to just let them be.


 The hem of the skirt is the original hem of the jeans shorts, and I unpicked a little to sew the side seams, before resewing the original hem in place. The original topstitching on the jeans shorts was a mixture of navy blue and a kind of dull, mustard-y orange, but all my new topstitching is quite a brighter orange.
 It’s a bit daggy, let’s be real, but I guess I’m an 80’s girl at heart really so daggy is set in stone into my DNA. I’ll happily wear it as a knockabout skirt on the weekend and when I just feel like slouching around. It’s fun, very comfy, and I often kinda like that scruffy vibe anyway, hehe.


 Fabric first; I used a piece of linen that was originally white, and that I dyed myself using a Japanese indigo plant brewed dyepot, from a natural dyeing workshop that I attended a few years ago. I absolutely love the natural blotchiness of the natural dye and am so pleased I finally found a really worthwhile project for this precious stuff!
 I used a white topstitching thread throughout, and most of the buttons were harvested from an old, yellowed business shirt of Craig’s. It’s quite gratifying when penny-pinching proves itself to be useful! and these are really very nice little buttons. You need a lot of buttons for this pattern and I only needed to supplement with a few not-quite matching ones to make up the full complement of 18.
 Now, the Mestre; this design is superficially a classic, button-front shirt, but upon closer inspection a number of small but quite distinctive features begin to make themselves known; the chest pocket is an interesting 2-pocket layered pocket, the side seams mostly consist of buttoned plackets, curving down into a gracefully rounded side edges, and the cuffs are likewise interestingly shaped with an asymmetrically curved profile.
 The back is pleated into the yoke; it’s supposed to be pleated the other way but I personally like for a pleat to go inwards, like this. I really like the little hanging loop; my linen was too stiff to stitch right sides together and turn out as instructed, so I just pressed the folds in place and topstitched the loop to make it work.
 I must also say that the instructions for the Mestre are absolutely excellent… the construction of the side edges, sleeve seams and armscye seams is a completely new one to me, and results in a perfect, flat-felled seam. I don’t want to give away the details, but it’s very very clever!
 Likewise the construction of the sleeve/cuff placket was totally new to me, and results in a cleverly engineered placket with all raw edges enclosed. So nifty!
 A very small detail that you might not notice without paying very close attention is that on the front buttonhole placket, just one lone buttonhole is situated horizontally. I find subtle and explicable details like this to be very charming.
 The lower hem of the shirt is completely faced, with the same facing doing double duty for the side button/buttonhole plackets. The finishing for this area is likewise well thought through and results in a beautiful finish. You need to do a fair bit of machine basting… later removed, and I have to confess I haven’t bothered with basting in a while! but I am glad I followed the instructions to the letter because the technique outlined was the absolutely best way to finish.
 In fact, I’m extremely impressed wth the thoughtfulness that went into the details of this pattern and am excited to make it again some day!


