So, we were going to Bali to attend our friends L&L’s wedding in early May… and I decided I wanted to make a special new ensemble to take away with me. Not to wear to the wedding, because, well … is ivory still a no-no for a wedding guest? I’ve always thought so, but then I did notice a few white-ish ensembles at the wedding anyway. So maybe times are a-changing… but I digress.
So… this outfit. Craig and I were planning some special dinners while we were in Bali, because this was a meaningful holiday for us for a reason totally unrelated to our friends’ wedding… it’s our 30th wedding anniversary this year! and the last time we were in Bali was for our honeymoon. When we heard L & L were planning their wedding there, we decided we’d make this trip a kind of second honeymoon for ourselves. And I wanted something new for the occasion 🙂
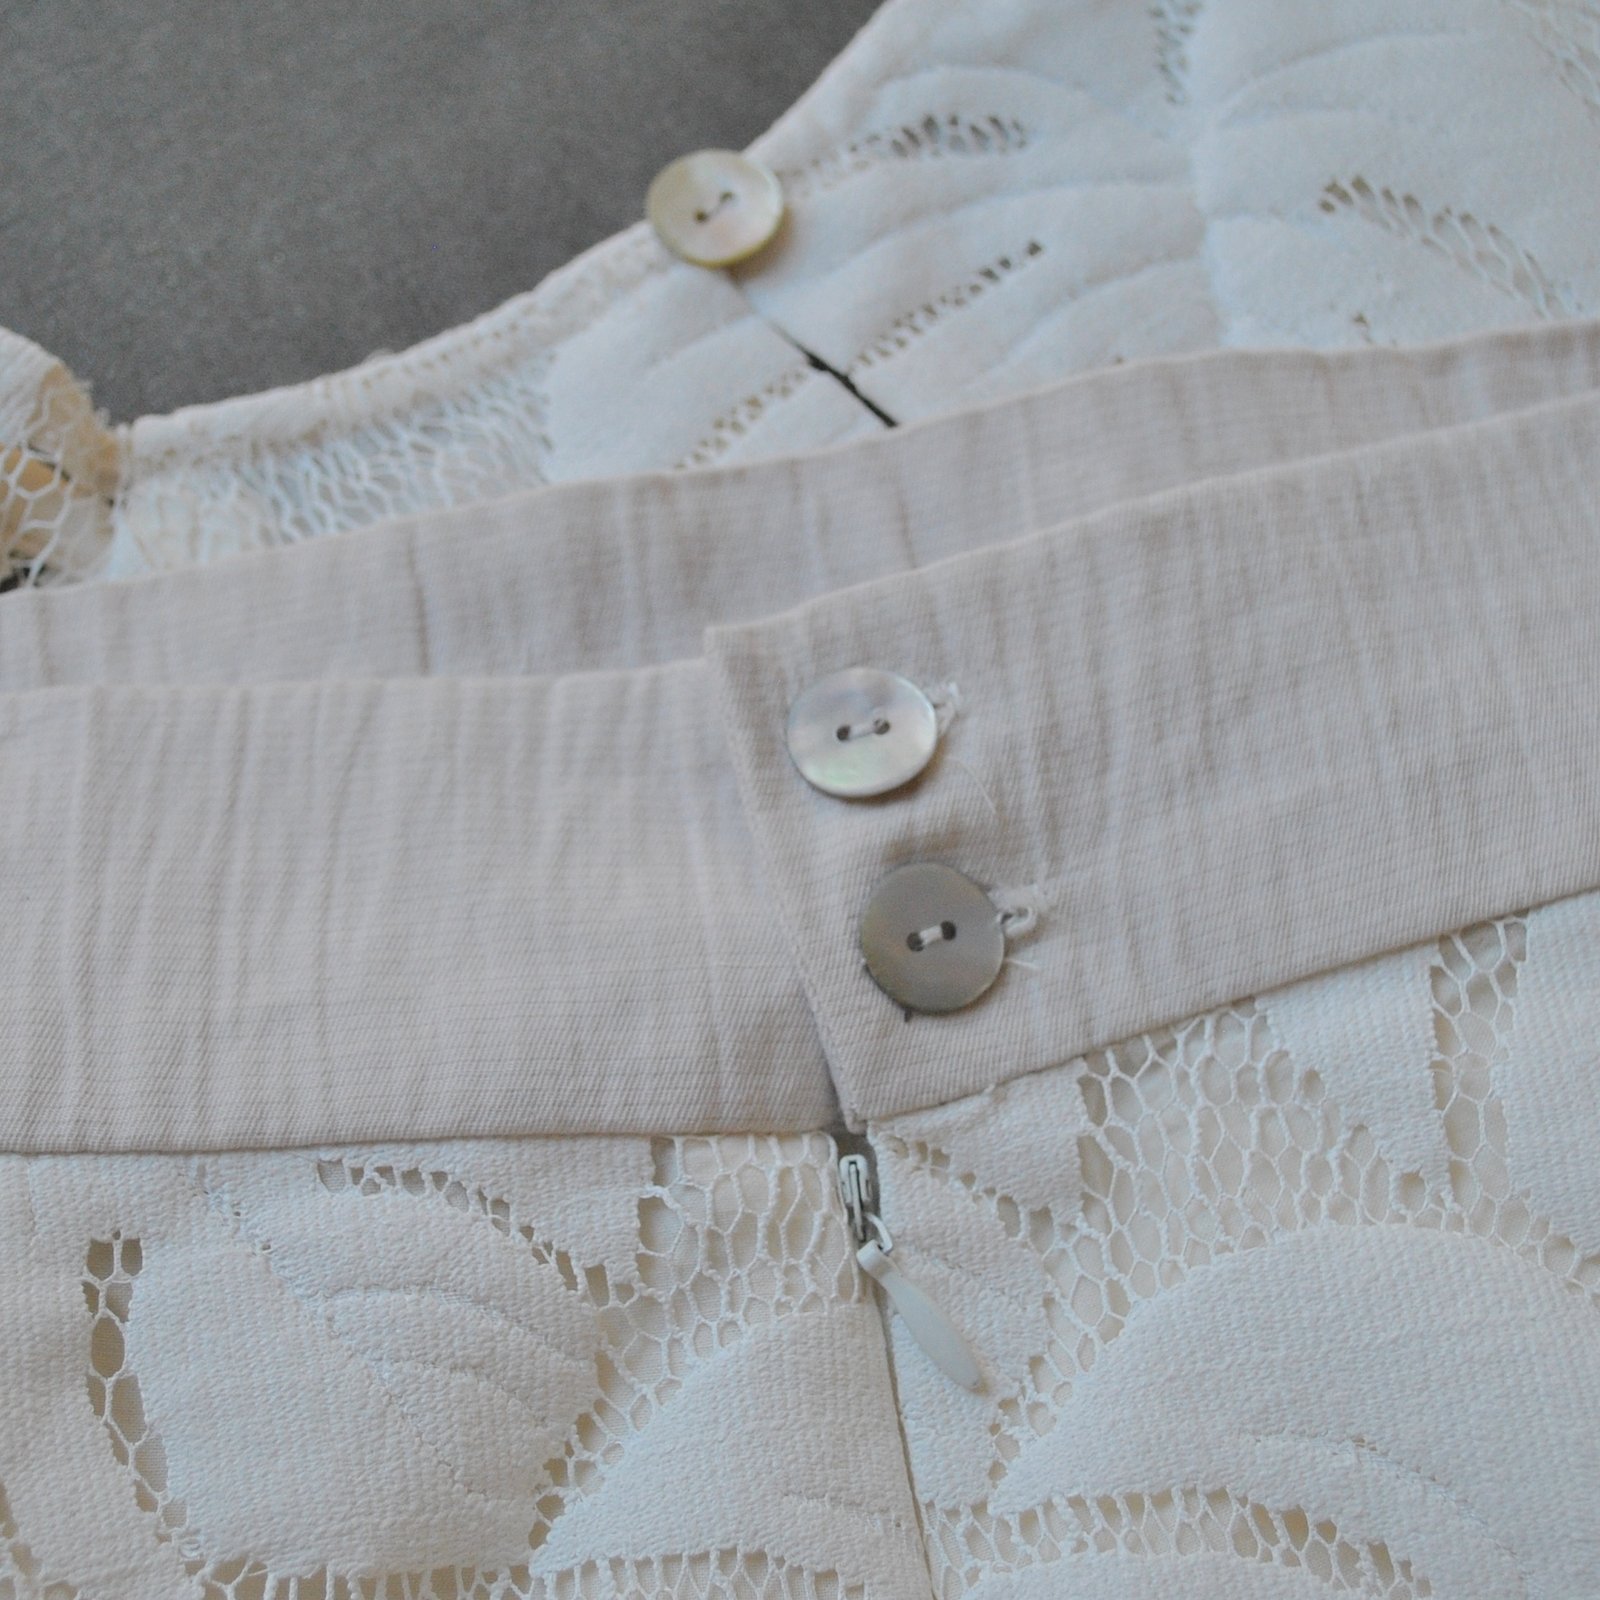
I bought the very unusual lace fabric from Tessuti’s in Melbourne, during my girls’ trip over with Mum and Cassie. It’s quite a dramatic fabric, very stiff and with a “painted” feel to it… I will admit to a small “what was I thinking?” moment afterwards! but some of my favourite ensembles have come out of crazy, challenging fabrics, so I try not to let that impede the hurtling of the creative trainwreck at all…
I underlined throughout with a creamy cotton voile, that I bought from the Morrison fabric and clothing sale… honestly one of my favourite sales to go to here in Perth, though it is very much a lucky dip. You can get amaaaaaaazing bargains, at the same time there can be a lot of weird and horrible stuff too that you simply can’t believe Morrison would ever use for their beautiful clothing line! But it’s nearly always super cheap, so well worth a look in! This creamy-coloured voile was $10 for a whole roll. Awesome sauce!!
Patterns… the skirt is my regular ol’ standby Vogue 1247, lengthened, with the pieces spliced to eliminate the horizontal seams. btw, Sanni asked about this pattern and how it’s keeping, and the truth is that it is indeed getting pretty tatty!! I really should trace it on something tough to preserve it because it really is a winner and no doubt I will be using it, yet again!
The top is the Collins top, by Sydney designer In the Folds. Emily put out a call on IG for contributors to a kickstarter to help her to get a print run of her previously pdf only patterns, and since she had been kind enough to send me the Acton dress pattern a year ago I wanted to pay it forward … the reward was this pattern! which of course I am super thrilled about. It’s a pretty popular pattern, and I thought its exaggerated swing shape would sit out nicely in the stiffish lace, and make a cool counterpoint to a little fitted miniskirt underneath. I underlined both garments throughout, with the exception of the raglan sleeves, which are just the lace.
Neckline bound with self-made bias binding, from the same cream cotton voile as the underlining.
To keep things light, I just trimmed all the raw edges inside with my pinking shears
The lower edges of the lace are just trimmed evenly with my rotary cutter, the voile is hemmed with a narrow, 1cm hem.
Skirt waistband; cut from a different piece of thicker, naturally crinkle-y, cafe-au-lait cotton, also bought from the Morrison fabric and clothing sale. For closure on both skirt and top I used small mother-of-pearl buttons, found in Le Stash.
Do you wanna hear something funny? See that trapezoidal piece at the back, lower edge of the top? I cut that piece out upside down… with the palm leaves pointing UP instead of down like they are everywhere else… not once, but twice! Once was bad enough, but I couldn’t believe my own stupidity when I found myself doing the same thing, a second time! *facepalm and it was an absolute miracle I had a large enough piece leftover to cut it out a third time in one piece since I really had bought only just enough of the lace in the first place. It is very slightly off-grain… but hey! at least it’s the right way up!!
wot is this pose then, eh?
So that’s it! I really reeeeeally love it, but then again I’ve always had a predilection for white lace things. This one is not too sweet or “young” for me, but just nicely sophisticated enough, I think. I wore it to two separate dinners in Bali, and the tropical feel of the palm leaf motifs combined with the cool airy breeziness of lace and voile in the humidity of Bali made it the most perfect of perfect things to wear for our special outings.
Verdict; very happy 🙂
Oooh! before I forget! a post script/public service announcement… I recently received an email from the Great British Sewing Bee! *cue excited squeal when I had a split second of thinking they were having an Aussie version.. however sadly, NO…the email was to let me know that the next UK season is open to applications and asking me to spread the word. I mean, if we had one here I would love it if someone let me know about it! so I’m like, OK! Also, if we did have one here I would be SO onto that in a hot minute, and if you’re lucky enough to live somewhere where you do have these things, well what are you waiting for?!
THE GREAT BRITISH SEWING BEE is looking for a new collection of brilliant amateur sewers for the fifth series of BBC Two’s The Great British Sewing Bee. For more information or to apply please go to: www.applyforsewingbee.co.uk
Closing Date: Midnight May 28th 2018
Details:
Top; In the Folds Collins top, in a stiff lace underlined with cotton voile
Skirt; based on Vogue 1247
Sandals; (white) designed and made by me, details here
(turquoise) la Soffita di Gilde
So, once upon a time I picked up a lovely remnant of fine-grade sunshine-yellow linen from a sale at Potters Textile … and then at some point decided I wanted to make a yellow skirt. I plucked this, my only piece of yellow fabric, from Le Stash; and selected Burda 2/2015;109, which I’ve been admiring and coveting for some time. I traced it out, noted very happily that the pieces fitted perfectly on my piece of yellow linen with practically nothing to spare whatsoever, cut it out and made it up without much further thought.
And lo, it was horrible. I can’t even begin to describe just how frumptastic it looked. I didn’t even take a picture of myself wearing it, it was that bad, though I did have the presence of mind to force it upon poor Jane to model before taking the scissors to it again.
It actually looks quite nice on Jane here, but trust me, it didn’t look nearly so nice on ME.
I don’t blame the pattern, which I still think will be quite nice with the right fabric, of a stiffness and body that can hold its own with a pleat. In a lightweight linen? NUP.
Anyway, obviously I cannot bear to waste a lovely piece of fabric, and particularly one of such a sunny disposition. And this time I listened to what it was whispering to me in its tiny, squeaky, linen-y little voice (yes, Virginia, fabrics DO have a voice) and realised that this delightfully lightweight loveliness wanted to be a delightfully lightweight, breezy little TOP. Of course I granted its wish. Who am I to deny a fabric its destiny?
Fortunately it wasn’t too difficult… the skirt had long long ties to go around the waist, and it was easy to open out the waistband and let out each of the pleats just a little, to allow what was previously the waistband to be an underarm band instead, and re-jig the old side seams. I harvested what was remaining of the waist ties to be shoulder straps for my new top, unpicked the two big pockets, and re-cut one to be a triangular insert to go in the previous skirt opening to fill in that gap, and re-cut the other to be a big kangaroo pocket to go on the front of the new top. By the way, the old side seams are now at the centre front and back of the top, and the previous centre front and centre back, which is where the big skirt pleats were before, are now situated at the underarm seams. Finally I stitched a buttonhole and a button from my stash to the newly extended underarm band so it can close, since the ties are gone.
Et voila! a bright and sunshine-y little top. I love it in this guise so much! it’s hard to remember how sad and tragic it was as a skirt. I took it to Bali, when we went there for L and L’s wedding – ah such a wonderful time we had! I’ll have to write something about that here soon 🙂
note; Craig does not take pictures of me as a rule! but I basically forced him to each day we were away. I’m like, but it’s me-made May!! Reaffirming long held suspicions that the depths of the feminine nature will forever remain a mystery best left unsolved #instagramhusband
Now we’re back home and winter is creeping slowly into Perth and I’m reluctantly putting it away with the other little summer lovelies… but am happy to think it’ll be waiting in the wings, an cheerful little thing for when summer rolls around again. 🙂
Sooo, I took part in the 10×10 challenge again! #gluttonforpunishment No really, I actually do enjoy doing this a lot, even if I get a little bit tired of my chosen pieces by the end of it. I like the capsule aspect of it, and let’s face it; a wardrobe challenge is always gonna suck me right into its gaping maw. Really, it’s just a fun little diversion in the scheme of things. The fact that this one’s only ten days long makes it quite manageable and painless. I mean, this is coming from someone who voluntarily subjects themselves to quite strict, year-long wardrobe challenges, so you know, we all set a different bar.
So, the scenario; you pick ten items of clothing, which you will wear over the next ten days. You are allowed to freely add accessories like hats, scarves, gloves, bags, jewellery and tights, as needed.
My selection… two dresses, and three tops, three skirts, two pairs of shoes; a pretty easy-to-mix-up arrangement. I made everything except for those blue thongs…
from L to R, all items are linked back to their original construction post; the number in brackets is the number of times each thing got worn during the challenge.
No stunning new insights I’m afraid. I’d initially chosen my little hand-knitted teal Audrey-in-Unst cardigan, which I thought toned in quite nicely with all my other things, but the weather turned out to be so muggy and humid! Rapidly realised that cardi was never going to get worn … a giant waste of valuable 10×10 real estate! Moral of the story, check the weather forecast! so I swapped it out for my loose and breezy red floral skirt. Which was an absolute delight to wear. Man, I love that thing. A surprise hit was my navy blue Perth blouse. I basically whipped that thing up just to test my pattern… and I’m enjoying it so much! I did like it as soon as I’d made it but am only just starting to appreciate its versatility and how nice it is to wear. My two favourite outfits for the challenge were the navy blouse with my red floral skirt, and the same blouse over my navy/pink dress… loved wearing both of those outfits and I just cannot choose between the two.
Though, of course I liked all my outfits… all these things are pieces that I love to wear, which is why I chose them, obviously. One thing I’m getting from these 10×10 challenges is that I feel like I’m really making clothes and shoes for myself that I LOVE, that I’m comfortable in now, and my things GO together just how I like them to. This is a very reassuring thing.
Will I be doing the next 10×10 challenge, which is officially the summer one, but for me will be a winter one? yes I think so. I think the winter one is probably the most difficult one; I mean when the weather’s warm, it’s easy, because you can just throw on a frock and your shoes; two pieces and you’re good to go. In winter, you really need the layers just for warmth. I’m imagining piling on the same ten things day in day out. Or maybe you can avoid that? be more creative, if you’re clever with the choices? Hmmm, the challenge of it… I can feel myself getting excited for it already!
One of the most exciting things for me lately is seeing pictures popping up of everyone’s Perth dresses, it’s been absolutely wonderful seeing it work and how everyone makes it look even more amazing than I could have dreamed! … I personally think it looks fab on everyone but then maybe I’m a wee bit biased? 😉 By the way; by far the most oft-repeated feedback I have received has been requests for a greater size range… I promise this is being worked on right now, as we speak! type? read? well, right now, anyway. And will be on offer pretty soon.
But in the meantime… behold, my lovely testers! all totally rocking their Perth creations… and I should just mention that the sleeves have been shortened by 5cm in the final version of the pattern.
Now for a little story… I have to confess that I made Mum’s dress here! Mum did print out the pattern and made a dress, but it was a little small and oddly shaped, which was very confusing. It took me quite a while to work out WHAT the heck was going on … she’d sent me photos of her pattern which had some weird anomalies. It was during the lead up to our release, and it was all quite stressful actually, totally doing our heads in. Finally she had the opportunity to bring her pattern itself up to my place, I made a few measurements and worked out that their printer must have been set to “fit to scale” for parts of it, meaning the pattern was partially printed out of whack. It was miraculous that she’d managed to make the dress at all, really.
A timely reminder… when printing the pattern at home, check that the printer is set to ACTUAL SIZE!!!!
I didn’t want to make poor Mum make another dress, and I can practically make them in my sleep now, so I resolved to make one for her myself, a little surprise, to make up for all the stress the mis-printed pattern put her through. I whizzed up to Fabulous Fabrics, bought some of this lovely charcoal grey linen and a purple-y/grey pearly button that I think looks absolutely beautiful with it! and quickly whipped one up. I think it looks absolutely beautiful on her, she loves it! and it fits perfectly too, yay! so all is well that ends well.
At Mum’s request, I made the sleeves longer, and she decided she likes them rolled up to make a faux cuff.
I’m showing it twice… but really, that button?!! I LOVE it!!
I’m beyond thrilled to announce the publication of our very first pattern! The Perth dress/blouse is an unlined, loose-fitting little summer frock with a bit of a buttoned-up menswear vibe to it. It’s kinda like a shirtdress, but kinda not. A faux shirtdress. The shirtdress to make when you’re not making a shirtdress. Hehe, I joked in my own head while making it that it’s the shirtdress to make if you loathe buttonholes, since there are barely any at all in this one! Also, I say “our”pattern, not because I’m using the royal “we”; but because I’ve gone into partnership with my daughter! #whatdotheysayaboutfamilyandbusiness but it’s OK, Cassie and I get along very well. Plus she has mad magic Illustrator skills, which perfectly complements my complete lack thereof. So we are the Carolyn & Cassie Pattern Co – this warms the cockles of my heart SO much I can’t even tell you! I never dreamed we’d have some kind of venture together like this but now we do I think I can tick it off some sort of subconscious bucket list that I never knew I had.
So we have a brand new Etsy shop, CarolynandCassie; situated here… Right now there’s only one thing in it, well TWO, since the pdf pattern and paper patterns are listed separately, but we harbour big dreams of having lots and LOTS of designs there in the future. Or maybe that’s just the happy glow that comes with having it finally finished… I’ve been basically living and breathing this thing for such a while, well …. it’s out there now!
So this is what I’ve been working on for the past few months, not just pattern making but lots and lots of sewing too. Apart from well over a dozen muslins, I’ve made four Perths in my quest for the perfect Perth. I shall now proceed to bombard you with Perths, ahem…
1. My chocolate/tobacco version above; this is not strictly a Perth but a “sort of” Perth dress, really. This is my prototype Perth, a Perth in spirit since the final pattern is actually quite different everywhere in small ways … you can see in my little movie below that it’s super bouffy, for one thing, and I tamed the boufff in that back with a big ol’ stern box pleat. Down, boufff, down!
I made this one back in April of last year! and because I’d already had the idea of making it into a pattern somehow it never got blogged here, even though I wore it a few times.
2. My white one… a true Perth and currently my favourite mostly because of the perfect fabric. It’s a white shirting cotton from Fabulous Fabrics, almost like a sateen, but a super fine one, crisp, lightweight and with the perfect amount of drape. LOVE IT SO MUCH and actually I’m slightly regretting that I didn’t buy the whole roll #addicted In fact, this might be a good time to state what I think is the ideal fabric for this design… lightweight, thin fabrics that have some drape, yet still have just enough body for the tailored collar to work. Basically, if you can imagine a mens’ business shirt made in it, then it’s probably just about perfect. Sad sad times… I went back to the fabric store yesterday on another quest (long story and a pretty “big” one too in lifetime terms, I’ll relate it another time…) and had a quick but hopeful look out for this perfect white fabric.. they’d sold it all!! *sob* #gottagrabitwhileitsthere
This one has slightly longer sleeves, that I eventually decided to shorten for the final version of the pattern. I shortened them back to the length of my original brown design because I thought the shorter sleeves looked a little more feminine and “perkier”; a nice offset to the overt masculinity of the buttoned-up, very formal looking collar.
3. Further playing upon the menswear influence, I ran up a third version with a smart white collar, a lot like the shirts that I’ve made for my menfolk over the years.. these ones here are prime examples. I used a lovely lemon-y yellow, lightweight pinstriped linen that I bought in Fratelli Bassetti Tessuti in Rome when we visited six years ago. It was my Roman souvenir, and I’m fiiiiinally making something with it. Well, it’s nothing if not well marinated! I used a single black button at the throat as a small but definitive focal point on the dress.
Going back to my point about the perfect fabric, this linen has a little bit of body, maybe if I’m being super picky then I would say it has slightly too much body for the design to drape perfectly? But it’s still pretty nice to wear, and cool!
4. And finally; along the way I realised the design would make quite a nice blouse too, so we went about making this happen. I like this length for a blouse slightly cropped and a little boxy. For the blouse, I used a dark indigo chambray, leftovers from this dress actually! and a wooden button.
The chambray is a touch on the spongy side with some body to it so Im a teeny bit meh about it for this design really, but well… I’m completely ok with it for testing out, and I think it turned out a pretty cute wearable muslin.
Some of the technical deets…
So, want to hear the story behind the pattern?…. it’s ok if you don’t just stop reading now. If you want to know to whole boring saga, carry on! SO: nearly a year ago I made my brown dress, my prototype as it turned out. I’d bought this lovely, slightly blotchy chocolate/tobacco linen from Tessuti’s in Melbourne during my trip there with Mum, Cassie and Tiffany, and drafted my own pattern, using my own block that I made years ago from my own measurements using the diagrams from Pattern Magic (originally blogged about here), though I tacked on the collar and collar stand from my favourite Burda mens’ shirt pattern… but before you cry “plagiarist!” I did NOT use that Burda collar and stand for my own Perth pattern! I drafted the Perth ones myself from scratch, as I did all parts of the pattern. I promise you, I’m very ethical and would never try to claim something as mine that is not…but more about the drafting process-ario later, I’m getting ahead of myself.
So, I made my brown dress. I put quite a bit of thought into the closure, and worked out a solution to get the look I wanted. I liked it, but overall thought the silhouette was a little “booffy” and was definitely planning to streamline it a bit down the track. In the meantime though I’d posted a progress picture on instagram, and there was a small number of polite comments suggesting an interest should I make a pattern for it. The seed was planted…
I thought more and more about it.. I wasn’t daunted by drafting a pattern to fit “me”, but I was wondering how I could grade it. At first I thought I’d get a qualified person to grade it for me. I approached several people I know who have completed fashion design school at tech, none of whom had time. But my friend J, fashion school graduate, and all-round awesomely inspiring lady, was extremely encouraging and assured me I could “easily do it” and it was “super easy”. I secretly had doubts about this… but she piled my arms high with her pattern drafting books and sent me off. I definitely felt challenged, and like I couldn’t possibly not do it now! I was honour bound! J would think I was an idiot! Well… I am obviously, but no need for the world to know that, hehehe…. I spent the next few months studying the books J had given me, taking notes… the best by far was Winifred Aldrich’s Metric Pattern Cutting for Women’s Wear, I pretty much got everything from that. There was also a vintage Burda book, I can’t remember its title at the moment but that one gave some very helpful grading tips too.
So I eventually graded my pattern! I’d drawn it out by hand on large sheets of paper from a flip chart pad, with no seam allowances, graded it all by hand, and proceeded to trace and test each individual size myself before getting it scanned as a full sized pdf. Yes, this is definitely NOT the most efficient way to go about it… I had early, highly romantic ideas about a hand-drawn pattern… aaah, so naive! I quickly abandoned that fantasy!! though hand-grading was an essential step in the process in the end, and I happily had complete confidence that my pattern “worked” in all the sizes… Then I started thinking about learning Illustrator. I made a few low-grade investigations… and then Cassie got wind of what I was doing and reminded me that she basically spent her whole degree using Illustrator. I was like, wow, would you teach me? and she replied, oh Mum, I could make that pattern into a pdf for you in half a day… I was, like OH My GOD! My saviour!!! At first, I was just going to pay her for her time… but as time went on, and we were working side by side on our computers, her on the pattern (it took a lot longer than half a day, btw!) me on the illustrations and instructions (also way longer than half a day!) and the idea of a partnership came up and it felt totally natural. She was keen. And I’m so very happy about it! This means that if either of us come up with an idea then we have this outlet for it, and we have complementary skills.
Of course, it’s our first pattern, and the learning curve has been steep. I reckon I did some things three or four times over, simply because the right way wasn’t immediately obvious. Almost like, you have to kiss a lot of frogs before you get a prince. Or maybe you can’t see the trees for the forest? Making a pattern turned out to be something like that!
The next step was the all-important “real” testing phase, and it’s SUPER important! I’m completely indebted to my delightful and awesomely helpful testers… who went through my amateurish instructions with a fine-tooth comb, thank goodness since I could barely see anything anymore for having re-written them a hundred times over. Those that sent me pictures have made the most beautiful dresses which has been SUPER exciting. I will do a separate post highlighting my lovely testers, soon, once everyone has got “final” pictures in to me.
Making the pattern a tangible thing: well at first I was just like, A4 is enough, yeah? Then one of my lovely testers SaSa of paisley pirouette mentioned a firm preference for A0, and I had a lightbulb moment that I should offer that too. Sounds so obvious in retrospect but truthfully I was kinda overwhelmed with it all at this point, so I really appreciated the reminder! SaSa also kindly recommended to me a massive comment thread about people’s pattern preferences, over on sewbusylizzy, which I sat down and read in a night. I got from this that sewing peeps were pretty evenly divided three-ways in their allegiance to and/or total avoidance of A4, A0 and/or paper patterns. Meaning in fact, a pattern designer pretty much has to offer everything if she/he wants to a. please everyone, and b. be taken even half-way seriously! So Cassie got to work on the A0 file and I went about making paper patterns happen. I got my patterns printed at Officeworks, folded ’em all myself, and printed out and compiled my own instruction booklets, put together the pattern envelopes myself. Goodness, that took an entire day all by itself, phew! And then I set up our etsy shop… aaaand sat on the edge of my seat waiting for my first sale! The excitement when the first one popped in, wheeee! What a rush!
So that’s it! Want to try out my pattern?! We are the Carolyn & Cassie Pattern Co. our shop is CarolynandCassie on Etsy, and we have the Perth dress/blouse pdf pattern and the Perth dress/blouse paper pattern on offer. I’ve also put a link to the shop up in my sidebar. And I would love to see your Perths! If you make one, then please either let me know in the comments, or tag us @handmadebycarolyn and @shyshycassie on instagram, and use the hashtag #perthdress
Perth, and Perth! hehe
Am I thinking about my next pattern…? well, of course!!
I’ve made a new dress! Every year, my group of lovely friends gives me a gift voucher to Fabulous Fabrics for my birthday… basically my ideal pressie, and I get to go in and choose something yummy… this year I chose this utterly divine silk charmeuse printed with an unusual fractured design. It almost looks like a watercolour/hazy kinda of an abstract , that has been cut and laid in random, uneven ribbons across a pearly ivory ground and then printed like that. You can’t really “see” much of anything in the print when looked at as a whole, but if you look closely you can see areas which look like the topstitching on old levi’s, and a brown leather belt with a brass buckle… you’d never think of it to look at it!
I used Vogue 1351, and managed to eke out of my voucher allowance a length of ivory silk habotai to line it… this is so divine to wear against the skin! so it’s worth it for a slithery slippery little number like this.
… I showed off the lining briefly in my action video below… in which I am obviously totally upstaged by my little production assistant, and honestly I’m not in the habit of lifting up the dress to show off ma underpinnings generally, but I know sewing peeps would understand. Apologies for the crashingly bad quality btw, I’m still learning how to do these videos! editing is kinda tricky and I’m still in the stage where it’s super lucky if I get any clips in there at all, let alone in the right order, and well, forget about continuity. Hopefully I’ll get better at this over time!
I left in the turning off the camera bit at the end too, just because during editing I realised it showed off the cowl neck quite nicely and you can see how the bodice lining doesn’t flip out at all, but sits hugging your torso quite securely and nicely. One of the things about a cowl neck is how they can be too exposing if not done well, and I have a few of these in my own wardrobe that I need to be really careful with! but this pattern is not one of them. The cowl is supported beautifully by the lining in a very modest way. It’s one of my favourite patterns for this reason… this is my fourth time making the pattern, my previous versions are here, here and here. I still wear all of them pretty frequently, except for the green wool one, which came to a heartbreakingly tragic early demise thanks to a too hot wash cycle. I could have cried when I pulled out this mangled, felted little thing from the depths of the washing machine. We were still in the honeymoon phase and I was so excited to think I’d be wearing it a million times yet. *sigh* A moment’s silence please…
And a couple of commenters mentioned after my previous video, and thanks for the positive response! I’m so pleased it’s a feature that people might like! anyway, a few wanted to see more, particularly what things look like when you sit down, so I dashed out to quickly film and tack on an extra bit with that too, which also happens to show off the dress closure by invisible zip in the left hand side seam. I really like dresses that close in this way, much easier to do up than a centre back zip and makes for a nice seamless look.
Details:
Dress; Vogue 1351, silk charmeuse lined with silk habotai
Shoes, in the video; Pedro Miralles
So, a few months ago, I was contacted by Nadja, of Schnittchen Patterns, who asked if I would like to be the Aussie in Sewing around the World 2018. Such an honour to be asked! and of course I was delighted! I’m the designated Miss February, hehe.
I was kinda like, hmmm February … and of course, Valentine’s Day. Pink, clearly… I mean, I love pink anyway, so really I don’t even need an excuse to make something pink. But it’s nice having one!
Usually on Valentine’s Day, we’re in the habit of going for a picnic together; it’s such a lovely time of year here for a picnic! warm balmy nights with pink and apricot and orange and navy blue sunsets. I make up a nice basket with the finest goodies Coles has to offer; I’m thinking smoked salmon salad, strawberries and chockies, with a bottle of pink bubbly- clearly got pink on the brain here, but naturellement! – and a rug… we carry it down to the foreshore, set ourselves up, plastic flutes in hand to watch the sun go down, with a thousand city lights across the water, twinkling into being like fairy lights. Yep, pretty nice. Should make the effort more than once a year!
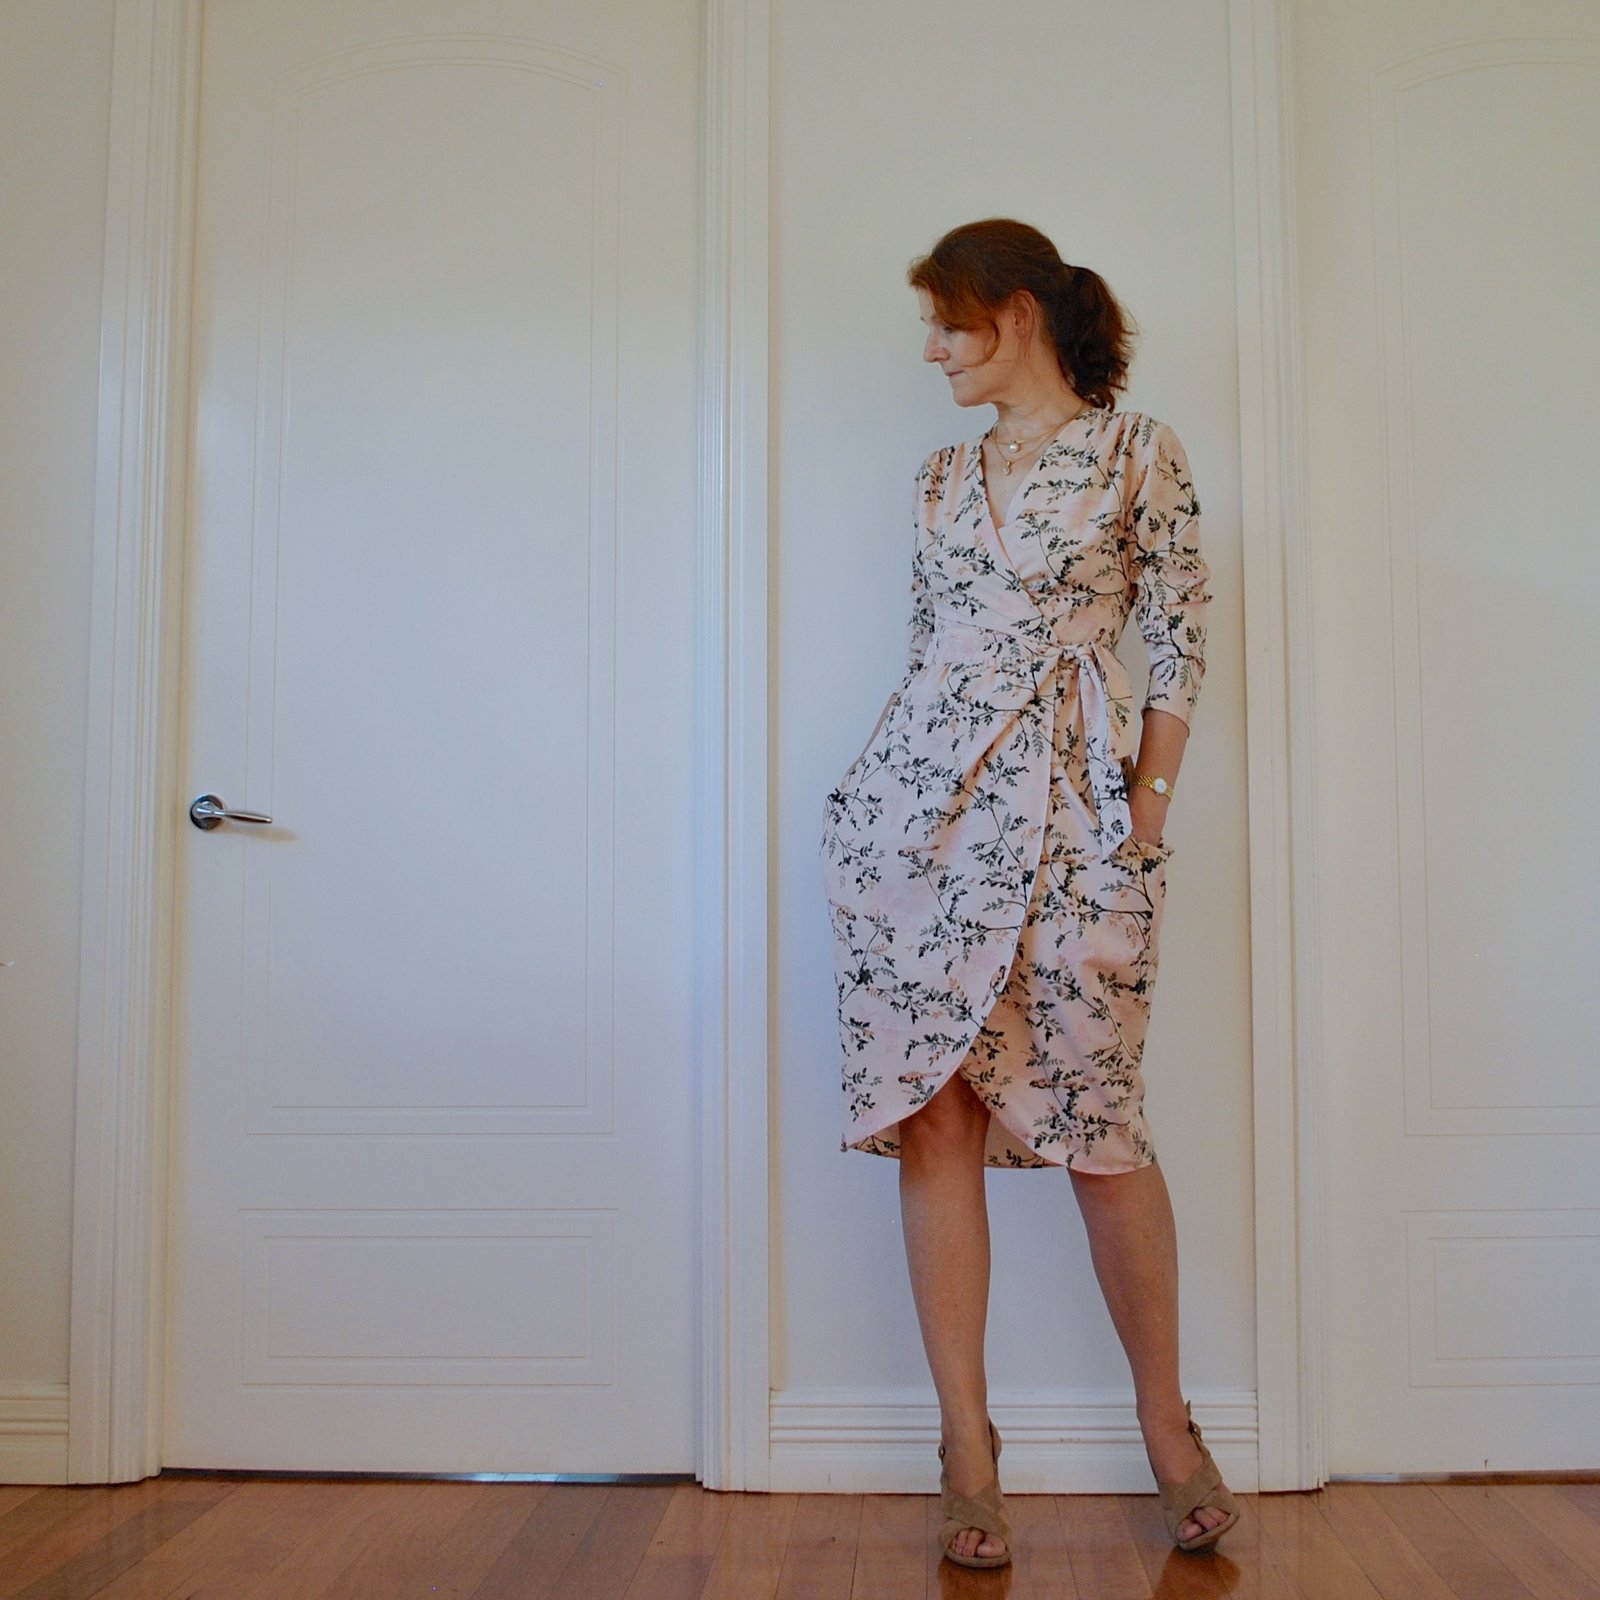
Anyway, I pictured myself clad appropriately in something super romantic, ladylike and feminine… I chose the Schnittchen Sally dress pattern, because it’s nothing if not romantic, ladylike and feminine… a true wrap dress with ultra-oversized pockets and a tulip skirt; a sweet and slightly old-fashioned in a good way, beautifully drape-y design… my favourite part is the bodice, with those lovely gentle gathers falling gracefully from the shoulders.
For the fabric, I picked out this crepe from my stash, originally bought from Spotlight last year sometime. I bought it with no plan in mind, just because I loved the delicate, Chinoiserie vibe of the print… and the colours; deep mossy green boughs against a beautiful warm, peachy-pink sky… this is basically my perfect pink.
Actually, I’ve been very inspired by a more ladylike vibe and silhouette lately, pinning tea length and floaty floral dresses like they’re going out of fashion… oh wait, well you know what I mean! Honestly, I think floral is having a real moment. Although, you know fashion; dichotomous is pretty much the thing. I myself am into romantic one day, quirky the next, sculptural and monochromatic the day after that. I often wonder how the defining look of our times is going to be depicted; 10, 20, 30 years in the future. Maybe the skinny jean/loose tee/moto jacket look, and yet, my Vogue magazines for the past year have zig-zagged wildly over several different extremes; the sharp yet comfortable, post-modern, luxe ath-leisure look, the oversized, minimal look, the floaty, floral, feminine look. I personally am very much more excited by these looks than the skinny jean one.
Making this dress was pretty easy, once I’d nutted out the waistband design. I didn’t have quite enough fabric to self-line the pockets, so used a portion of coffee-coloured polyacetate lining fabric for that bit; otherwise I used up every last scrap of the crepe, which is an enormously satisfying thing to do in the sewing world. The instructions are translated from the German and are … interesting, and took me a little while to wrap my head around them. I don’t mean that in a negative way. I actually like to be stretched mentally in my sewing, get my brain buzzing about with different ways of thinking about it, and it’s not so often that pattern instructions make me stop and THINK. These ones did! It’s funny, I’ve been sewing for aaaaages and have always experimented with lots of different pattern companies, but pretty much everyone employs the same lingo and you can’t help but fall into a bit of a rut. I mean, for example, you come to expect particular words to be used to describe particular procedures in sewing, and when those particular words are not used, when another, unexpected word is used instead, it can throw you for a bit of a loop. Speaking kinda generally there, but specifically, the construction of this dress is a straightforward affair, it’s just that you have to read, and comprehend, and not just expect everything to be written using the exact same set of prescribed terms. It’s actually one of the things I enjoy about using other-language patterns.
I don’t know why I always include a rear shot… it’s rarely an interesting sight and I always think I look awful. But anyway, I guess about half the people around you will catch sight of it whether they want to or not, so I guess it’s a good idea to see it for yourself too. It’s since taking pictures of my rear view for the blog that I’ve learnt pattern placement on the back of your clothing is JUST AS IMPORTANT a consideration as the front. Happily, this is a pretty lovely print, with little possibility of an unfortunate, accidental bullseye.
I am in two minds about the hem length on this one though. Part of me is wondering if I need to lop off a few inches…
HUGE plus, the pockets are actually HUGE (satisfied sigh) You could stash a kitten in there, easily… #don’tevenknowwhyIthoughtofthatone #leavingit
I consider myself Valentine-ready! Pass the champers! (hic!)
Details:
Dress; schnittchen patterns Sally dress, in a printed crepe, quite crisp, thin, drapes beautifully
Sandals; Zomp, from Zomp shoes
Later edit;
I’m trying out a new “thing” for the stuff I showcase here on my blog; a little action!! a little less conversation! the flat picture is kinda nice, not 100% informative, and I know I like to see things more “for real” as in how they move, how they look in 3D… this may or may not become an every-time feature… apart from the ineptitude of the model – it’s her first time! please forgive!! – what do you think?
So, what are the latest whatevers to wing their way out of the atelier, hmmm? Well, I’ve been making LOADS of things, just nothing much to show for it, as yet. Remember I mentioned I was making a pattern? Well, making a pattern comes with making a truckload of muslins, of course. I’ve actually made 13 dresses in the last month alone, albeit they’re made from old sheets and are a bit rough, but still. Am I going to count these in my “one refashion a month” resolution? no, that wouldn’t be fair. How’s the pattern coming along? swimmingly! which is fab… I’m almost at the testing phase, I will be incredibly happy to get there after 8 months of preparation. 8 MONTHS!
In more tangible making results, I made a little romper for Sarah’s new little boy… Sarah LOVES stripes, so the descent into stripe-matching madness struck once again. I used Butterick 6372, which I’ve made twice previously, and just altered it slightly to be a romper, and added that cute little pocket. Would you believe I re-did that little pocket THREE flipping times?? First I made a curved bottom pocket, which was pretty awful, followed by a flat bottomed pocket. Equally awful. I do really like the pointed bottom pocket though, I think it’s super cute. It’s my favourite part about the whole romper actually!
The striped cotton terry is from Spotlight, hopefully the last piece of fabric I will buy this year, given Project Stash Reduction is a goal this year. The red cuffs and pockets were culled from a Wildcats Tshirt from my refashioning pile. Thus partially fulfilling my once-a-month refashioning resolution #virtouslyRubbingFingernailsOnChest.
There was a little bit of leftover striped fabric, so I also made an adult sized beanie, using a pattern made by Andrea of fabric epiphanies. I’m afraid though that I couldn’t for the life of me work out how to print it up so the sizing square was the correct scale… three attempts later, and eventually I settled for “pretty close”. I estimated my beanie is actually about 7-8% bigger than the pattern, and then Sarah informed me it is too small! aaaagh! It is a pretty cute pattern though, I will still probably give it another go one day 🙂
The stripes do match up all around though, both inside and out, a matter of personal pride for me. I bound the beanie using a strip of blue merino, given to me by Mum.
So, after cutting the romper cuffs and pocket from the Tshirt, I still had quite a chunk of Tshirt leftover, well this wouldn’t do! I immediately realised, as you do; that I could get two pairs of knickers and a bra from the leftovers. Well, I’m sure that is the first thought anyone would think, hmmm?
I used the cloth habit Watson pattern, and cut out a bra plus two sets of matching knickers… yes, it was an XL Tshirt. I avoided as much of the advertising as possible and tried to stick to just the Wildcats logos as much as I could.
As I was making it, it occurred to me… is jungle January still a thing? See, in the past few years I’ve been in the habit of making a set of underwear for jungle January, and one of the things about the basketball is that the Perth Arena is known as “the Jungle” during the Wildcats games. Like, they’re always screaming “WELCOME TO THE JUNGLE!!!!!!” and going on about “…. HERE IN THE JUNGLE…!!!!” “Jungle” I guess because, wildcats. Anyway, it occurred to me that I was serendipitously making a jungle-themed set of underwear again. Without even meaning to! Win!!!
Do you wanna hear something funny?
I’ve been in the throes of making this set for several weeks now, fitting it in as light relief in between working on my pattern, you know; and I took it along to the sewing guild meeting yesterday in the hopes of finishing it up. And there I had the joy of seeing Emma also making a Watson bra. Except her’s was really beautiful; super pretty, with chartreuse lace, pink and blue elastics, generally all round gorgeous and very feminine. Just absolutely lovely in every way. Such a contrast to my sorta … lowbrow one made from an old basketball Tshirt, With logos, and everything. Like something a teenager might wear. Or more like, refuse to. Omigawd, so embarrassing. I swear I don’t try to be like this. It just happens. Every now and again, I think back to an anonymous commenter who used to frequent my blog, and who couldn’t resist from pointing out my 1) immaturity and 2) unnecessary penny-pinching-ness, among other things. Ahem, guilty as charged!
I thought about not posting this next one… but wellll, here goes… I’ve also made another thing, squeezed out from the Wildcats Tshirt, I mentioned it was an XL yeah?! I also got a little cropped top, much nothing to write home about at all… I made it specifically for my new workout aspirations. I hadn’t made any working out or losing weight resolutions on New Year’s Eve … but just lately I’ve been feeling a bit stodgy and decidedly… “matronly”, is the only word I can think of. So I decided to do something about it, and purchased the Kayla Itsines Bikini BodyGuide. One thing you’re supposed to do before even getting started is take a picture of yourself, preferably in a sports crop top and little shorts, and then take a new picture in the same ensemble every week as you work through the guide. So obviously I had to make myself a little crop top, asap! I used my customised version of the Closet Case Nettie bodysuit pattern and whipped up this super basic thing, just edged with a line of white overlocking thread around all the edges, which I think looks nice with my little white shorts. I made those too.. they’re are the eponymous Carolyn pyjama shorts. I rolled them up a bit, to show as much abdomen as I dared. Hopefully, it’s going to become a more shapely one in a few weeks! Don’t worry, I will not be posting a new picture here every week, but I’ll probably do an summary when I finished the course!
I started out with the beginner’s schedule, and practically killed myself just doing day 1!!

 So, we were going to Bali to attend our friends L&L’s wedding in early May… and I decided I wanted to make a special new ensemble to take away with me. Not to wear to the wedding, because, well … is ivory still a no-no for a wedding guest? I’ve always thought so, but then I did notice a few white-ish ensembles at the wedding anyway. So maybe times are a-changing… but I digress.




 So, once upon a time I picked up a lovely remnant of fine-grade sunshine-yellow linen from a sale at Potters Textile … and then at some point decided I wanted to make a yellow skirt. I plucked this, my only piece of yellow fabric, from Le Stash; and selected Burda 2/2015;109, which I’ve been admiring and coveting for some time. I traced it out, noted very happily that the pieces fitted perfectly on my piece of yellow linen with practically nothing to spare whatsoever, cut it out and made it up without much further thought.




 I’m beyond thrilled to announce the publication of our very first pattern! The Perth dress/blouse is an unlined, loose-fitting little summer frock with a bit of a buttoned-up menswear vibe to it. It’s kinda like a shirtdress, but kinda not. A faux shirtdress. The shirtdress to make when you’re not making a shirtdress. Hehe, I joked in my own head while making it that it’s the shirtdress to make if you loathe buttonholes, since there are barely any at all in this one! Also, I say “our”pattern, not because I’m using the royal “we”; but because I’ve gone into partnership with my daughter! #whatdotheysayaboutfamilyandbusiness but it’s OK, Cassie and I get along very well. Plus she has mad magic Illustrator skills, which perfectly complements my complete lack thereof. So we are the Carolyn & Cassie Pattern Co – this warms the cockles of my heart SO much I can’t even tell you! I never dreamed we’d have some kind of venture together like this but now we do I think I can tick it off some sort of subconscious bucket list that I never knew I had.
 So we have a brand new


 I’ve made a new dress! Every year, my group of lovely friends gives me a gift voucher to Fabulous Fabrics for my birthday… basically my ideal pressie, and I get to go in and choose something yummy… this year I chose this utterly divine silk charmeuse printed with an unusual fractured design. It almost looks like a watercolour/hazy kinda of an abstract , that has been cut and laid in random, uneven ribbons across a pearly ivory ground and then printed like that. You can’t really “see” much of anything in the print when looked at as a whole, but if you look closely you can see areas which look like the topstitching on old levi’s, and a brown leather belt with a brass buckle… you’d never think of it to look at it!


 So, a few months ago, I was contacted by Nadja, of




 In more tangible making results, I made a little romper for


 As I was making it, it occurred to me… is jungle January still a thing? See, in the past few years I’ve been in the habit of making a set of underwear for jungle January, and one of the things about the basketball is that the Perth Arena is known as “the Jungle” during the Wildcats games. Like, they’re always screaming “WELCOME TO THE JUNGLE!!!!!!” and going on about “…. HERE IN THE JUNGLE…!!!!” “Jungle” I guess because, wildcats. Anyway, it occurred to me that I was serendipitously making a jungle-themed set of underwear again. Without even meaning to! Win!!!





































