
Och aye! I’ve made this big, swirly tartan dress, and I absolutely LOVE it! I know it ‘s kinda crazy and huge-skirted and possibly a bit over the top, but you know what? it’s also extremely comfortable and cosy, and so swirly and swishy. The instant I finished it and put it on I immediately felt simultaneously relaxed, like I had put on a warm comfy dressing gown or something; but also a bit chic as well. The big feminine skirt with a nipped-in waist does that, but I really like how the volume below is balanced out by the mannish style shirt top with cargo pockets and flaps, and a notched collar.

Hehe, actually while I was making it I did worry a little bit that it was going to look exactly like a dressing gown! but once I put it on I was instead happily reminded of 80’s Ralph Lauren, and even Spandau Ballet. Remember To Cut a Long Story Short? big big fan here. HUGE fan. I still know all the words off by heart; and that film clip transports me right back into breathless, happy teenagehood all over again, and wearing this dress totally reminds me of that clip and that joyful time in my life; the over-the-top, big, blowsy, romantic 80’s era. So I”m very happy. And, can I say? there’s something about a big wide dramatic skirt that really brings out the poses in a person. Not to mention twirling… put a big skirt on a girl and just watch; you just can’t help it but break out into a coupla twirls.

 #awkward!! Yes, well; obviously most of us don’t actually twirl very often. Twirling is something of a fashion blogger contrivance… although if I do want to get in a bit of highland flinging I am all set. 😉
More realistically, it still looks pretty awesome when you’re striding briskly along the street too, and this? I do a LOT.

When making this I had an image in my head of an actual dress like this from an 80’s or maybe 90’s editorial, I swear it was a Ralph Lauren… so of course I wasted many hours searching and searching and searching to link to it, and do you think I can find a picture anywhere of that maybe-Ralph Lauren dress??? NO. The closest thing I could find is this maxi-dress, which isn’t it.

Anyway: Fabric; soft, cotton flannelette, tartan shirting from Spotlight. The same stuff I used to line my Tosti jacket, in a different colourway. One side is slightly fluffy, the other side is smooth and flat. I put the fluffy side inside. This is the opposite of how I used it for my Tosti jacket, which has the fluffy side out! Or… since it’s the lining, is the fluffy side therefore in? hmmm, that’s a puzzle! Navy blue buttons from Fabulous Fabrics.
Pattern: Mum had given me some of her old patterns, including this great Vogue 1147 shirtdress with multiple variations, from 1993. I thought it perfect for that vision of the big skirted, maybe-Ralph Lauren, maybe-not dress in my head. It’s not in my size, but the three nested sizes made it fairly easy to downsize a bit. I made view B, at far left.
The skirt pieces, bodice pockets and flaps are all cut on the bias; bodice and sleeves on the grain. As much as possible, I matched the tartan. #madpatternmatcher This was easy in the bodice and sleeves, and the pockets which please note, are exact mirror images… however! That skirt.…! I love how the centre seams in the skirt have a nice, fairly even row of white diamonds and am fairly happy with how the lines join up at the side seams… this took some careful pinning and only a wee bit of fudging… 😉 Those side edges did not have the same profiles and combine that with an asymmetric tartan…! *hair-pulling stuff* Anyway, the matching turned out pretty good, spot on where it counts, and so is reasonably satisfying 🙂

I cut the sleeves long, then stitched an ultra-wide wide hem. This is then turned up once in a wide cuff, and secured with invisible hand stitching 1cm inside the fold. I did it this way because the underside of the fabric is different from the right side, quite fluffy! and I wanted the smooth side to be on the outside of the turned-up cuffs.
Because the skirt is on the bias, I let it hang up for a week to let the bias drop a bit, and it did! by quite a lot in some places. The hem is hand stitched.

I also made a sort of belt… this helps to pull the waist in. I only made this actually because of my year of totally handmade, meaning I can’t grab one of my nice leather ready-to-wear belts, and I really think the design NEEDS a belt. But now I’ve made it I LOVE how it blends invisibly into the dress so perfectly! It’s basically just an interfaced waistband, with an inside button and two buttonholes. One buttonhole is for the start of the evening, before dinner. The outer one is for when you decide you do want to have dessert after all. Comfort dressing, at its finest!
Details:
Dress; Vogue 1147 from 1993, tartan flannelette shirting
Tights; my own pattern black stretch, details here and my tutorial for making your own custom fit tights pattern is here
Shoes; made by me, details here


 make another one!! Doh!! Clearly there’s something terribly wrong with me… #madvogue1247addict

 aaaaaand, my week of exclusively wearing Vogue 1247 skirts, in a nutshell…!


 what’s with the ballet pose? I have no idea. Anyway… I have a

 I’ve kept the selvedge from off the fabric, and have sewn these inside one of the pockets! just because I love information like this… namely: this design is by prominent Finnish designer Maija Isola, and was created in 1964! out by a year but definitely still of my era, haha. “Pieni unikko” translates literally to “little poppy” I’m not sure what KI 2009 means yet, but I’m investigating…. Also, how cool is it that the laundering info is printed on the selvedge?! so classy and very considerate really, it’s been along long time since I’ve seen such consideration in a fabric. That information’s the kind of thing I usually forget the very minute I swan out of the shop with my new fabric tucked under my wing.


 The loose front pieces also allows you to have these big loose comfortable pockets that you can shove your hands in, while still maintaing quite a slimline dress overall. As a result, the pattern uses very little fabric. I managed to squeeze my pattern pieces out of 1.5m, which is not too bad, not too bad at all, I think *preens oneself on an exceptionally economic layout* I had the merest of scraps left after cutting out my pieces, scraps, I tell you! The pattern has you line the dress, and after a bit of um-ing and aah-ing, I decided to not. Reason? summers here are very hot and I think the breeziness of this lovely cotton fabric is going to be perfect just as it is.


 I made some new shoes! and they lace up at the back of the heel.

 I lined the shoes with some very thin, pale gold suedette from Spotlight, the same type of stuff I’ve lined all my other shoes with, and the exact same stuff as
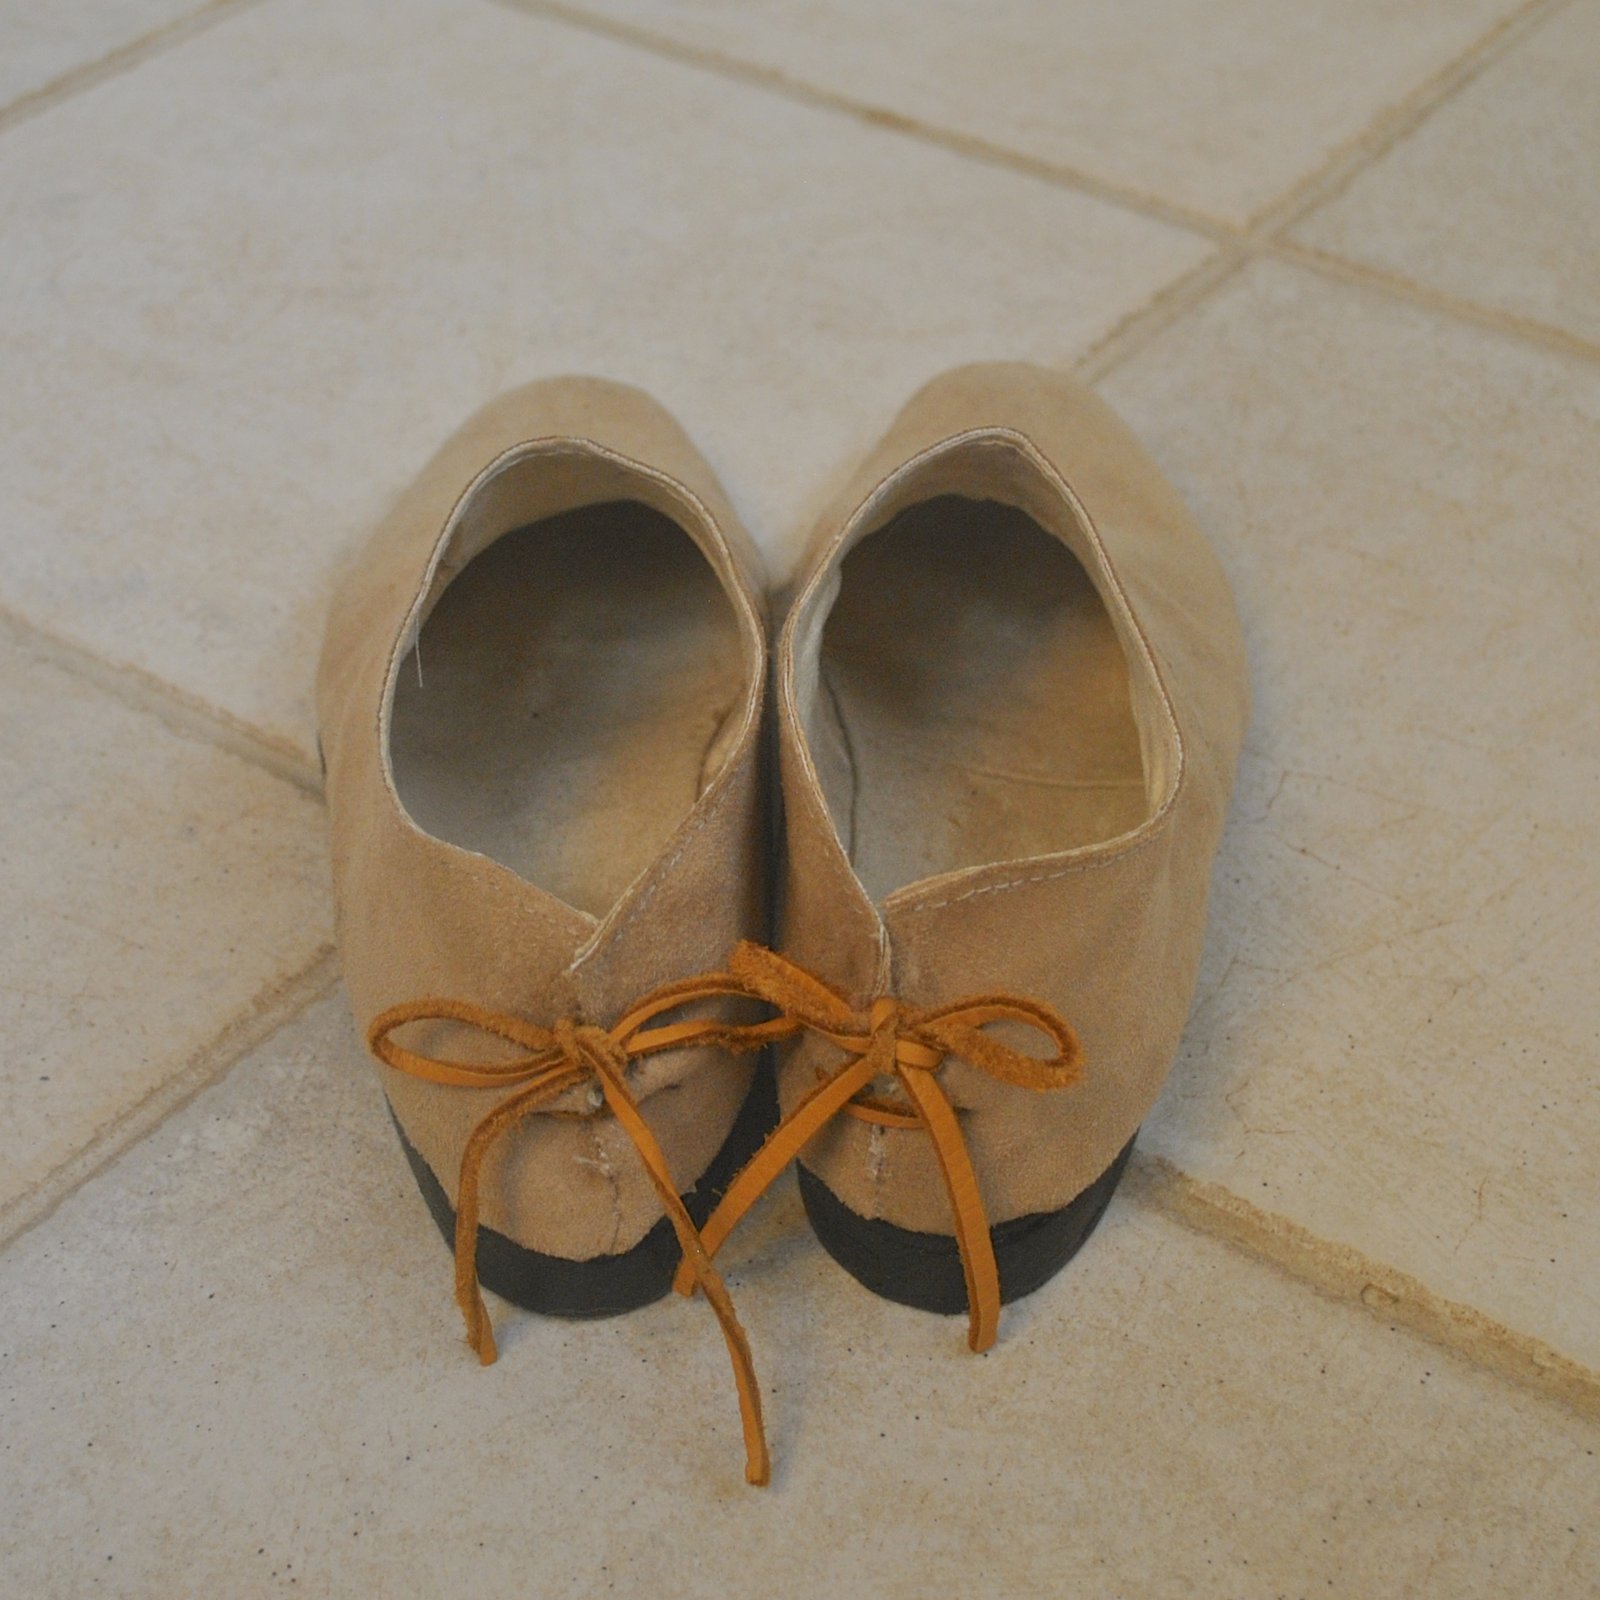

 hello! I’ve made some new shoes!
 This is actually a shoe version of a muslin, whatever you would call that… I’m working up to making some shoes using some of the Icelandic fish leather that I bought when we visited there a few years ago and I’m trialling a new pattern. The pattern looks almost identical to the pattern I’ve been using previously, to make my previous pairs of oxford shoes, but since I made that pattern prior to getting my lasts I decided it would be prudent to make a new pattern tailored specifically to the lasts.


 Details above: the top pieces are edged with close-spaced zig-zag stitch in black, and the shoes are fully lined with pale yellow faux suedette from Spotlight. The paisley fabric is from Spotlight too. Foam shoe liners from Coles for added comfort are covered with the pale yellow suedette which gives a co-ordinating, neat and tidy look inside.
  Craig and Cassie both separately and spontaneously, and without my asking, mentioned that they thought this is my best finish yet. The shoes are quite sturdy and I don’t think I’d even be embarrassed should they be subject to a close inspection. Hehe, I cannot say the same thing for some of my previous efforts!

 I was thrilled when
  Did I dive right into that invitingly turquoise water for a frolicsome dip? NO!!!! Since I’m the wussiest wuss that ever wussed I just got my pictures super fast and then threw on my jeans and thick woollen cardi again pretty quick! You can see that turbulent water and my crazy hair, it was blowing a freaking gale and the waves were booming and thundering onto the sand like the proverbial white stallions. I do love the beach in any and all weather, including wintery and wild; I love the sparkle of sunlight on the water, the swirling foamy shallows, and the crashing of the surf. Well, perhaps more so when I’m warmly rugged up snug as a bug in a rug, of course. Sienna loves the beach too, but it’s alright for her, in her thick fur coat! hehe, the things we do…
 It’s funny; when I finished the pink/black one I almost immediately took a violent dislike to the colours I’d chosen… It seemed a bit… I dunno, young and sporty? or something. Then I made the charcoal version. Which I really adore. When I took out the pink/black one again, to take photos in it, of course, you know the story, it didn’t look quite so hideous after all. I actually took quite a shine to it again. The pink seemed a bit warmer and less Barbie than I’d remembered it. I decided I might even like it better than the charcoal one. I don’t know. Oooh, I’m torn! Either way, I expect both are going to get worn this summer 🙂
 Heather has introduced her own sizing chart for the pattern, which I think is a pretty good idea. You know, when you’re making something and you sometimes get too lazy or too cold to disrobe for proper measurements, and go with the same size you always take, or worse; what you think you are. I do find that when faced with an unfamiliar sizing chart, you’re more inclined to get out the tape measure and do a properly slow and careful remeasure, to determine your correct size. Which I did. So saying that, how do I feel the cups fit? well they both fit pretty good. Though I do feel like the cup on my charcoal one, while it fits me; is just a smidge on the scant side for my tastes, if that makes any sense. I believe Heather has upsized them on the final version, which I reckon is a good call. I am small up top but I still kinda like to have lots of coverage there, for personal preference. I might remake the charcoal bikini top, following the new sizing of the final version of the pattern. But maybe not ’til summer!
 Fabrics and bits and bobs: the fabrics are from Fabulous Fabrics; who do get some very nice swimwear fabrics in stock during the season. I bought all these fabrics in previous summers, stocking up during sales. Stashing strategically, as you do 😉 Other supplies from my fast dwindling MakeBra basic kits; the underwires, under wiring channeling and the foam for the cups. The swimwear elastic, plastic swimwear hooks for the straps and back closures are from Spotlight.
 I’ve been busy making a few tops…
 SO! Exhibits A and B; two Nettie tops,both made in a really gorgeous, pale cream knit from Fabulous Fabrics, given to me by Mum. Now, I know I’ve said a gazillion times before that I have SO MANY white tops I should never ever need to make another one, but you see; a full-sleeve-length ivory Tshirt was one of my most worn wardrobe items last year. So, I’m pretty confident that these two boring things are probably going to be two of the most worn things in my winter wardrobe this year too! #ivorytopaddict. I managed to squeeze two tops from out of my piece of fabric, yes! *air fist punch*
 Along the back edge only, I topstitched the seam allowance down to the top, just inside the seam line. In both cases, the raw edges of sleeve and lower edge are finished with the overlocker, than turned under once and invisibly hand-slipstitched in place.
 The method is as follows:


