Category Archives: Uncategorized

a bit green about the gills

I made a green dress… this is a dress that I’ve been meaning to make for ages! and have been quietly gathering suitable green fabrics as I see or unearth them.  It’s actually been a very long term work in progress! since I identified what I thought could be the first suitable fabric about four years ago.  I know, right?!

You can actually see it right here; it’s the leftovers from this little bag that I made for Mum, for her birthday back in 2018… this is what I think of as the “jade” green colour centre front of the skirt part… it was harvested from a pair of silk trousers that Mum had let go years ago.  The “yellow” green raw silk was from the remnant bin at Fabulous Fabrics; as was also the “grey” green silk suiting remnant… although they were trophies from separate hunting trips… and the darkest forest green cotton corduroy was leftover from these paper-bag waist trousers, and originally from Minerva.

So obviously I love this pattern a lot, it’s the sixth time I’ve made it up!  Here’s a little collage of all the V1316’s I’ve made… from left to right, top to bottom they are:

1; made from four pairs of old corduroy trousers; black, brown, grey and cream…I describe how I add pockets to the design in this post too.

2; made from blue corduroy, that I pre-overdyed with different dyes to be four different shades of blue… this one is probably my own personal favourite…

3; made from four different colours of cotton corduroy.  I later overdyed the whole dress crimson for a more cohesive look

4; made using old denim jeans.  This was the first one I did not line, and it is perfectly fine of course!  This one is probably an equal favourite for me too!  🙂

5; made using yellow cotton canvas, leftover from the covers I made for Clara’s dog beds.  The seams are defined with blue bias cut cotton.  This seems to be everyone else’s favourite over on instagram!

6; my new one!

I’m extremely happy with my newest one! and I made a few slight mods, has well as the usual addition of pockets!  Of course!  I simply CANNOT live without pockets nowadays, sorry.  I know this is a very well-worn lament that perhaps should go without mentioning yet again, and yet this is a sewing blog and so I guess it really needs to be mentioned.  Sorry.

I lined the dress fully with light jade green lining fabric, and instead of using the same lining fabric to cut the shoulder pieces, like the pattern suggests and which I have obeyed for versions 1,2 and 3 in the past; I cut them from the dark green cotton corduroy,  I also cut an extra centre front bodice piece and stitched it to the neckline of the dress lining… these help to keep the lining “invisible” because I’ve always found in the past that the lining has a tendency to peep out on this dress, no matter how carefully you understitch the armhole and neckline edges.  This is such a simple fix and I’m glad it finally occurred to me!

Still pretty chuffed with these circa 2022 labels!  The challenge with each garment is to find a good spot to put it!

pinterestmail

FEED ME! … a peg bag

So I’ve just whipped up this crazy little peg bag …  it makes me smile every time I hang up the laundry!

I used an approximately 50cm length of charcoal denim from the stash, too small for a skirt but not so small to toss out of course!  I know, no scrap pieces is too small to throw out really, but you know what I mean.

I drew up a pattern with a boxed bottom, and edged the opening with some red cotton bias leftover from my previous dp studio sporty dress.  The teeth are from the same sturdy cotton I used for the dress’s white “sporty” panels, interfaced.


I inserted the hanger through the open, unstitched bottom of the peg bag, and then pulled the bottom edge through its “mouth” to stitch it closed.  Then stuffed the bottom edge back down through the mouth to the inside.  So it’s all nice and neatly finished with the hanger firmly ensconced in position, only the wire hook poking out through a tiny hole in the top.

It’s pretty cute, I think!  Gives me a giggle every time I catch sight of it!

AAAAAAAGH NOOOOO!!!

#use30 update: 19m down, 11m to go!

pinterestmail

dp studio dress with sporty details

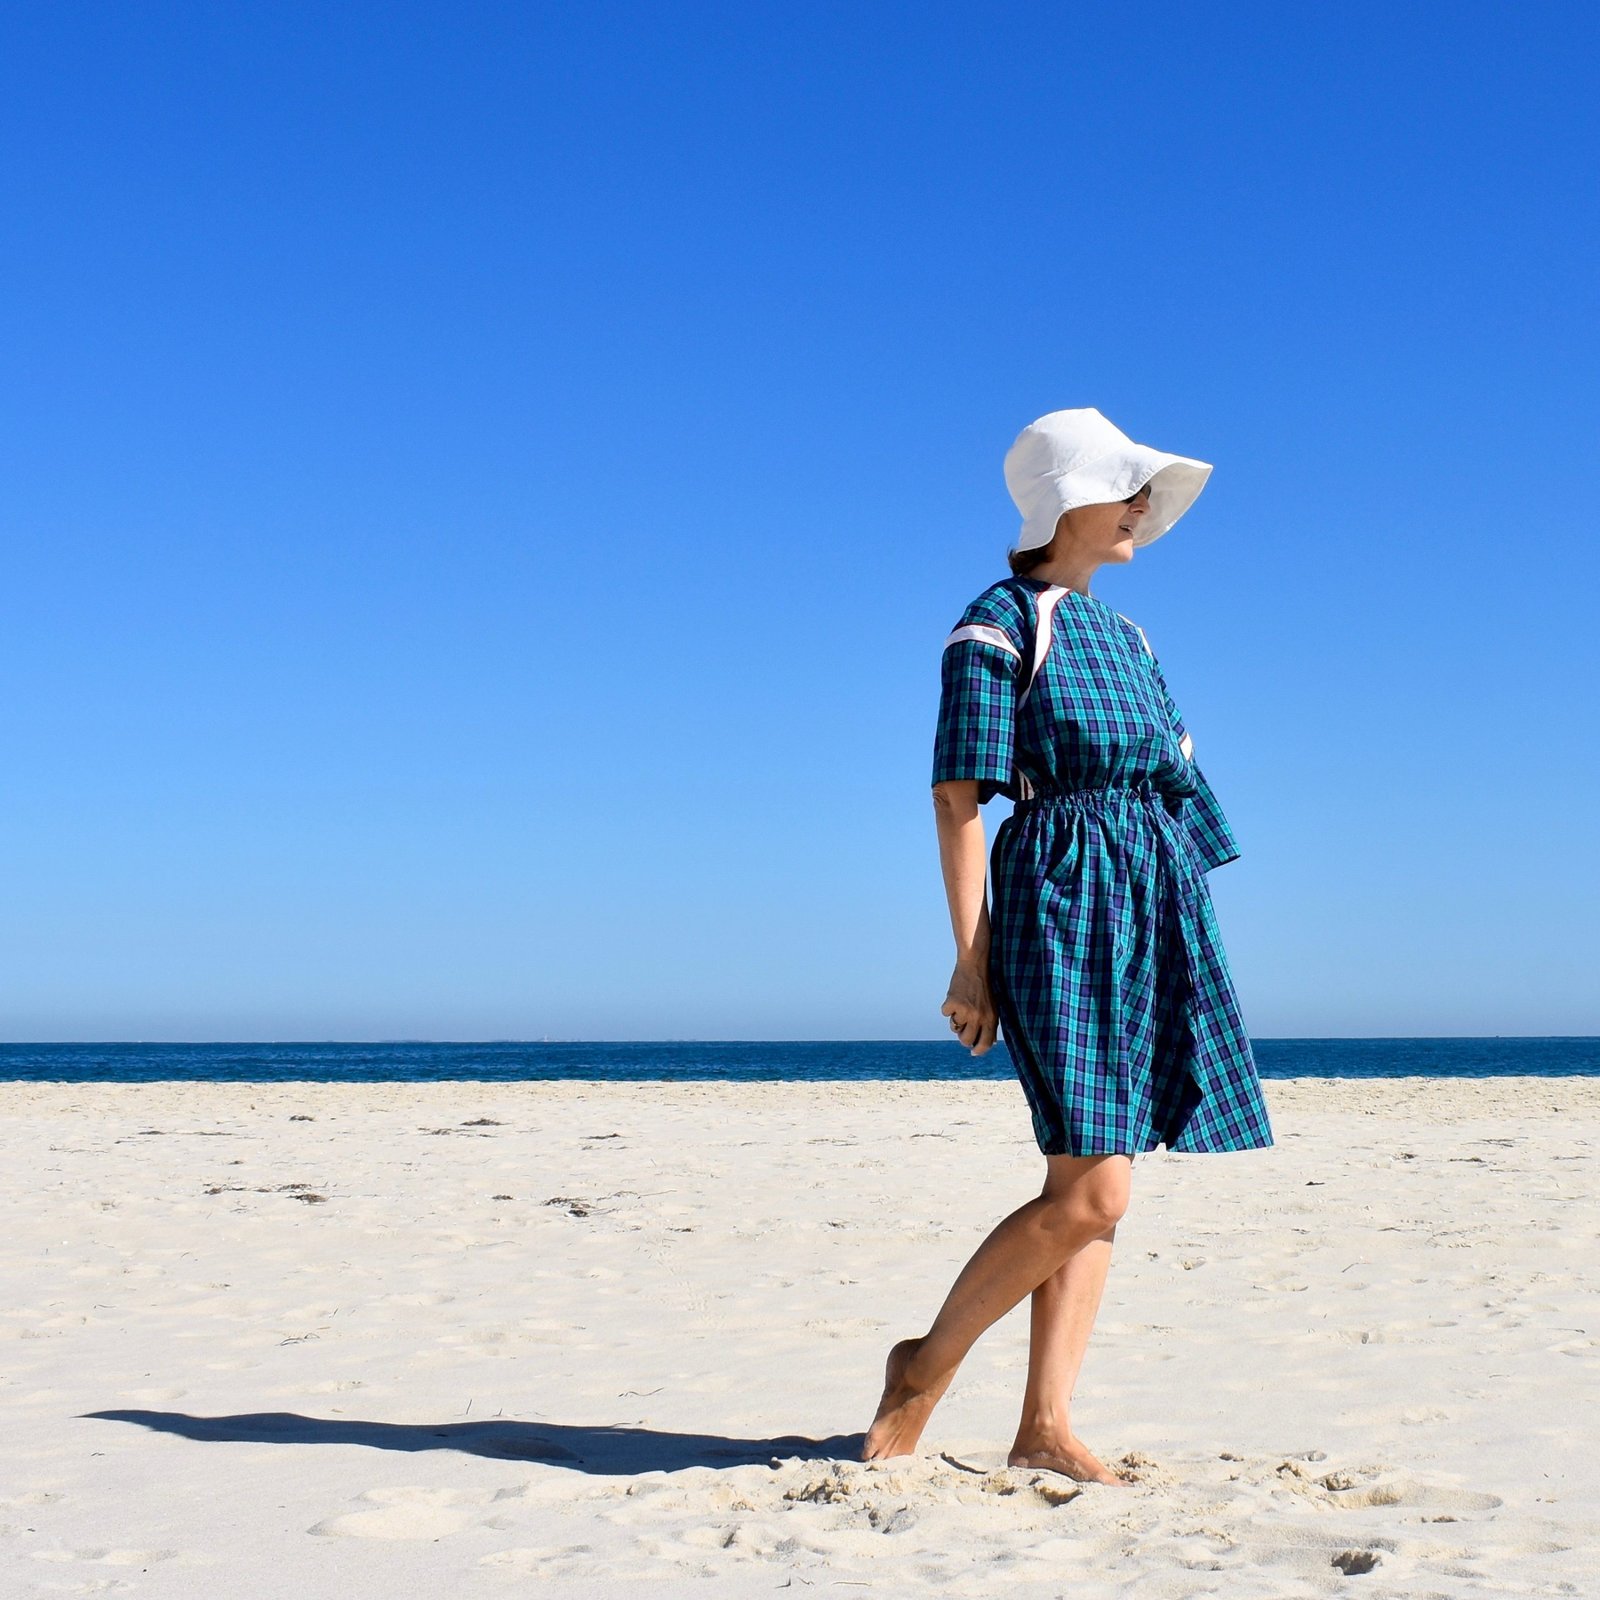
O hello!  I made a new dress… this is a pattern that I’ve had for years, and have only just got around to finally giving it a whirl.  It’s the dp studio Le 905, or “dress with sporty details” and it’s pretty fun I think!  Quite unique in all its details, and you really don’t see many of them in the sewing community.  Since a major reason I sew is to have a unique wardrobe then I further reasoned that it was a good choice.

The gorgeous main fabric is this cotton plaid in the colour jade/red from Minerva.  I really enjoyed sewing with this crisp, strong and sturdy and yet lightweight fabric… t was really easy to work with, which is always a joy!  The design has curved panels in the front bodice and also panels in the armscye seam; I did not have enough plaid to cut the panels as well, so cut these from plain white cotton.  At some point I thought the white panels were going to look a little stark against the plaid, so I edged them with strips of bias-cut red cotton, leftovers from this dress… this is the method I used for this.

I really love how this looks in the end! reminds me a little of the sort of racing stripes you get with sportswear like tracksuits, stripes going up the sides of the legs etc; and I’m very happy this plays into the “sporty details” that the dress is named for.

Some other details of the dress:  the skirt is cut in two huge, identical pieces, unusually with a centre front and centre back seam.  Of course I obsessively plaid matched along these seams… 😀 Actually, I also had to cut the back bodice in two pieces and join them, because of not enough fabric.  I stitched my circa 2022 label to the back this time.

The design allows for no pockets, so I added some slanted single welt pockets in the appropriate location.  Due again to lack of plaid fabric I cut the pocket bags are cut from the same red cotton as the decorative strips, I had just enough plaid to cut the welts and a strip to edge the pocket bags… so you don’t get blasted with red if you happen to peek inside the pockets!

The above picture also shows the neckline facing edged with red bias; I prefer necklines finished thus nowadays, since it’s softer and less irritating against the skin.  Honestly, overlocking itches and irritates and drives me mad sometimes.

The above pictures also shows the sleeves and hemline finished with a facing,  I cut these from an irridiscent teal blue/pink taffeta that I had already in my stash.  So perfectly matched! it’s like it was meant to be.  The casing was a heavy-ish white cotton chosen for its strength.


The sleeves are supposed to be gathered into the armscye… I initially did this, but decided the puffy sleeves were just too fussy for my tastes.  Quite honestly, can puffy sleeves ever be considered “sporty” anyway?   Anyway I unpicked my sleeves and took 13cm from each sleeve at the sleeve seams; so the sleeves could be inserted into the armscye without gathering.  Much nicer in my opinion!

As pictured above, the waistline has a casing attached inside the dress with twin casings for twin drawstrings, both feeding out of two eyelets.  This took me quite a bit of time  threading them through, and also arranging them each time I put on the dress takes a little bit of time too; and so I’m not sure I’m 100% happy with the outcome.  If I was going to make this design again I would do a single casing for just a single drawstring, I think.  The two of them together don’t always draw up as equally/evenly as I would like, so arranging them neatly just seems a bit fussy.

Oh, one last thing; someone on instagram asked me about the dp studio instructions, and I would have to honestly say they are minimal, at the best!  If you have been sewing for a while and do not need exact and unambiguous direction then you’ll be fine.  Otherwise, maybe not!


pinterestmail

ivory madou

I made a new jacket  🙂

I love making and wearing jackets, and this one was … um, fun? to make?  Haha, no really.  I used this beautiful ivory/vanilla wide wale corduroy that I bought years ago, from Potters Textiles… it’s one of those quite lovely luxe fabrics in such a perfect “white” for my complexion that I’ve been saving for all this time… just waiting for that perfect pea coat pattern.  Although maybe it’s not quite a pea coat in the end, maybe more of a cropped shacket…?  Honestly I don’t understand all the in or even relevant terms for clothing a lot of the time but it’s a jacket and very comfy and fun to wear, and I LOVE it!  Phew what a crazy sentence!  I’m sorry!

So, launching into the pattern deets: this is the FibreMood Madou jacket pattern, from the latest magazine/pattern release.  It’s quite boxy and intended to be a bit longer that my version here.  I cut mine  bit short; partly because I thought this was a better length, and partly because by doing so I have enough leftovers to scrape a little mini skirt for winter too.  Ha!  It has huge breast pockets, which may well be mostly decorative in the long run because honestly, can you actually put anything bulkier than a credit card in a breast pocket?? but they look pretty cool, I think.  However, there are also huge hip pockets, thus satisfying my die-hard little pocket loving heart.  *happiness*

I added one of my circa 2022 labels.  Still love these!

Now, why was it *inverted commas* fun? to make, as expressed above?  well, being wide wale corduroy, and also being really gorgeous fabric that I absolutely could not ruin; any wobbly wales in the corduroy were going to drive me absolutely crazy and I quickly realised I could not tolerate any of that …  I ended up hand-basting the central back seam; cursing myself the whole time for not ignoring the pattern and cutting it on a fold instead NO! actually I remember now, I DID cut it on a fold, and thought I’d just cut the edges off and avoid that centre back seam… and then I thought; no, I’ll follow the pattern as it should be and have a centre back seam.  So I sliced up up the middle thus condemning myself to handstitching the seam.  However!  I have to admit I love the look of the centre back seam now; it’s perfect as far as the wales looking lovely and even, and it does make the back look a little more interesting than if there was no seam.

Same goes for the front button band stitching, and putting on the patch pockets; I was super super careful in the pressing, the lining up, and the stitching of each of these components.  And am very happy with the results too!

The underneath of the collar, and the front bit of the hip pockets are cut from a perfectly colour-matched pice of heavy natural calico; that I bought from Calico and Ivy years ago.  I did have enough fabric to cut these things, but am determined to get that matching mini skirt!

I used some dark copper jeans buttons for the buttons; from stash.  My supply of these is very low now and I will need to buy more in the near future.  It feels good to be using my stash though!  I love finding exactly what I need, already in my possession.  Reminds me, I can update my #use 30 stats; I had 2m of the corduroy, and I still plan to make a little skirt from the leftovers, so I think I can claim 1.5m for this latest creation.  Bringing up my total to 18.5m for the year so far.  11.5m to go!!

pinterestmail

handprinted socks and hand warmers

I’ve knitted a new pair of socks and matching hand warmers for myself… aren’t they beautiful?

Yoshimi sent a handprinted sock blank to me for my birthday last year, and I got onto it straight away!  I’ve never seen or even heard of a sock blank before, and was quite interested to give it a go… the sock blank looked like this:

and was knitted, I presume by Yoshimi on her knitting machine, in two strands of sock wool held together.  And then painted.  I started at the bottom, unravelling carefully as I went and knitted my socks from the toe up, because I wanted the red/pink section to be the cuffs of the socks…

The pattern I used was my regular Patons pattern, that has been modified, and then I have also reverse engineered to be a toe-up pattern.  I think I will publish the latter one of these days.

You can’t tell just by looking, but the “foot” section of the socks got re-knitted about three times before I was completely satisfied.  The problem with knitting toe-up is that it is very difficult to gauge what the length of the foot is going to be, at the point where you have to start increasing for the heel, and I got it wrong a few times.  I figured I really wanted them to be perfect, so each time I realised it wasn’t going to be quite right, they got unravelled back to the start of the increases, yet again.

I also realised before too long that there was enough yarn in the blank that I thought? hoped? I was going to be able to get a pair of hand warmers out of them too… and there was!  I put the socks onto a length of waste yarn, without casting them off until I knew what was what… and started knitting the hand warmers from the other end, and finished in the red/pink section so they could have a red/pink cuff to match the socks nicely.   I also carefully measured how much I needed to cast off, so I could stop in just the right spot.  I’m proud to say there was a bare few 10cm leftover after I’d cast off!

I’m SO happy with how these turned out!  The hand-dyed yarn is such a pretty range of colours!  Thank you to my dear friend Yoshimi for such a lovely thoughtful gift!


pinterestmail

pretty pink and lace simone

Here’s something I made recently… a rather lovely, if I say so myself – slip dress that I feel is perhaps almost too pretty to even wear!

This is the new Simone slip dress pattern by Closet Core patterns, I was lucky to be picked as a tester and I also luckily had a short length of pink satin in my stash already, plus a very short length of cream coloured lace that was fortuitously the exact and perfect length for the project…  one of those projects where it was all just very lucky and fell happily into place.

I initially wasn’t going to post pictures of my actual self wearing the slip, these are the fitting pictures I sent off to Closet Core for pattern feedback… but I think they’re ok really.  One of my all-time goals with this blog in the first place was to get over my awkward attitude towards photos of myself, so I shouldn’t revert now, hmmm?

The slip was of course quite easy and fun to make; I love testing patterns and trying to make things carefully.  I was very careful in lining up the edges of fabric to my table before cutting out and I measured the bias with scrupulous care; and I think that paid off.  However, despite great care in stay-stitching the back top edge; I must have stretched that bit out just a bit because it flips out against my back, so *shrug*

Anyway, it’s certainly turned out quite lovely in my opinion  🙂 and of course the satin is beautiful to wear; so I’m very happy with this useful edition to my wardrobe.  I’ve already worn it a couple of times underneath other things; which feels like a very swish thing to do!  I always feel like this when I wear my ivory Ruby slip too….  maybe I should make a few more!

I finished off the bottom edges with a skinny triple-stitched hem, and the side seams using french seams.  btw, I just love this (above) picture! these finishes look so lovely in satin. The stronger pink colour in the close-up pictures is much closer to its real colour than the slightly washed out colours in my modelled shots, I don’t know why it’s like that!

Oh! my #use30 pledge came into play again, hip hip hooray!  I managed to polish off another 1.5m with this here lovely bit of frippery; so I’m up to 17m down, and with 13m to go!

I’m back on track!

pinterestmail

a fabulous Mr Fox

Hello !  I’ve just finished making this cute little fox for Theo. And he has a nice little outfit too.  A reversible waistcoat and a pair of smart trousers, no less.   Quite dapper little chappy, no?


I was recently the lucky winner of the James Fox pattern from a giveaway run over on instagram by his designer Lisa of A Sewing Life, along with the patterns for his trousers and waistcoat.  So I thought since I made a bunny for Arthur not that long ago, I should make some sort of an animal for Theo too.

I couldn’t find any appropriately coloured felt in the shops here, so I ordered some.  I ended up getting some hand-dyed wool felt from Indigo Inspirations; this is the Rust colourway, and I ordered some plain white from the same shop at the same time, for his chest and the other white detailing.  His gloves and boots are dark chocolate brown cotton corduroy, leftover from my recently made brown skirt, originally from Tessuti, in Melbourne? I think?  It was a gift from Cassie..  Buttons are old stash.

I redid his nose several times until I was totally happy.  Faces can be tricky and I’m very happy with how his turned out in the end!

His trousers have POCKETS… oh my gosh how gorgeous is that?!  Of course I had to pose him with his paws shoved insouciantly down into them.  He looks exceptionally debonair like  so, in my humble opinion…

hide and seek…

He has fully articulated limbs, which make it lots of fun to pose him.  He doesn’t really stand up by himself very well; in fact he topples over at the drop of a hat.  I’m not sure if I overstuffed his head, making it too heavy? but I do know from experience that you have to stuff a doll’s head very firmly in order for it to look any good at all.  So I don’t know how the instability could be avoided?  Anyway, he props against a wall very well.

“paint me like one of your French girls…”

Achieving the aforementioned articulation was a little fiddly, because of the difficulty of manipulating a needle through two buttons inside half-stuffed arms and body, but it turned out ok in the end, I think.  My first go at stitching up the backs of his fully stuffed arms wasn’t very neat, and it’s an area that’s really on show on the finished fox. Before giving him away, I unpicked my previous stitching and carefully redid it to be a lot neater.

All his clothes are made from some of Craig’s old shirts; which I always keep for the buttons as well as for the (usually) beautiful quality fabrics.

I hope Theo enjoys his new fox, and I can’t wait to see him played with!  I wonder what his name will be?

pinterestmail

hand drawn check

Isn’t this fabric totally gorgeous?!!  I love it so much!  I still have a huge affinity to pink, despite that I’m not “supposed” to wear it, whatever that means.. well, if it makes you happy!  And this little group of colours really does.

This is the Hand Drawn check by Nerida Hansen fabrics, colourway Navy Pink  – yes of course they had me at “navy” plus “pink”; one of my all time favourite colour combinations!  and I used one of their patterns, the Summer dress to make this too!  btw way, yes those are direct links to the things, but rest assured they are not affiliate links  🙂


goes so nicely with my teal clogs!!  #bonus

and yes I made those too… details here

I’m totally over the moon with the gorgeously pretty and floaty result… it’s a really lovely combination, if I say so myself  🙂   The design is very simple; it just slips over your head with no closure needed, my favourite sort of thing to wear, especially in summer  😉 and the beautiful cool slipperiness of the tencel linen sliding over your body as it goes is an absolute delight.

The Summer dress design has massive pockets, ahem; not that that is in any way important, of course!  😉 and a slight oversized-ness that feels happily up-to-the-minute in the fashion stakes.  I wasn’t sure if I should go down a size, but in the end decided to trust the size chart.  And actually I’m in love with the loose fit.  I really like the midi length.  It’s not a length that I’ve been wearing a lot over the last few years but I feel it sneaking back into my list of “wants”; as in things that my mind feels lately are all of flattering, comfortable, and a little bit of a refreshing change.  They say that hemline lengths are the barometer of the fashion world? well who knows, I often just think that anything goes in fashion right now, but it is nice to have a variety of things to choose from in the wardrobe.

I was careful to match up the checks at the side as best I could; even though I sometimes rail against the rigidity of this mindset, and I feel like it can sometimes lead to more fabric wastage too… I still do it myself most of the time!  It does look a lot nicer when you go to the effort of making sure the print is nice and consistent all around.  As it turned out; the skirt length was just about perfect that there was almost no wastage through pattern matching; which was a nice outcome.  And I managed to cut the huge deep pockets from the sides, so I actually have a small amount of leftovers for … something.


Of course I fell in love with that print first and foremost, but actually the quality is superb as well.  It sewed up beautifully; very soft and supple, but has a very nice amount of body too.

I cut some of the leftovers into bias strips and made bias binding; which I used to bind the front and back facing.  I love the look of this! and of course it’s a much more comfortable finish to wear than if you just whizz it around on the overlocker; which can be scratchy. Of course I also added a circa 2022 label.  These are so cute! and the novelty has not worn off at all for me  🙂  Probably going to put one of these on each and every thing I make for myself this year!

And I made a mask.  As you do.  However, just something about the print – which I love! – well in a mask I felt like it turned out a little bit … Hannibel Lector-ish?  Yeah, I know; once you see it…  The dress itself doesn’t trigger that for me at all… but in a mask? hmmm!

Why yes, I did indeed made my hat too.  One of my all-time most worn garments!  Details here

Now I have to confess this fabric was new to me this year, so I can’t really count it in my #use30 metres fr0m stash.  In the process of testing our new pattern lately I have used another 4m of fabric from my stash, but I really should ADD the 2m I used for this gorgeous dress in there to be fair!  So; I think I can subtract the balance of 2m off my tally; bringing me up to 15m used, and 15m to go? sounds kinda about right?  I know; it’s getting a bit dodgy in the accounting department but honestly I have zero regrets.  I absolutely love this fabric and it makes me very happy, so I’m definitely not beating myself up over the whole thing.  I will use 30m from the standing stash in the end, however long it takes, and I’m content with that.


 

pinterestmail
Switch to mobile version
↓