bathers

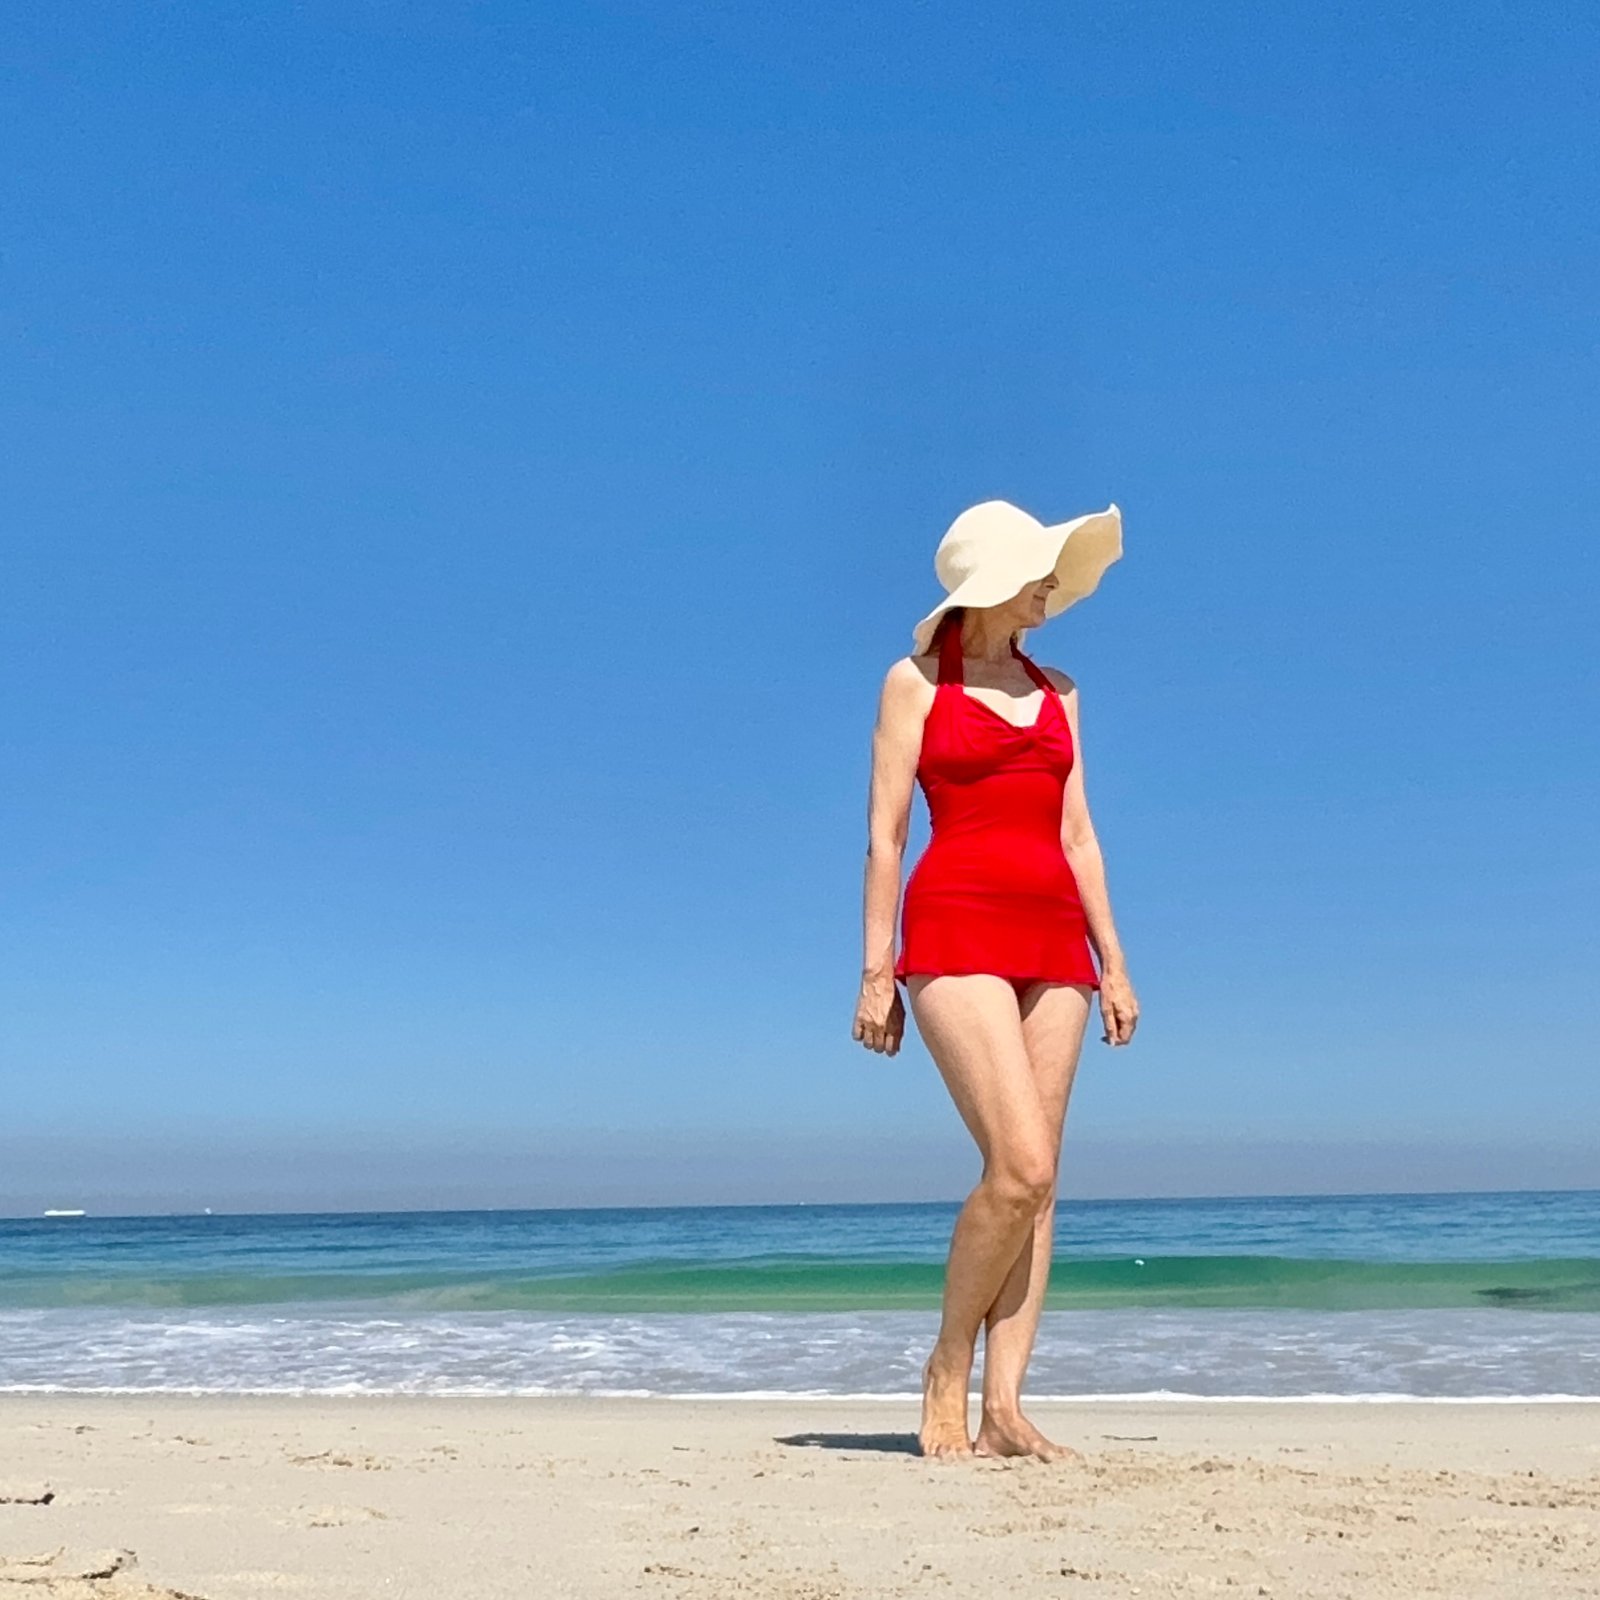
Hello!  I made a new pair of bathers for myself… and I’m chuckling to myself that I’ve gone kinda Bay Watch this year.  Is Bay Watch even a part of the collective consciousness any more?  hmmm I could be aging myself a bit with that reference?!

it’s only a year since I made my last pair of bathers but the fabric didn’t last as long as I was hoping.  Oh well.  I swim every day nowadays so maybe it’s not so surprising that they’ve worn out.  And I have to admit that I don’t think this fabric is going to last l0nger than a year either.  It already has that very stretchy quality that doesn’t bode well for future stability.

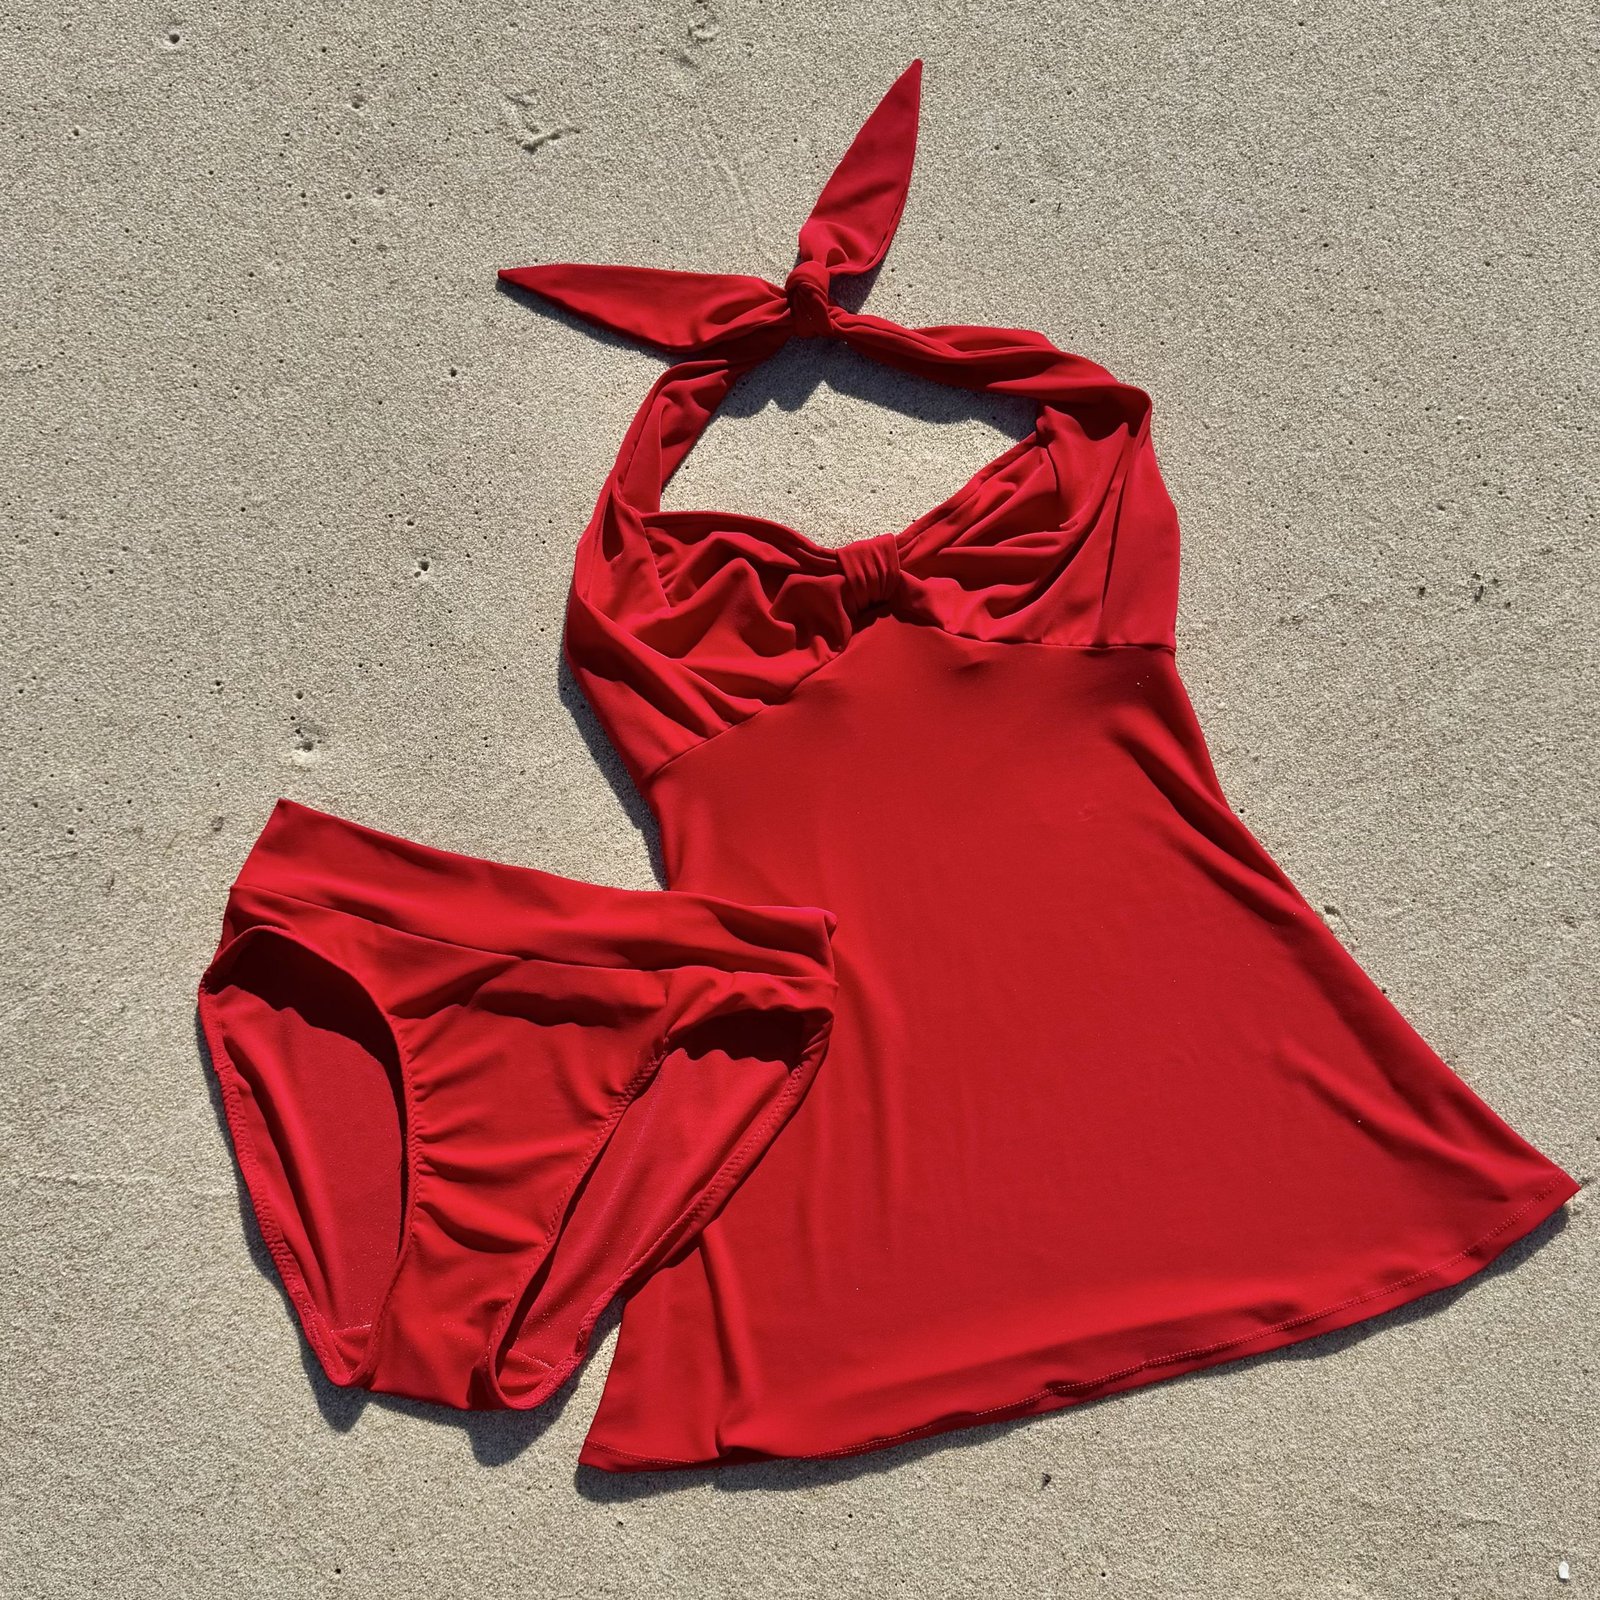
I used my old favourite “vintage” pattern – oh and it hurts to use that word since I bought it when it was new! of course McCalls 2772, that I’ve been using practically every time I make bathers.  I just really like the style of this pattern, and when you’re happy with a thing then it’s ok to stick with it.  The stretchy red polyester is from Fabulous Fabrics.

As usual, I made a skirt that I’ve stitched to the underneath of the bikini top to make a tankini version of the pattern.  The whole back “skirt” is cut in one piece just using the upper curve of the bikini back as a guide and with the regular length of elastic attached to the top of it.

The first beach swim in the new bathers! and here’s to many more.  When I was browsing fabrics I really wanted to find a cool print like palm leaves, or beach balls, or something with a mix of beautiful colours, or pretty florals, or wide stripes or something nautical.  I found nothing at all that I liked in the print selection, this plain red was the only thing I even vaguely liked in the end.  It’s ok, because I do love red, and it feels both cheerful and timelessly fashionable.

pinterestmail

a special lace dress

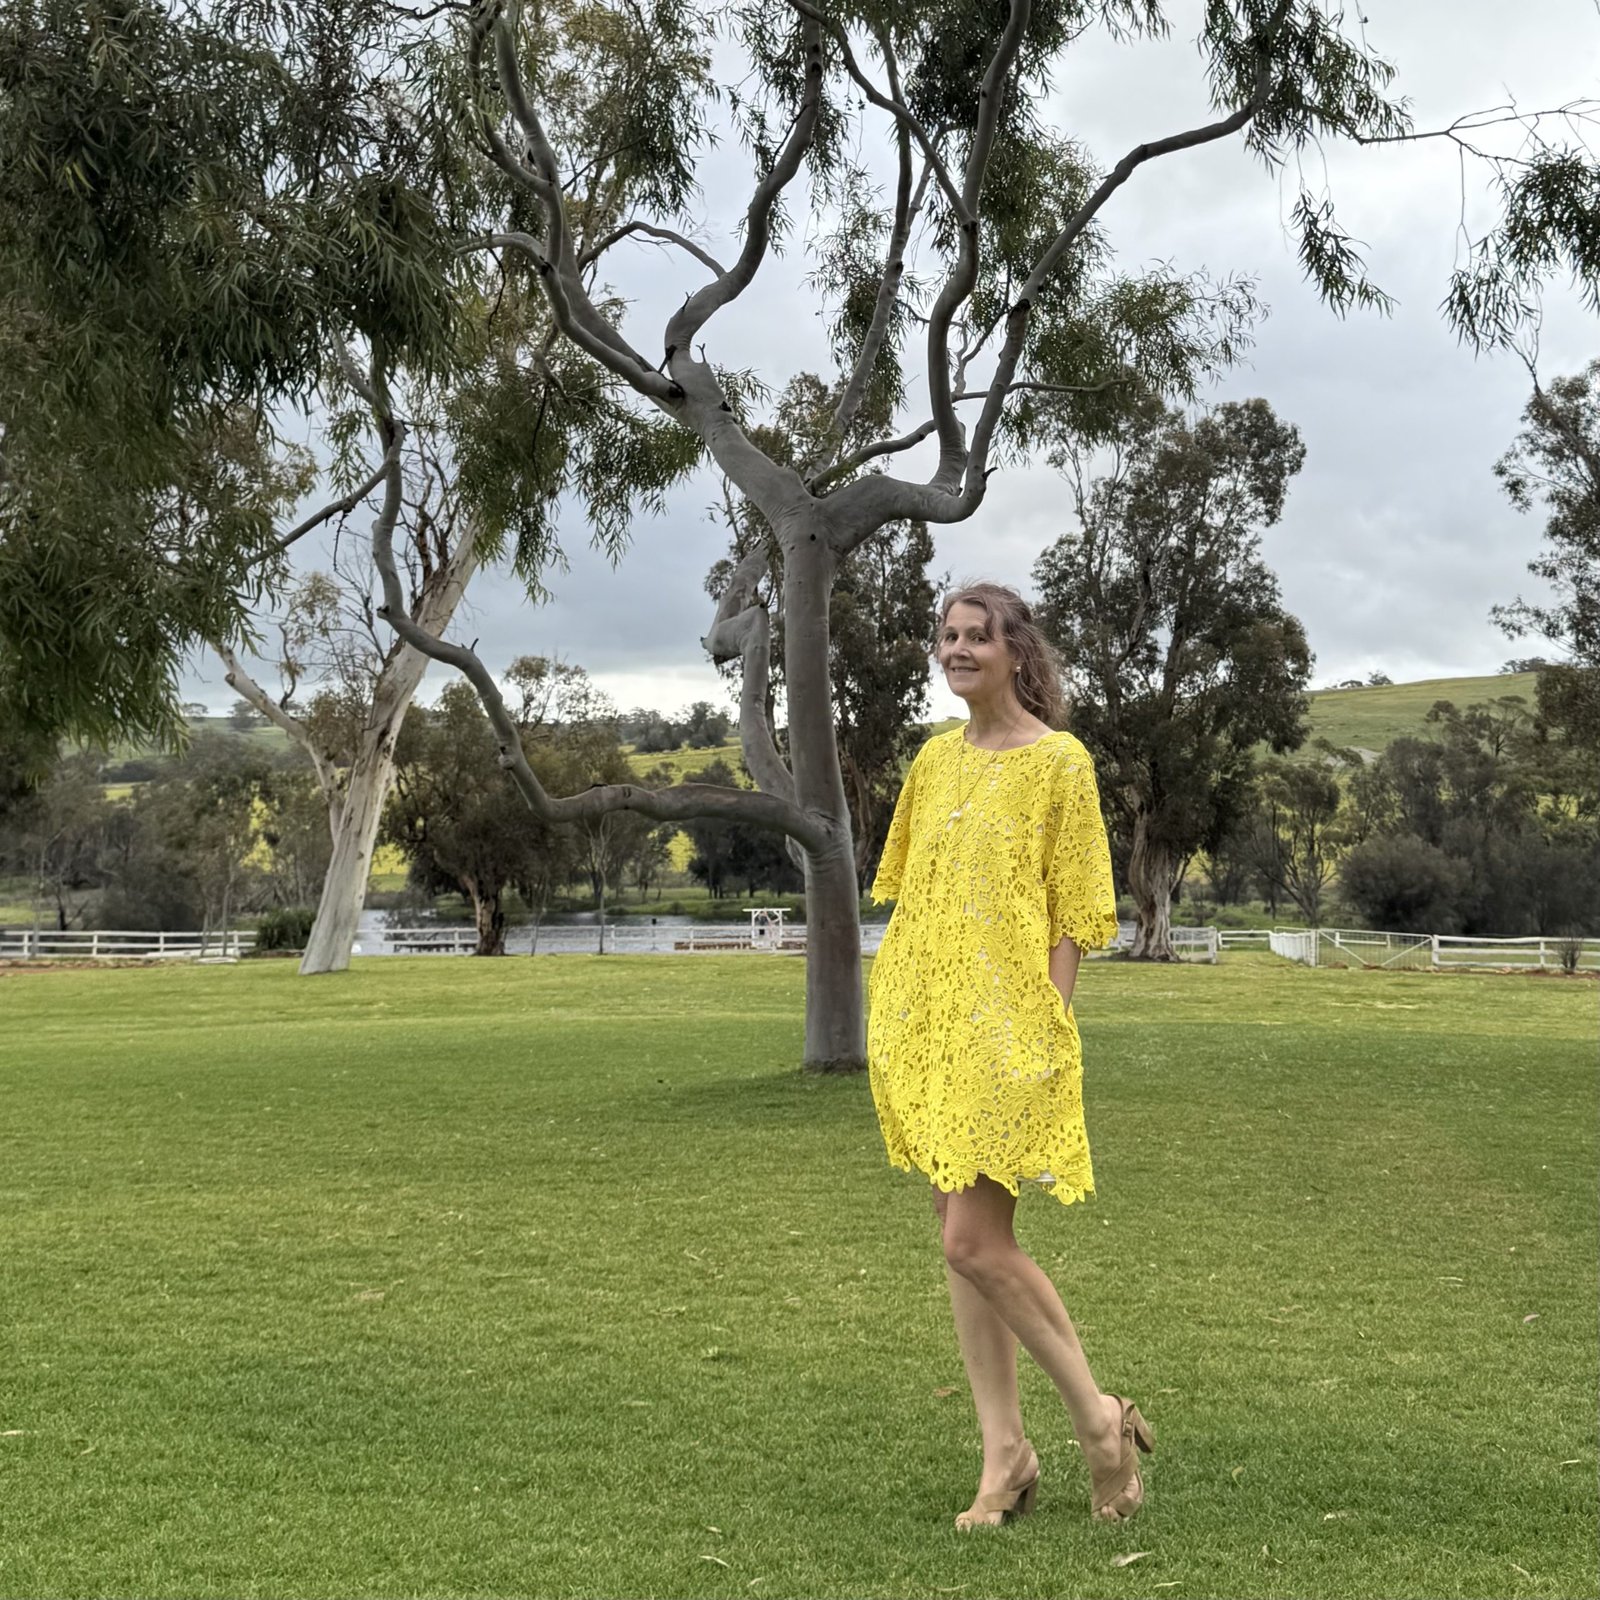
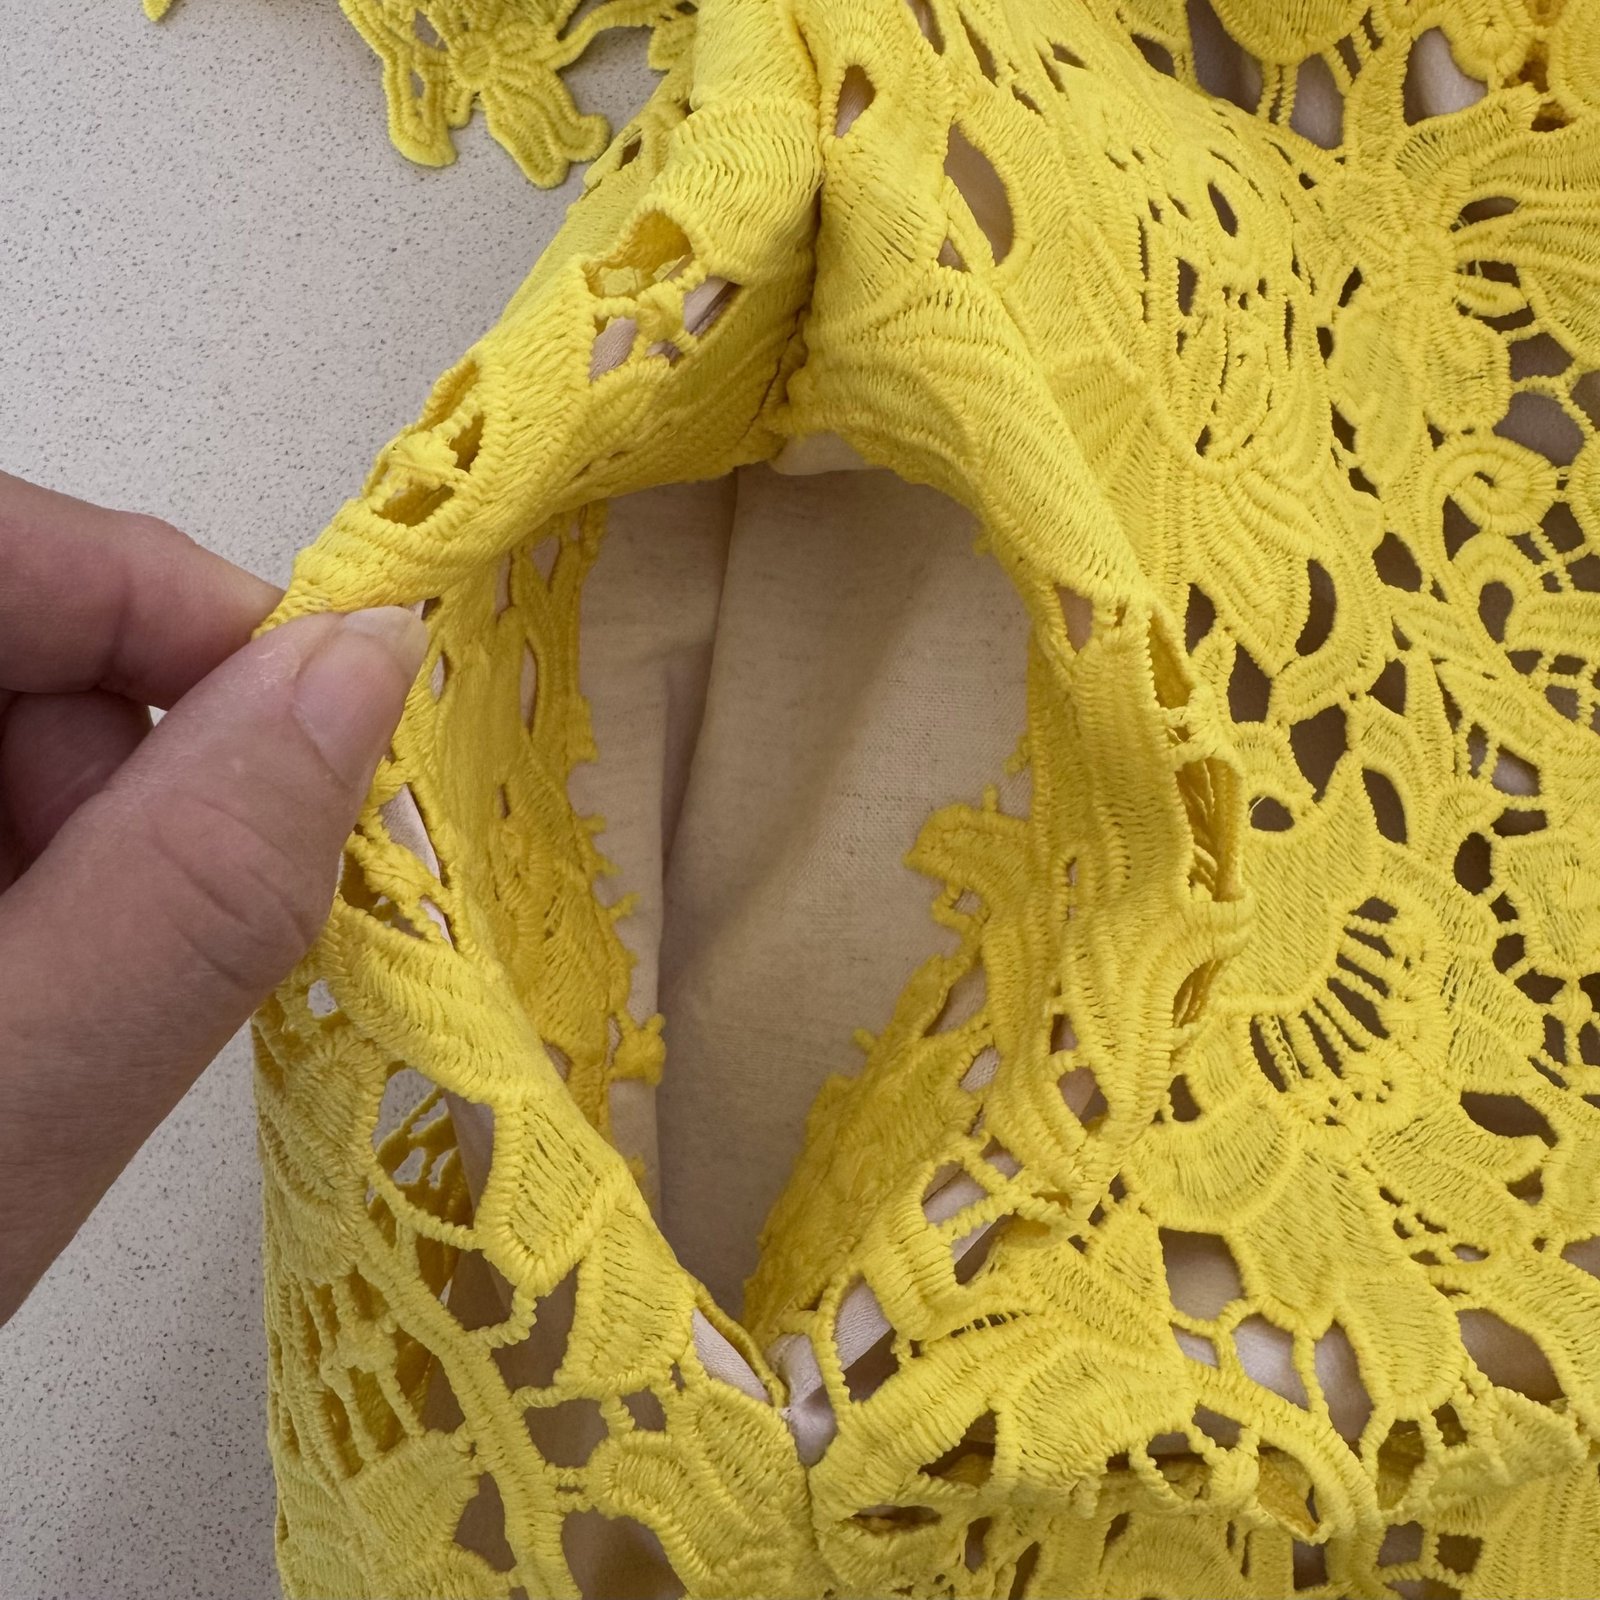
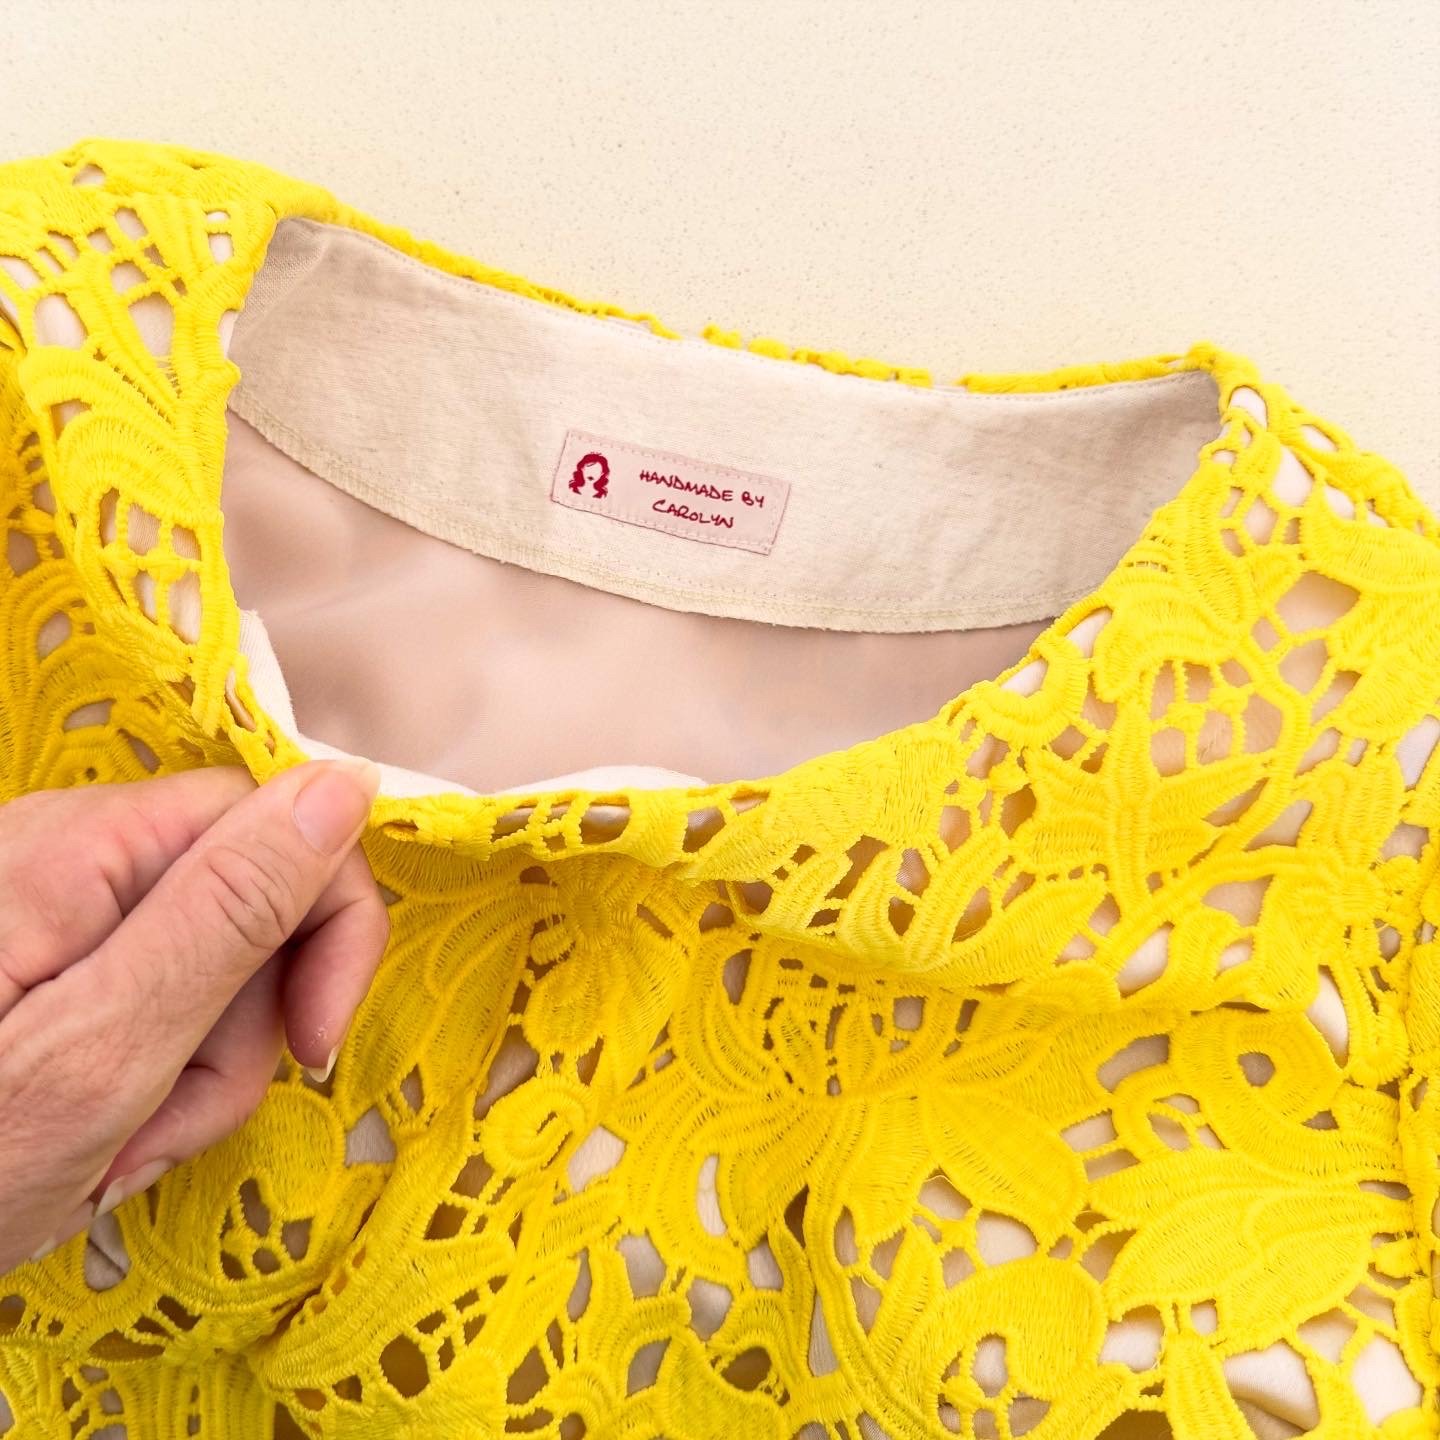
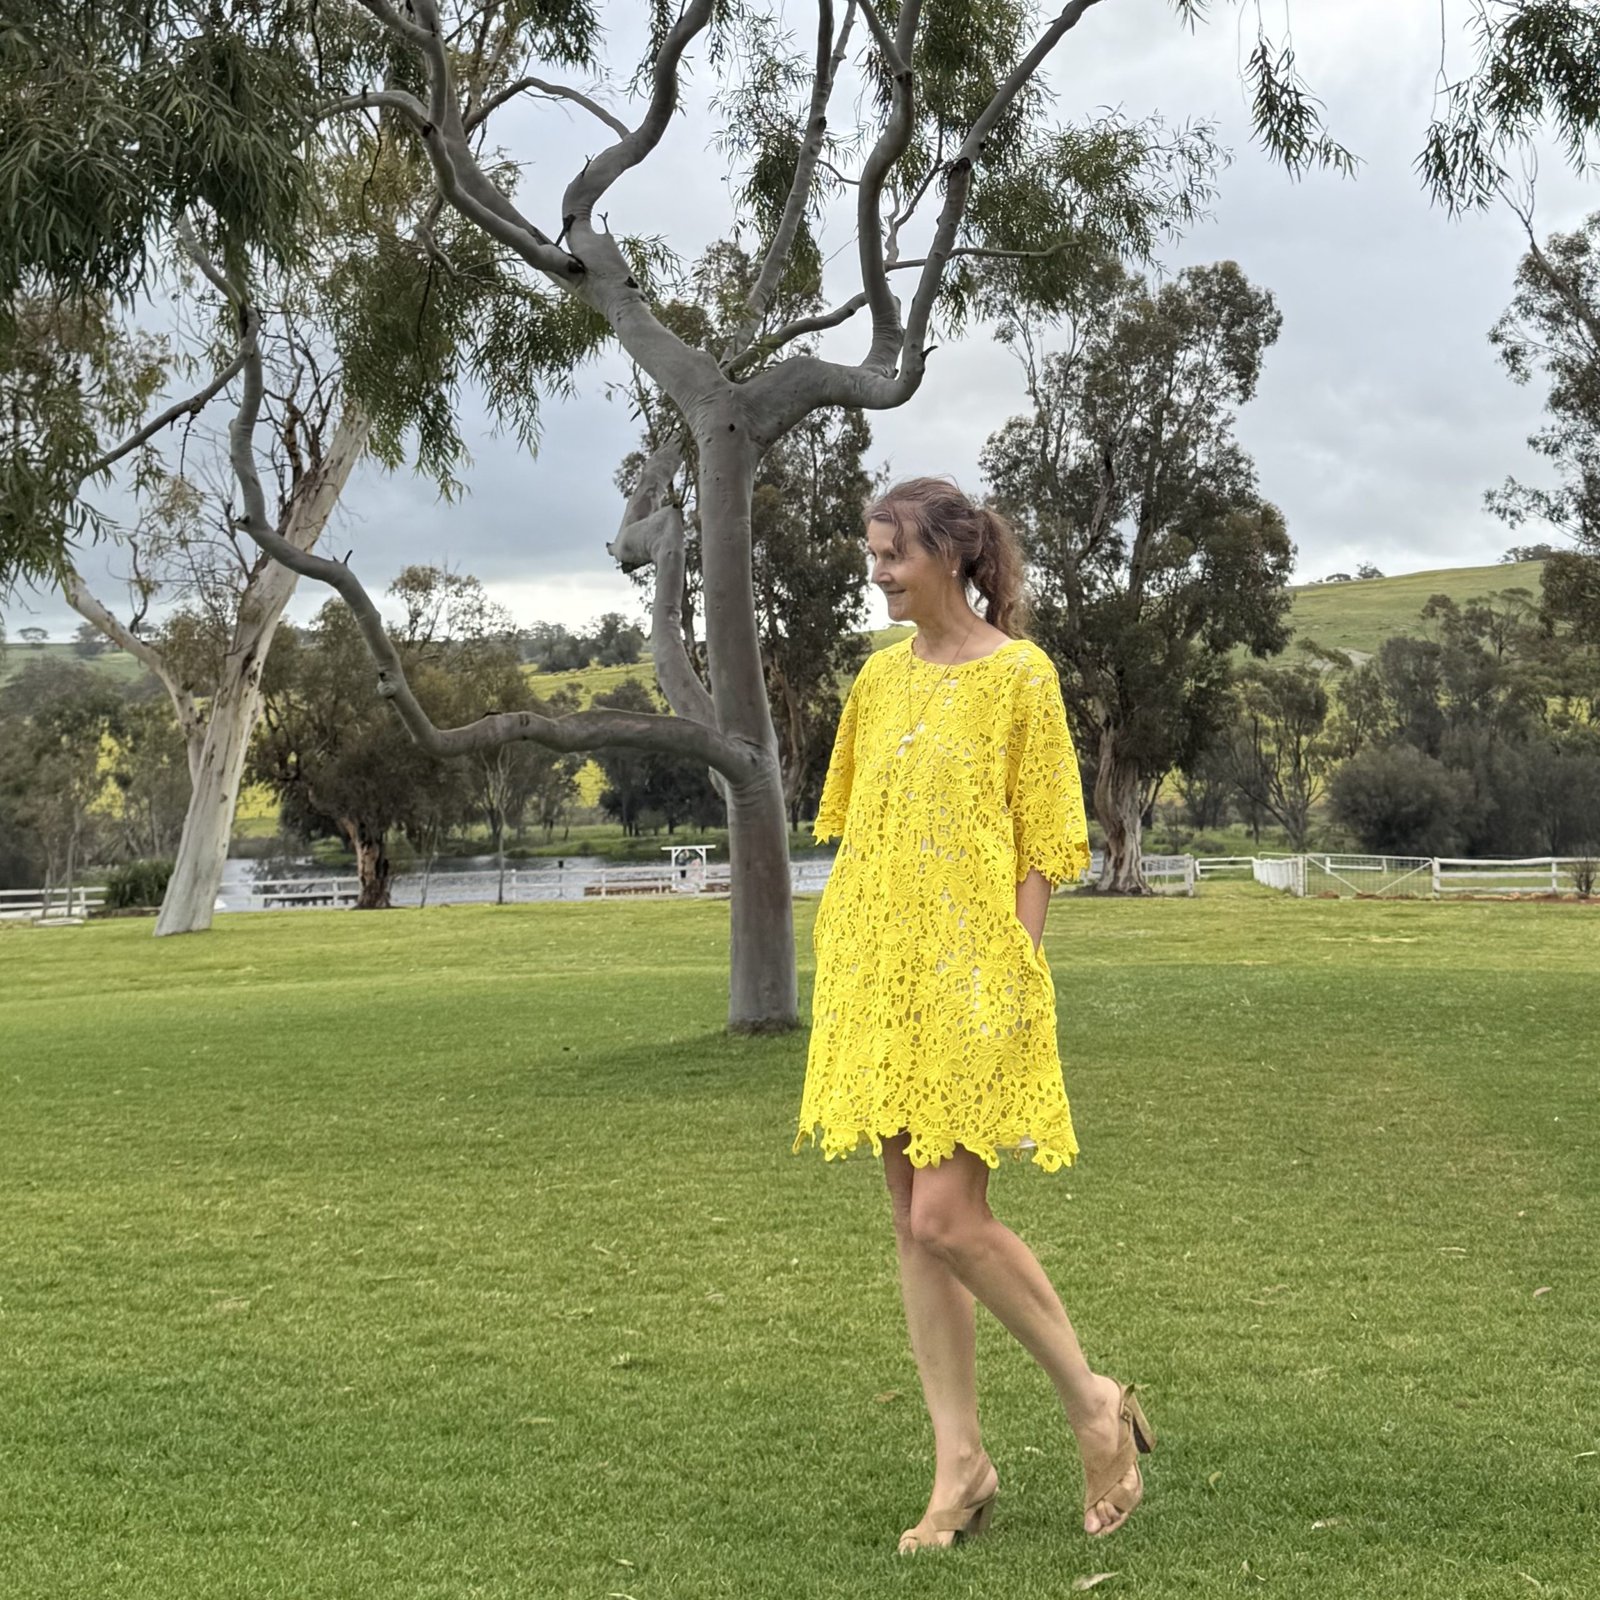
hello!  Recently my lovely niece J married her long-time man and so of course I had to make a new dress for myself for the occasion…  I was vaguely toying with the idea of shopping for fabric before I remembered two things: 1. as everyone in our family knows, J’s favourite colour is famously yellow, and 2.  I have a piece of very yellow, and happily wedding worthy fabric in my stash already!


I bought this neon-bright yellow guipure lace from Mood Fabrics in New York City back in 2019, when I was over there with my friend Yoshimi… we met with other sewing ladies and they took us on a fabulous fabric shopping spree!  Such fun.  I wrote about it on my blog here…  Originally I had envisioned making a little mini skirt from the lace but when the fabric was rolled out on the counter it turned out there was a pretty large chunk of the border cut out, so the salesperson basically threw that part of the fabric in for free.  Meaning, I ended up with a lot longer length than I had needed.  And obviously I couldn’t waste the extra bit by making that little mini, so it sat, awaiting some other project that could make use of it.Et voila!

I used the Closet Core Ceilo pattern with a few small modifications… namely; spicing the back yoke and back pieces together to eliminate that seam, including inseam pockets in the side seams,  and I also cut it to be a bit more flared.  Oh, and I also traced a size up  – or maybe two? can’t remember now – for that fashionable oversized look.  The hemline, which is of course the natural border of the lace, was determined by how much length I could get, and I also managed to get the sleeves on a border.  It only took a little bit of pattern Tetris but I’m thrilled that I achieved what is one of my primary aims with any sewing project, which is to have minimal leftovers!

My dress is underlined completely with a pinkish/coffee coloured silk chartreuse that I bought from Fabulous Fabrics originally.  I basted the lace and silk layers together within the seam allowance all around except for the side seams below the pockets, and then overlocked the edges before continuing to treat the two layers as one.  The side seams below the pockets I stitched the layers separately and actually the lace is arranged so there’s not a “seam” in this part, but the lace motifs are arranged and hand stitched carefully so you can’t see a seam here.

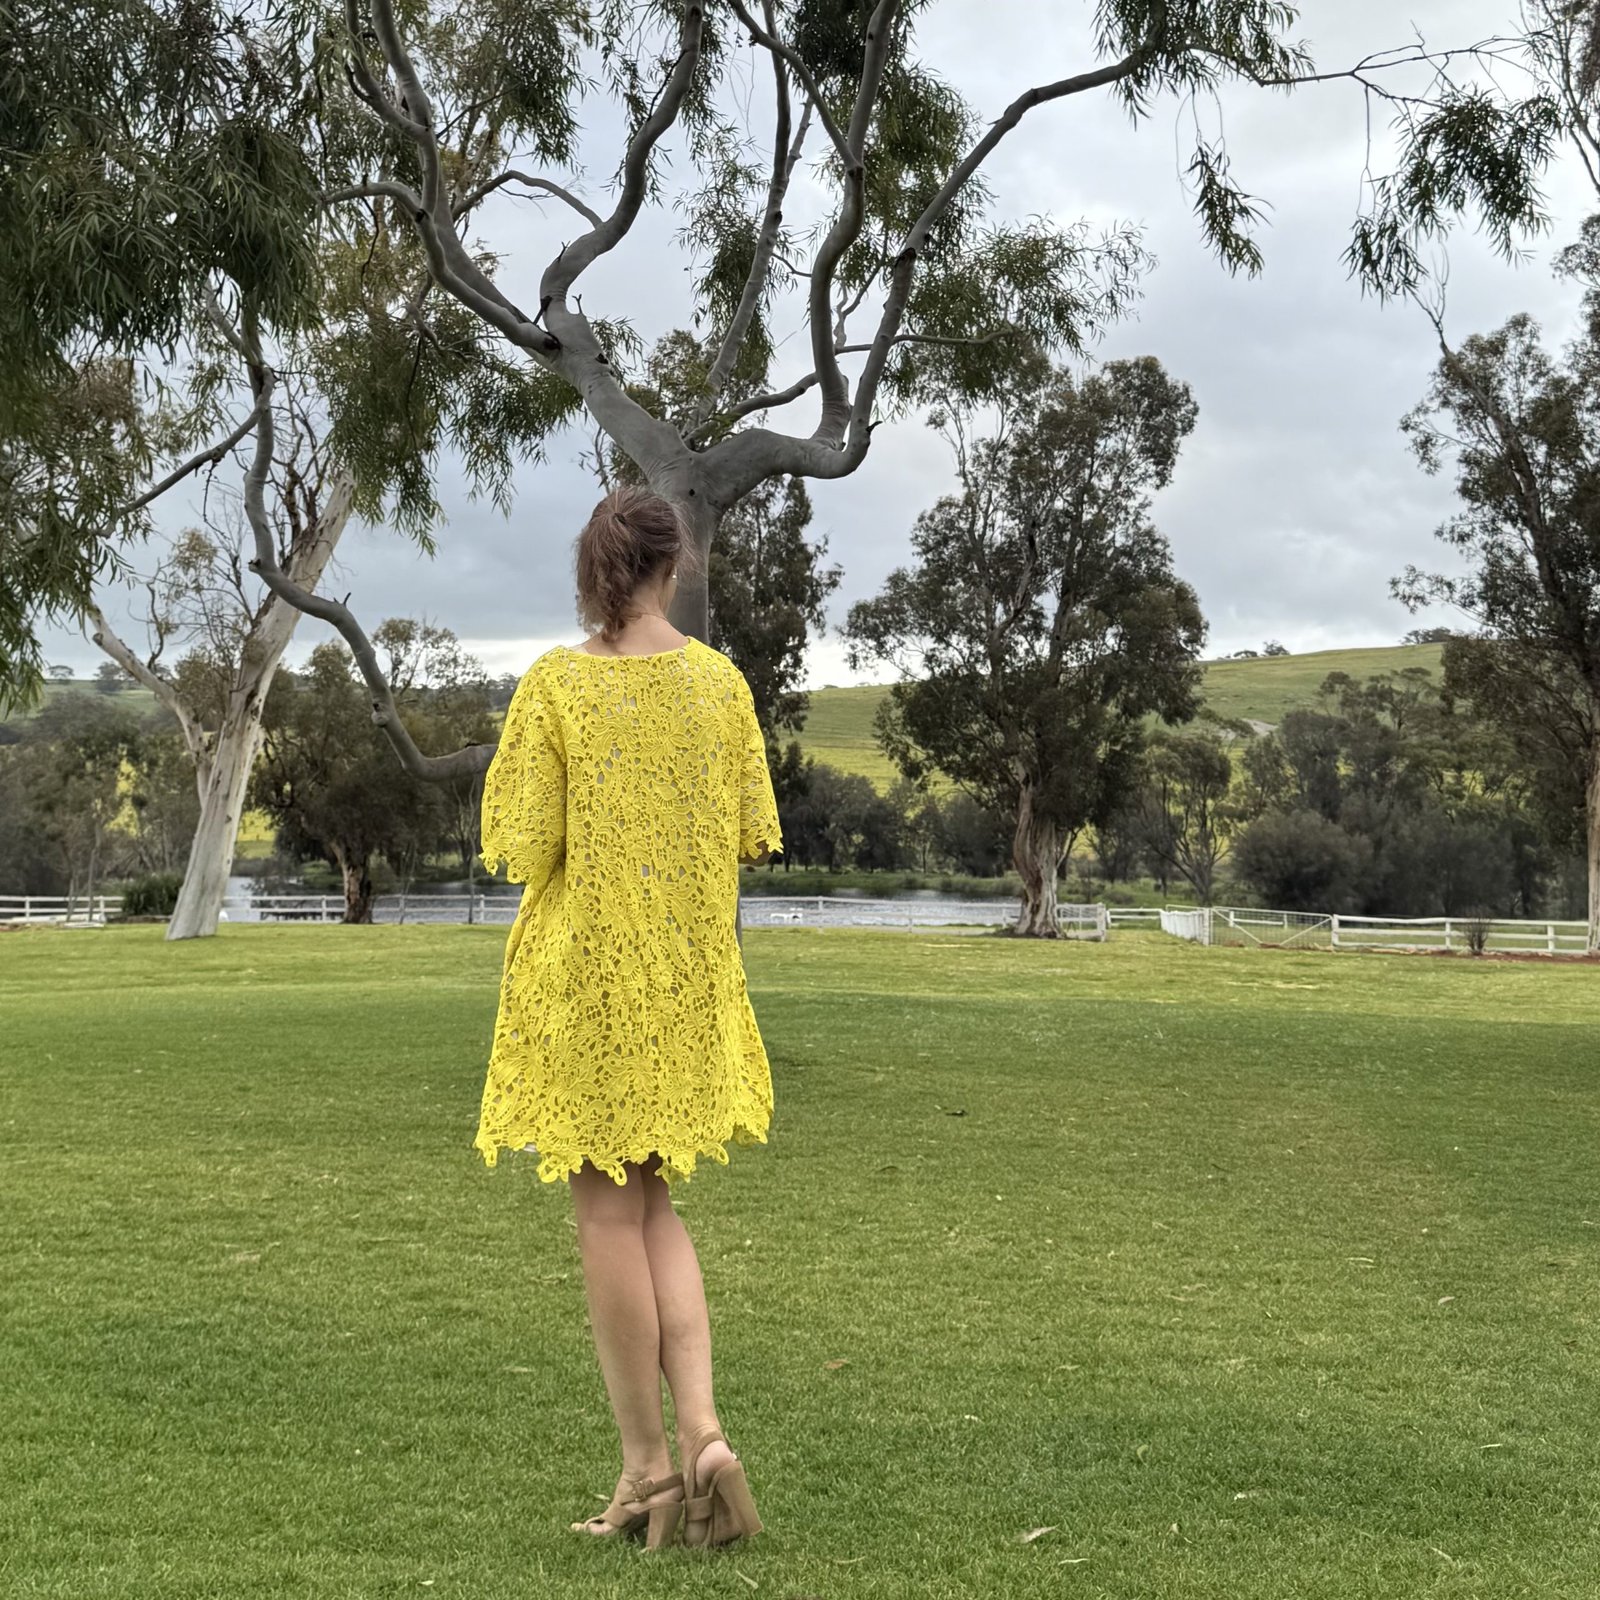
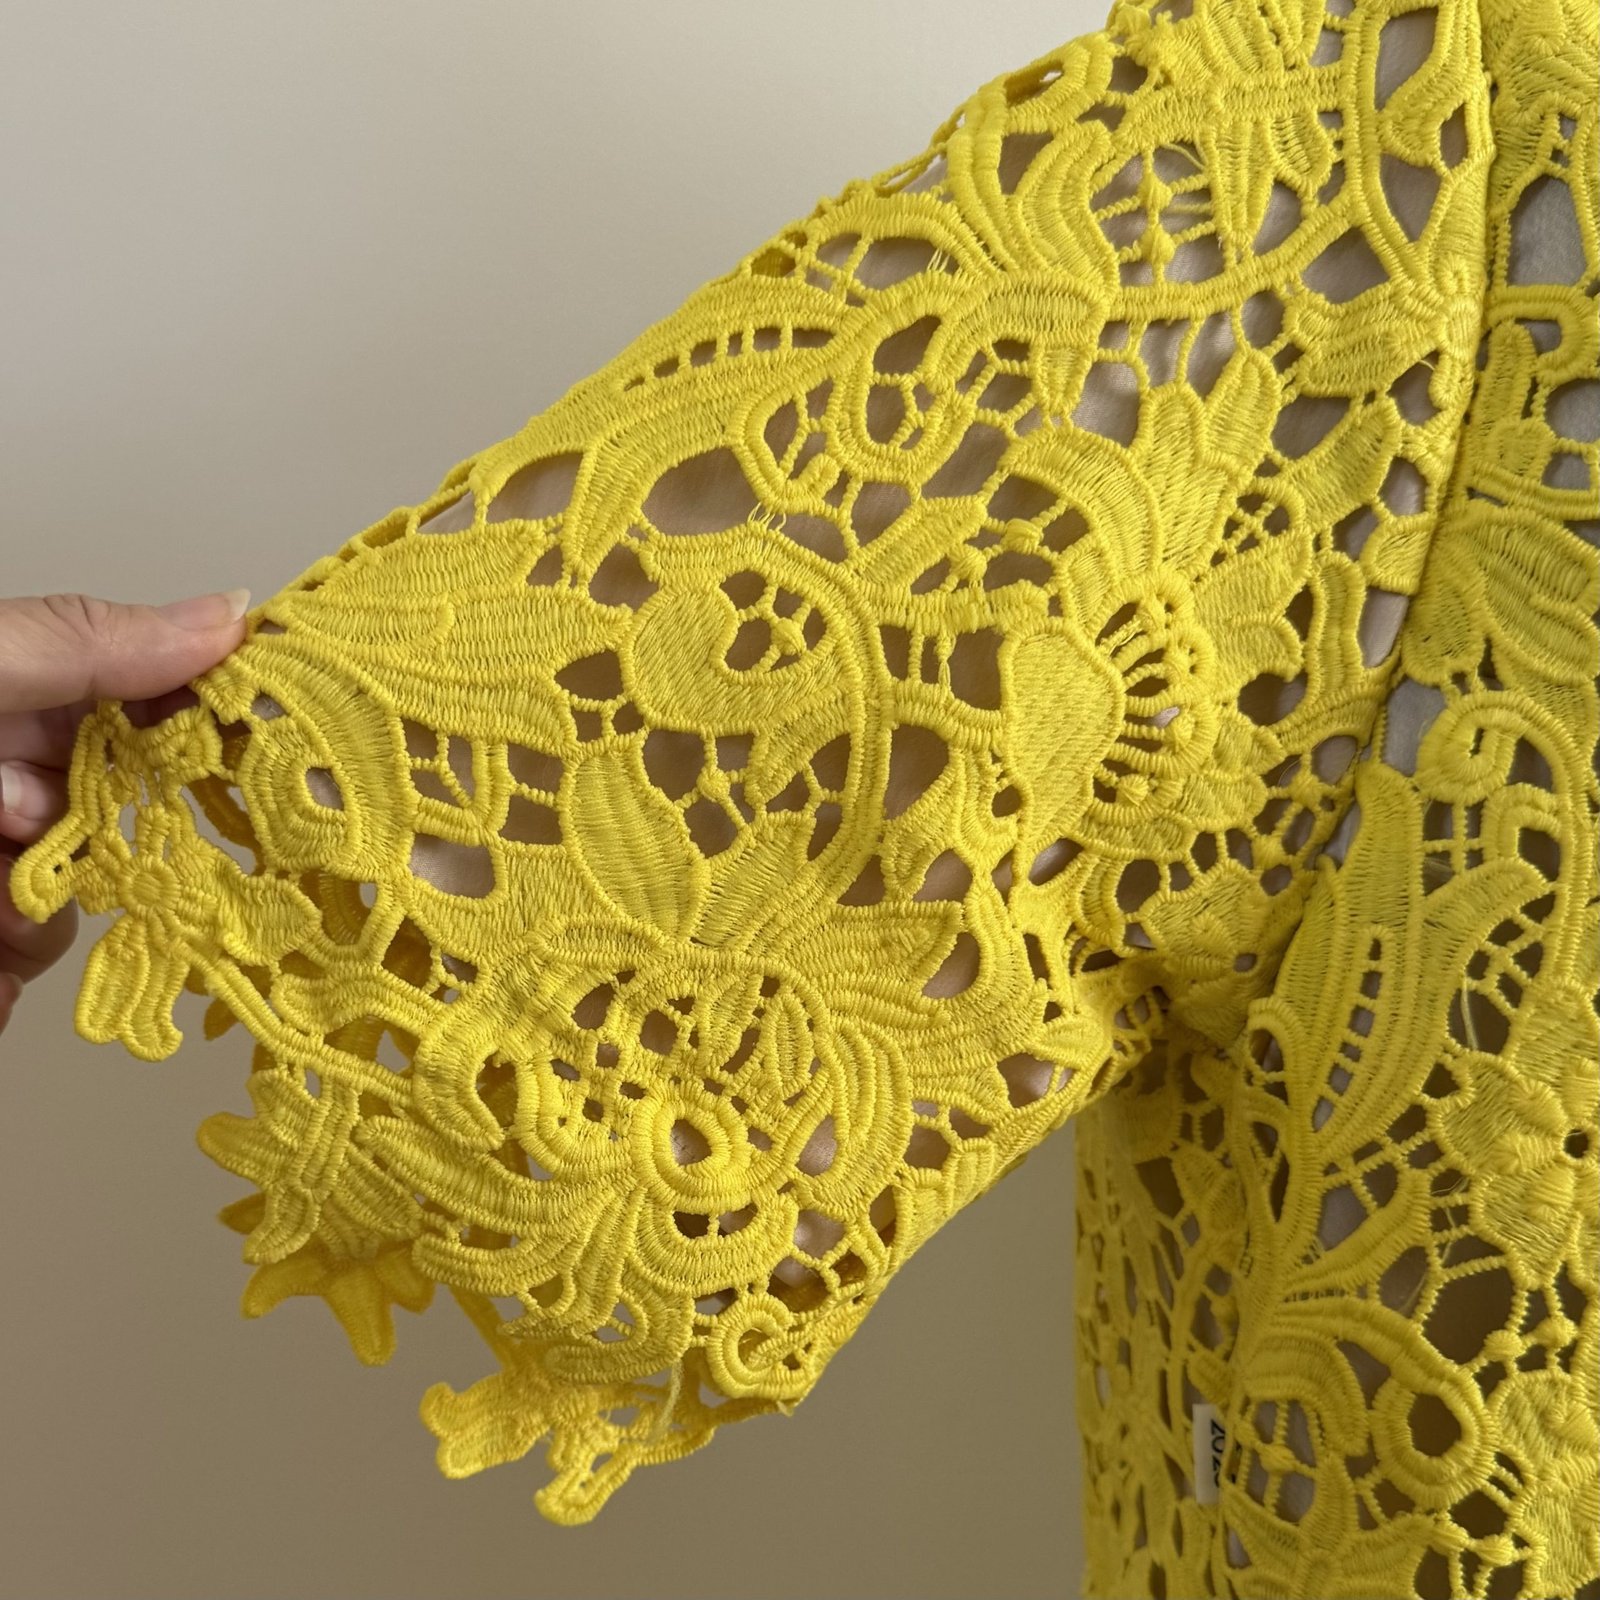
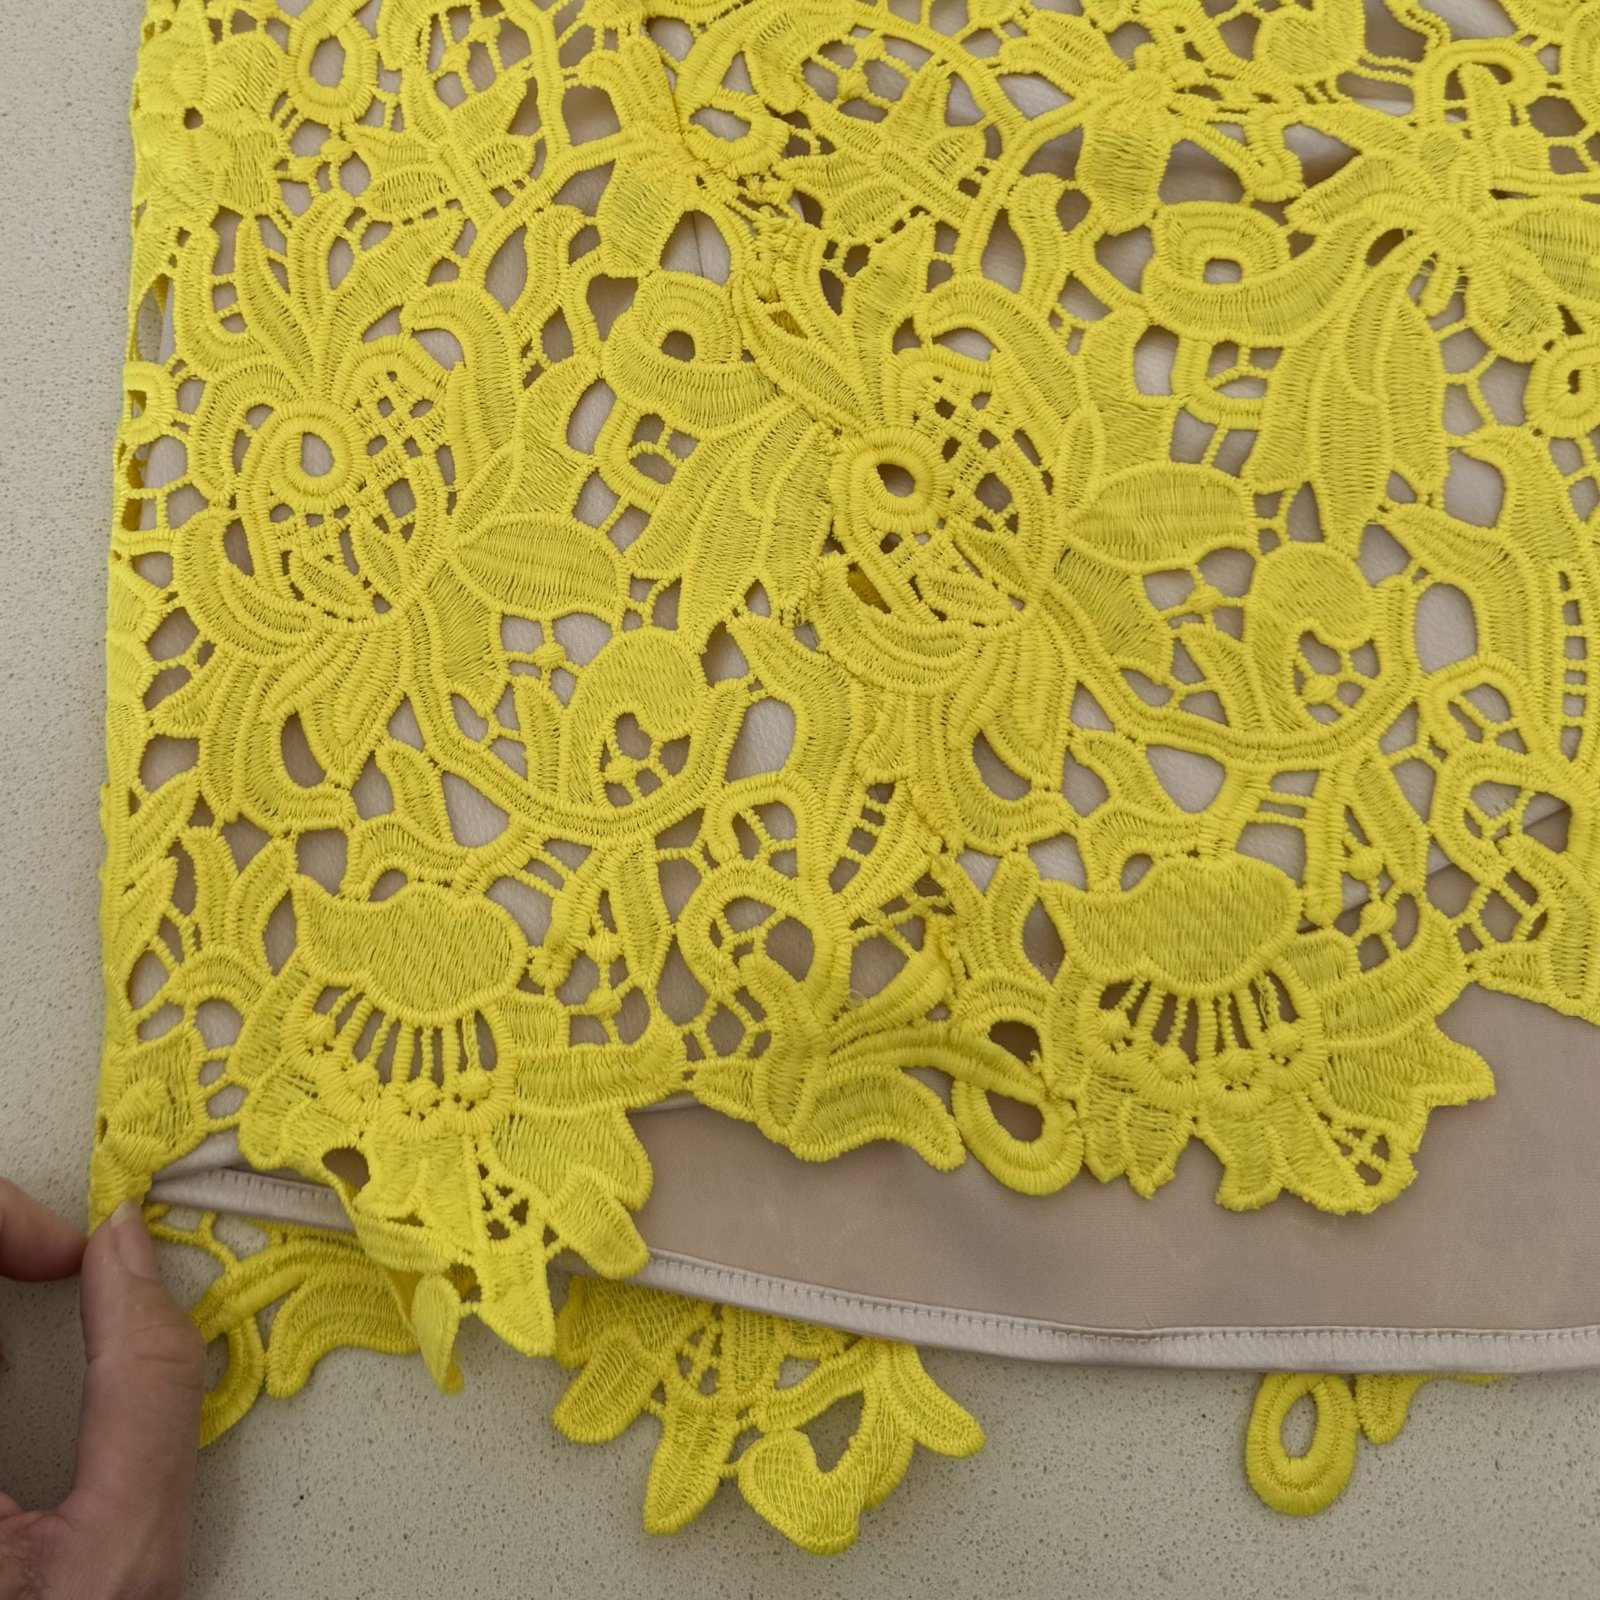
I cut the pockets and neckline facings from a natural cotton linen that I’ve had in the stash for years, saved specifically for this same sort of purpose.

I chose this because the silk charmeuse wasn’t going to be stable enough in these areas – actually the lace is very heavy, far heavier than it looks!  I cut the lace front and back to have side seam extensions along the pocket area and stitched it down carefully to the pockets inside.  So, when you’re wearing the dress the lace appears to go all the way inside the pockets, no flash of offensive beige to be seen, so it looks really nice.

The seams allowances around the neckline, especially the shoulder seam area here are seriously bulky, and I trimmed, clipped and understitched aggressively to get everything to sit nice and flat!  I also went back later and stitched the facing to the silk underlining as far around and as close as I could get to the shoulder seams.

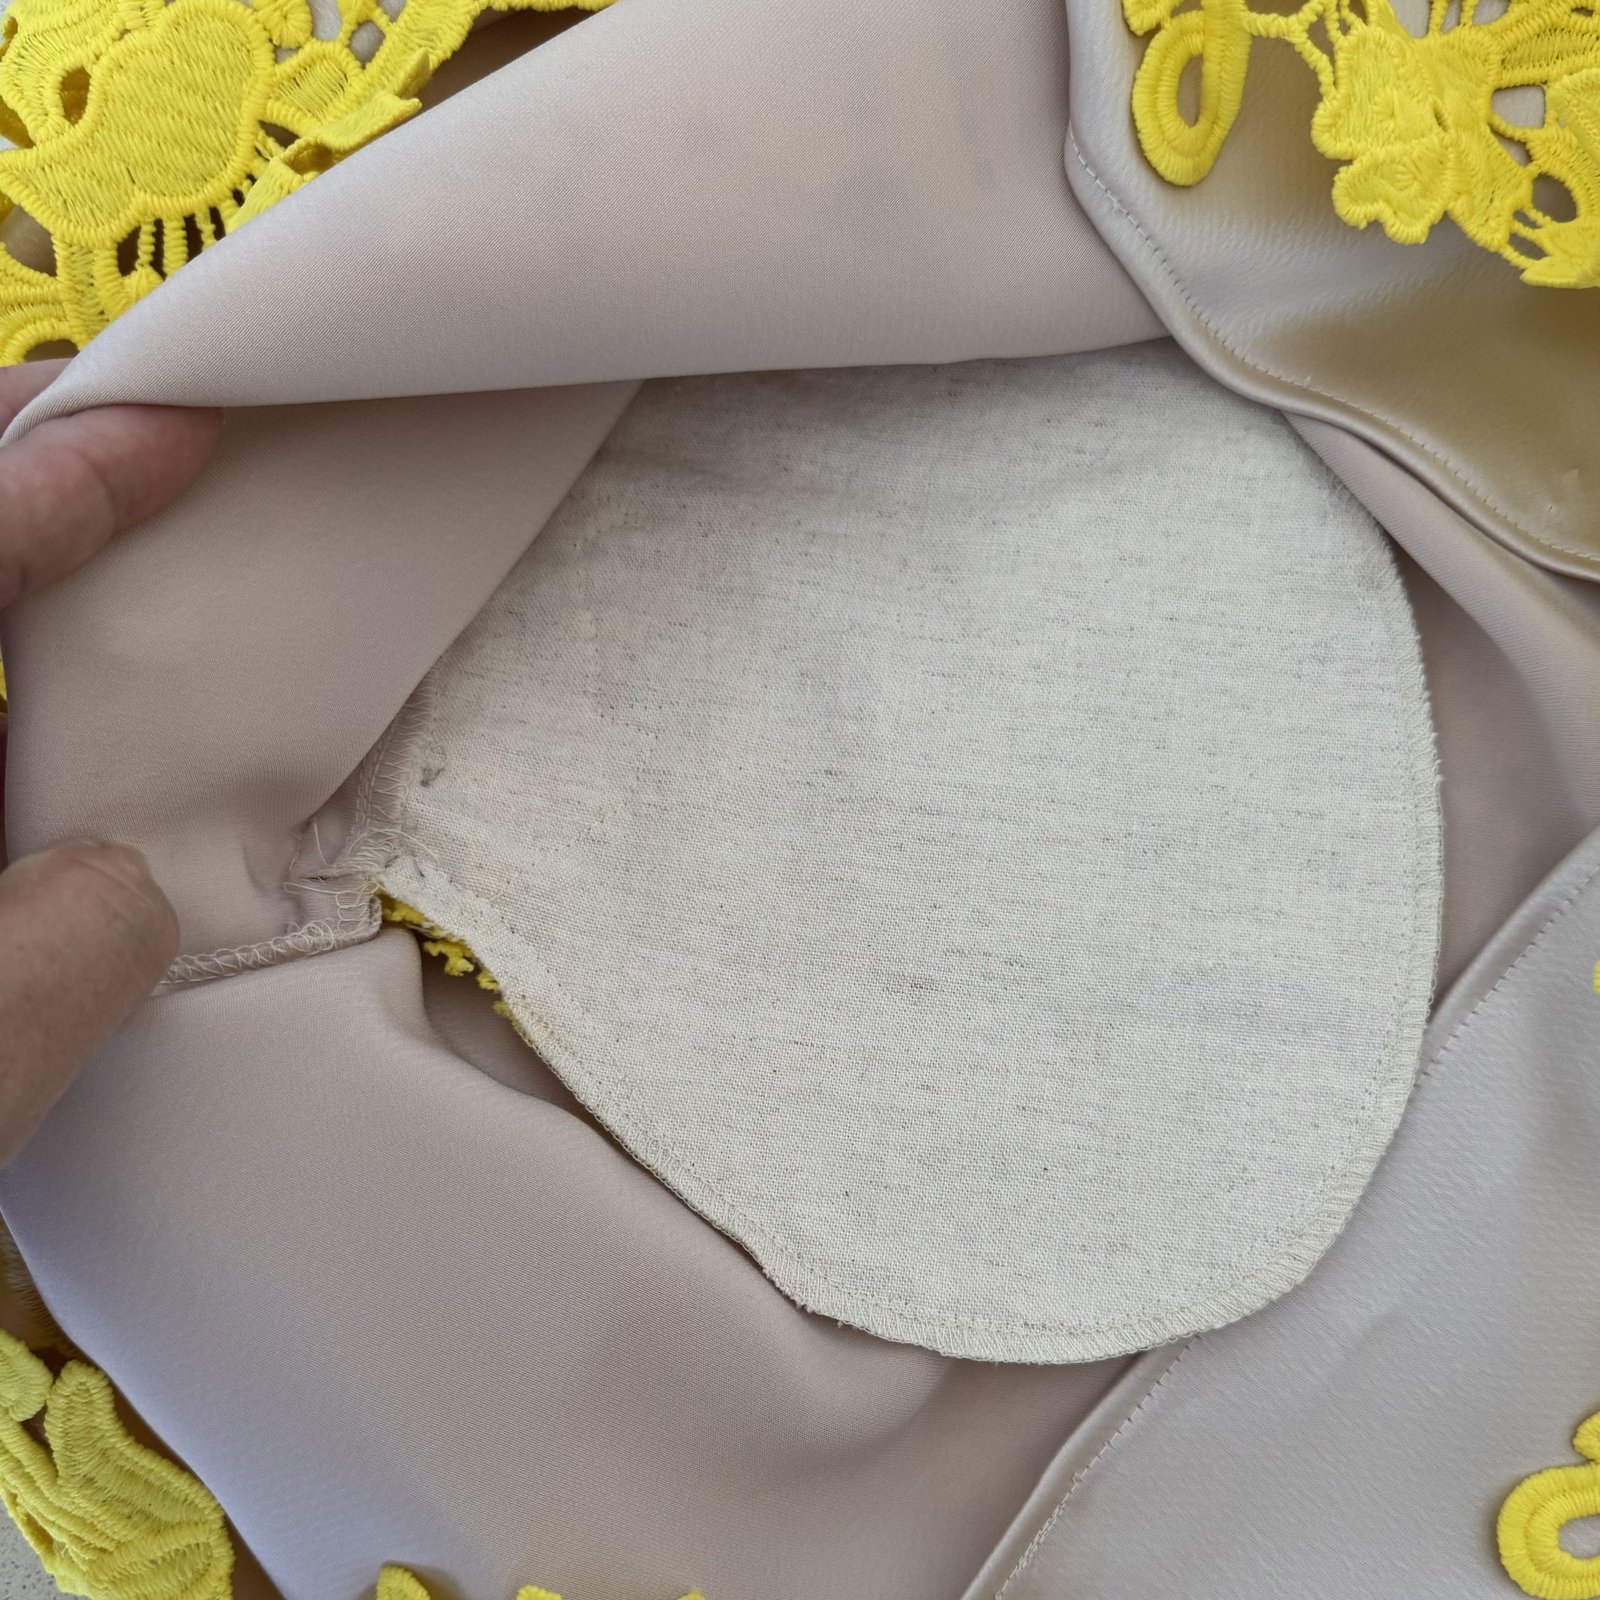
I’m including a picture of the happy couple because, although I did not make the dress, I did alter it to fit her and also did some minor repairs.  This took three separate fittings and I took precisely zero photos of the process or anything.  My only excuse is that I was also working on my own dress and stressing a little bit that I wasn’t going to get it all done on time.

Thanks to its oversized and loose nature, my dress was so comfy to wear and to dance in, and I was so happy about that!  and just saying, I only wore these high heeled sandals for the ceremony and photos.  For the reception on the same property I went to our car and switched over to my white sandshoes with little socks, brought for this very purpose.  Much warmer, and fabulously comfortable for dancing!  I also wore my new pink wool Sienna jacket for the cooler temperatures that came as evening fell too, but no pictures of that I’m afraid. Anyway, I hope I can get more use our of this dress, which actually turned out more lovely than I thought.  🙂

pinterestmail

winter white Dyron hoodie

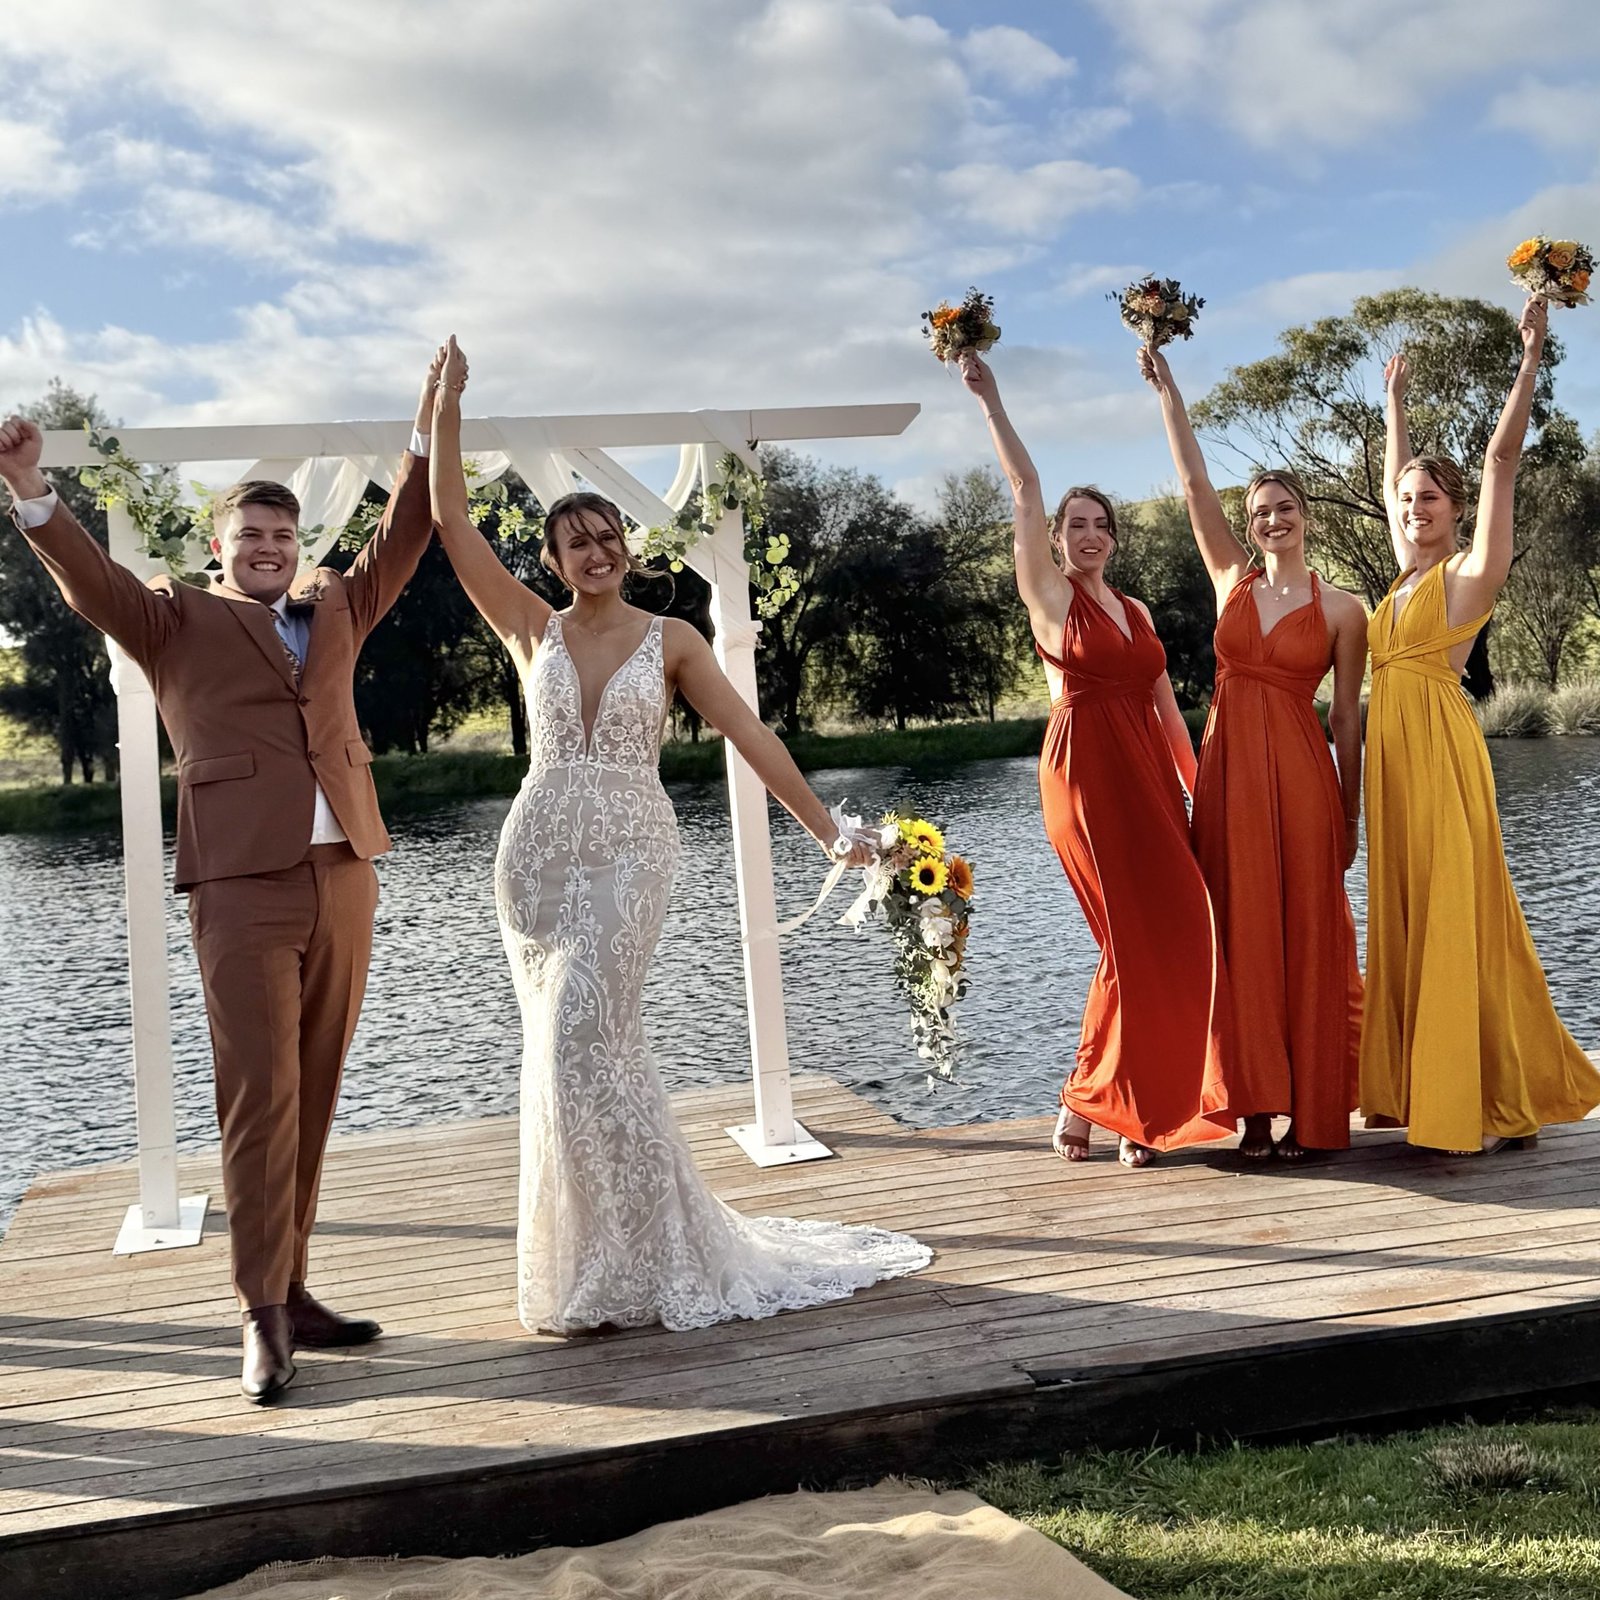
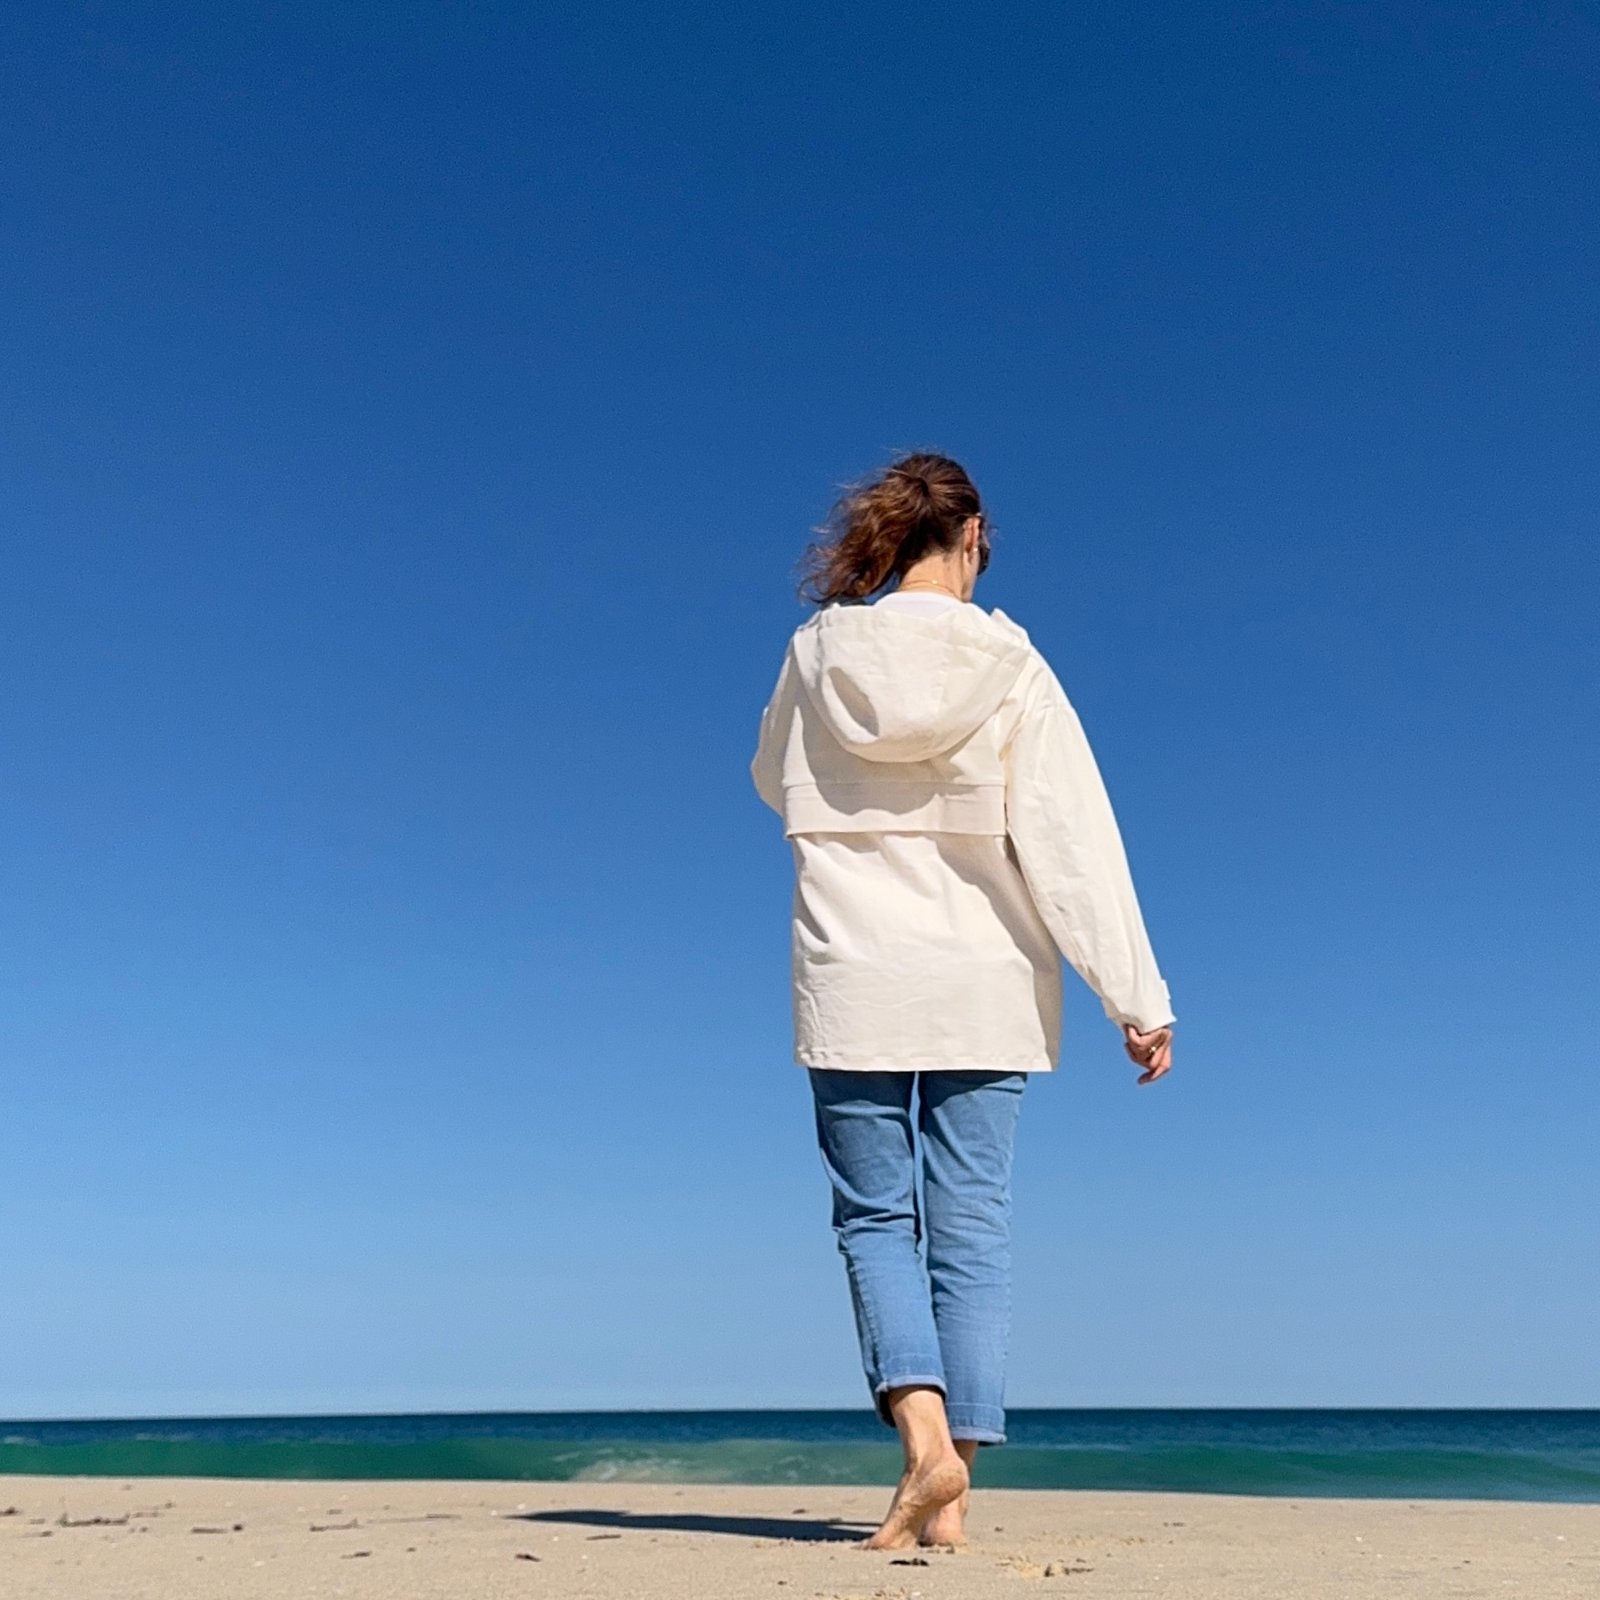
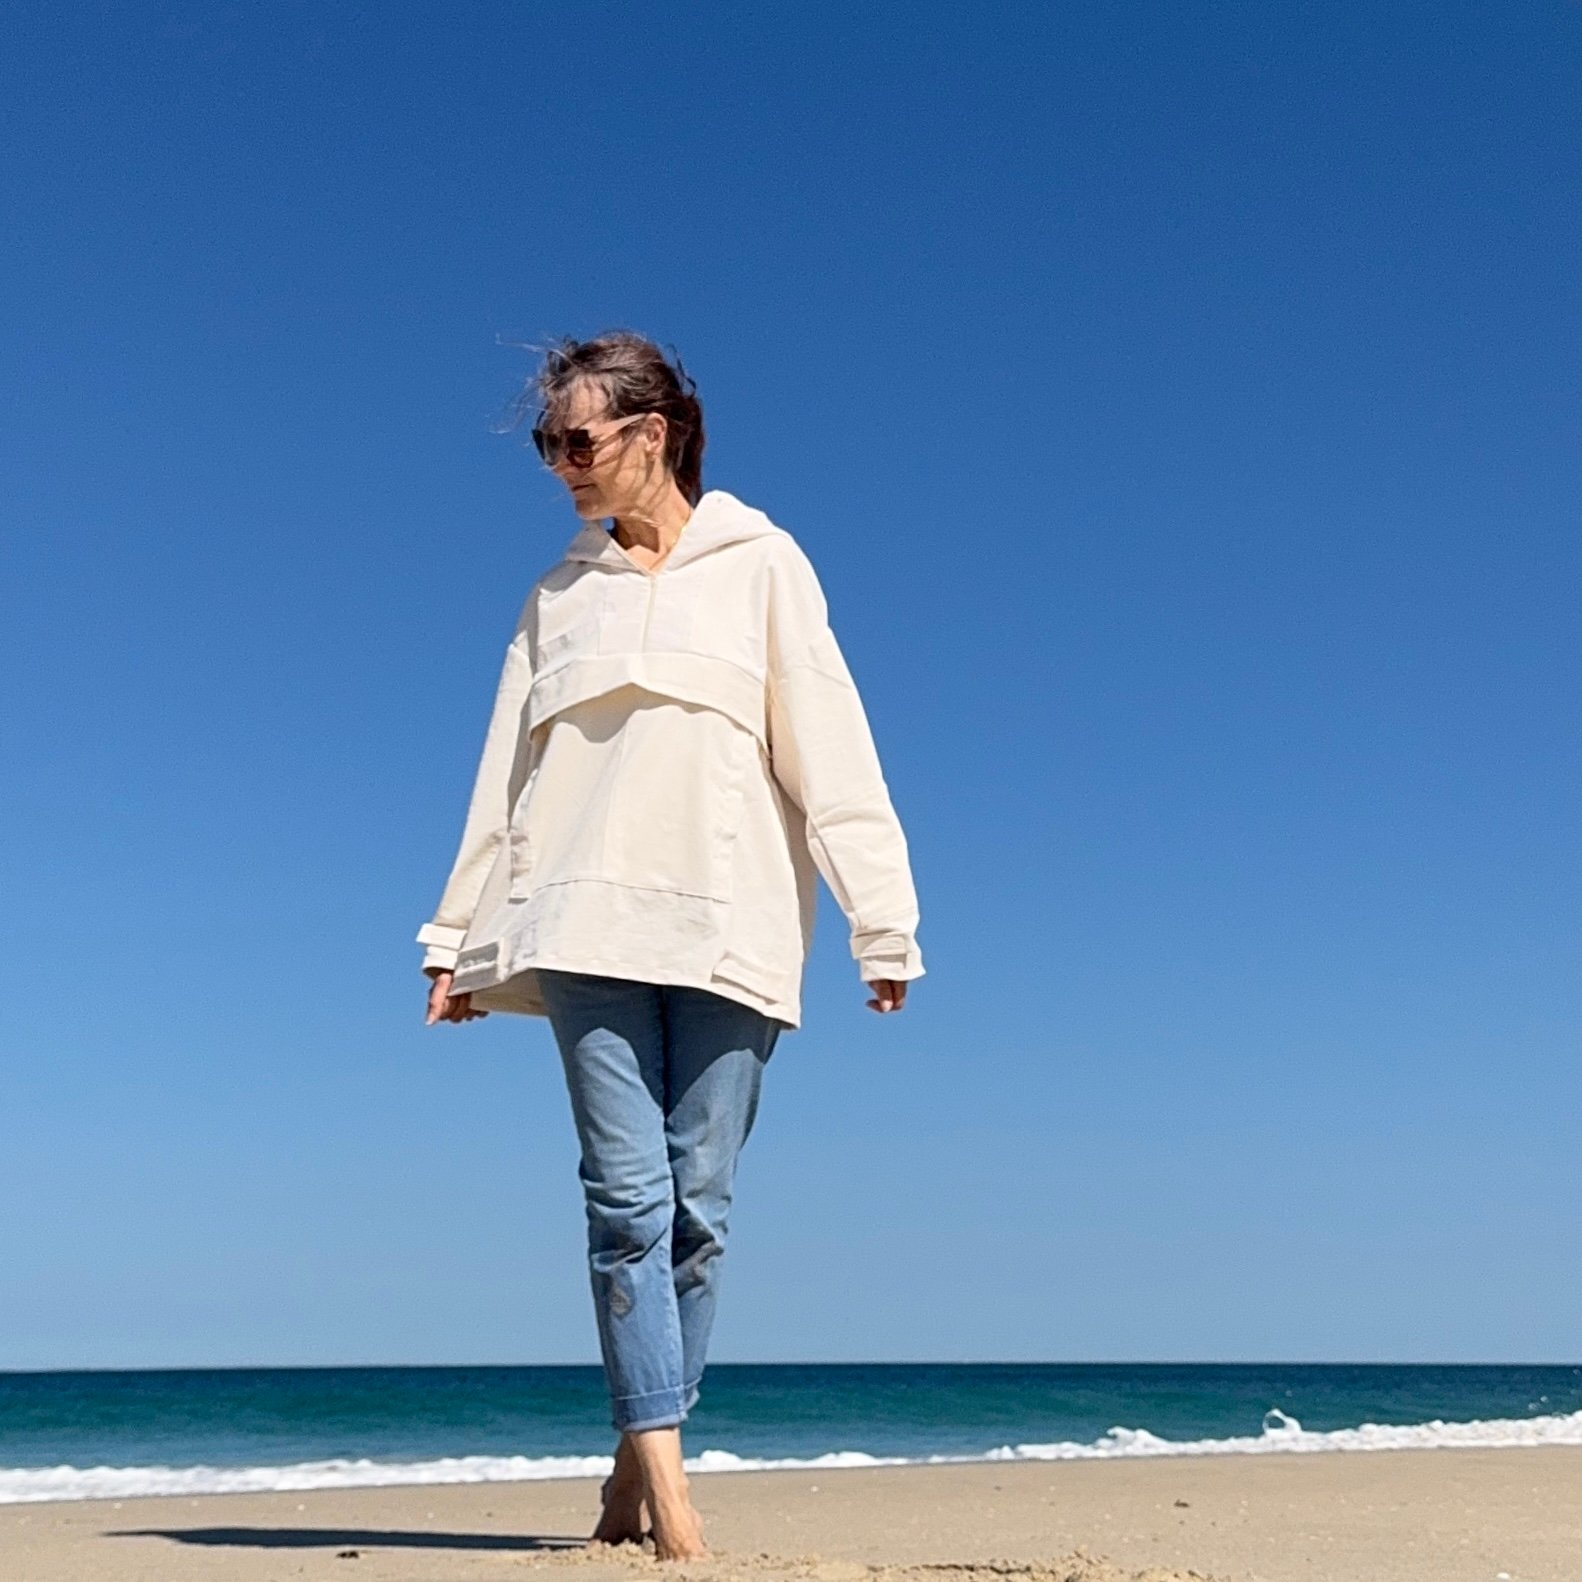
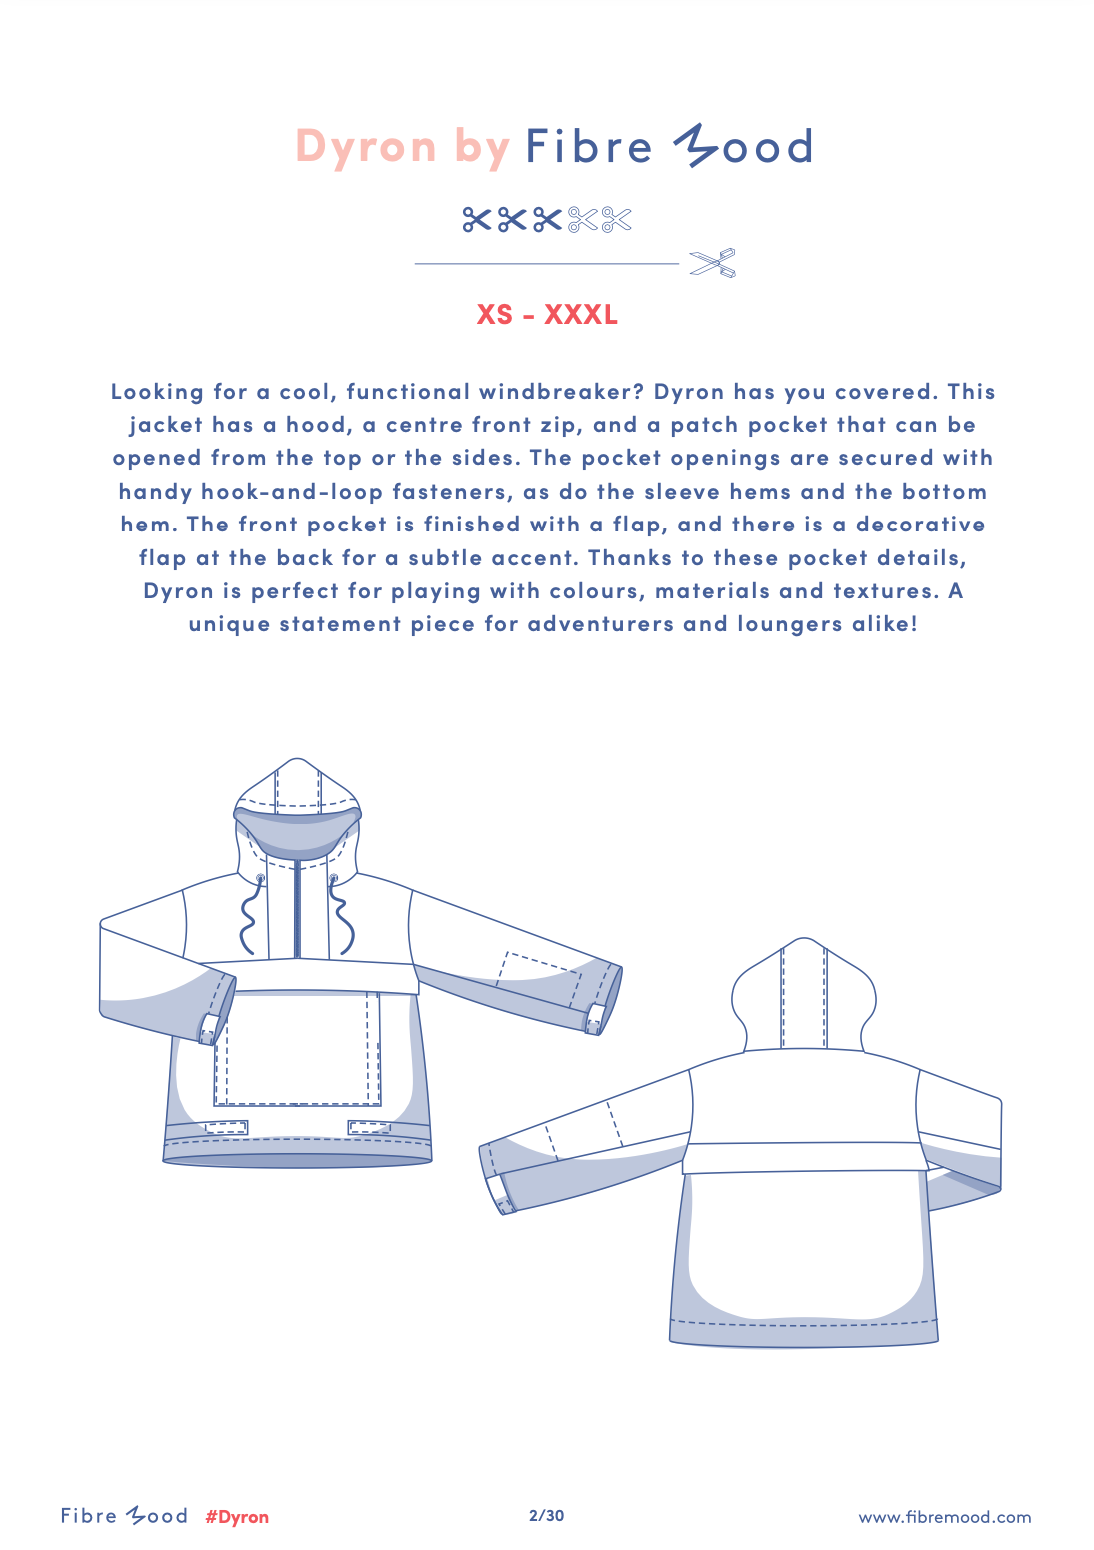
Hello!  I’ve made a new hoodie for myself, and think it’s rather beautiful if I say so myself.  Many years ago, when I started this blog, I would sometimes berate myself for being scared of wearing colourful clothing.  I tried to break away from making too many white things.  I think I’ve succeeded in training myself to wear more colourful clothing, but actually my love for plain white things, or really, ivory things, hasn’t gone away.  I still have quite a lot of cream, white or ivory fabrics in the stash!  When the new Fibremood Dyron hoodie pattern landed in my inbox I got out some of my hoodie-weight fabrics and found I had enough of this lovely winter-white corduroy to cut out the hoodie.  I’ve been hoarding this corduroy for a looooooooooong time so it feels really good to enjoy it, at last!

I made a size small, haha.  Yes, it’s huge.

To be fair, the blurb does state that it’s deliberately styled as oversized, but still…   I really love this design actually.  I had an ivory zip in my stash already, fortunately, so I didn’t need to buy anything new to make the hoodie.  As well as a zip, you needed velcro tape, which is the closure for both pockets, and is also on the sleeve tabs and hip/waist tabs.  I only had black velcro, which worried me a little for a while.  But it shouldn’t have.  In the end I decided the black looked absolutely fine.

Speaking of those hip/waist tabs, to be completely honest they really are completely unnecessary, and are just a nuisance.  In the end I unpicked the velcro tape and just stitched them permanently down.


This shows the front pocket with once of its side velcro closures.  Inexplicably, this pocket also has a top opening with velcro closure too.  This is kind of inaccessibly tucked right up underneath the “flap” so I don’t even really understand why it’s there.

The hood is lined with a matching cream coloured lightweight cotton, when I realised a double layer of corduroy was going to make the hood too heavy and stiff.

This is a rather clever sleeve pocket in the left sleeve.  It’s inserted in one of the sleeve seams, and also has a velcro closure.  I’m not sure what you’d use it for but it is big enough for a phone.  So I guess that could come in handy.

Wearing it here with my really old, but favourite, Closet Core patterns Sasha trousers.  I’ve been saying for ages I need to replace these, and the good news is that I have finally taken steps to make this happen.  Stay tuned!


pinterestmail

Acacia skirts

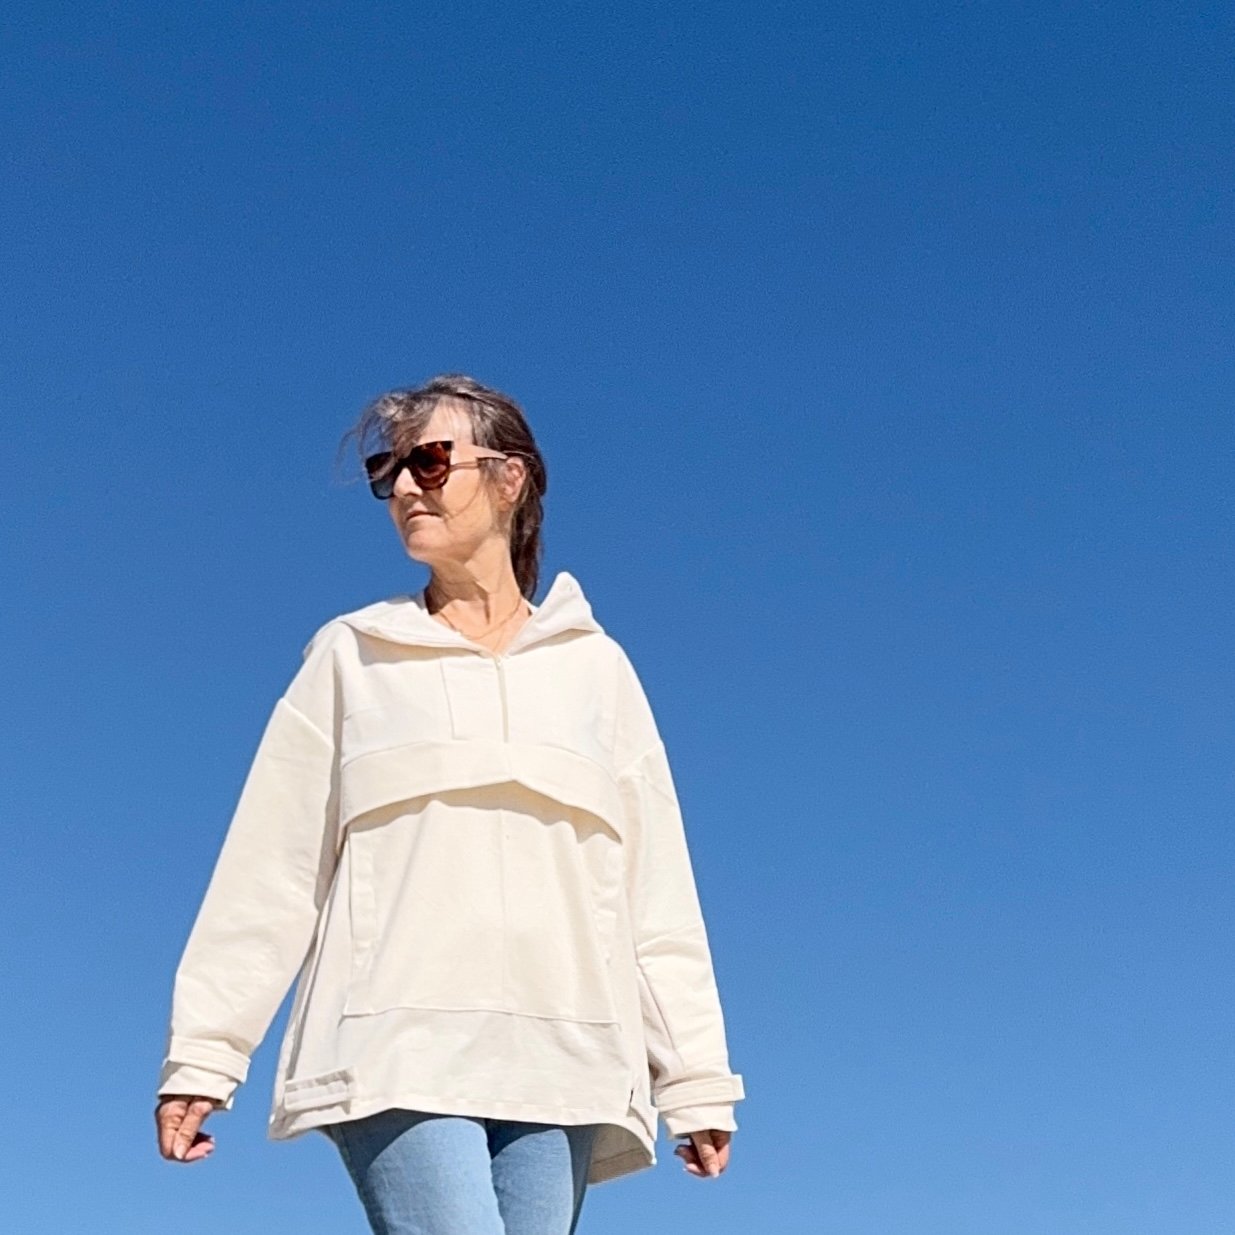
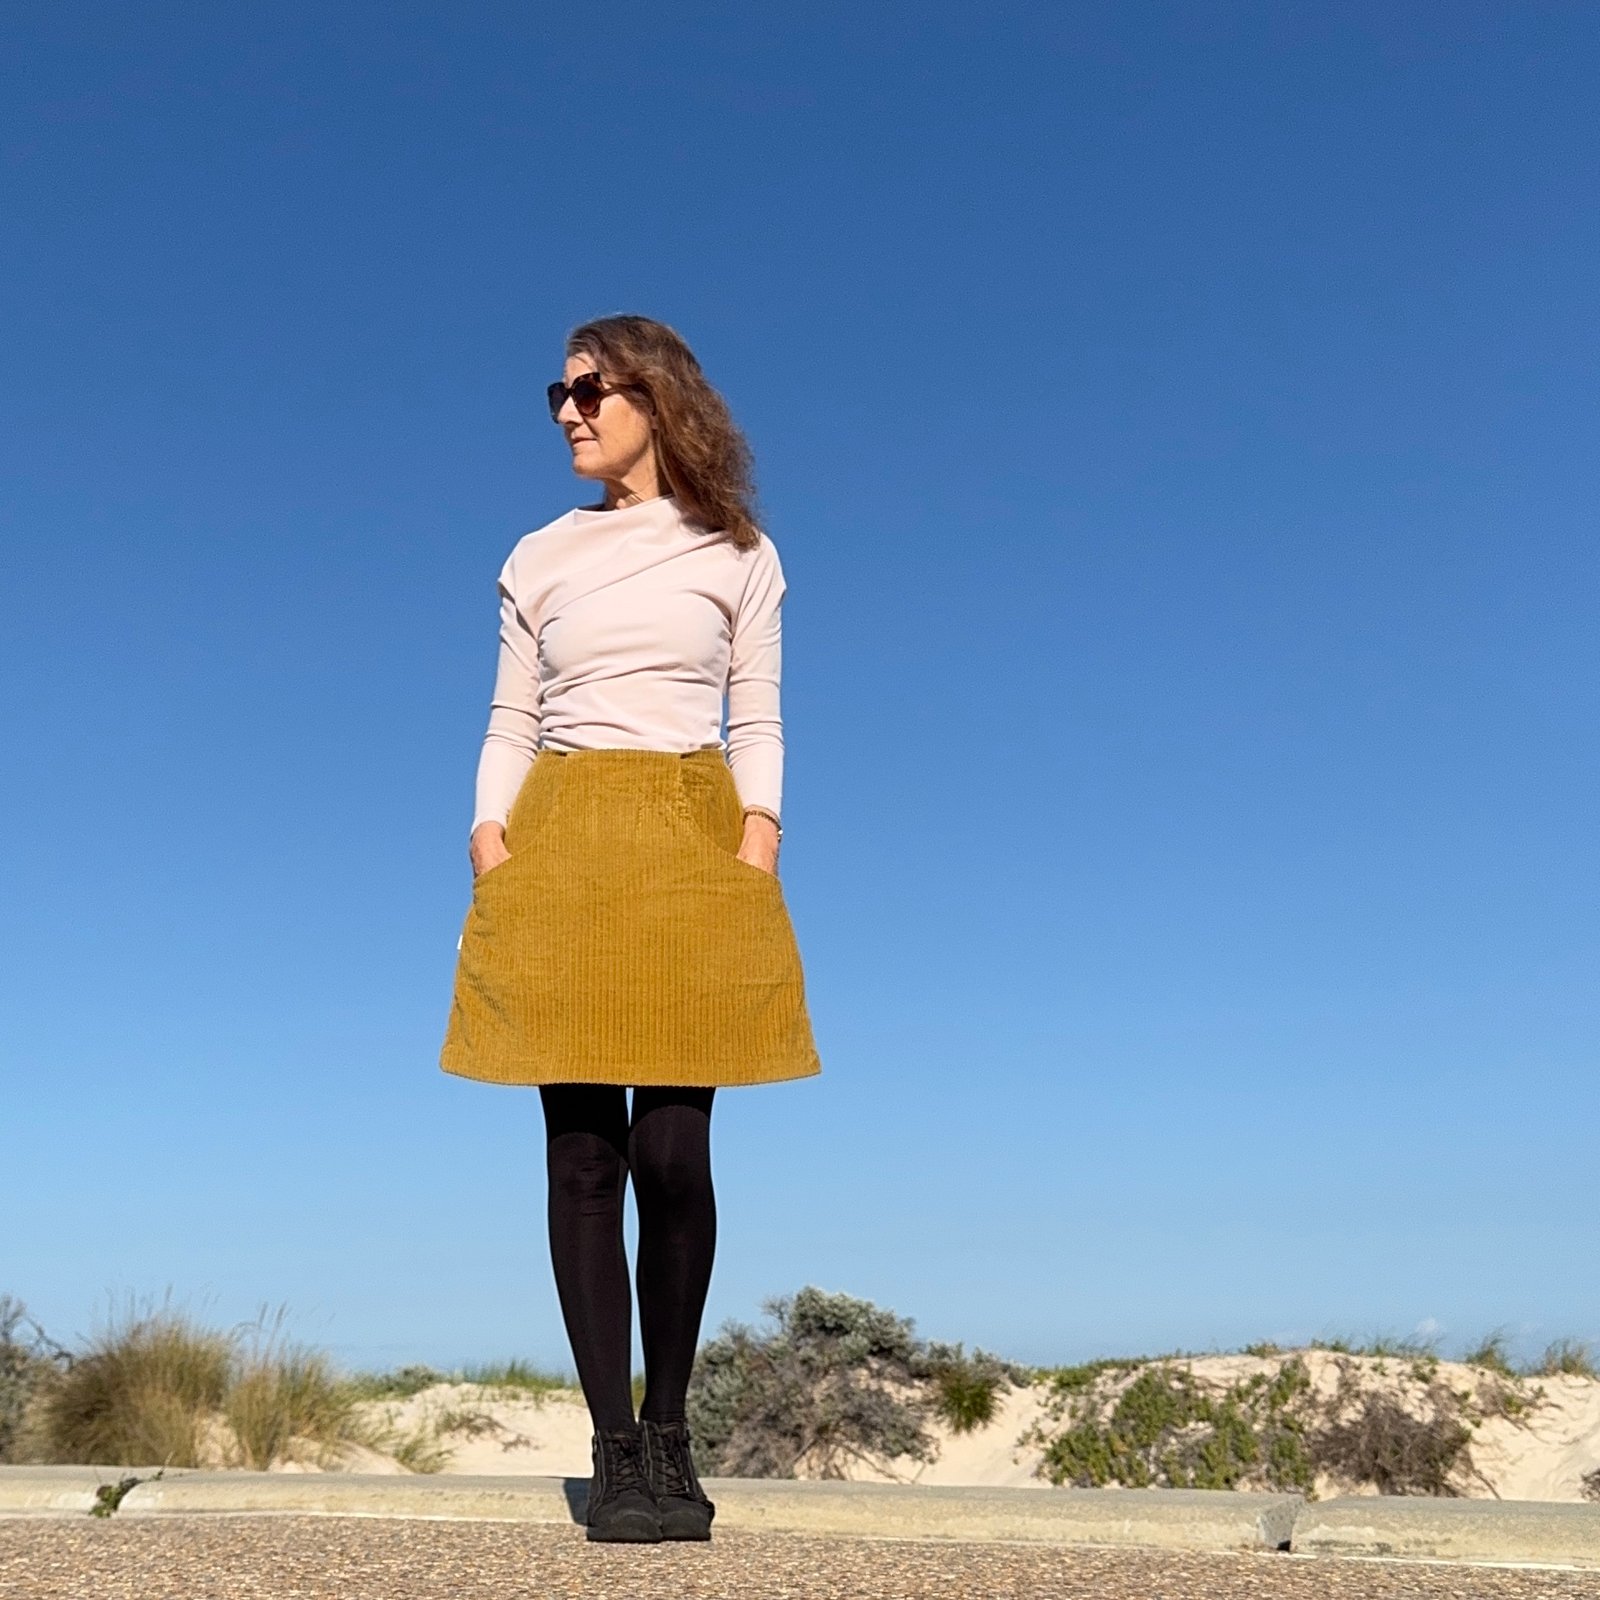
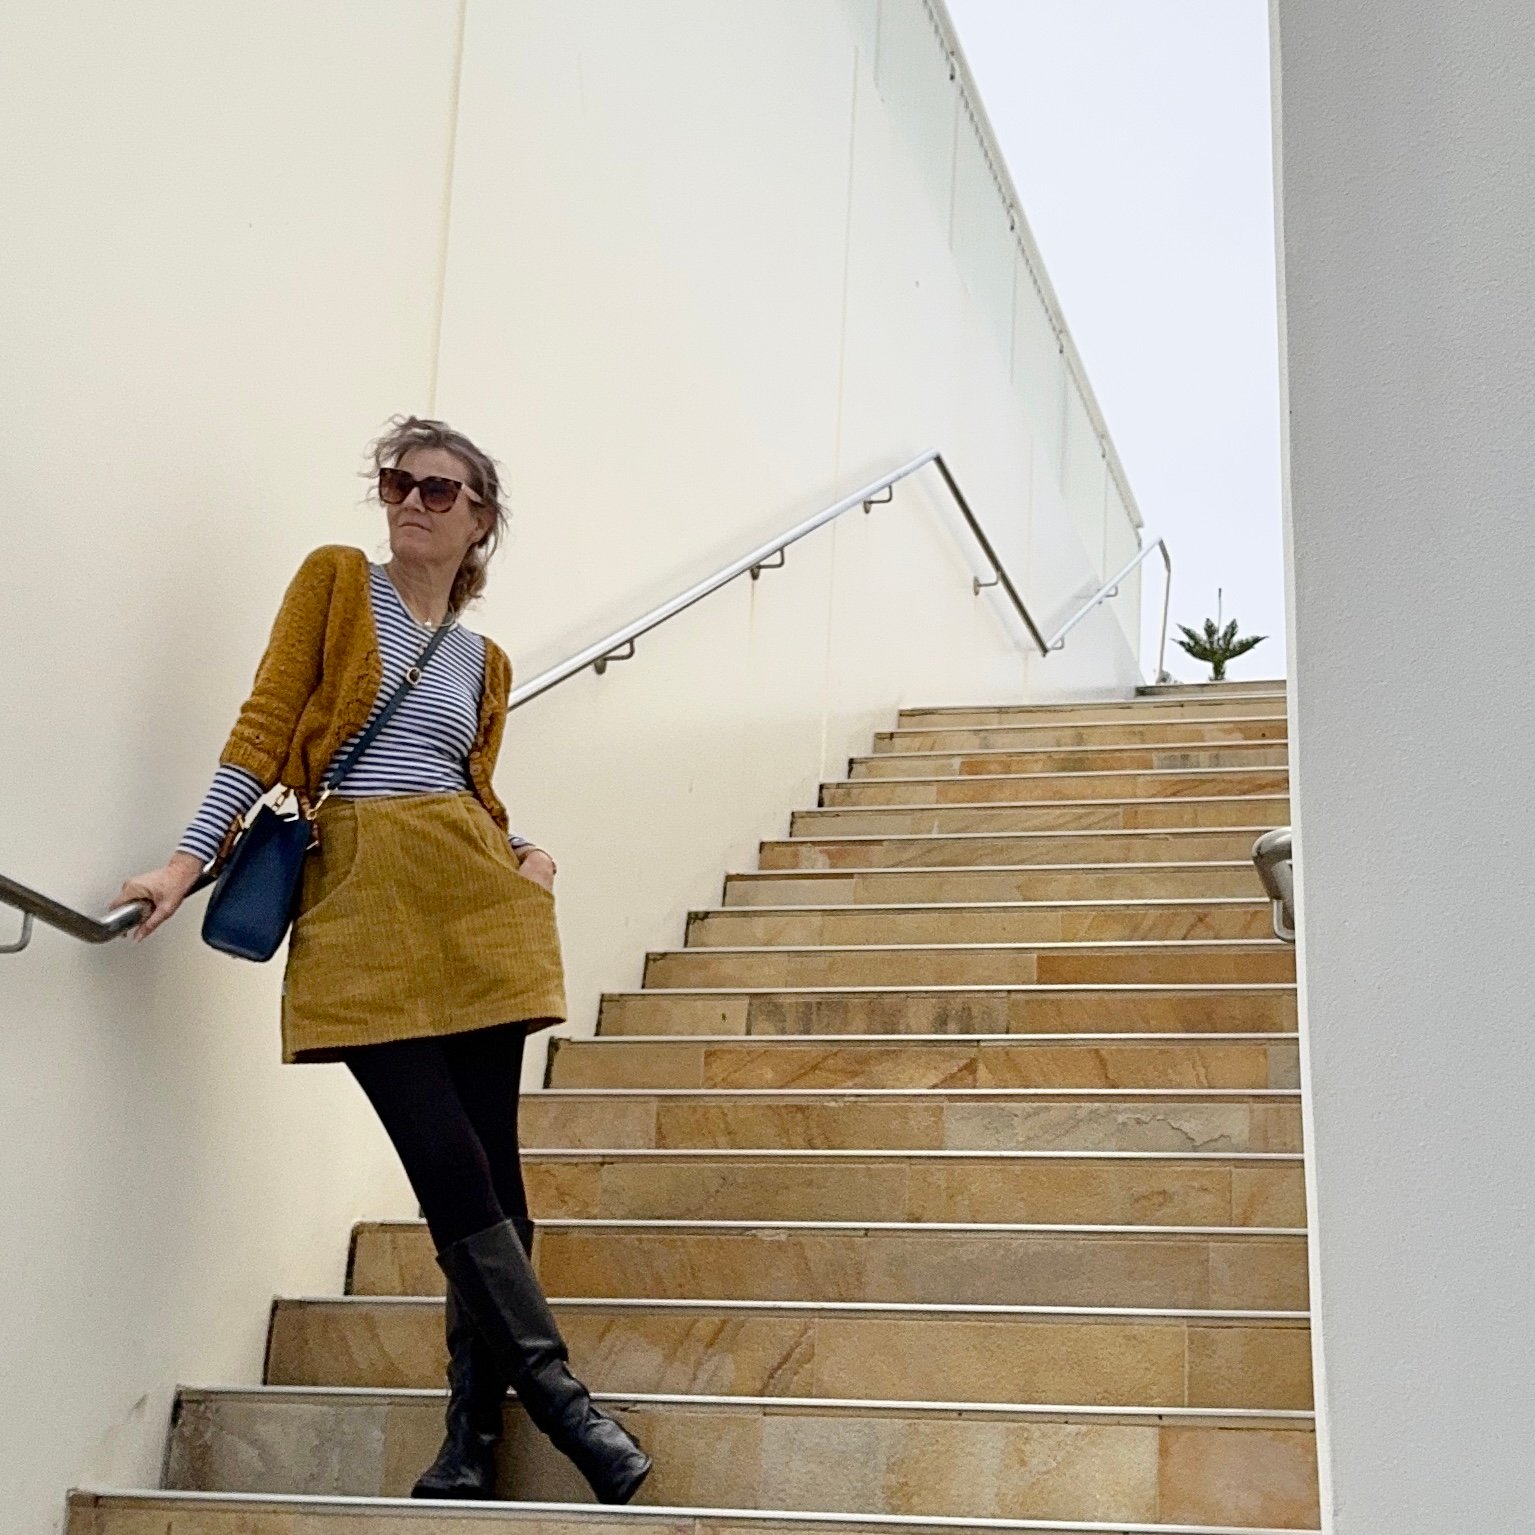
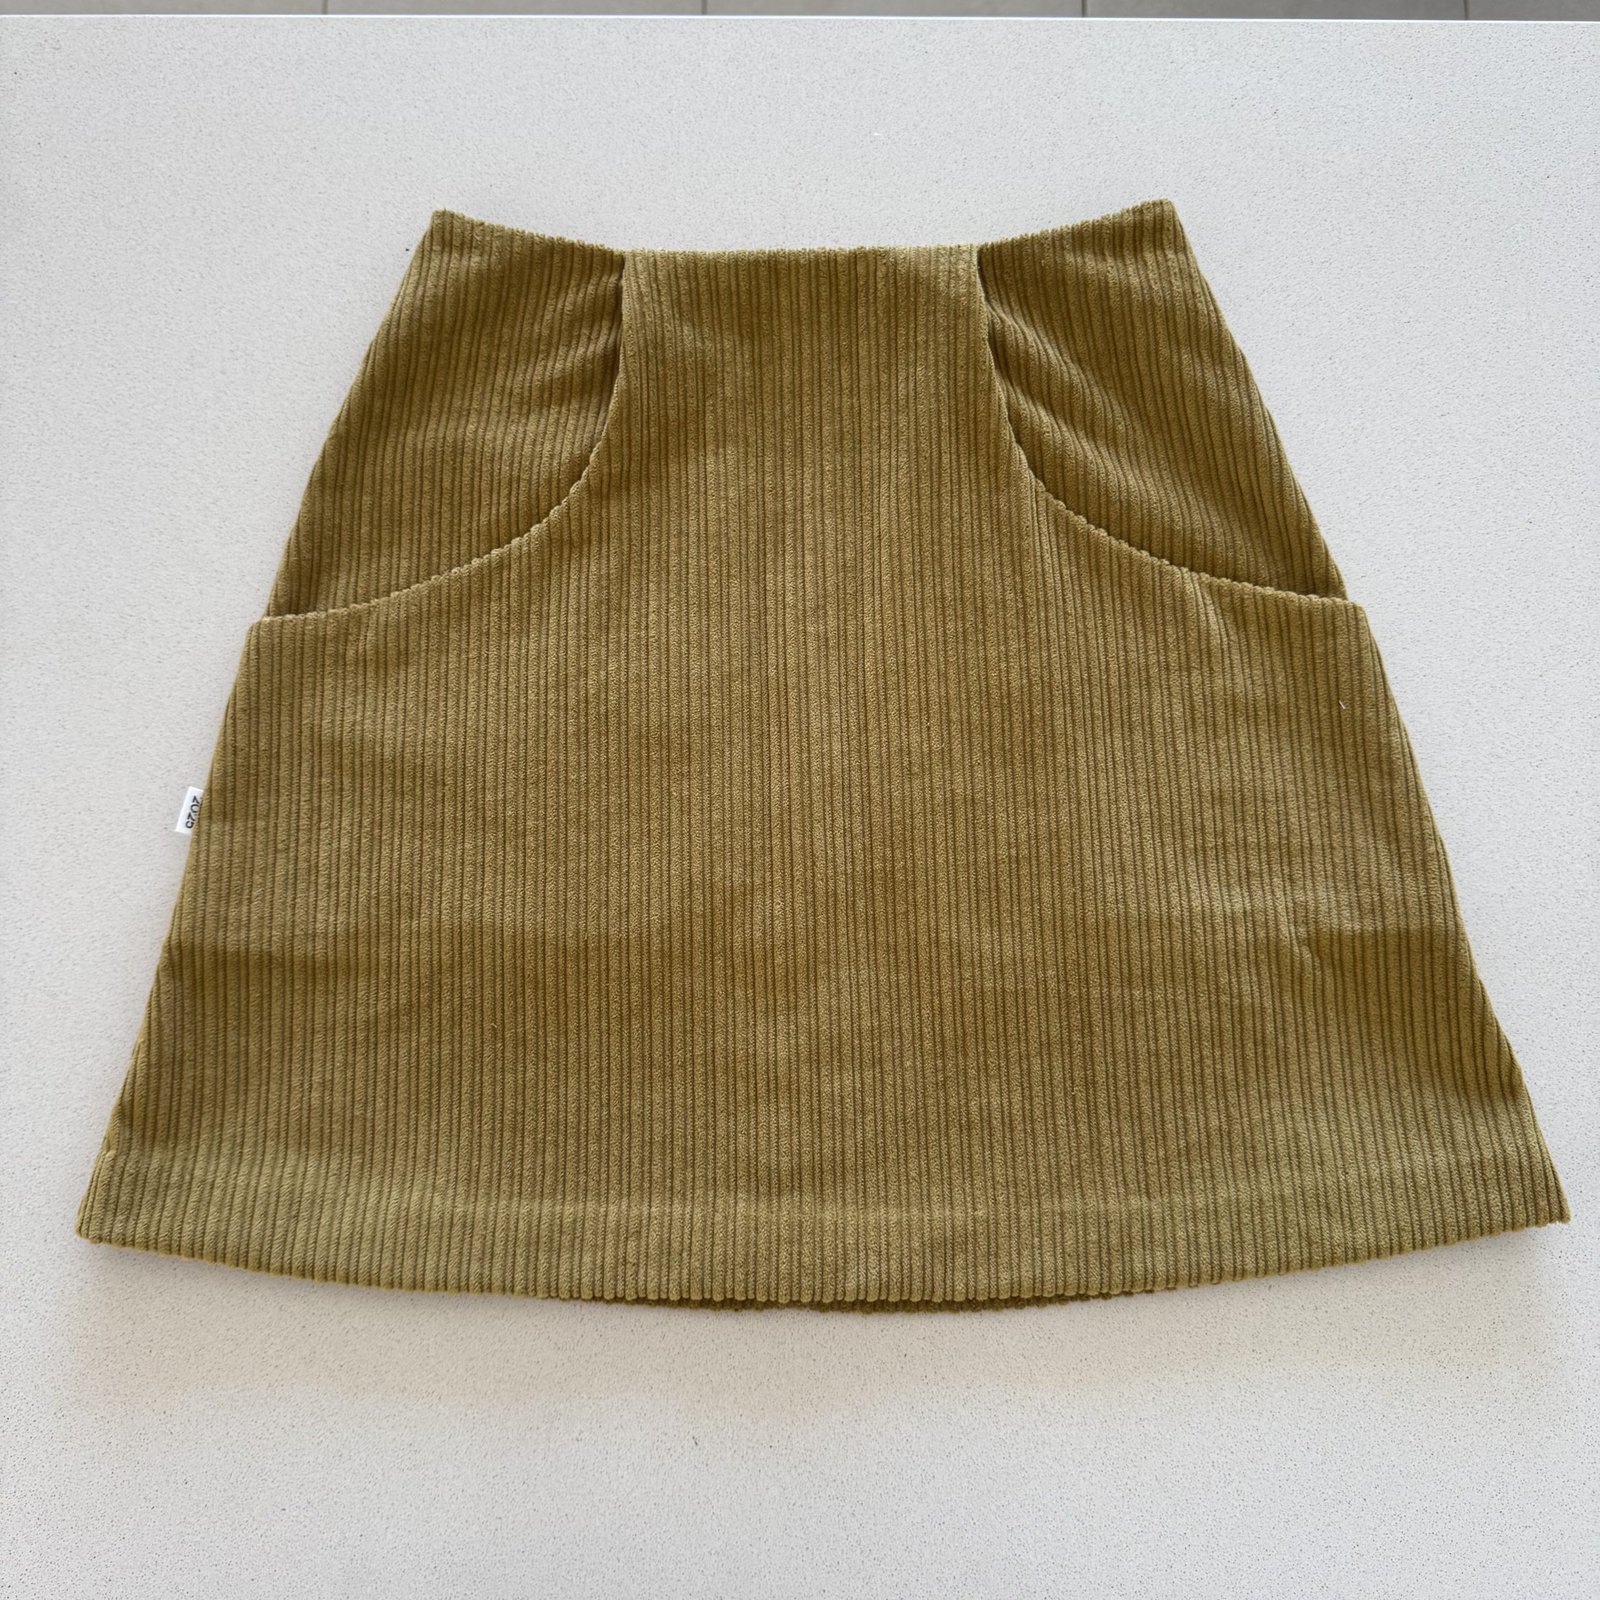
hello!   I made a few new skirts, using a new pattern, the Acacia skirt.  The pattern is a Peppermint magazine and Warp and Weft collaboration… available in the magazine for free, or as a pdf pattern from their website.  It’s a cute little A-line miniskirt with deep deep pockets and a central back zip closure.  Of course I’m always going to be interested in a winter miniskirt pattern with pockets!  I couldn’t wait to try it out!

Unusually for me, I decided to make a sort of toile.  It’s a wearable toile, of course.  For this, I used a piece of fabric that was given to me by my Indonesian sister-in-law.  It was fortunately the absolute perfect size to cut out the skirt!

I really like this little skirt but I’m glad I made a toile, because I felt that the front was a bit flat for me, making it jut out a bit at the waistline.  I unpicked the pocket joining seam and cut out a dart allowance from the pocket on the inner edge, and this worked really well.  So I made this same adjustment when I made the real version, the corduroy one.

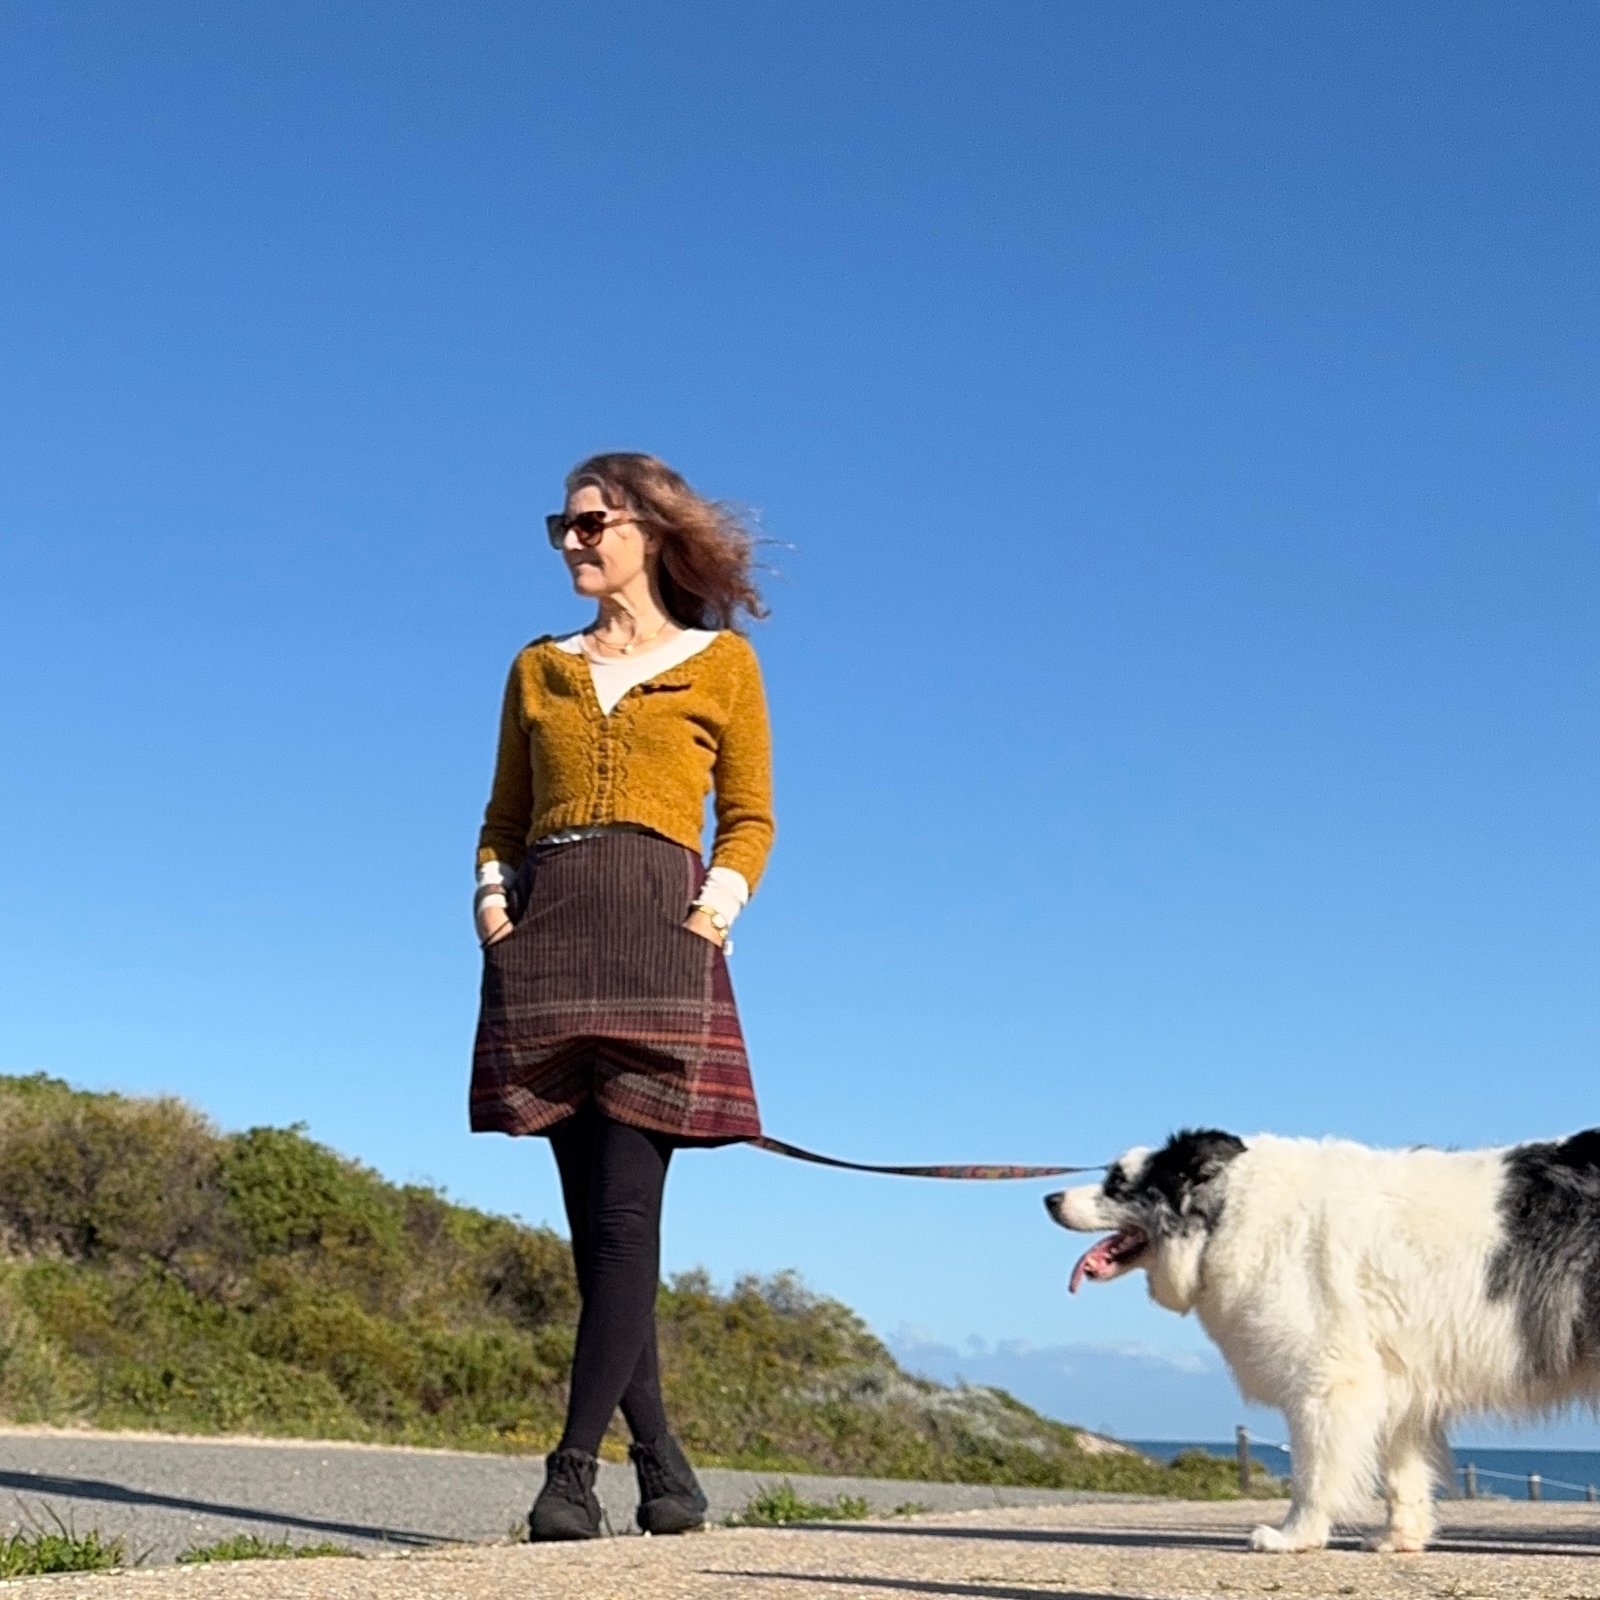
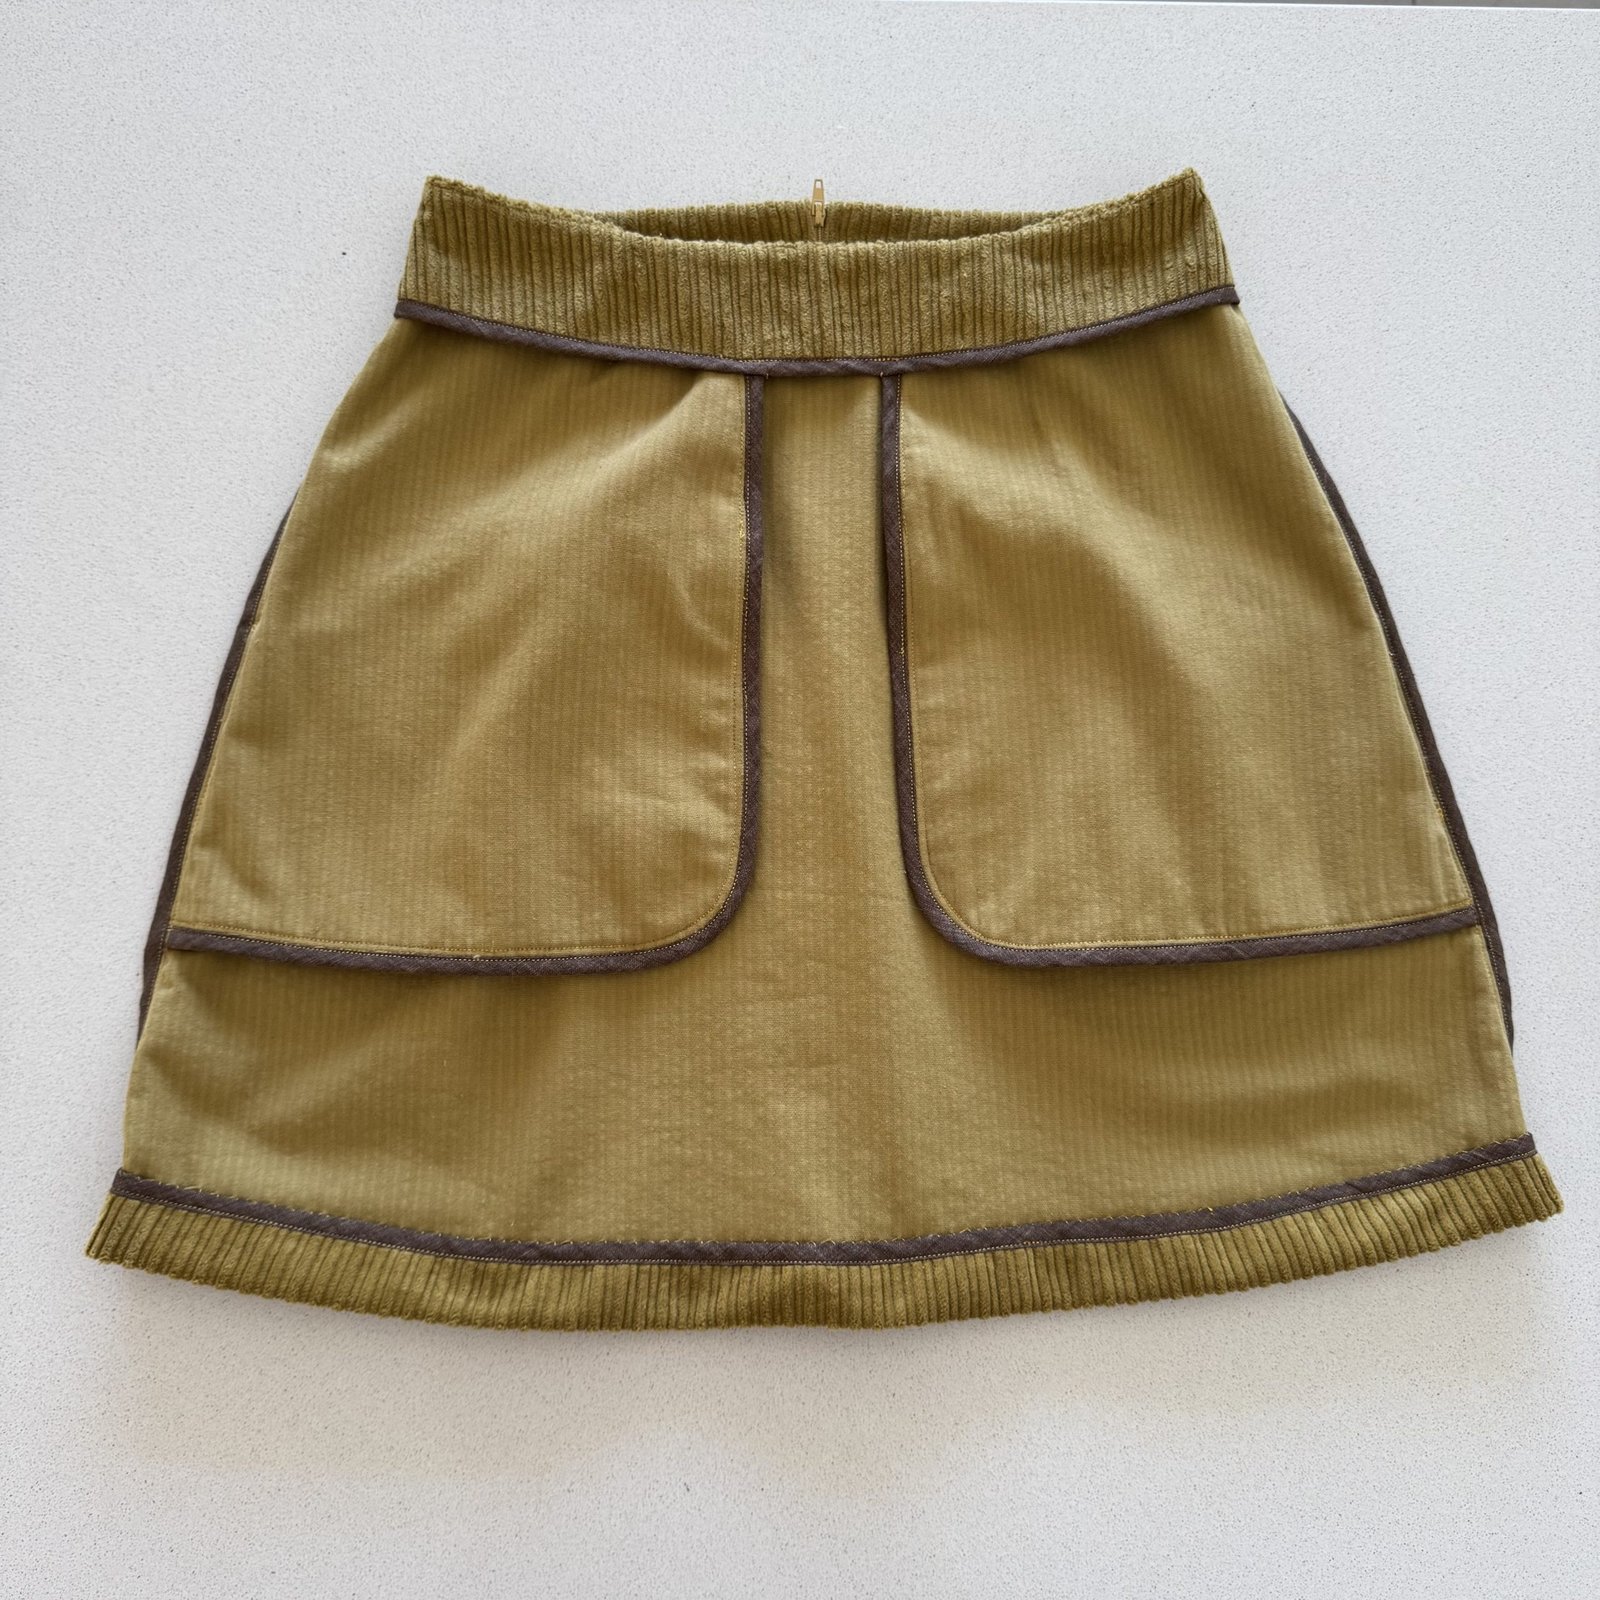
The wide wale corduroy I used for the “real” skirt is is colour Amber from Warp and Weft (available on their website here). I decided to do a “nice” finish to all the raw edges inside and applied a HongKong finish.  For this I found a small scrap of lovely brown linen leftover from my patchwork dress.  It was just enough to finish the skirt.

Corduroy is a little tricky when it comes to the seams lining up in the wales… and centre back seams are notorious for turning out pretty terrible, so I did this zip insertion by hand so it looks perfect.  So glad I did this!

Initially, I added 10cm to the length of the skirt,  I thought this would be necessary because the samples I saw did look quite short on the models… however after a few wears I have to admit that I felt like it was a little too long after all.  Trust in the designer!  I ended up lopping off that extra 10cm.  I wouldn’t rule out adding length to the design again in the future, but a lining is absolutely necessary, imo.


Is it a little too short now?  I’m not sure, maybe.  It still has a reasonable hem so I could still add a little length back.  Probably in the future I would add 5cm and then see how I feel about that.


pinterestmail

green sparkly “stardust” velvet

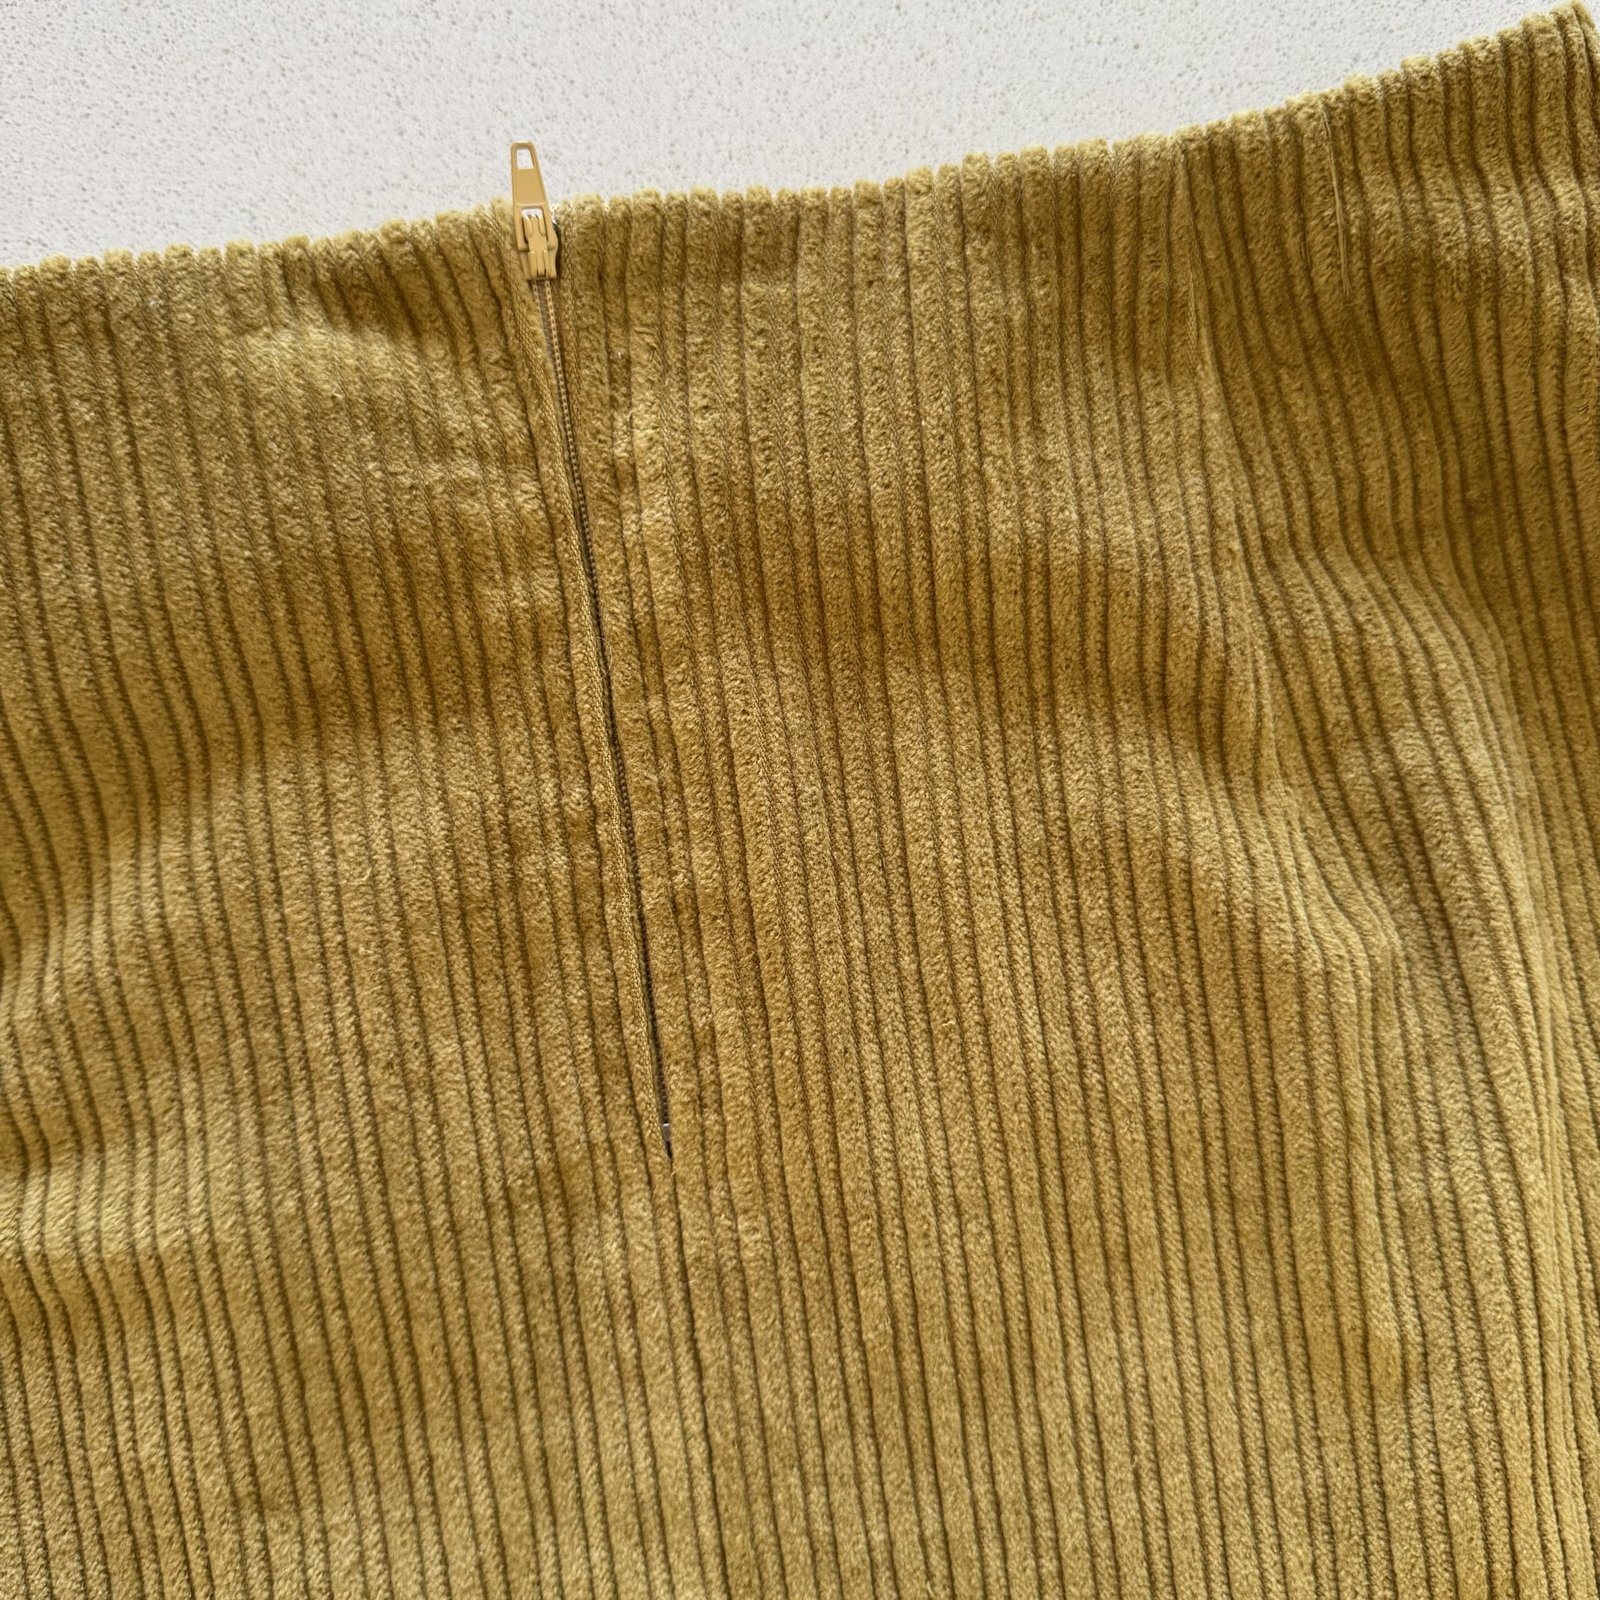
My mother gave me a length of bottle green, sparkly stretch velvet for my birthday last year… and I wanted to make something nice with it before my next birthday rolled around.  This is fast approaching so I needed to get cracking!

I decided to use the twist top pattern from the Japanese pattern-making book Pattern Magic by Tomato Nakamichi.  Since we moved house five years ago I actually threw away a lot of my old patterns, including all the ones I had painstaking drawn up from first principles using this book.  I know, seems like a silly thing to do, but at the time it felt important to clear the decks so I could make a fresh start with a reduced sewing stash, so I can’t really regret it.  Anyway I needed to remake the pattern again from scratch, but that wasn’t really such a difficult task in the end.

It’s a great design, one of my favourites; and I’ve enjoyed wearing all my twist tops over the years.  I’m wearing it here with my purple Jade mini skirt made earlier this year and blogged here; and my self-designed black tights.

I had a little leftover velvet, just enough to cut a new set of underwear, my usual combination of one bra plus two sets of undies

I used the MakeBra DL 03 pattern, and foam lining and underwires from the kit I bought from them a few years ago.  I still had some elastics in my stash, and the only thing I had to buy new was the hook/eye closure, from Spotlight.  The undies pattern is of course the Cloth Habit Watson pattern, probably my most used pattern ever since I bought it!

I made one small difference between this bra and my previous ones… I’ve always had the ring/slider adjustors situated at the back of the bra for all my previous ones, for some reasons I can’t even recall now.  Eventually I’ve come to realise that whatever those reasons were in the past, ultimately it’s actually extremely INconvenient to have the adjustor on my back.  So I switched it around for this new one.  I have no idea why I’ve put the straps on in that idiotic way all this time.

I love this beautiful “star-dusted” fabric and it feels so luxurious and beautiful to wear it!  Thank you so much to Mum for such a lovely and thoughtful birthday present!

pinterestmail

colour-blocked Mimi and golden chain-mail

hello!  I’ve made a new/old blouse for myself… I’ve always enjoyed the challenge of using old textiles PLUS I’ve also always loved patchwork and mixed-prints in clothing so obviously this new blouse is certain to become a favourite!  why?  because the fabric is salvaged from three well-loved old shirts of my husband’s… I really liked each of these shirts when he was wearing them, so when he decided they were too worn to be worn any more (hehe) I packed them away to be refashioned one day.

I know it seems weird and silly to use three whole mens’ shirts to make just one woman’s shirt…  like an exceptionally inefficient use of resources really! however there really were so many bits of each shirt that could not be used because of holes, stains, or threadbare patches that I had no choice.  I was on a rescue mission!

The pattern is one of the newly release patterns from Fibremood, the Mimi blouse. Such a quick and simple thing to make!  Especially coming hot on the heels of two jackets, ahem.  It was nice to be an able to whip up something without having to think too much!

The pattern actually has the button and buttonhole bands cut on, so my use of the third contrasting fabric is an alteration really.  I did have to do a bit of calculation to get this to work out well.  I was seriously worried I wouldn’t have enough of the yellow fabric but thank goodness I did in the end.  Another issue was cutting the lower front panels… I had to join some pieces together to get a piece big enough you might be able to see the joining seams on both of those sections of my new shirt.  The sleeves also have joining seams that I did my best to make reasonably unobtrusive.

I’m wearing my new shirt in the above pictures with a pieced denim skirt I made last year using old jeans and our own Meelup skirt pattern, plus a number of superfluous pockets, making this outfit a wholly recycled-fabric ensemble.  I really love this skirt too! it used to be quite a bit paler in colour and I overdyed it blue while I was dying something else one day.  Oh, I remember it was this skirt...

Something else I’ve made recently was a “golden chain mail” tunic for my middle grandson T for his book week costume.  Doesn’t he look amazing?!  He wanted to be Tom of the Beast Quest series.  I was only commissioned to make the tunic, and my clever daughter Cassie made the rest of his costume including that amazing helmet.  Theo made his own shield!

I used the measurements from an oversized T-shirt he already had, and bought the golden sparkly remnant from Spotlight.  It was very cheap but is actually quite nice stuff … I have a little bit left over and am wondering what I can use this for?!

pinterestmail

charcoal Sienna jacket

hello!

I’ve made another Sienna jacket, yes, hot on the heels of the last one.  I realise this is a weird thing to do but I’m well known for doing weird things so it’s just the norm at this point.  I had this large and rather bulky piece of thick, woolly, charcoal knit in my stash and decided that to use just this one piece would actually free up a disproportionally large amount of space in there.  OK then!  I think I originally bought it from the remnant bin in Knit Wit, Nedlands.

This one is a little different from the previous pink one, as well as being different from the pattern… I cut the front so as to have a straight edge and to have the front facing integral with the front.  I also left off the collar and made a hood instead.  I love hoodies and don’t have enough in my wardrobe!  Honestly if I’d had enough fabric I definitely would have made my pink Sienna to have a hood too.

This fabric had two distinct sides; a side that looks like boiled wool and the other side looks like a stocking stitched knitted piece.  I chose the boiled wool side to be the right side of my jacket.  It’s really very bulky stuff so instead of traditional seams I got creative …

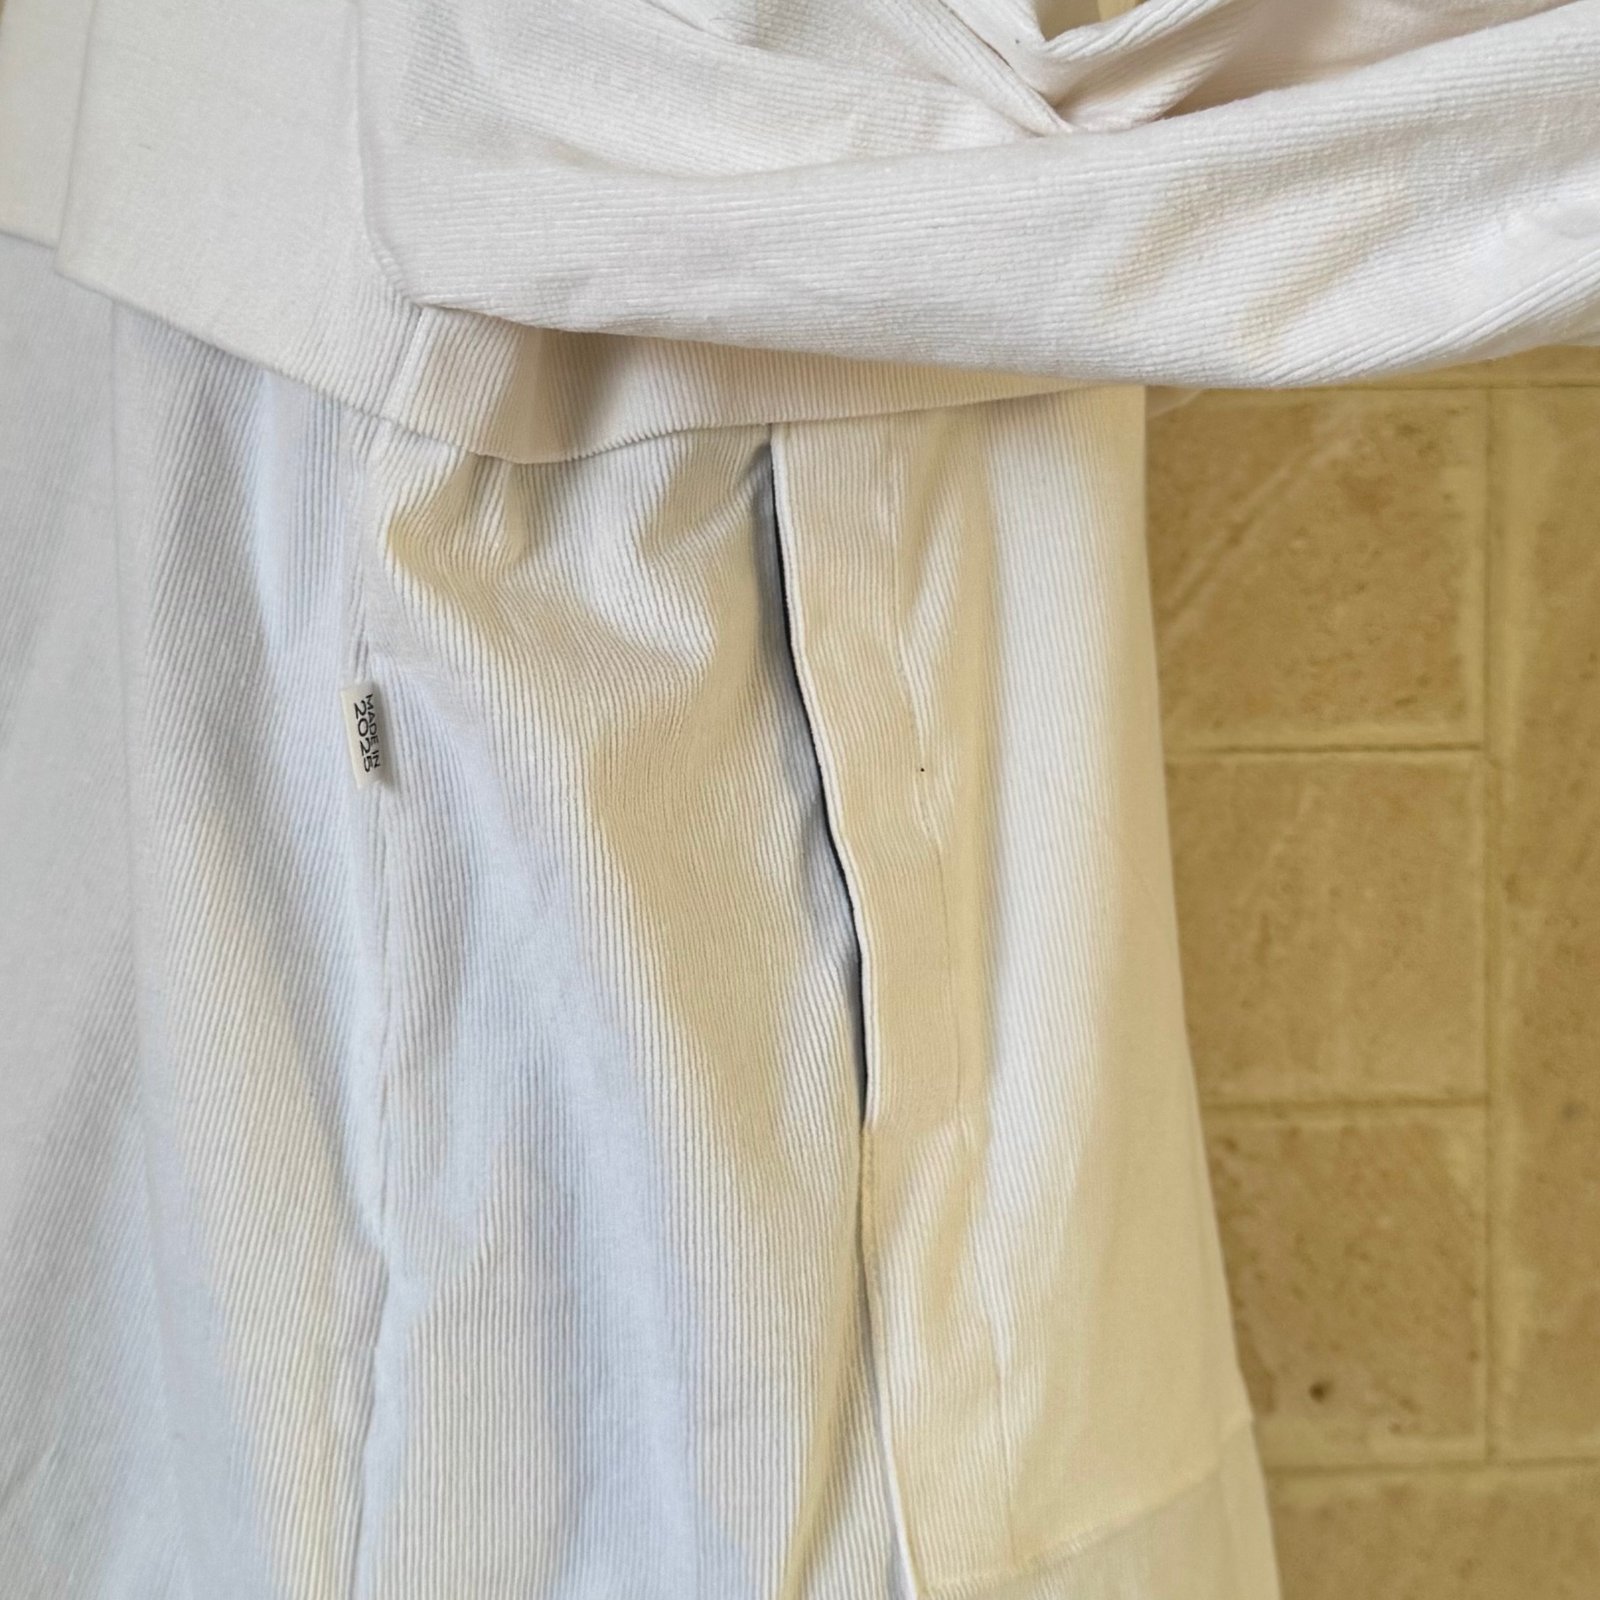
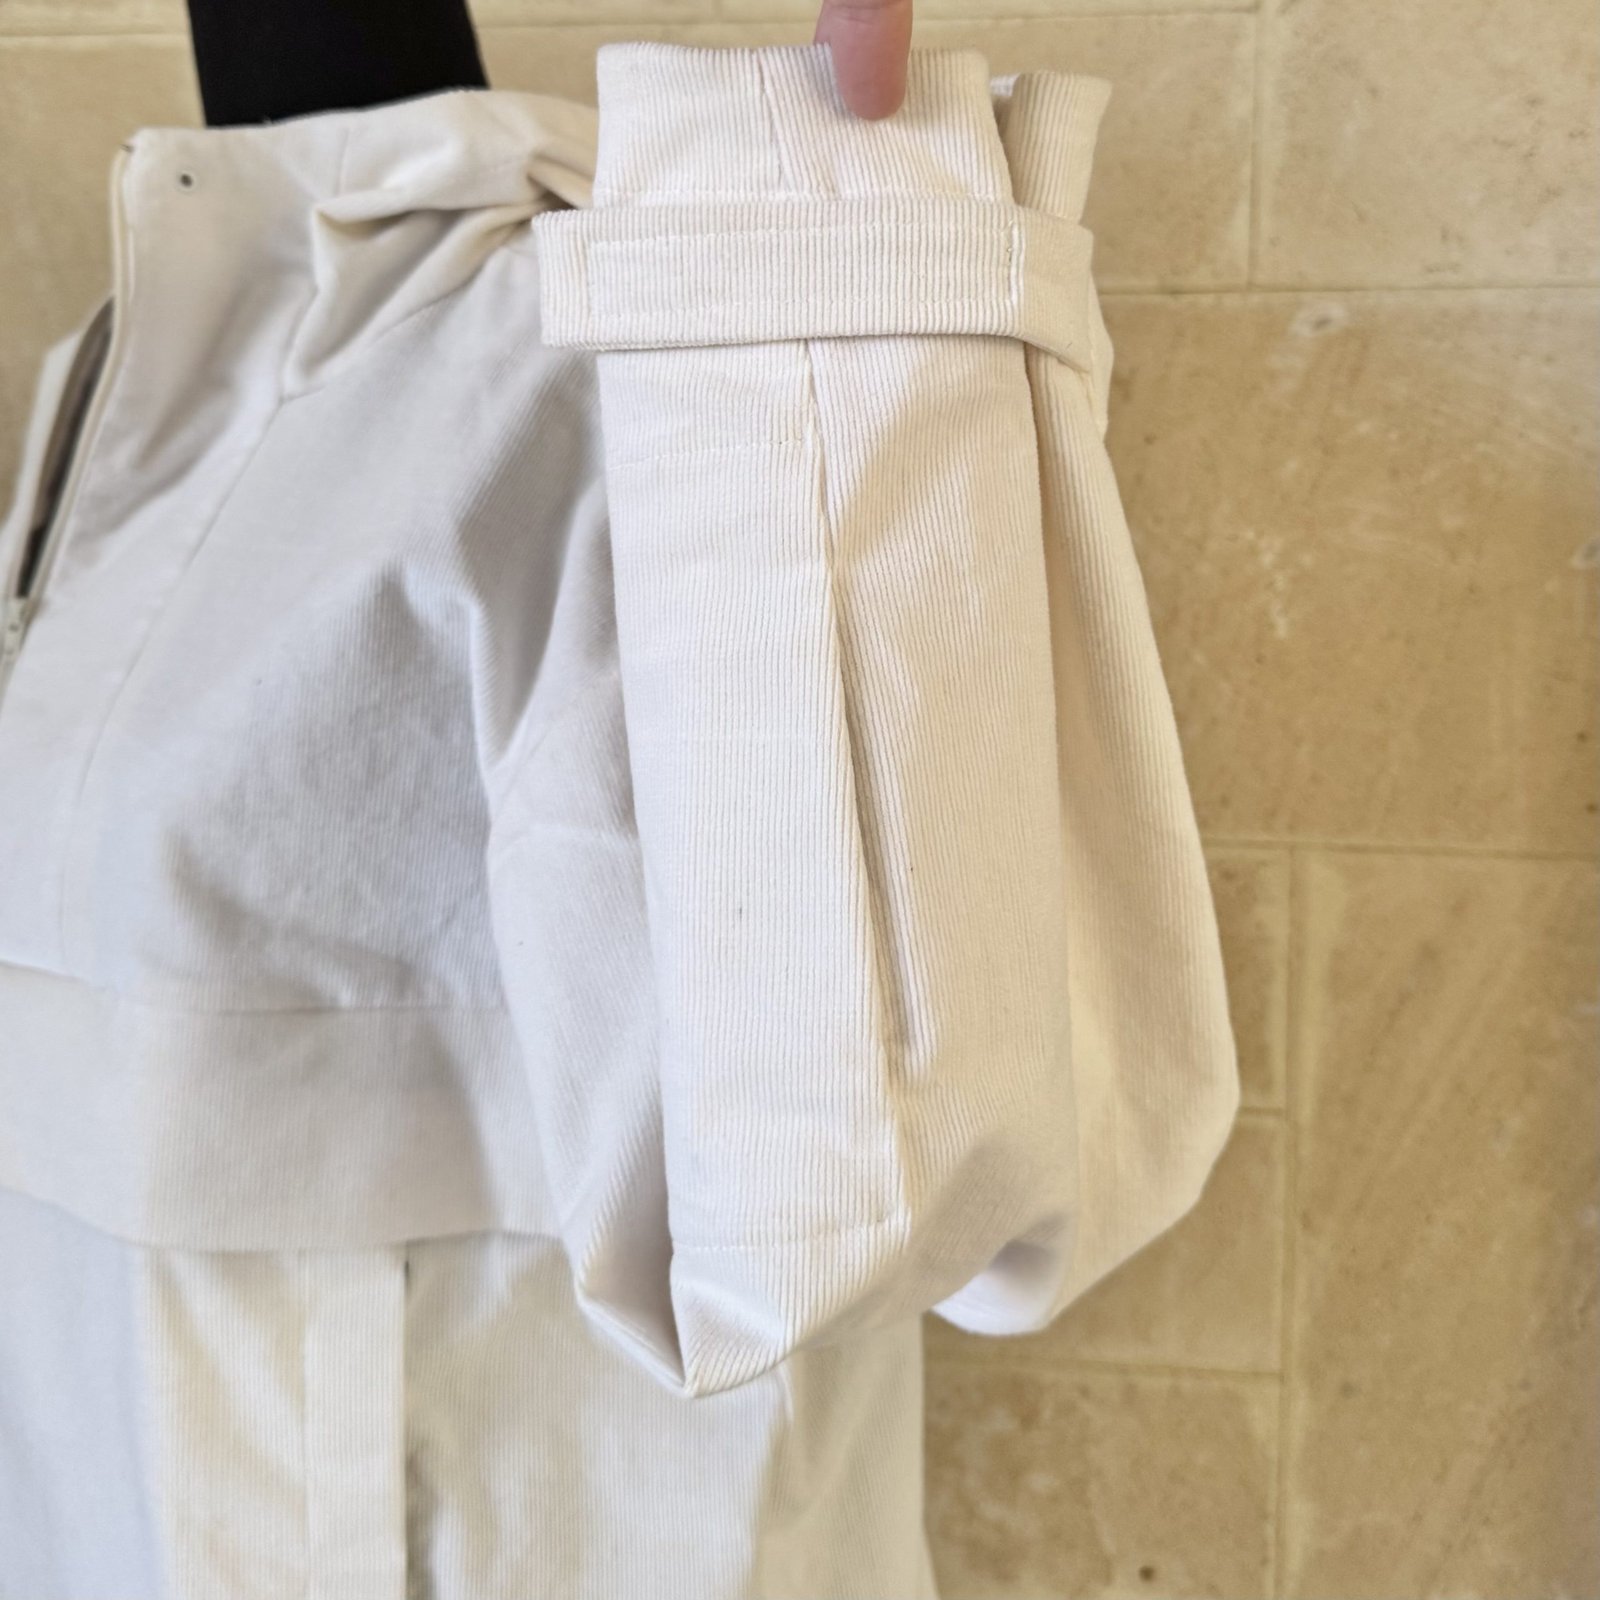
for the hood, I turned under a seam and lined the hood completely with a black, sorta silky but not-silk stuff that is thin but nice and soft.  I cut the back neckline facing from the same fabric.  The hood edging is turned over the edge of the hood lining and simply topstitched in place.  After stitching, I trimmed the hood edging inside close to the stitching.

Similarly, the pocket flaps were made by laying the two flap pieces wrong sides together, and stitching together as normal; then trimming the seam allowances off neatly close to the stitching.

The sleeve bands and sleeve band “holding pieces”? keepers?  (forgot the proper name for those) are made the same way.

The front facings, pocket tops, jacket and sleeve hemlines were made by overlocking the raw edges, turning under allowances/facings to the inside, and then hand-stitching in place.

I actually went out to buy new buttons for this jacket when I decided only plain, black, matte buttons would do.  I’d initially stitched on some other buttons from my stash but just didn’t like the result.  So I made the executive decision to go against my “buy nothing” principles this time.  I think it’s ok to do this if you’ve used all the workhorse buttons in your stash and really have trouble finding fabrics that match any of those colourful, wild and wacky buttons that remain in there!

This is an EXTREMELY warm jacket, much warmer than just about all the other ones in my wardrobe at the moment, yes, even my new pink one!  I’ve been wearing this charcoal jacket just around the house mostly, and have saved the pink one for wearing out.  I think we only have a few weeks left of weather cold enough for this one – hey I’m definitely not complaining about that!

I fully expect by September it will be just too hot for it… really I should have made it at the beginning of winter!  In any case, it feels great to have taken the fabric from out of the stash, and into the wardrobe!

pinterestmail

pink Sienna jacket

hello!  I’ve made a chic (I hope) new jacket… and in such a pretty colour, I’m completely in love.  Guava pink?  Strawberry icecream pink? Sherbie pink?  Coral? Ham pink?  haha.  Whichever, I really adore it and feel like it’s one of “my” colours that suits me quite well.

The fabric is a thickish wool felt that I bought from the Fabric Store in Melbourne during our weekend trip over there in March ’22 to see Harry Potter.  The name of the colour is actually “red clay”, and I have a merino t-shirt in the same colour way, blogged here.  I even bought some matching thread in the same transaction, which I have carefully saved ever since just for these very projects.  Quite unlike me!

I used the Closet Core Sienna jacket, a pattern that I have used once before, in a different variation.  This new one is variation C, the shortest of the three.  I like that it’s cropped, a little boxy, and the notched collar.  I also like the abundance of pockets.  This little jacket has five tucked away in its smallish self!

I made a BIG change, of course.  I wasn’t going to, but after doing only a little bit of sewing I decided it had to be lined.  Not lining would have felt a bit sacrilegious to this beautiful wool fabric.  For this I used a pale pink lining fabric from my stash.  Another change; I abstained from topstitching, which this design has in copious quantities, and instead carefully arranged it to have all hidden/invisible stitching as much as possible.

So, the breast and hip pockets are made as welt pockets, and I agonised quite a lot over getting those slanted welts just right, with the pockets inside hanging “down” and not skewed sideways.  This was a lot harder to achieve than I first thought it would be.

Typical of me to make a project a lot more complicated that it should be, honestly, I don’t know why I do this to myself.

The sleeves are the variation with a pocket in them.  I think this is such a cute idea!

I happened to have the perfect coloured velvet ribbon to make the hanging loop, so I love this detail!

Do you think I had the right buttons in my stash?  No! I did not! and I’m still on a kick to not buy anything new, as much as I can.  I still have a small blob of modelling clay left, so made my own.  I’ve done this multiple times before and love how hand shaped and painted buttons look.  I made ten – the pattern requires eight, so I picked the best eight for the outside of the jacket, and sewed the two spare ones on the inside, on a scrap of felt, just in case I need them in the future.

I can’t actually decide if I prefer it buttoned, or unbuttoned.  I’ve been wearing it buttoned, but worry it looks a bit funny.  But it’s obviously warmer that way!

I love how this turned out!  To be honest, I finished this jacket just before we went away, but didn’t have the time to blog it.  Since coming home though, I’ve worn it several times.  My new favourite coat!

Here it is worn with my pumpkin silk Mysotis dress, blogged here.  Love this mix of warm spicy colours!  It’s been very very cold here this winter, and my new coat has proved itself delightfully snuggly; absolute bliss. I’m going to thoroughly enjoy this coat for the remainder of this winter, and the next… and the next…

pinterestmail
Switch to mobile version
↓