Tag Archives: Pattern Review

rusty lace Cissy dress (Homer and Howells)

I’ve made this rather awesome new dress, if I say so myself!!   Paprika!!  Rust!!  Kinda… burnt orange/dark red/burgundy/wine!!!  It has a strongly autumnal-flavour in colour and feel, but actually it’s beautifully cool and breezy enough for summer too.  I wore it today and it was super comfortable in spite of the 38C heat.  Phew!

The pattern is the Cissy dress pattern by new company Homer and Howells; I discovered and started following them on instagram a few months ago and was thrilled when they asked if I would like to try out this particular design… because I knew it would make a lovely summer frock  🙂

I had this glorious richly-coloured lace that’s been languishing in my stash for hmmm goodness knows how long … I can barely remember its purchase!  I’m pretty sure I bought it at Tessuti’s in Melbourne on one of my holidays over there with Mum and Cassie.  Like about 95% sure.  #youknowthingsarebadwhen…  It’s one of those fabrics I’ve taken out and petted every now and then, even laid out pattern pieces on it before having second thoughts, but finally I felt this particular project was just the right thing.

The pattern is an exceptionally easy thing to make.  It does have pockets, beautiful great big pockets too, absolutely perfect; but in the spur of the moment I just couldn’t think of a way of inserting them nicely or invisibly enough into my underlined lace dress, so left them out this time.  Who even am III????!! but really.  I’m a little ashamed I didn’t think a bit harder, because right now I can think of two separate ways I could have made it work, hmmm.  But I’m feeling too stressed out to unpick all that overlocking to put some in right now.  Maybe later.  After the wedding…  🙂

Of course I needed to underline, because it’s lace, and therefore completely see-through.  I had a length of white cotton in my stash too, inherited from Mum’s stash; that was just the right sized piece, and I thought the white underneath would be really cool.

But you know what? it wasn’t … when the dress was finished, I decided the white cotton was actually really awful; just too harsh of a contrast.  So I dunked the completed dress into a dyepot of mixed orange/red/brown/hot pink dyes.  And now I think it’s lovely!  the underlining is almost the same colour now, just a shade lighter than the lace, and I think absolutely perfect.  I’m really going to enjoy wearing this chic thing!!

Notes; I shortened the sleeves by about 9cm, and the dress by about 17cm from the top edge.  At full length, the dress was just a little too “granny-ish”, and yes I know I AM now an actual granny! but there’s granny-chic which is cool; and then there’s just “granny” but not in a chic way.  The lace that I chose, combined with the long skirt tipped the original look into the latter but I do really love it at this slightly shorter length!  I actually do have fabric in mind for this pattern at the designed-for longer length, but that will probably not happen until after Cassie and D’s wedding… ha!  I have so much to do!!!  #notevenlaughing  #cryingjustabit #ineedaholiday

I managed to incorporate the natural scalloped lace edge into the hemline, which I think is super pretty! but sadly didn’t have enough lace do the same for the sleeves.  They’re just hemmed.

Details:

Dress; Homer & Howells Cissy dress pattern, lace with dyed cotton underlining
Shoes; caramel/ivory clogs are made by me, and my own design, all details here. White shoes are also made by me, at a shoe camaraderie workshop, all details here

pinterestmail

rusty drapey dress

I made a new dress!  The pattern is Vogue 1343, a Tracy Reese design; and I used this beautifully thin and slightly crisp georgette from Minerva in colour Rust…

The fabric is gorgeous, yes?  I really really love the deep rich smoked-paprika colour, definitely my colour, and just enough sophisticated black, grey and off-white thrown into the print to keep everything looking sharp.

I bought the pattern ages ago, and have wanted to make it for even longer!  obviously, haha…  I really like the multitude of details it has; it’s not your average little shift dress at all.  To be honest, halfway through I wasn’t liking it very much; there were a few little problems so I’d gone off it a bit, and had pretty much decided I was NEVER going to make the pattern up ever again.  But once it was finished and I tried it on and was like… hmmm, ok I get it now!  I think it ended up way cuter than I expected!

The first problem was that front neckline drape.  It’s beautiful isn’t it?! but SUPER low cut in its original format.  I did actually make it up as is to start with, but it was so crazy low almost the full bridge on my bra was on show.  Ridiculous!!

And it’s pretty difficult to remove width from the cowl once it’s been cut and you’ve folded and sewn all those pleats etc… so I pulled up the drape by opening up the shoulder seams and removed 1 1/4″ in height from the neckline edge of the front shoulder yokes instead, tapering to nothing at the armhole edge.  I kept the height at the armhole the same, because the armholes on this design are not huge already and you don’t want them tightened up more!  The back yokes are unchanged.

You still get masses of drape, but a little less scandalously so, and at least I’ve got complete bra coverage now!

This picture also shows how the armhole edges are finished with bias cut strips.  The back neckline edge is finished the same way.


The next problem was finishing the hemline.  The pattern includes separate facing pieces for the hemline; which are attached, under stitched, and hand-stitched to the dress.  I had doubts this was going to work for georgette but trialled one and of course it looked terrible.  So I did what I should’ve in the first place; stitched up the side seams with French seams and just finished the hem in one go with a narrow hand-rolled and -fell stitched hem.  Much nicer!

Oh yes! French seams!  The pattern stipulates them and of course they are the perfect method for this fine and floaty fabric anyway.

I do love how the folds give this lovely soft fall of fabric in the skirt

The last problem… not really a problem but just a little annoying? according to the pattern you stitch the skirt to the bodice, matching side seams etc… well there is no way the side seams can be matched in this design so I think this is a mistake in the pattern…

this is the bodice back and the skirt back pieces… you can see the notches are way off, for a start.  It’s almost like there’s a missing seam allowance on the skirt back?!

It’s ok though in the end, because you can actually fit the whole bodice into the skirt without any dramas.  Just let go previously held notions of notches and side seams aligning, match up the centre fronts and backs obviously, and bob’s your uncle!

I didn’t have any matching buttons, but wait a minute, what do I have here? but a small handful of leftover ivory-crepe covered buttons leftover from when I made 100 of ’em for Kelly’s wedding dress!  I’d covered lots of extras; partly because some of my earlier ones weren’t up to scratch, and also just because I wasn’t sure how many I’d need.  I painted some with leftover acrylic “blackboard” paint, and they’re perfect!

My rouleau straps turned out super skinny!! 3mm… rather chuffed with this!  It’s all thanks to quality of this super fine fabric, I think  🙂

This is used for the button loops and the belt loops too; the latter will probably not be used because my favourite belt doesn’t really fit through them!  Yes, this is a design greatly improved by a belt, I think.  Partially because the waist is elasticated, and I looooooooathe elasticated waistbands with the fieriest of fiery passions!  This one is hidden nicely under my old, super-wide belt… which also hides those super skinny belt loops.  Ehhh…

And… this is my first thing out of my “make nine/twelve” for this year!  Here is my updated mud-map….

I may have had my doubts while I was making it, but I’m very happy with the outcome in the end!!  I love the rich colours of the fabric, the design is quite unlike anything I’ve used before; in fact that goes for the style of the dress too!  Well a change is always a good thing for the system and I plan to wear this both on cool days of summer, and warmer days in winter too.  Who knows, I may even make up the pattern again one day!  🙂

Details:

Dress; Vogue 1343, in a fine paisley georgette
Belt; super old, emu leather
Shoes; Zomp, from Zomp boutique

pinterestmail

Forget-me-not Sabrina skirt

In spite of being a Forget-me-not pattern I almost forgot to post this!! Except I didn’t, because here I am posting it.  But I had forgotten? for a little while anyway; that forgetful state of being ending as soon as I remembered.  I guess it’s technically not possible to “almost” forget something.  You’ve either forgotten something, or you haven’t; either one, or the other.  Like, maybe you DID forget something, but then all of a sudden, you DID NOT forget that something.  Ahem.  Yes, my brain does indeed love to devolve into such ridiculous semantics, arguing to and fro with myself.  Ultimately I did not forget, which is the main thing…

So, the skirt!  I made it a few months ago, as a tester for the pattern; it’s the Sabrina skirt pattern by Johanna of Forget-Me-Not patterns.  This is a really nice pencil skirt design of a deceptively simple appearance, I say “deceptively” because it has so many options for custom-shaping it to hug your own individual curves exactly, you really have no choice but to find that perfect fit… To start with, it has shaped gores; three in the front and four in the back; plus waist darts as well.  Additionally;  this very comprehensive pattern also contains separate pattern pieces for three different fit versions;  a straight fit, a mid fit, and a curvy fit.  You select which version you’re going to make based upon your own personal hip-to-waist body measurements.  It’s an amazingly detail-driven pattern!

The pattern also includes separate pattern pieces for the optional lining, and instructions for installing it in two different ways; the easy way or the more advanced way.  No prizes for guessing which one I chose to try out!

The advanced way results in a beautifully installed lining, with all seams and edges neatly and perfectly enclosed inside..  I’m over the moon with how my lining turned out! all steps are meticulously and carefully explained, and I found it very easy and straightforward to follow along.  In fact, the instructions are absolutely excellent; and I can highly recommend!

Fabricwise; I used a piece of rather lovely rusty-orange wool tweed, a leftover scrap inherited from my paternal grandmother, and a not quite matching deep raspberry lining fabric from my stash.  I had just enough of each to cut out the skirt, with zero leftovers.  It always makes me feel like celebrating when this happens!  It didn’t even feel like too much of a risk; entrusting my precious fabric to an untested pattern, because I knew with all those fitting seams and darts I’d be able to fudge fine-tune a really good fit.  I’d chosen my size based mostly upon my child-bearing hip measurements, and didn’t have to do much in the way of special fitting alterations, just nipped it in just a little towards the waist.

So, I finished this just as the winter was ending, and I’ve had to tuck it away to wait for next winter. I am really looking forward to wearing it though.  Not only is the fabric kinda special to me, knowing it was from Marnie, but a sleek, perfectly fitting pencil skirt is a no-brainer, yeah?  very much my style.

I’m happy!

Later edit: this skirt now has pockets!  see my how-to here:

and another edit! this skirt has been shortened!


Details:

Cowl; hand knitted by me, details and my pattern here
Merino tee; Nettie tee pattern by Closet Case patterns, details here
Skirt; Forget-me-not Patterns Sabrina skirt
Tights; made by me using my own custom-fit pattern, details here
Boots; Roberto del Carlo, from Zomp boutique

pinterestmail

Carole in blue velvet

Should that be “Carolyn” in blue velvet??  well I think it should!  Because this thing is so very very me!  LOOOOOOVE!

Actually, this is the Carole pattern, from the new issue of Fibre Mood magazine, available for purchase here.

The fabric is a totally GORGEOUS deep blue velvet that I bought at the Morrison fabric sale from.. ooh, maybe a few years ago?  I forget.  This also happens to be the only piece of fabric I had big enough for this pattern.  Lol!  Same as for the Faye dress, this pattern is a HUGE fabric hog!  It doesn’t show up too much, but there is a centre back seam on every back piece; the bodice, the middle piece, and the skirt piece.  This is not ideal, but was completely unavoidable.  The skirt piece alone is ginormous!  Even trickier; the pattern is designed for fabric 150cm wide, which my fabric was NOT ahem; it’s important to comply with this simply because the skirt piece is too big to cut out with fabric any narrower.  I only managed it by flipping the skirt pattern piece by 90 degrees and having a centre back seam.

Even one of the front middle pieces is also pieced down the centre, but I sneakily arranged for it to be the left front, the one that is covered up once the dress is all wrapped up closed.  You could never tell! except that I’ve now told the whole internet, right here, woops…

Technical deets:  I omitted applying iron on interfacing to the skirt opening edges.  Well, I did actually apply it, but thought it looked too stiff and did not allow the skirt to flow and undulate elegantly in the way I desired it too… so I peeled it off.  I think the skirt turned out so much better without it!

I had precisely zero velvet left after cutting out the main dress pieces, so cut the bodice and neckline facing from an old pair of Sam’s work trousers, which was the perfect shade of inky navy blue.  I’ve previously used these same trousers for the piping and buttons on this dress here.  Waste not want not!

For the ribbon tie closure, I bought a length of navy blue cotton twill tape, and zig-zagged the raw ends so it won’t fray.  The hem is hand-slip-stitched in place.

I absolutely LOVE this dress!  I almost, almost wish the weather was colder, so I could start wearing it in earnest… but well, I could never truly wish for colder weather, really.  Not with a straight face.  However, I shall very much look forward to wearing it next year.  Truthfully, I actually finished making this quite a while ago… like a few weeks ago #oops but have been completely unable to take a picture of it.  Partly that’s me being lazy.  It’s been so hot!  unseasonably so, and I just didn’t want to put it on.  I did try to take pictures indoors, at my now usual photo spot; but they were terrible.  I LOVE velvet but obviously it’s like a black hole when you photograph it, soaking up all light and basically looks just dark and completely featureless.  This is an example of what I’m talking about…

hehe, only including the picture because it’s got my beautiful Sophie in it, really…

Another thing is .. well, you guessed.  The wedding dress.  As well as the wedding consults and planning.  We helped a lot with advice and as a sounding board for Tim and Kelly when they were planning theirs; and now of course, Cassie being our daughter, and the lion’s share of planning a wedding generally falling to the girl; fair or not that’s just how it is! well of course we’re fully into the details of this one too.  I’m just getting more and more behind on everything! and my sewing/blogging schedule is all over the shop.  I’m not complaining, far from it! but just explaining I suppose.  Life is currently quite FULL, for us.

Hmmm, got carried away and off the subject just a little bit there…  I should just delete all that, but I’m currently in the mood for stream of consciousness blogging, so I guess it should stay.  Ha!  That’ll teach me!

Details:

Dress; the Fibre Mood Carole dress, in deep blue velvet
Tights; made by me, details here
Boots; Sempre di, from Zomp boutique

Also, I’m part of a link party… check out the other creations people have made from the magazine!

pinterestmail

I made a cool white dress

O haiiiiii!!  As per the title of this post I have indeed made a cool white dress.  Noice, huh?

IN other news, in an attempt to be more time efficient I am now aiming to write this blog post in the swiftest time possible, and with minimal to-ing and fro-ing and correcting and proof-reading.  Since normally I’m about as slow as a wet week.  Let’s see how I go… it is now 16:17…

So this is Burda 08/2017; 119; also known as the “miscellaneous dress” on the Burda style website.  I was idly browsing on the website and spotted it, and instantly fell in love.  I almost almost clicked buy now for the pdf, when I thought to do a last minute check on the Burda magazines I have in my collection.  Bingo.  Of course I already have it.  WIN!!

I had a length of white cotton sateen sent to me by Minerva; it’s very thin and a little crisp, and perfect for a highly detailed little summer dress like this design, I think, with some twists and folds and pleats and things that are perfectly highlighted in a plain colour.  Or,should I say, non colour?  with black and white, I never know whether it’s technically correct to call them colours actually, but my personal feeling is that both ARE colours and should be awarded that title.  Why should the most commonly used shades in apparel not be considered official colours anyway?  Weird.  But I digress.  I’m never going to write a nice swift blog post at this rate!

So, my dress.

I love designs with a twist and/or something unusual/asymmetric/weird about them, which is the reason I chose this design since; it’s chocka with stuff like that; obviously it has that belt/cummerbund thingy at the waist, and there is also an apparently full length asymmetric fold running all the way from the left shoulder right down to the hemline.  it’s not really a full length fold, that’s just an optical illusion since it’s chopped off and restarts in the waistline, but I love how it does look like it runs all the way through.

This Burda pattern is quite a challenge actually, and I scratched my head several times as to what I was supposed to be doing.   My advice is to mark the seam NUMBERS carefully and accurately; yes, those corners on a Burda pattern where there is a 1, 2 etc; those are the seam numbers which are often used in the instructions.  In my view, having them marked in this pattern is imperative to success.  Attaching the front bodice and skirt to the ride side middle piece and the right front middle piece, and the tab piece is pretty darn tricky to get your head around.  I’m not even sure if I got it exactly right in the end, but it “looks” pretty good and that’s all that matters really.

And truthfully I love a challenge though, something you can really get your teeth into  🙂

Clara asks; does my bum look big in this?

I also have a little feeling I should have done some sort of small bust adjustment, but am probably just splitting hairs here; I’m actually very happy with the final result and am positive I’m going to wear it a lot.  You know one of those dresses that it’s almost impossible to take a bad picture of it?  It felt a bit like this when I was reviewing the pictures of this one.

The fabric had just a little bit of stretch, just enough that I risked sewing  up most of the centre back seam, and only put in a short, 15cm zip at the top end near the neckline, enough that I could fit my head through it.  This worked out great, I can pull the dress over my head and it stretches just enough that I can wriggle into it just fine!

The back is really pretty plain; kinda blah with nothing special going on at all.  I think in a perfect world I would have chosen for this design to have something equally visually interesting at the back too, but well, you can’t have everything.

The first day I wore it, I paired it with my handmade slides/sandal things that I made at my first shoe camaraderie workshop… I love how they look together!

So that’s it!  It is now 16:45; not too terrible… oh but I haven’ t counted the time it took to take and upload pictures. Damm!

I am actually in this picture here, posing like a boss somewhere back there.  There just happens to be a subtle, unobtrusive bit of photobombing going on at the same time…

Details:

Dress; Burda 08/2017;119, in slightly stretchy, thin white cotton sateen
Shoes: white slides made by me! details here 

pinterestmail

deep golden Faye dress

I’ve just finished making this dress… it’s rather gorgeous, isn’t it?

Just before going away, I was contacted by the lovely Sophie, who asked me if I’d like to make something from the autumn issue of the Fibre Mood magazine… would I?!!  Fibre Mood is a newish Belgian sewing magazine, with a nice variety of designs suitable for different sewing skills, some quite simple, and some more funky and cool with interesting details.  I chose the Faye dress – I have to admit partially influenced by the totally divine sample! printed it out before going away, but got no further until the day I got home again …

and literally as soon as I got home, like the very same day… I got onto it and finished it.  Again, maybe influenced by the sample; I dug out from my stash this silk crepe in just about exactly the same colour.  Copycat?  Moi?  Well, I may have also been influenced by the fact that it was literally the only piece in my stash large enough for the pattern layout too!  I’d originally bought it from Tessuti’s in Melbourne, during one of my girls’ weekends over there with my Mum and Cassie.

It’s so autumnal!!  I’m incredibly into autumnal tones right now, I think probably influenced by all the beautiful fall foliage images we’re getting from the northern hemisphere right now, but also of course because I am an “autumn” myself.  I do think these tones suit me pretty well  🙂

pockets!!”…  in a hoarse drug-dealer-on-the-street-corner voice…

The design is slightly 80’s, in a really good way in my opinion! reminding me of the comfortably loose-fitting midi shirt-dresses with gorgeous wide and swishy pleated skirts from ralph lauren 80’s collections…  the Faye design IS a true shirt dress too actually; with a long concealed button band, and with both the bodice and skirt pleated into the waistline.  And, of course, and at the risk of sounding fanatical; HUGE pockets in the side seams, above  🙂

The bodice has what look like pocket flaps on the front, but which are actually faux flaps, and are more of a design feature.  The back bodice has a matching horizontal seam, and a rather cute hanging loop as a purely visual feature.  I love small interesting details like this!

well, hello gorgeous!  Sophie likes the dress too…  🙂

I didn’t have matching golden buttons in my stash, and am trying to use my stash rather than always buying new – holiday souvenir shopping notwithstanding!! – so I dug out some black buttons from my stash.  It may sound counterproductive to stitch very visible buttons underneath a button band constructed specifically to conceal them! however I actually like this look of them peeping out a a lot.

The sleeves are stitched with a very wide hem, which is then turned up to for a self-cuff.  I really love the almost “safari” shirt vibes of the bodice.  This photo also shows the nice pleats in the bodice and skirt fronts.

The only part of the design I found a little too scantily explained was the hemline… there were basically no instructions as to how to finish the hemline with that concealed button band as well as the button band itself either.  I know from past experience this is something you do have to address a lot earlier than the very last step! this sort of thing requires stitching the corners right sides together and turning out, and at least a little bit of hand-stitching things down.  The instructions for Faye pretty much leave all of that entirely up to you.  I also decided to hand stitch the concealed button band pieces together at the lower edge too, to make it all look a bit neater and seamlessly finished off.


Also, in my  opinion, the nature of the button/buttonhole band construction makes for a very thick area at the front of the waistline… because the button band and concealed buttonhole band are cut-on with the bodice and skirt, and then seamed together at the waistline… when you create all those multiples folds that are inherent in a button band, not to mention that of the concealed buttonhole band, well let’s just say there’s a heck of a lot of layers in there.  If I was going to make this again, I would probably cut the button/buttonhole bands separately and in one long piece, no waistline seam, and attach them to the centre front edges of bodice and skirt after they’re joined together.  The way it’s done in Faye is not actually terribly terrible, because this is the kind of dress you wear a belt with it, and a belt hides the waistline anyway; however I think this approach would make for a less bulky and cleaner waistline.

The hem, I made as a super skinny rolled hem, finished with tiny fell-stitches.  My crepe is the kind of fabric that when you press your very narrow finished hem, thus flattening it out from 3D to 2D, it morphs out to a much wider hem, seemingly by magic.

Summary; I love my autumnal new dress! and may even dare to wear it as a spring-time dress… I think it will work equally well!

Details:

dress; Fibre Mood “Faye” dress in a golden silk crepe from Tessuti’s in Melbourne
Tights; self-drafted using my own custom fit pattern and black polyester stretch from Spotlight
Belt; super old one from Country Road
Boots;  Officine Creative from Zomp boutique, a birthday gift from Craig

the swish is amaaaazing!  I’m so into the swish right now!

pinterestmail

Elementary, my dear Sherlock

Yes, I know; a complete mis-quote of an already mis-quote… *braces oneself for outraged Holmes enthusiasts*

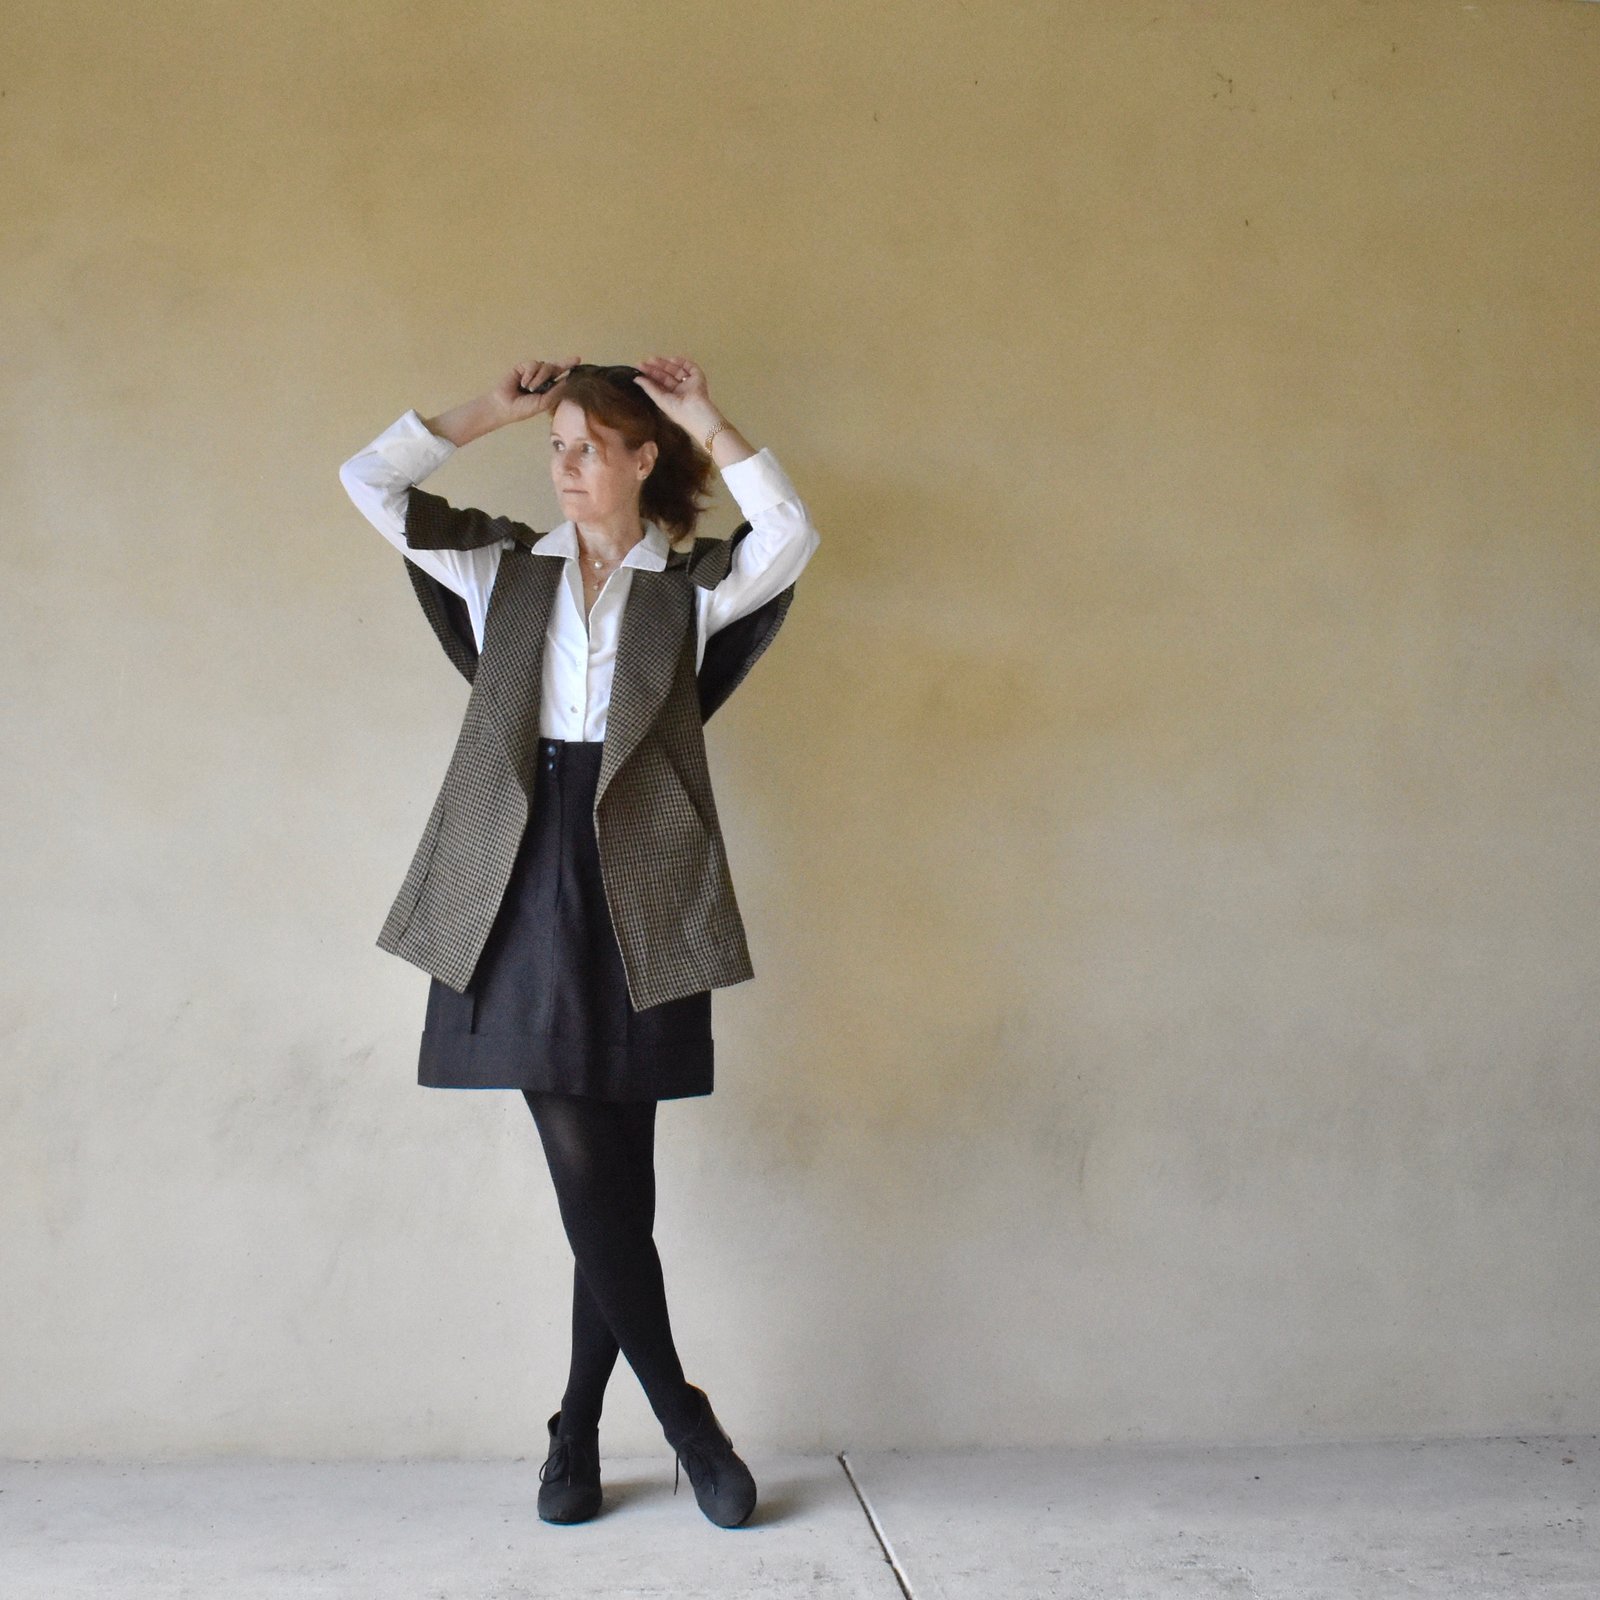
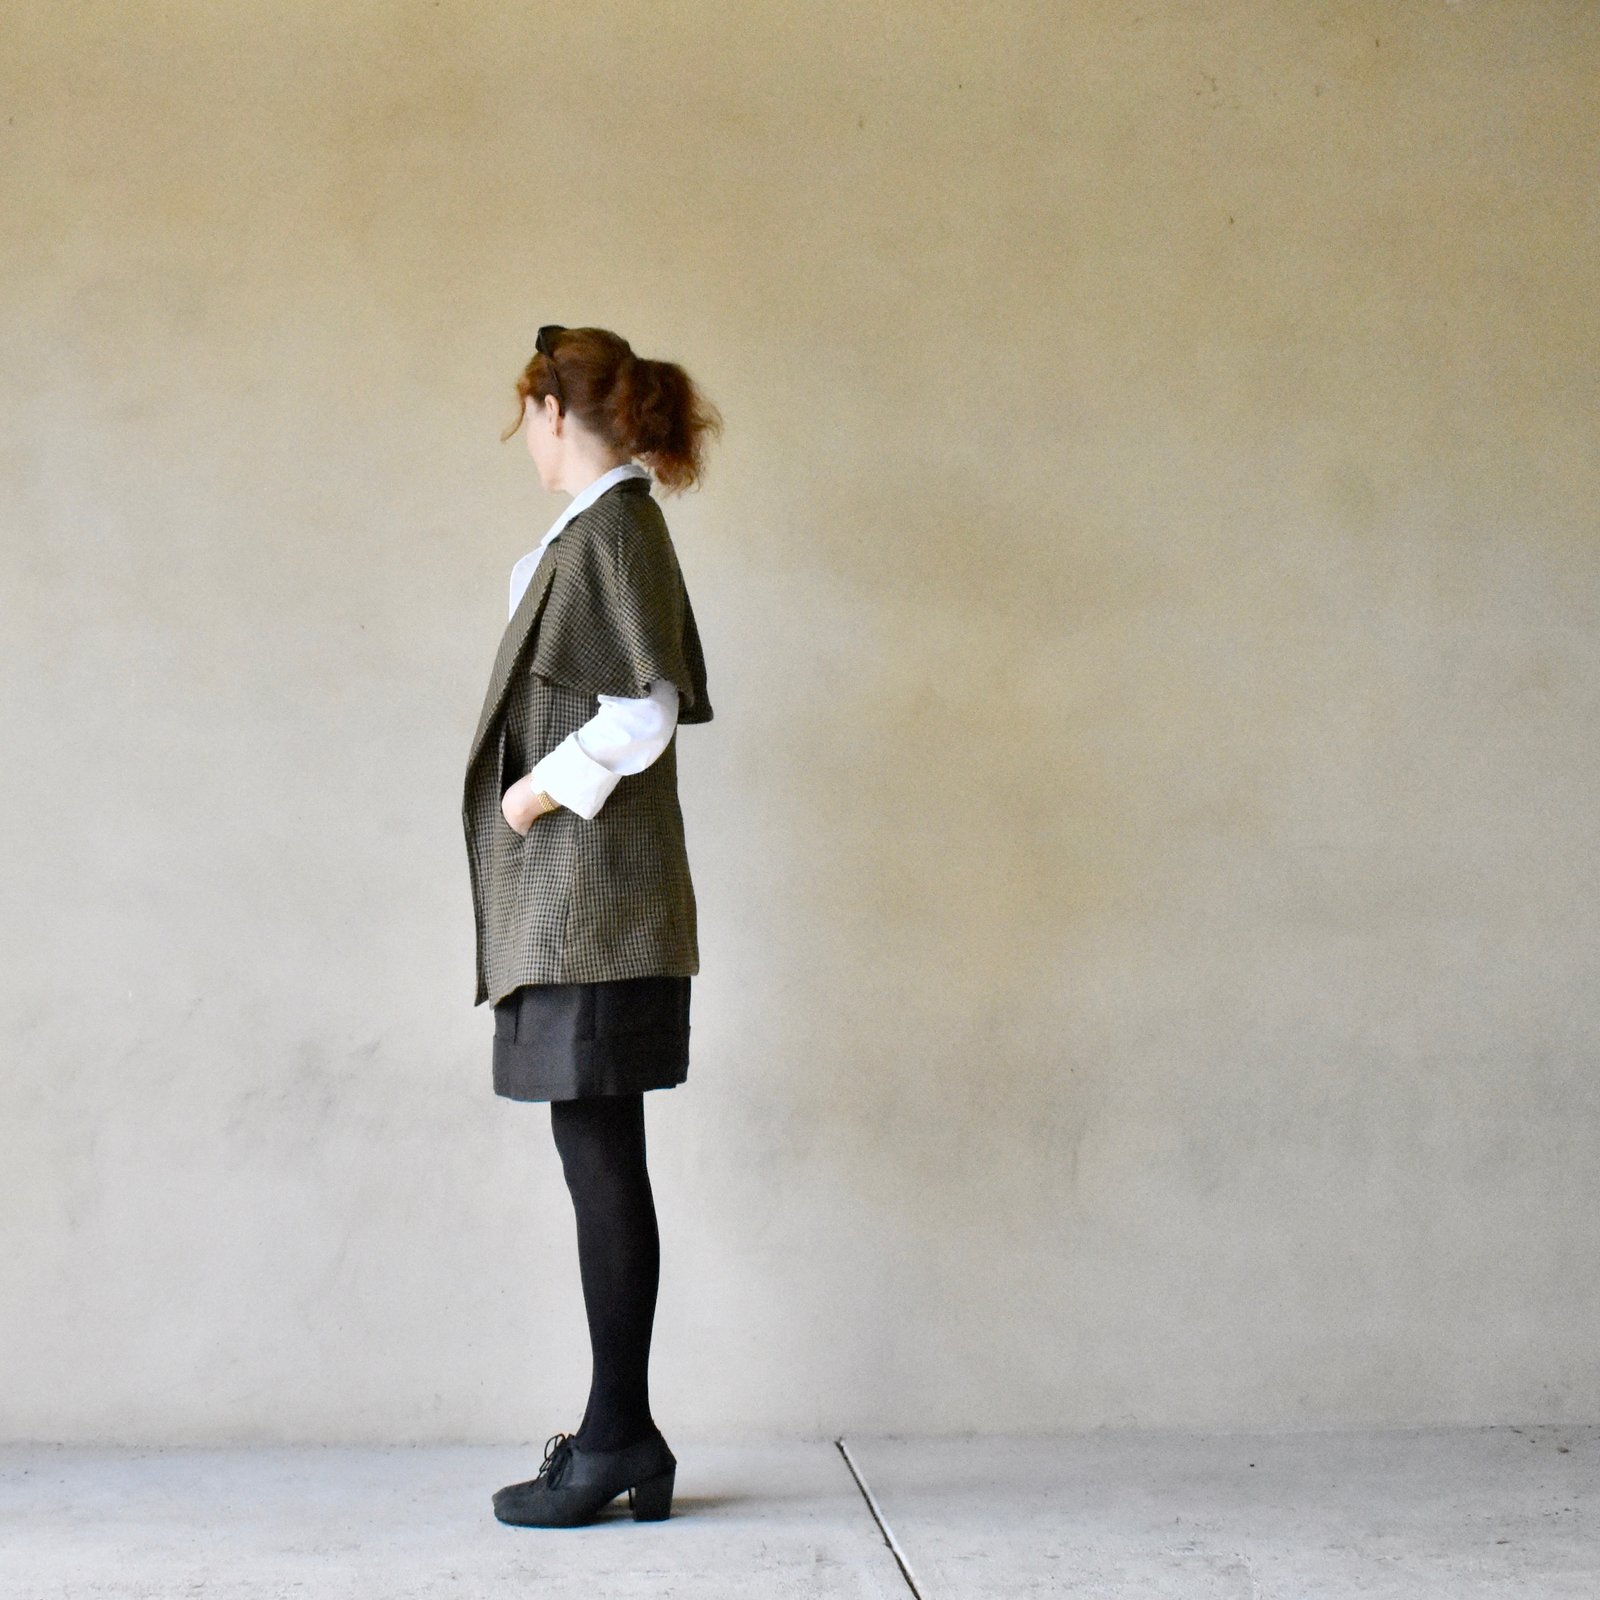
But wot is this new thing I’m wearing ‘ere then?!  Is it a jacket…?  no, a cape…?  some tweedy, distinctly Holmes-esque thing, somehow exuding English-ness, an air of briskly strolling in the country, of hounds-at-dawn, roaming in-swathes of fog and mystically swirling mist, stalking the streets of London or out on the Baskerville moors?  Fittingly, I’m accompanied here by my very own hound, who while certainly a fearsome and diabolical creature at times, is however sadly lacking a Baskerville lineage.

So, I was mindlessly browsing Le Internet, checking out new-to-me pattern companies, something I am wont to do, randomly, late at night and way past my bedtime,… and clicked Add to Cart on the Cape-Sleeved Jacket by Trend Patterns.  Followed by… Purchase.  So daring!!

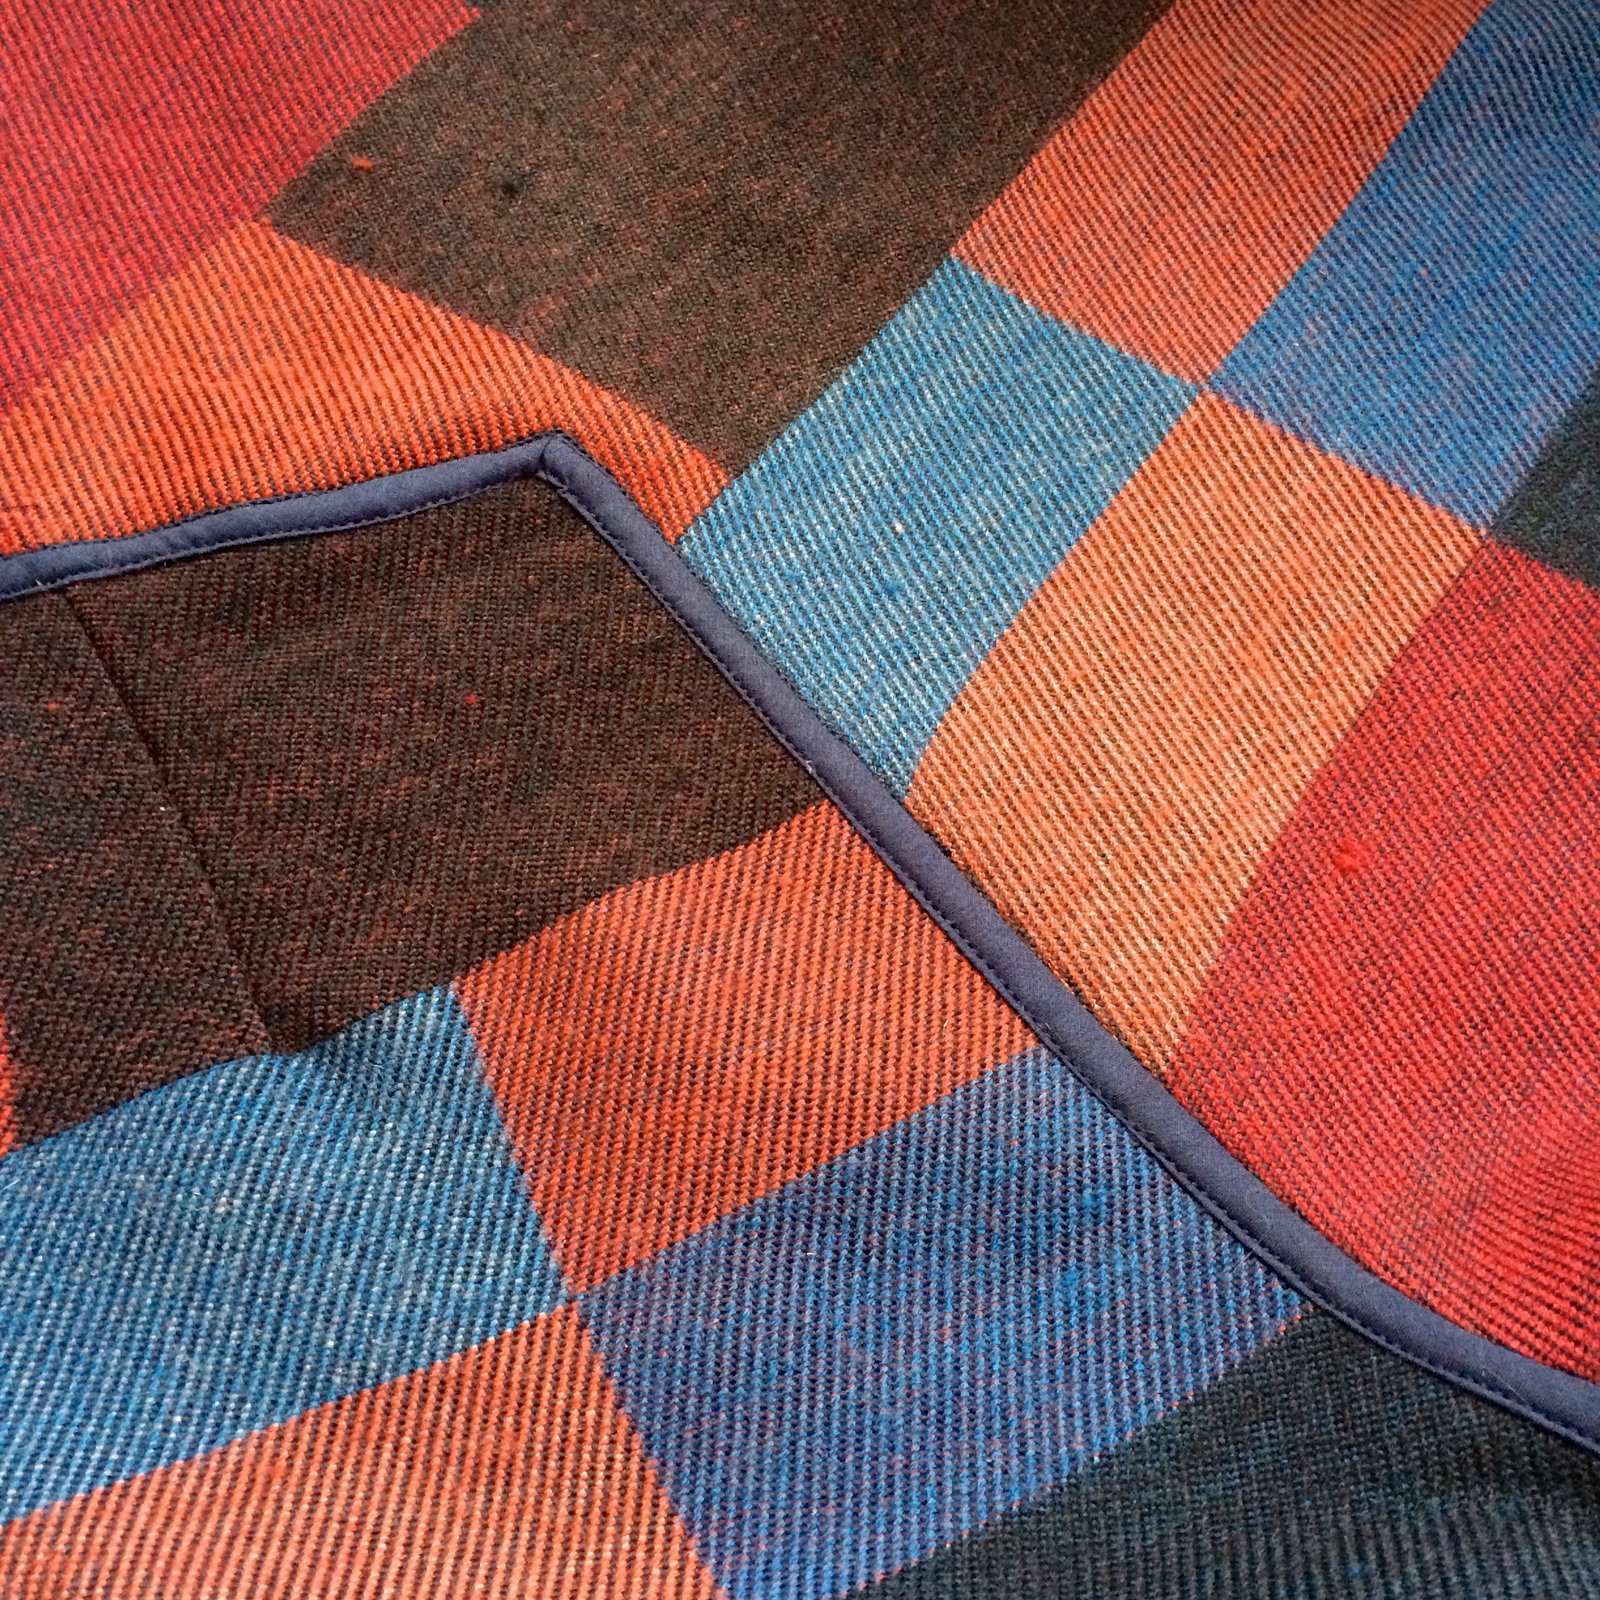
It’s a rather interesting and lovely style, not something I’ve seen anywhere else: a longline open jacket with notched collar and interesting “sleeves” that are more like an intriguing hybrid of sleeves and cape.  I searched my stash for a suitable victim, and unearthed a grey/black houndstooth-y check suiting; given to me yonks ago by ?I think? Mum, though I’m not totally sure.  It had exactly the right weight and style for this design, but the colour was pretty dead and cold and flat and looked absolutely terrible on me… so I squandered more time than I care to admit to, attempting to dye it.  It was a rather large piece, so I’d started out leaving it to soak cold in a large tub of yellow dye.  This had almost no effect, so I added orange for synthetic fabrics.  This had a tiny teeny little effect.  So then I dried the fabric, and cut out the jacket pieces, which made for a smaller bulk of fabric for the dye pot, and boiled it all up with the same dye mix.  Finally; SUCCESS!!!!

helping…

from left; original colour… after soaking… after boiling

The new shade of tobacco was rather warm and pleasing, and deemed acceptable.  Of course the big problem about dying pieces, already cut up; as opposed to one single piece of fabric, is that the pieces frayed a bit, and also got stretched out and distorted somewhat in the boiling/dyeing process, and so I’m not 100% confident that my final jacket is all that perfect or beautiful… but I did my best!  carefully steaming everything back into the shape of the intended pattern piece.


Lining;  fully lined with chocolate polyacetate lining fabric, from my stash, probably originally from Fabulous Fabrics since it’s a really nice quality.

below; see how the front armhole is open right up to practically shoulder level? I think it’s worth pointing this out since I actually had no idea it was like this from the line drawing and remained ignorant right up until it came time to add the cape facing…

That’s not a criticism btw, just an observation.  I really love my new Sherlock Holmes jacket, and I really loved making it too; but I’ve admit; it was not a particularly easy project.  Even given the fact that I complicated things for myself a. dyeing and b. deciding I absolute HAD to have in-seam pockets – which were a big success in the end if I say so myself.  I’m so glad I put them in.  Actually I can’t imagine a jacket without pockets of some kind.

How did I put in my pockets?  so I remembered to take a few pictures but not many, so hopefully my written explanation will suffice…  I cut the front armhole piece (below, at left) and the front panel (below, at right) as pictured; and in addition, a pocket opening facing piece (below, middle) with the same upper edge as the slanted edge of the front panel (at right)  I also cut a pocket lining (not pictured) from the same chocolate polyacetate lining fabric used throughout the jacket…  it’s the same size and shape as the pocket bag extension (at left) and with a slanted top edge equivalent to that of the pocket opening (at right)…

the pocket opening edge is that slanted edge showing out from under the square inner edge of the paper pattern piece, and that little extra piece is the pocket opening facing.  The facing is interfaced (see below), stitched along that slanted edge leaving a 1cm free at either edge of seam, and under stitched.  I cut a pocket lining using the same chocolate lining fabric that lines the whole jacket and stitched this on to the lower edge of the pocket facing.  Then stitched the pocket and pocket linings together around the long curved pocket edge.  The remainder of the jacket construction proceeds as normal, and the pocket is nicely hidden away between the jacket outer and lining

So; what was tricky about making this jacket…?  well, the steps are illustrated with photographs, not drawings; so if you’re the kind of person who often goes on the illustrations then it’s not always clear which pattern pieces or which seam you might be looking at in this photograph or that one….  and there are 27 un-numbered pattern pieces…  Maybe I’m just dumb, or losing it or something, but I’ve been sewing clothes for myself for over forty years and there were bits where I was scratching my head and had to read and re-read over a couple of times to “get” it.

It’s also pretty important to mark the marks, notches and dart lines carefully and securely.  As far as this project goes, this is where my brilliant plan to dye my fabric pieces fell apart a bit since a lot of these little marks were dislodged and lost while dyeing, and notches disappeared in fraying edges, and it was pretty hard to re-instate everything accurately.  To be honest, there were several times I felt like heaving the whole lot in the bin and starting over anew, with fresh new fabric, particular since I hadn’t even liked my fabric all that much in the first place!!

I think numbering the pattern pieces would have been a HUGE help, and then to use those numbers in the instructions.  Another thing, the instructions are…. kinda sparse.  The term “bag out” is used several times …  I’ve always been a little thrown by the term”bag out”.  I mean, I know what it is… basically just another way of saying stitch the outer and lining layers together.  See, I grew up under the tutelage of the long-term pattern companies like Vogue, McCalls and Burda; and “bag out” is not a phrase that ANY of them EVER use, as a rule.   Also, “bag out” is incidentally Australian slang for picking on someone, like rudely giving them a really hard time, so seeing it pop up in sewing instructions is always a moment for pause 😉

After all this; I actually quite happy with how my jacket turned out, and am even little keen to make it up again.  I think my attempts to dye the fabric just made the project a whole bunch harder than it needed to be, and I’d like to give the pattern a second chance, and to do it properly, make a really good and proper tailoring job of it next time.  I would also like to add a few more pockets, to the inside and the lining, like a mens’ suit jacket has.


Details:

Jacket; TPC13, the Cape-sleeve Jacket by Trend Patterns, grey tweed overdyed with orange dye
Shirt; the Closet Case patterns Carolyn pj shirt, white cotton, details here
Skirt; Burdastyle 10-2010; 136 (the Karl Lagerfeld skirt), in black suiting, details here
Tights; my own custom fit pattern, details here
Shoes, designed and made by me, details here

My cape-sleeve jacket feels so very very Sherlock Holmes to me that I couldn’t resist just popping over to London for a more appropriate photoshoot location….

jk, of course.  Hurrah for the wonders of photoshop!

pinterestmail

Sydney jacket

have you guys seen COLOSSAL… ?

Bet you can’t guess where I am here…   Yeah, I know, it’s a tough one.   Some locations are just so obscure and far off the beaten track, but I do like to seek out these especially quiet and sleepy, tucked-away little spots to highlight here on ye olde blog…  GO me.

Yeah, so I’ve made a Sydney jacket… I bought the pattern from Tessuti’s in Melbourne back during my March trip away there with Mum, Cassie and my niece Tiffany; and have finally got around to giving it a whirl…  I think I first saw this design on Sue, at one of our meet ups and was instantly interested.  It’s a pretty nice design with a true shawl collar and not just your usual body with two set in sleeves.  This is like my wearable muslin, if you like.

I used a very blankety-like wool-mix from Spotlight, which I think is definitely a lot more “mix” than “wool”, haha! but that’s fine by me!  I tossed it in the machine when I got home and it washed up beautifully, absolutely zero shrinkage and just a bit of light “fluffing”, which was equally ok with me; in fact any and all fluffing is totally welcome in all my winter clothing, thanks.

I agonised for ages over which side to use; one side was more vibrant but “flatter” with a more pronounced twill to its appearance; the other side is fluffier, and with more muted colours.  I loved both sides equally! and couldn’t decide… finally I asked Craig and Cassie to choose for me.  They both voted vibrant OUT, fluffy IN.  Hurdle number one; cleared!

It’s a lovely fabric really, warm and cosy and with that richly colourful blocky weave, the perfect drape;  and I loved the idea it for this particular jacket pattern… however! the Sydney instructions have a big bolded announcement on the first page… IMPORTANT: Not suitable for woven fabrics that fray when cut  What is my chosen fabric? only like the most fray-able of fraying fabrics ever invented by mankind. Typical of me, so stubborn.  I’m like… Oh, I’m not supposed to use a fray able fabric?  JUST WATCH ME THEN mwahahahaha.

Solution; I edged the visible raw edges with bias binding… oh I’d bought a mid blue poplin for my bias binding, but it was a bit bright.. so I sludged * it up nicely with a bit of iDye in Brown, to make a nice deeper dirty blue; a much better colour for my fabric.  I think it turned out a rather nice match!

Hurdles two and three; cleared!

new colour, with scrap of the original colour on top…

*”sludged” as a verb. along with the associated adjective “sludgy”, are technical terms used a lot around here… where Brown dye is employed liberally and frequently to tone down the overly bright colours beloved by commercial fabric designers and that form about 99.99% of commercially available fabric, so they better suit those of us who look hideous in said brights.

What else is there to say?  I lengthened the sleeves to bracelet length… I really like them at this length, and even though I wasn’t very serious about it at first I absolutely love my jacket now it’s finished.  It’s rather Lagenlook, yes?  I’ve worn it two days in a row since I finished it… and that’s just about unheard of for me! who pretty much has to mix it up some every day… There’s just something about this rather simple yet inherently dramatic style that prompts the adoption of random flamboyant poses.  My enthusiasm for photoshop going only so far, you’ll just have to imagine the appropriate backdrop in each case…

exhibit A, supersleuthy spy… the scene: nighttime; the main gallery of the Louvre in Paris, a dim light glistening off the polished parquet floorboards, while painted masterpieces look on silently

exhibit B: busy woman-about-town hailing a taxi on the streets of some mega-metropolis no, not in her garage, oh no not at all) the scene; outside the New York stock exchange, close of business, important business-y types milling about on peak- hour sidewalks

exhibit C: Victoria’s Secret model strutting down the runway.. except she forgot her wings and is instead clad in rather unsexy but warm, warm winter woollies in lieu of the cute little bejewelled bikini.  Or alternatively; Rio de Janeiro’s Jesus… or a tightrope walker…

Because the wrong side/underneath of the fabric shows around the neckline I applied the bias binding on the inside of this centre back seam here instead… it’s not super visible, under my hair and all, but you know… I made a little hanging loop too…

So that’s it!… oh wait, one last thing to add; and that’s my method for dealing with a frayable fabric in a pattern that calls for un-frayable fabric.  In this pattern the seaming is the simplest method possible; seams are formed by overlapping the raw edges and simply topstitching in place… and using my method you first bind the upper raw edges with bias tape, so you end up with all the seams thus highlighted throughout.

First step; overlock the raw edges of the underneath edge…  the bias binding will be applied to the upper edge only.

Cut bias binding strips 2.6mm (1″) wide… this allows for a seam overlap of 1cm (3/8″) For patterns calling for a wider overlap, the same method applies, just cut the bias binding strips correspondingly wider i.e., for a 1.5cm (5/8″) overlap, cut bias binding strips to be 3mm (1 1/4″) wide.. etc.

Stitch bias binding to the upper side raw edge in a 6mm (1/4″) wide seam.

Press over and around to enclose the raw edge.

Position the upper side edge over the underside raw edge, with the overlocked edge even with the bias binding edge.  This corresponds to a 1cm (3/8″) overlap, as required by the pattern.

Topstitch the two pieces together by stitching in the ditch, or if preferred, just inside the bias edge.

Topstitch a second time, with a second pass of stitching a scant 3mm (1/8″) just inside the folded bias edge of the upperside.

For the opening edges, lower edge and sleeve edges; I simply applied the same bias binding and slip-stitched it down inside just like a regular bias-bound edge…

Voila!  Jacket made the same way you’re supposed to, and using the forbidden fabric to boot!  Ha!

Details:

Jacket; the Sydney jacket by tessuti patterns, wool-mix blanket fabric from Spotlight
Top; twist top from Pattern Magic by Tomoko Nakamichi, green stretch, details here
Skirt; Jade skirt by Paprika patterns, in red stretch knit, details here
Tights; self-drafted, details here and my tutorial for making your own custom-fit tights pattern here
Boots; Roberto del Carlo, from Zomp shoes

SaveSave

SaveSave

SaveSave

SaveSave

SaveSave

SaveSave

SaveSave

SaveSave

SaveSave

pinterestmail
Switch to mobile version
↓