Monthly Archives: December 2017

You are browsing the site archives by month.

2017; a retrospective

It’s the last day of 2017… and what a year that was! we made it, hurrah.  Thank goodness for that, eh?!

So, in these end-of-year retrospective thingies I usually like to pick out some of my favourite photos/outfits/memories, just one for each month of the year…  Not all of these pictures appearing here made it to ye olde blog at the time, some are just happy memories of a happy day, that I decided to include them just because    Of course I am still wearing my handmade clothing in each one though…

January

ringing in the New Year at Eagle Bay, wearing my red gingham dress and ivory hat


February

 wearing my totally local, hand-dyed and -knitted outfit

March

as Queen Rutela, for ComicCon… making this costume was a ridgy-didge marathon!  LOVED EVERY MINUTE!

April

sunrise at Eagle Bay in my apricot top and boyfriend jeans

May

that time I made a jean jacket using 3 pairs of Tim’s old jeans.. worn with striped skirt and white oxford shoes, all made by me

June

Wonder Woman-ing … in pink skirtraincoatroll neck sweater

July

camping and trekking in Alaska! I wore an almost totally handmade wardrobe for our trip, details here

August

camping and kayaking off Vancouver Island! my handmade travelling wardrobe stood up quite well to the test

September

we got Clara!! wearing my yellow “dog bed” dress

October

…out to lunch in the city, in a tee, skirt and shoes all made by me

November

 my Lisa Carolina dress and handmade clogs

December

today, in fact!! in shorts, top and cardigan made by me

So, what happened this year, handmaking-wise?  Well, I suppose I should mention it again though it seems so long ago now… was it really only February?!; but a huge thing was finishing up my Year of Handmade.  That crazy year-long project in which I wore only clothing that I had made myself, for one whole year… including of course all shoes and underwear, in fact everything.  Wow, what a ride… I can hardly believe I did it, even now!  I was happy and so pleased and proud to round that up successfully !  The year in total can be viewed in my Year of Handmade album here, and my final summary of the year can be read here…  and just updating with a post script: since I finished I have continued to wear my handmade clothing of course, since I have very few pieces that are NOT made by me! but have allowed myself to go back to wearing rtw shoes.

What did I make?

This year I made 70 clothing items; including 17 items for others and 3 prs of shoes.  Yes, it seems like a lot! but it is definitely less than in previous years… see, I am really trying to be more careful with my time and resources, to work slowly and surely, to not be wasteful with materials, to finish things as neat as I am capable.  But I guess there must have been quite a few quick and easy ones in there too!

I also discovered bookbinding and made a few little hardback books.  I can’t really see this overtaking my interest in making my own fashion and clothing, though!

What did I wear?

I’m still faithfully keeping up my ootd blog, and noting what I wear and how frequently, which hopefully alerts me to what I do not wear! in an attempt to be more, I dunno, “mindful” about the things I’m adding to my wardrobe…. Here in a nutshell are my most worn clothing items for the year:


Apart from shoes, most of which are worn a heckuvva lot more that any of my clothes.I suppose because I have less of them?… my most worn clothing item for the year by far is my pale pink Kelly raincoat!  It has been worn a total of 52 times, which is pretty outstanding for one year.  Coming in second and third place is my ivory corduroy hat (21 times) and my navy blue Miette cardigan (also 21).

Favourite creations:

hmmm this is a toughie, I don’t know if I really have just one favourite this year?  I feel like this has been a very sensible year, in that I’ve been adding mostly useful and nicely thought out items to my wardrobe.  None of which are inherently “exciting” but which I tend to reach for over and over again.  I’ve been uncharacteristically prosaic, actually.  Maybe I can chalk this year up to “the year of being sensible” #yawn oh dear…

Oooh, no wait; I’ve just remembered my Queen Rutela outfit, which totally destroys any claims I might have to sensible wardrobe planning, obviously.  You don’t get much less sensible than that ensemble!  And gawd, it was fun! It was terribly involved and there was lots of nutting out how on earth I could even begin to make bits and pieces of the costume?!  but I really do love a challenge and enjoyed making that so much.  Plus Cassie and I had a blast at ComicCon! she isa already halfway though her costume for next year, so I’d better get cracking on mine.  What am I going as this time? ooh, wait and see!

What are my plans for next year?

I think I just want to mostly continue along the same path that I set for myself this year; namely; to make everything that I can, and to make things that are useful, and well made, but additionally; maybe to loosen up and have a bit more fun with my wardrobe,, make some things that creatively stretch me a little bit more,

On another note; I’ve recently sorted through my fabric stash and done a HUGE tidy up and organization of it all… but I will save the specifics of that for its own blog post because I think it deserves it… but I’ll just say for now that another tentative goal for this year is to buy as little fabric as possible and to make from what I have, IF I CAN.

Aaaand thirdly, and I don’t want to jinx myself, but I am sooooorta thinking about making a pattern, hopefully early in the year #fingerscrossed

That would be called… a resolution?  ooh the R word.  Sorry.  Other, things I’m aiming for this year, is to make something for someone else, at least once a month, and also to also refashion something at least once a month.

Any other thoughts?

Just the most important one, which is that I’d just like to sincerely THANK everyone who takes the time to read my blog! and most particularly to those who write a comment every now and then, thank you so very much,  *mwah* I am so very grateful for each and every kind word.  And I’d like to wish for all a safe, happy, prosperous and peaceful 2018; above all I hope the New Year brings you much joy and happiness!  xxx

SaveSaveSaveSaveSaveSave

SaveSaveSaveSaveSaveSaveSaveSaveSaveSaveSaveSaveSaveSaveSaveSaveSaveSaveSaveSaveSaveSave

SaveSave

SaveSave

SaveSaveSaveSaveSaveSaveSaveSaveSaveSaveSaveSaveSaveSaveSaveSaveSaveSaveSaveSaveSaveSaveSaveSave

pinterestmail

Christmas pressies; a sewing marathon

Tim and Kelly…

As usual, I made Christmas presents for my family… I started late October, so I was giving myself plenty of time, or so you’d think!  I’m a fairly efficient seamster, and I still only just finished a few days before Christmas!  it’s been a little intense and stressful, actually; every year I underestimate how busy the lead-up to Christmas is and how I just don’t get as much time to devote to sewing presents as I thought.  Plus, I’m a lot more finicky and particular – maybe excessively so?! about my sewing now too.  I think this is a good thing, but I have to accept that I’m taking longer to make things, and should start sooner!  Or maybe make less?

Anyway, it got done!  *phew

Listing everyting in the order I made it…

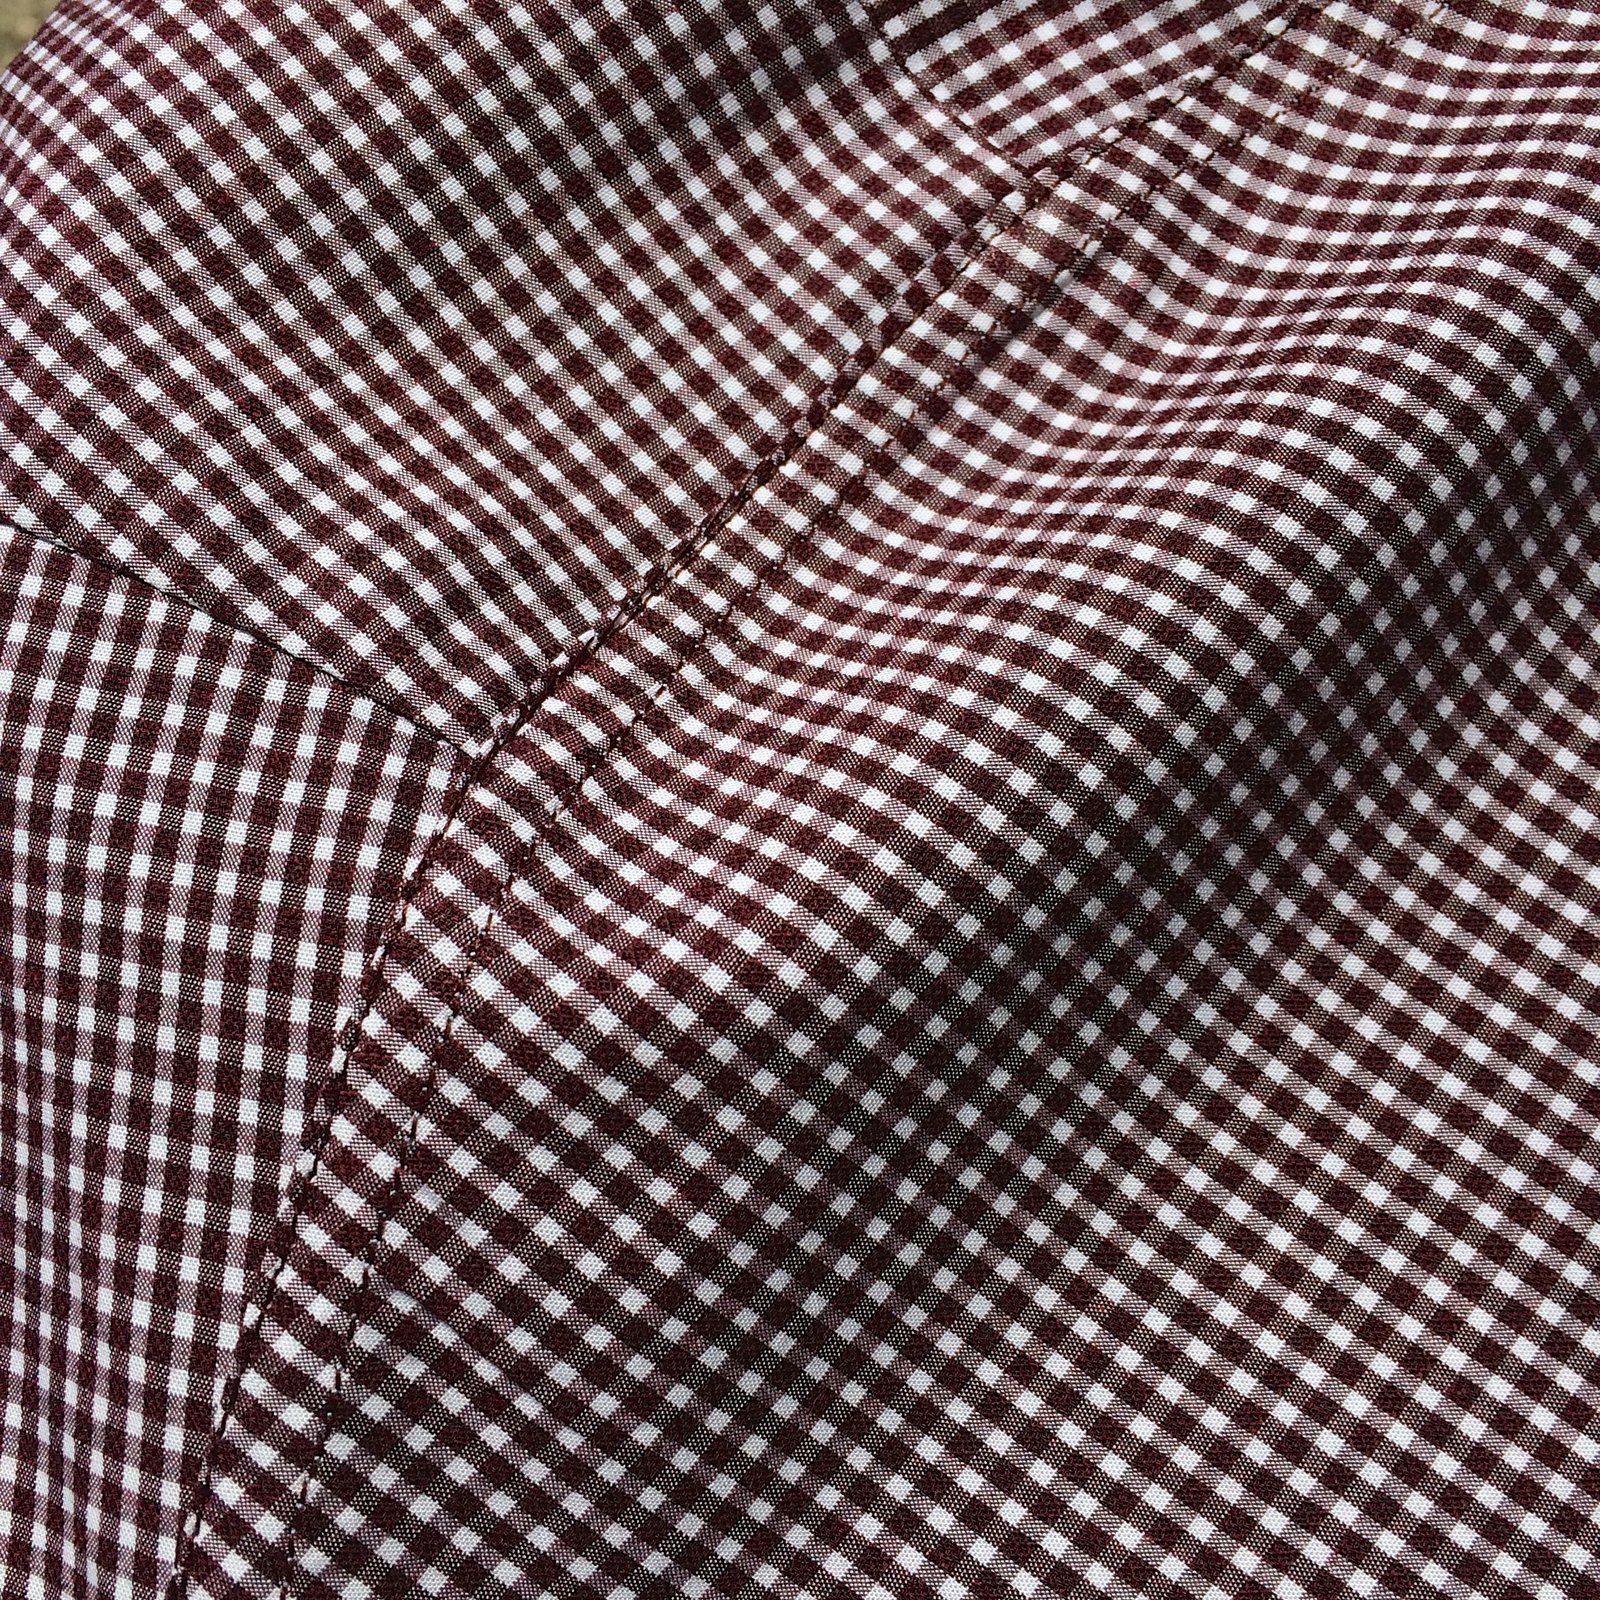
First thing to get made was a shirt for Tim… He has a job now where he has to look smart, so I decided to make a business shirt… I bought the really lovely deep maroon, mini-scale gingham cotton shirting from Tessuti’s in Melbourne, and used Burda 6874, my kinda go-to shirt pattern since I semi-retired Burda 7767.  d’you know I made that pattern 37 times… can you believe it?!  that tissue paper was wearing pretty thin in some places and in some other places I’d trimmed off the cutting lines altogether, woopsies!!

what sleeve placket…? of course I busted a gut matching those teeny little checks everywhere, took me two days before I could see straight again…

I made the buttondown version… see how the collar up there buttons down onto the shirt?  This is what qualifies it as a buttondown, folks!  I don’t wanna get all grumpy and pedantic here, being Christmas and all, but the number of times I’m reading about someone’s very lovely, but NOT A BUTTONDOWN shirt erroneously labeled as such and have to hold myself back, because we all hate a little lecture, right? I’m gonna stop right now otherwise I’m going to become that painful lecture-r.

this is the inside of the shirt… I’m pretty proud of my flat-felled seams… and I use the burrito method for the yoke so that’s all nicely enclosed too

All seams are flat-felled, using my own tutorials here and also this one here… yes you can flat-fell every single seam in a shirt! and it’s so much better and nicer… although I’m starting to realise that this is probably why what used to take me maybe two days to make a shirt…  now takes me double that time at the least! but anyway.  My guys appreciate the tailoring, so I’m happy that they’re happy.

Sam’s shirt…

I’m just SUPER happy with how my buttondown collars are looking nowadays!  It’s pretty hard to get that sitting just right and perfectly symmetrical; and I think after all the shirts I’ve made I’ve finally got it down…

Next up; I made a matching top for Kelly.  I’ve previously made matching tops for the two of them and noticed that they wear them together a lot! yes, it’s super cute…  I did a little bit of subtle inquiring as to whether matching clothes were still something they liked before I went there and got a positive response.  Alright then!

I had to be far less subtle about fitting it though!  I’d previously taken Kelly’s measurements for when I made a Kelly anorak for her… it’s impossible to do this without it being obvious! and made a block for her, using my Pattern Magic book to help me.  Yes, this is a pretty involved thing to do, requiring protractors and algebra and such-like! but honestly I’ve always found it to be a hugely worthwhile exercise when drafting new patterns.  Then I mocked up a quick plain bodice, and got her to try it on, and made the necessary changes.  In Kelly’s case, the block fitted but the armhole/bust dart had to modified considerably… the famous full-bust adjustment.  I regret now that I didn’t take any pictures of the mock-up bodice and the changes I made because it was a new learning curve for me that I wish I’d documented!

For Kelly’s top, I’d chosen the asymmetrical cowl top from Pattern Magic 2; the shape of the cowl is dictated by the shape of the facing.  It’s always a bit of a challenge to draft your own patterns, but well I love a challenge! and I knew the shape of this top would be super flattering for Kelly and suit her beautifully…  I cut the pieces on the bias and inserted a maroon invisible zip in the left side seam, so it zips down undone… however Kelly says she can squeeze into it without having to undo the zip which is cool.  I think the bias-cut is what gives it that little bit of stretch.

Next up! a business shirt for Sam! He has also started a new job which requires business dress everyday… I’d noticed a lot of young men wearing gingham shirts while we were in Melbourne… a good sign that gingham is super on-trend! so hot right now! which is basically why I bought gingham for both my boys in the first place.  It’s a bugger to pattern match though, even worse than stripes! gnnnnnnn  but oh well…

Again I used Burda 6874, flat felled seams throughout, same links as for Tim’s above… aaaaand so not much else to add.  Both Sam and Tim have been working out some lately, so I think I’m going to have to make some small adjustments to their shirts in the future.

Next up!  I made some little things for Cassie, she needs more work clothes so this was another practical gift really.  I made three things for her…. I just want to say here; it might seem unfair that I made one top plus TWO skirts for her, when compared to just one shirt for each of the boys, but it really does even out because the TIME I spent making these three little separates is actually the same as the time I spent on EACH of the boys’  shirts.  I know, crazy right?!  it’s all that tailoring bizzo that takes so much time…

Likewise, Kelly’s top needing a block made, plus the fitting muslin, plus drafting a pattern, also took about the same amount of time as making three tried and true things for Cassie!

Anyway; Cassie had already chosen this lovely crackle-y hand-painted cotton from the Fabric store in Melbourne while we were there, and I secretly bought the mustard gingham printed silk from Tessuti’s while she was looking elsewhere.  So the little top was a surprise!  The crackle print really is gorgeous, it is hand painted in Zambia and has that handmade naturalness to it…  LOVE this but pattern matching those hand-painted stripes was never going to happen!  of course they are all different widths and thicknesses which just adds to the charm of course.  I just shut down my inner-obsessive for a little while and did my best… at least I got the centre back seam to match!

The other little skirt is a cityscape print, maybe New York City by the looks of that Lady Liberty in there!  We’d seen the fabric in the upholstery section of Spotlight, so she’d known this one was coming too…

for both skirts I bound the lower hem seams using some leftover purple pin-striped linen, the leftovers from when I made this shirt for Craig a few Christmas’s ago.

I have also taken to binding the bottom edge of the zip and stitching it down to the seam allowances… often the bottom edge of a zip has a slightly scratchy bit which can be extreeeeeemely irritating when you’re wearing it… so I’ve taken to doing this whenever I made an unlined skirt with an invisible zip.  Such a small thing that greatly increases the comfort factor when wearing the skirt!!!


Oh! patterns!  I used the Inari tee pattern for the little top and Vogue 8363 for both of the skirts, and since I’ve made both of these patterns for her several times already they were super quick and easy to run up. For both skirts I added belt loops so she can cinch in the waistline a bit; in self-fabric for the Zambia striped one, and in black denim for the cityscape one.

Next up! a short-sleeved white shirt for Craig! also using Burda 6874 and a white cotton broadcloth from Spotlight, this was intended originally to be the same as this little shirt that I made for him a few years ago and which happens to be his most worn shirt … then just before making this I’d whipped up my little yellow/black&white lingerie set and had the gingham ribbon sitting out, and suddenly had this brainwave as to how I could use a bit more of it! I stitched the gingham ribbon carefully down the button line of the button placket, and used a little bit to trim the pocket.

To match this gingham detail, I lined both the collar and collar stand with some cotton gingham that I’ve had for aaaaages, and used black buttons to finish the shirt.  Note; IT’S A BUTTONDOWN SHIRT!  Also, of course it’s nowhere near a clone of the other white shirt any more but I still think he’ll wear it a lot…

Next up! a pullover/sweatshirt for Craig!  truth now… I was running out of time, and steam! and this fair near killed me!

Craig with a much much smaller Sam and Tim…

So, once upon a time, nearly twenty years ago, we went on a summertime camping trip down south and it was blooming’ freezing, our tent nearly blew away, we got rained on, hailed on and fair near froze to death!  In pure survival mode, Craig drove to the nearest town bought a red sweatshirt that he has since LOVED and worn about a million times, almost to bits since it’s getting reeeeeeally worn and threadbare now.  At some point he asked me to make a clone of the famous sweatshirt…

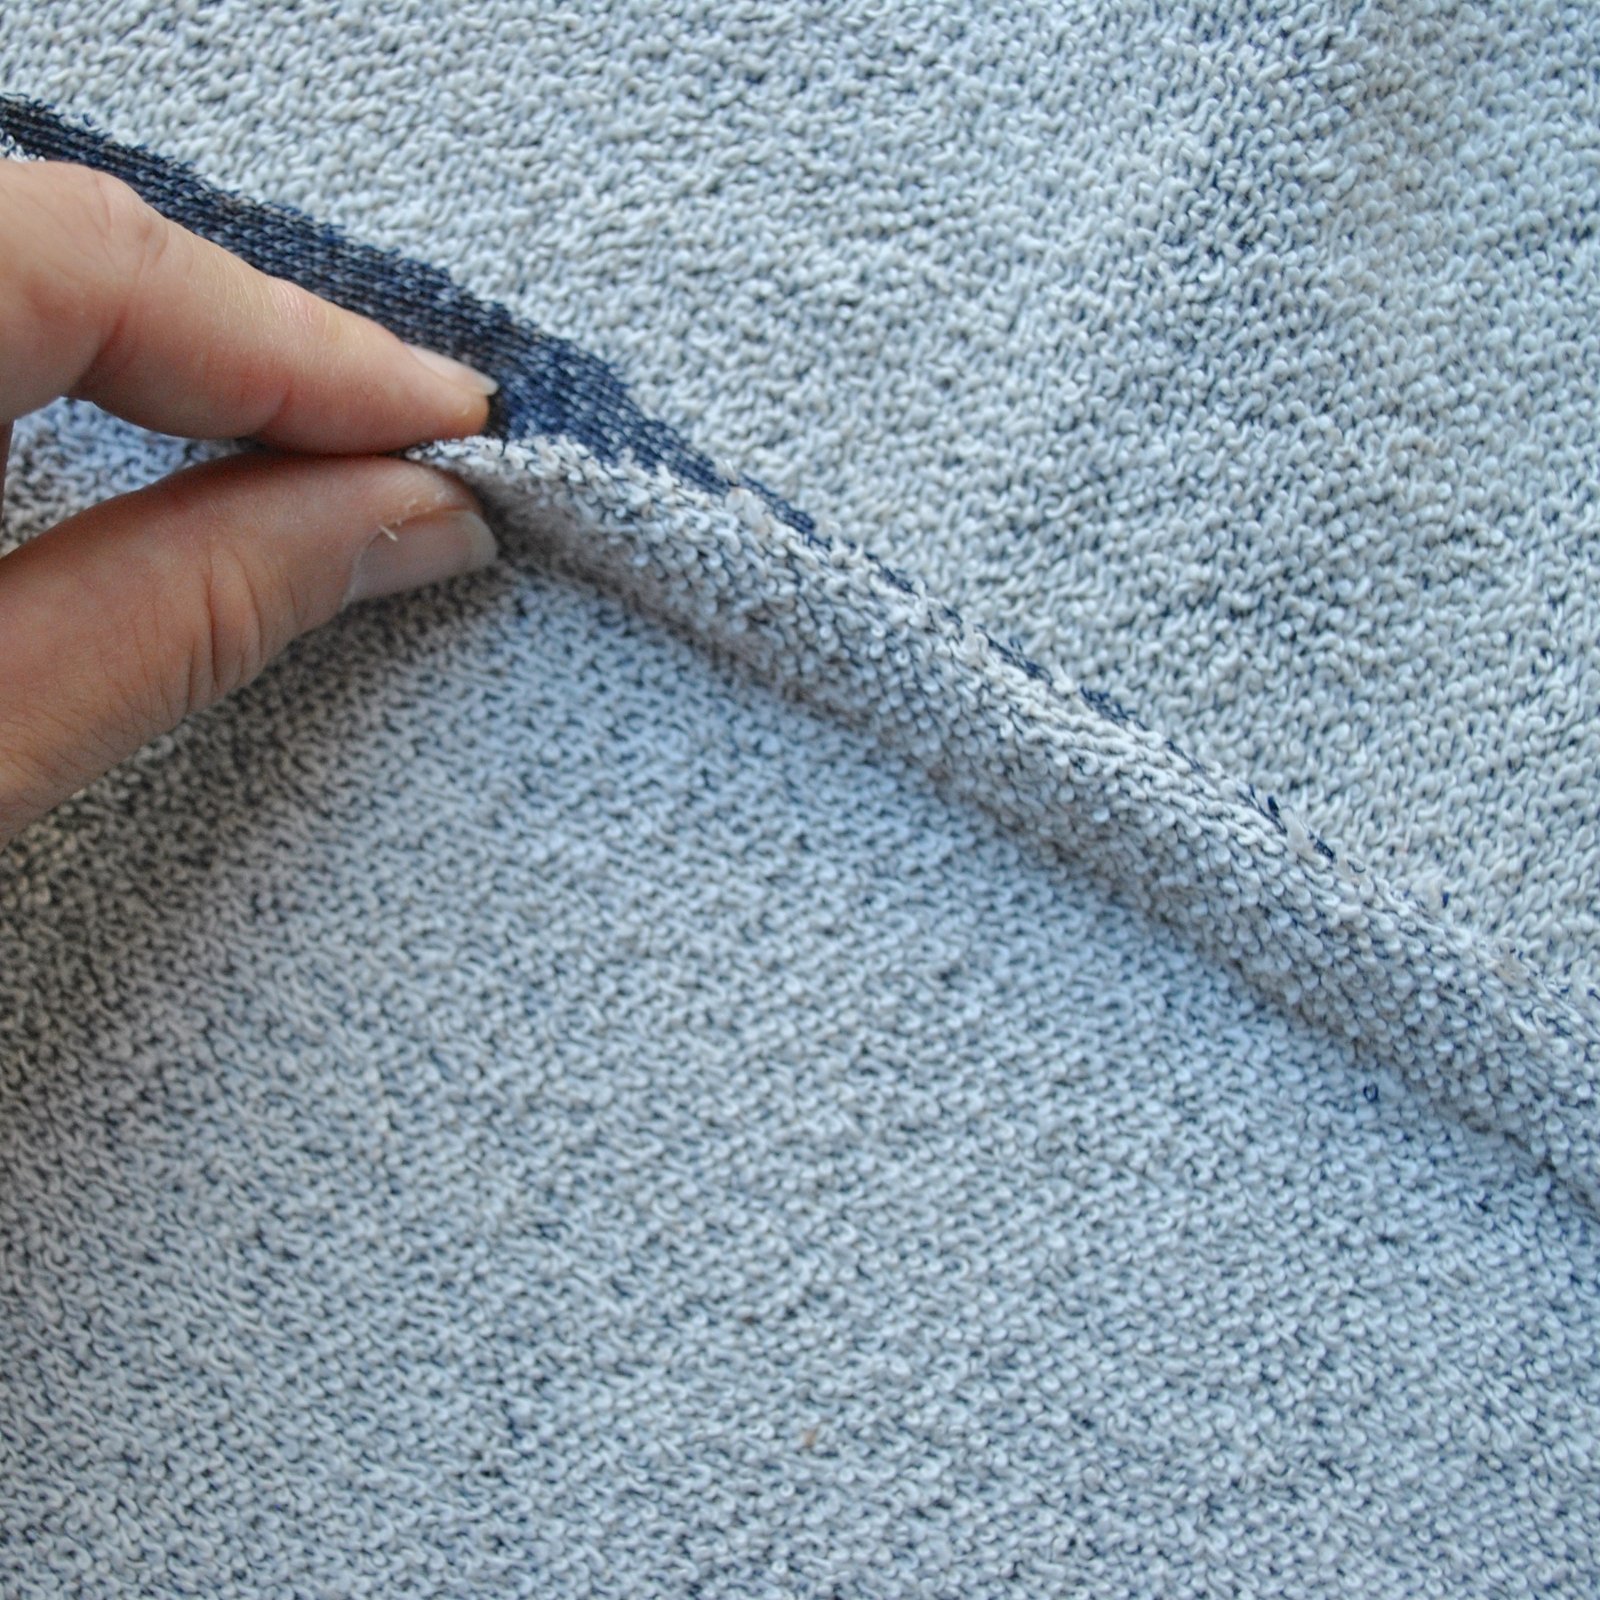
Of course it’s easy to clone a sweatshirt, but the challenge is in finding suitable fabric! I found this blue marled French terry in Spotlight, and while the colour is a teeny bit blah and the texture is not as nice as his original sweatshirt, it’s going to make a reasonable stop-gap until winter rolls around, the winter fabrics come into the shops, and hopefully I can find something nicer.  I busted a gut finishing off all the seam allowances off beautifully inside though… imitating the exceptionally beautiful finishes that were in the original.  For the pockets and bias binding I used some of the leftover navy/white gingham that I used for Sam’s shirt, above.  The pockets are French-seamed and the rest of the seams have an interesting amalgamation of HongKong bound AND flat-felled seams… not sure if my method is the same as in the original but I worked out a way to do it and took a few pictures along the way.

First, stitch the seams, then figure out which way you want the seams to be stitched down and apply bias binding to the topside of the seam allowance… ie. to stitch along the same stitching as previously you will be pinning/stitching along the UNDERNEATH,

OR alternatively you can save yourself a step here and stitch the bias binding on at the same time as you’re stitching the seam; your choice.

Press the garment seam allowances open, then press them to the side where they will be felled, with the bias binding on top.  From the other, right side, of the garment, pin through all layers.

With the right side facing up, topstitch the garment to the seam allowances plus binding, through all layers, just to the side of the garment seam…

view on the inside…

Keeping the bias binding free and clean, trim and grade the garment seam allowances…

Turn under and press the raw edge of the bias binding down so as to encase the seam allowances of the garment, pin in place.

With the bias binding facing up, and following the previous stitching as a stitching guide, topstitch the pressed edge of the bias binding down.  Since you’re using the previous stitching as a guide, the width of your double-topstitching will be nice and even from the outside.

Voila!  Such a nice neat finish!  at first I thought it might be overkill, but it is rather classy, if I say so myself; looks pretty good both inside and outside.  I will definitely be using this one again!

As seen above, I also applied bias binding all around the zip tape and stitched it down with double top-stitching the same way to match… this really does make a nice, neatly finished look when the zip is down.  Which it will be, most of the time.

And, last but not least!  I also made a few more little hardback notebooks… just fun little things, however I do know that the recipients do actually use notebooks regularly so I know they will be useful too!  I used mostly a mixture of leftover and old papers; from old scrapbooks, some with the children’s scribbles still on them!  I’m sentimental that way  😉 , various papers, musical paper, some pale coloured wrapping paper, writing stationery; just lots of different stuff.

The notebooks are covered variously with linen, velvet, printed cotton.  The one I made for Mum is covered with raw silk hessian.

So! Yes, it was quite a lot of stuff to make and I was working on it all like billy-o from touching down after Melbourne right up until I finished right on the wire only two days before Christmas…  I’ve been thinking about this… why am I taking longer to achieve less nowadays?  and I think it’s because I used to be happy and content with a slightly more unfinished approach… slapdash is maybe too strong a word? whereas now I am far more, possibly excessively? finicky and particular about perfect finishes on the insides.  I think I’m ok with this…  I feel like well-finished clothing is what I’m into right now.

However, to avoid the Christmas stress maybe I need to start making Christmas presents a LOT sooner!  Each year I start way ahead of time and think by doing so will relieve the stress, each year I get super stressed out and have at least one “I CANNOT DO THIIIIIIS!!” moment.  But I did.  And now for a break from deadlines!!

SaveSave

SaveSave

SaveSaveSaveSaveSaveSaveSaveSaveSaveSave

SaveSave

SaveSaveSaveSaveSaveSave

pinterestmail

Liberty bathers

I made these bathers and took these photos over a month ago… hehe I just checked; 19th November!  What with the pre-Christmas social whirl and pressie-making craziness, I completely forgot about putting them up here, although I’ve been wearing them almost every day and actually happen to adore them too.  Oops!

I bought this gorgeous Liberty swimwear fabric from the Fabric Store, it’s the Liberty of London Argyll Swim in Mistral B… fell in love with this pretty print just about immediately; and those lovely bubblegum colours!  I’m having such a pink moment!  I planned at first to sew up my regular tankini adaption of McCalls 2772, and even cut out the pieces for the tankini.  But then hesitated, had a sudden attack of the oh here we go agains… see; I always make the tankini version of this pattern and never the bikini.  Plodding about mindlessly in the ol’ comfort zone as usual… and I really enjoyed wearing my black Sophie bikini last year.  Why not be daring and make the bikini?!!  Old-me would have worried about such nonsense as age-appropriateness, but now-me is getting over that now.  I  also asked my resident swimwear experts (Cassie and Craig) who both voted for bikini.  Alrighty then!  So I just dived right in … dove?

Not much else to say! only that I really really love this style of slightly blowsy halter neck top; I think it’s quite flattering to my figure, and I like the nice full-bottom coverage of the bottoms too.  One of the reasons I started making my own swimwear in the first place, even before I swore off buying rtw, was because of the at-the-time fashion for extremely skimpy bottoms.  Oh, and also because you weren’t allowed to buy a different sized bikini top and bottom, in spite of the fact that they’re priced as separate items.  Ha!  I still have vague memories of the actual day I called a halt to the sheer awfulness of swimwear-shopping… three very small children in tow, one in the pram… back and forth, in and out of the changing room… and those lights!! the refusal of the sales girls to comprehend that one wanted a size 12 bottom and a size 10 top… “No, I’m afraid you’ll have to buy two pairs of bathers if you want that!”  It was so frustrating!  I just went straight to the fabric store for a pattern.  Never again!!

Details:

Bathers; McCalls 2772 bought probably about 22yrs ago now, in Liberty swimsuit fabric
Hat; Country Road, also bought probably 22 yrs ago now!  it’s been a goodie.  I like it because I can hide my face like a movie star and thus be kinda anonymous while wearing my bathers on the internet, hehe  🙂

SaveSave

SaveSave

pinterestmail

mini Lamington petit fours, and baby birds

scaling Mt Lamington…

Before the onslaught of sewn Christmas gifts, and, I’m sorry, but there’s a LOT to share… here is a rare appearance of some baked Christmas gifts!  We kind of have a no-gift policy  within our extended families for Christmas nowadays, but I still always like to still give just a little something.  There have been years in the past when I used to make little Christmas ornaments and tree decorations but lately I’ve stuck to edible treats.  I dunno, but food seems less of an intrusive gift? if that makes sense? it can be kept for personal consumption if the recipient so desires, or else passed around at the ubiquitous seasonal parties at a pinch…  and, unlike ornaments which can sorta impose upon people an expectation that they’re hauled out for display every year; they’re consumed, i.e. they GO!  No random stuff to add to the household clutter, yay!

A few weeks ago, our friends R and J became Australian citizens after a looooooooooooooooong and extreeeeeeeeeemely drawn-out process, and celebrated with an “Australian” party; we all were to take a plate and I took a plate of petit fours, specifically that all-Australian classic: Lamingtons.  But not the big honkous ones, oh no, little elegant bite-sized ones.  They disappeared from the dessert table in quite a satisfactorily quick manner, so I decided to make them again for this years’ Christmas gift.

By the way, want to know what I wore??  I wore this ensemble!! haha, well if I’m going to wear it anywhere, it should be to an Australian party!  Some people at the party were even very kindly interested to know the whole story!

Your classic Lamington is usually quite big, like 5-6cm (2+”)  square, but I prefer them made in this bite-sized form a LOT more.  They look sweet and more appetising, and just more fun … well anything in miniature is more fun, no?

My recipe… adapted from various sources.  This makes a generous, party-sized batch; for gifts I made several batches to get enough.

Lamingtons

Sponge cake; if you’re short on time you can buy a ready-made sponge cake which makes this a super quick and easy treat!  however it’s not that hard to make your own.  If you do make your own, it’s best to make it a few days earlier and leave it to harden up and get just a little bit stale.  Stale cake? yes sounds horrible, but trust me, the Lamingtons really are the better for it.

5 eggs
3/4c castor sugar
1 c SR flour
90g melted butter

Beat the eggs until thick and creamy and pale; while still beating add the sugar very gradually, and continue beating continuously until dissolved.  Fold in butter, then sifted flour.  Spread into a 25x30cm Swiss roll pan lined with baking paper, make sure the mixture is only, like 2-2.5cm deep, at most! and bake at 200C for about 10 minutes, or until a light golden brown.  Turn out immediately and allow to cool completely.  Once cool put in an airtight container and let it sit in the fridge for a few days until a little hardened and slightly stale before assembling the petit fours.

A few days later: take out the sponge and cut it into neat and even squares BEFORE you prepare your icing.  Mine are about 2.5cm (1″) square in size, but obviously you can go whatever size you wish… square, however, is traditional!

Also before preparing the icing, have the desiccated coconut ready in a shallow bowl for the coating step.  Only then, continue!

Icing:

3 1/2 c icing sugar
1/4 c cocoa powder
1 Tblsp melted butter
1/2 c boiling water

Large quantity of desiccated coconut for coating… around 300g should be plenty

mix all ingredients except coconut! together thoroughly.  To save time and an extra pan; (remember the first rule of baking; minimise washing up at all costs!!) I just put the unmelted butter on top of the dry ingredients, and just slowly pour the boiling water on top of it; it quickly melts the butter into the mixture, saving you the extra step of having to melt it first.

To assemble the lamingtons; dump sponge cake squares into the chocolate icing and fully coat them, take out and let excess icing drip off for a second then quickly roll them in desiccated coconut.  Messy, but just do it fast!   It’s far better to do this step while the icing is still pretty warm, as it stiffens up pretty quickly as it cools… you can add tiny bits of boiling water to make it runny again but it’s not as good.

Set the freshly finished Lamingtons onto a wire rack and into the fridge to set completely.  They can be frozen, and in fact are DECLICIOUS eaten frozen during the summer.  Personally, I prefer them frozen… in any case it’s best to at least keep them in the fridge.

Real talk; this rather prosaic and un-pretty packaging below is how my family actually receives them….  when it comes to serving them up to guests I like to arrange them either in a militarily, strict grid on a square plate… OR even looking all dishevelledly pretty in a jumbled mini-mountain of lamington-boulders, like in the picture at top; but to give them away I buy these airtight, snap-lock boxes from the supermarket to pack ’em in.   Not super glamorous but they are super practical… so people can pop the boxes straight into the freezer, and keep the containers afterwards to store other food in them, if they wish.

Also I just wanted to show here our gift tags for this year… made using the leftover bits of card from when I made my iceberg advent calendar recently.  There was this little pile of randomly shaped card leftover and I couldn’t bring myself to throw them out with a need for Christmas gift tags just around the corner!  I once again wielded my trusty old star stamp … oh, and can I just say, if I could say something to my younger, newly adult self, it would be GOOD ON YOU! for buying a small selection of stamps and high quality ink pads during that early, brief card-making phase, because for decades now I have continued to use these every year to make Christmas gift tags for practically nothing since they’ve paid for themselves a gazillion times over now.

waste not want not!

Merry Christmas, all!!!

Oh! and a random note about life here lately… I just have to share this… we’ve had a little family growing up in our garden over the past few weeks! a couple of willy wagtails built a beautiful and perfect little nest up in the upper boughs of one of our potted ficus by the pool… we watched with great interest as the two birds took turns sitting on the nest, until one day…

and then the next day…

and the next:

last Sunday:

Monday;

Tuesday:

Wednesday:

Thursday:

on Thursday arvo, one of them popped out of the nest!! it sat on the bough for a few hours but later on hopped back into the nest for the night.  Every night a parent would sit on them all night…

on Friday, the parents started teaching them how to fly!

obviously I kept Clara inside all of this day and the next… I didn’t want them stressed out about her presence.  It was too cute watching the babies in their wobbly attempts to fly, flopping onto our outdoor table and weaving a little drunkenly through the patio.

Two ended up in the lemon tree where they spent the night, the third one, which seemed a little less developed than the others, stayed in the nest another night.  The parents were still catching insects for all three of them, and caring for them constantly…

Saturday:

all three end up in the lemon tree where they stay huddled up together most of the time.  The parents are still spending all their time catching insects for them and looking out for them, encouraging them to fly.

Sunday: empty nest syndrome….  🙁

they’re still spending most of their time huddled together, although they’re moving about from tree to tree, and while they seem to be catching a few insects here and there the parents are still feeding them a bit.

Well.  That’s where we stand.  It’s totally amazing how fast they’ve grown up!  there were a few days there where I felt they were changing almost by the hour!  I can’t even express what a gorgeous pleasure it’s been to witness this little family growing up and such a privilege that the parent birds trusted us just enough to build their nest here in our garden.  I just hope the nest will be used again next year!

SaveSaveSaveSave

SaveSave

SaveSave

pinterestmail

neon yellow and black gingham

So, Mum was coming up to stay recently and we were going to be doing some sewing together… for a variety of reasons I didn’t want to be doing my Christmas sewing, the biggie being that I needed a little break from all that #exhausted  #needsomeselfishnessSTAT

Anyway, I decided I wanted to just whip up something quick, fun and easy.  A simple lingerie set.  So quick!  Such fun!  So easy!  And, I reasoned; I have a billionty-one lingerie bits and pieces on hand already, so I could easily shop my stash and avoid any last-minute dashes to the fabric store.

Obviously when anyone sets out to do such a thing, a last minute dash to the fabric store will be an absolute certainty.  Ha!

So I had this small piece of neon yellow bamboo knit (Fabulous Fabrics I think), always intended for lingerie but never-got-around-to-it; and some bits of both white and black elastics, enough of the both together to cobble together a bra and two sets of sorta matching undies.  For the set to look cohesive, I used both white AND black elastics on all pieces…  so it’s kind of a case of nothing matches so everything does.  I do really like black ,white and yellow together though, so I think it turned out very nice.

The difference between the two pairs of matching knickers is subtle, oh so subtle! but it’s there.  One pair has black elastic on the waist, and white on the legs, the other has white elastic on the waist and black on the legs.  Subtle!!  To further emphasise the black/white dichotomy, I used black zig-zag topstitching everywhere there was white elastic, and white zig-zag topstitching everywhere there was black elastic.  This was not a totally successful ploy, since the white zig-zag stitching basically disappears into the yellow and you can’t even see it, but hey.

On another note; high contrast black zig-zag top-stitching on yellow is a deeply unforgiving exercise.  Much quality time was spent with my seam-ripper.

I’d planned to use a few little plain black and plain white ribbon bows in my stash, saved from old lingerie sets… but inevitably I became more and more convinced that black and white ribbons were just not right, and more and more convinced that the only option was something black AND white.  Like, gingham.  In fact I decided that gingham was the only possible choice, eventually.  At first I first made some ultra skinny rouleau loops with a scrap of gingham fabric from my stash – must avoid any last minute dashes to the fabric store!!! – and made some little bows, but they were just too bulky for the set.

Thus, the inevitable last-minute dash to Spotlight, for gingham ribbon.

It’s OK, I bought other stuff while I was there!  Alway, but always; there’s a little list building up.  (sigh)

Mum agrees that the gingham bows were exactly what the set needed.  The only thing is, that since the gingham ribbon is sold by the spool only, I now have about 3m left out of a 3.5m spool to do something with.  Lol!  MORE RANDOM STUFF ADDED TO THE STASH WILL IT NEVER END

Oh! pattern… I used the cloth habit Watson pattern for all pieces, except I used my own method for ensuring that all seams in the bra are enclosed in the lining, and as usual cut the knickers front and crotch lining as one piece so as to eliminate that horizontal front seam.  I love the Watson bra more and more nowadays; it’s funny; I’ve always preferred a slightly padded bra with a foam-lined cup, basically my whole life, but just lately I’m really into this soft, unwired, unstructured type of bra.  Especially for summer, when I’m not wearing tight Tshirts.  Sure, they result in the flat-chested look, but you know what? I’m at peace with that aspect of my body now.  I mean, it’s what I’ve got, it’s me, my body is just my body; and I’m ok with it.

Thank you, Jane for being such a fab lingerie model… and now, back to sewing the Christmas pressies!!

SaveSaveSaveSave

SaveSave

SaveSave

pinterestmail

navy blue mary janes (shoes)


I’ve made some new shoes!!  This is the first pair of shoes made on my new, semi-high-heeled lasts; that I bought … maybe six months ago…?  (blush) yes, it’s taken me quite a while to get onto it.  Can I just say… Steep.  Learning.  Curve.  That’s all.  Making these was quite a different kettle of fish to the fun and relatively easy little flats that I’ve been making up until now.  But anyway, they’re done.  And I know I’ve said this before, but I may be prouder of these than I’ve ever been of ANY other thing I’ve made before!!

You know the old saying? something about 10% inspiration, 90% perspiration?  YEP!!  Although this might be more like 99% perspiration…

Several times I almost gave up on these because I thought they were not going to work, and several times I thought I’d almost ruined them.  There are several bits that are definitely not perfect, a few scars from where I had, um, …issues… but I’m still pretty happy!

Confession time: I actually started recording YouTube videos to document the process of making these shoes, and basically gave up on that halfway because I truly lost heart a few times and felt like my shoes were never going to happen.  Likewise, I didn’t take many actual photos during the making of them either! the ones in this post here are basically all of them…  But I’m so glad I persisted in the end (minus the stress of filming myself) and have finally limped in to the finish line.  I’ll make another YouTube video, some other time, on some other shoes.

my friend R was cleaning out her wardrobe and gave me some old shoeboxes last week… I’m so glad I could put one to good use almost straight away!


So! the deets…

Materials: the material is a beige-coloured, upholstery suede, from a piece given to me by my friend A after they’d had some benches in their boat re-covered… I’ve used this same fabric to make two pairs of shoes previously… my white oxfords and my laced-at-the-heels shoes.  I spray-painted my pieces navy blue, using enamel spray paint (Bunnings) and also spray-painted two small, round-top, white plastic buttons from my stash…  the shoes are fully lined with navy blue suedette fabric from Spotlight.  For stitching both inside and outside the shoes I used Gutermann’s upholstery thread in navy blue (Spotlight).  The layers are glued together with PVA glue, and the heel counters and toe puffs are formed with stretch denim and PVA glue.  The soles are rubber sheeting (Bunnings); shanks are metal brackets from Bunnings, hammered to shape; foam insoles are just cut-to-size ones from the supermarket; heels are hand-carved pine (Bunnings)  I bought my 5.5cm heeled lasts from etsy store Tatyz

The biggest, albeit hidden difference between these and all the previous shoes I’ve made is the presence of a shank … basically a shank is piece or strip of something hard and inflexible, mostly metal; that provides arch support and helps the shoe maintain its shape.  I knew all along I’d have to put a shank in these, because of the defined sole curve… but racked my brains as to WHAT I could actually use.  I’d investigated buying purpose-made shanks, but there were two issues… firstly, how could I be sure the ones I was buying would have the right curve to suit my lasts? and secondly and really the biggest one, was that all of the sources I found had minimum orders of, like, 5000.  LOL!!!

I guess there’s probably a shoe-making supply store open to the public somewhere where you can actually buy them, but I couldn’t find it.  Anyway, in my meanderings through Bunnings looking for likely suspects I found these metal brackets, and thought I’d give them a whirl.  As it turned out, I think they’re going to do the job just perfectly!!

the yellow stuff is some thin foam which is just to pad out and level off the sole, offset the thickness of the shank

The brackets are very stiff and strong, and it took some crazy, Thor-like hammering to get them to curve just how I wanted them to, to fit snugly to the bottom of my lasts.  So I’m pretty confident they will maintain their shape very nicely, even when I’m wearing the shoes, and subjecting them to the pressures and strain of everyday walking.

I decided upon a hand-carved, wooden heel.  Ermahgerd, but these nearly killed me, not to mention my poor shoes… These ones gracing my shoes now are the second set of heels I made.  I actually fully carved another set, but when I loosely attached them to the bottom of my shoes to trial them I could instantly see they were too small and looked visually ridiculous to my eyes…  SO it was back to Bunnings to hunt for something else…  it’s actually pretty hard to find good-sized blocks of wood for sale, that are not planks.  The final heels were carved from a pair of furniture “feet”.  These are big fat square blocks of wood that you can screw to the bottom of your sofas or whatever… anyway, they were a good size enough for me to carve some nice, blocky heels.  I used our belt sander for all the carving.

rejected heels at right.  They were carved from a table leg.

The heels are glued to the bottom of the soles (contact adhesive, Bunnings, same stuff I use to glue the sole to the bottom of the shoes) and then nailed through from inside the shoe.  I drilled holes from inside the shoe, being very careful to avoid the shank! it would have destroyed the drill bit! Then, I swiped 2mm thick, 3cm long, shiny nails through a blob of PVA glue (in hope of giving them a bit of extra grip) and hammered them into the holes.

there are 9 nails per shoe… should be enough I think! I hope!

I’m making it sound all very straightforward… but this is the bit, yes, the very last step! where I seriously thought I’d destroyed my shoes. My first nail attempt was using a 3mm thick, 5cm long, galvanised nail, which in retrospect was a monstrous nail to choose.  IT WOULD NOT HAMMER ALL THE WAY IN.  Pulling that thing out did damage the back of that shoe quite a bit, which was pretty heartbreaking, but I certainly wasn’t tossing them in the bin after all I’d been through!  Explanation on how I patched it up later…

normally I cover the insole in the same fabric as the lining… in this case I thought the periwinkle/ purple colour of the foam looked quite nice just as it is…

Anyway, once I’d got the monster nail out, I had success with the shorter, sleeker nails.  The top edges of the back of one shoe were pretty stretched and dinged up from pulling out the nail, and I just judiciously applied new glue and a bit of new lining fabric to patch up what I could.  And I gave both shoes a new coat of navy blue paint… truth was they really did need freshening up, after the months I’d spent working on them, constantly handling them, and tossing them in a drawer in-between times, the initial paint job was already looking a tad shabby.  Also, in the process of making them I’d gone off my initial colour choice, thought it was a wee bit drab.  So I bought two tubes of acrylic paint (Spotlight) in ultramarine blue and black, and mixed up a shade that was still a deep navy but was a little more vibrant and rich.

Final thing was to mask the heels and apply a quick spray of fixative.

Well, the final final thing of course was to varnish the heels (3 coats of clear satin polyurethane varnish from Bunnings) and to glue a protective layer of rubber to the underneath of the heels.

Ta da!!  I’ve no doubt I will be wearing these with immense pride for years…. that is, until I make something better.  I’ve learnt so much!  On to the next pair!!


SaveSave

SaveSave

SaveSave

SaveSave

pinterestmail

an armada of icebergs…

Sooo… what tasteful works of homemade Christmas art has Carolyn proudly displayed in the entrance hall to assault the eyes of unsuspecting visitors to our house, hmmm?    Oh, a whole bunch of little cardboard icebergs… hmmmm, ok, yeah.  “Interesting” decor choice…  #kindergartenchic #sohotrightnow

It’s an advent calendar!!

Also; I’ve just looked up what is a group of icebergs called, and it’s an armada.   Cool, eh!

So, I saw this cute advent calendar on Burdastyle and couldn’t resist… because I freaking LOVE Christmas! and particularly Christmas crafts and all those fiddly decorative bits and bobs that you get to strew about your house….  maybe I even don’t mind a bit of baking too?!  Just a teensy bit…?  Maaaaybe  #notreally  😉

On the site it’s called an Origami advent calendar, which is perhaps a little bit of a misnomer… because my understanding of “origami” is that there must be no cutting nor any sticking/pasting too, and these cute little contraptions involve both.  If not origami though I don’t know what you’d rightly call this kind of construction, actually.  Just … making boxes?  cutting and pasting little receptacles together?  Well, whatever.  It’s a free pattern.

I used some card stock that Mum and Dad gave me when they cleaned out their shed…. it was perfectly clean and in very good nick! traced the template and cut out 24 identical shapes.  So my icebergs are all the same size.  In retrospect, if I was going to do this again (unlikely) or even if I re-use them for next year I would mix it up size-wise by printing out the template in two or more different scales, say 75%, and maybe even also as small as 60% to get a little range of sizes.  I think they’d look pretty cool with more of a variety of sizes, but I’m ok with how the arrangement looks for now.


Anyway, let’s be real… it’s the contents that you get excited about, really!

Instead of sealing the boxes completely closed with double-sided tape as recommended, I put tiny strips of velcro on it, so you can open the boxes to get to the sweeties inside without potentially destroying them.  See, it took quite a while to make 24 little boxes, like hours! and so I’ll probably re-use them, at least one more year.  Hopefully more!

For the numbers, I used my old alphabet/number stamps that I bought many years ago… during my cardmaking phase.  I found the boxes can fit up to four Lindt balls, with a bit of manipulation and shoving.  Probably Craig and I will be the only ones excited about popping open the daily “iceberg” and counting down until Christmas.  Or maybe, just me!

speaking of icebergs… I took these pictures in the vicinity f Le Conte glacier, Alaska, during our trip there this year.  So so beautiful!!!


I don’t know if I’ve ever shown here my other, far less trendy, advent calendar, that I made yeeeeeeears ago when the children were little… I seem to recall it was a free pattern too, maybe from the Woman’s Weekly or Better Homes and Gardens something like that.

I still put sweeties into the heart pockets every year and have this year too, although who knows when my children will drop by and eat them?!  This one’s a bit “country” but in my own defence that was the hippest of hip decor styles at the time!  I know, it’s a bit dated now, but that can’t be helped…  if there’s one set-in-stone rule about style, and this goes for decor and fashion; and that’s that what is HOT one year will definitely be NOT in a few years!!

one of the fabrics was designed by a Carolyn somebody, whose name was printed on the selvedge… and I had the brilliant idea of snipping off a “Carolyn” and attaching it to the back, seemed fortuitous at the time.  Now I’m mentally apologising to the de-surname-d Carolyn who actually designed the fabric… whoops!

Now, if you’ll excuse me I still have a small avalanche of fabrics awaiting transformation into Christmas gifts and my summer wardrobe, and it’s already the first day of summer so I’d better get cracking…. au revoir!!

SaveSave

SaveSave

SaveSave

pinterestmail
Switch to mobile version
↓