Tag Archives: Dress

greenery

… and the colour of the year for 2017 is….!!

hehe, it’s kinda silly, but in early January I love looking up what the fashion Colour for the Year is going to be, even if I then forget about it and don’t add any of it to my wardrobe!  This year it is Greenery, and serendipitous news, I had bought a length of this lovely summer weight wool pashmina fabric from Spotlight, in a colour that is well, not too far off.  I love being inadvertently fashionable!

So I made a little dress.  The wool is woven in a twill pattern, and is very light, practically sheer, so I lined fully with a springy yellowy-green polyacetate lining fabric.  It was absolutely amazing to discover invisible zips in Spotlight, in exactly the right colour too.  This is so rare, especially with more out-there colours like this one!

I used Vogue 1351, which I have previously made up once before, here.  This time I followed the pattern to the letter and cut the skirts and bodice front on the bias like you’re supposed to.  I let it hang for a few weeks for the bias to drop before hemming… why so long, do I hear you ask? well not for anything in mindfulness to the outcome of this dress, NO! but because like a ravenous wild beast my Zora Queen Comic Con costume has been demanding and devouring every scrap of my creativity to the exclusion of all else.  AAAAAAAGH!!

Anyway!  It’s finished now!  This dress, I mean; not the costume.  Although that is too, hip hip hooray.  Slowly getting back to normal making.  Well, normal for me, anyway  😉

It’s funny; the vibrant colour of this dress might make it seem kinda frivolous and not like a “basic” or a very core wardrobe staple, but it is a very plain dress really, and I actually think it’s going to be an extremely useful mix and match item in my wardrobe.  The kind of thing that can either command attention in an outfit thanks to its colour, or also play nicely with other items in an outfit, thanks to its lack of detail.  A useful little stayer.  The lightweight wool is just the right warmth and breeziness for our current mild and just starting to get cooler autumn days, and I think I’m going to enjoy mixing it up in winter too, with black tights and boots too, and a dark leather jacket or coat.  The bright green is going to look great with all my bright and colourful cardigans, and will also add a nice splash of colour to more neutrally neutrals too.  I love it and am really excited about its possibilities!

Details

Dress; Vogue 1351, light green wool pashmina on a roll
Cardigan (below); my own design, based upon the Nettie by closet case.patterns, details here, paprika stretch
Shoes: sandals designed and made by me, details here

   
Location: Pt Walter beach, Attadale.  I joined friends at the cafe there this morning for morning tea; it was pure delight!!  I love these early autumn days!

pinterestmail

totally local, totally natural, from head to toe

A person could be forgiven for thinking that I had abandoned my totally local, 1 year 1 outfit project, since there has been no mention of it here for months!… *blush* however, it has been plodding along, slowly but surely, and is now FINISHED!!!!  Hurrah!  At last!

The concept: last year Nicki from this is moonlight conceived the very interesting 1 year 1 outfit project and invited me to take part with her… the idea was that you make an outfit using ONLY local materials and primary supplies grown and/or sourced in your own area.  Well you know how weak at the knees I go for a dressmaking challenge! and the more difficult the better!  Several of us here in Perth took part last year; Nicki, Sue, Megan and me.  Sue, Megan and I met up for a hilarious photoshoot in our outfits one day last February; it was so much fun! and we all had plans for this year too.

from left: Megan, Sue, and me… the links in this post go to everyone’s individual posts about their outfits

So yes, I was all enthusiastic… however!  It really is a difficult challenge, far more difficult than you might think! and though I made a good start with dyeing some yarn early, my other challenge, my Year of Handmade, has consequently swept me away with its even higher degree of difficulty … I’m not whinging, ’cause I really do like challenges honestly! however I’ve struggled with everything this year a bit and it’s taken a while for me to get my groove on.  Fortunately Nicki announced a March deadline recently, which lit a fire under me.  I got cracking, and got finished!!!!

Thoughts going in: I loved my first 1 year 1 outfit project from last year; although I confess I’ve barely worn it at all!  Reason being that while I think my embroidered felt is ethereally beautiful, at the same time it is fairly fragile and can only stand up to light wearing on special occasions.  So my major priority for this year’s outfit was casual wearability; something that I could toss on and wear on a daily basis without fear of ruining it.  I also wanted it to try out some natural dyeing techniques.

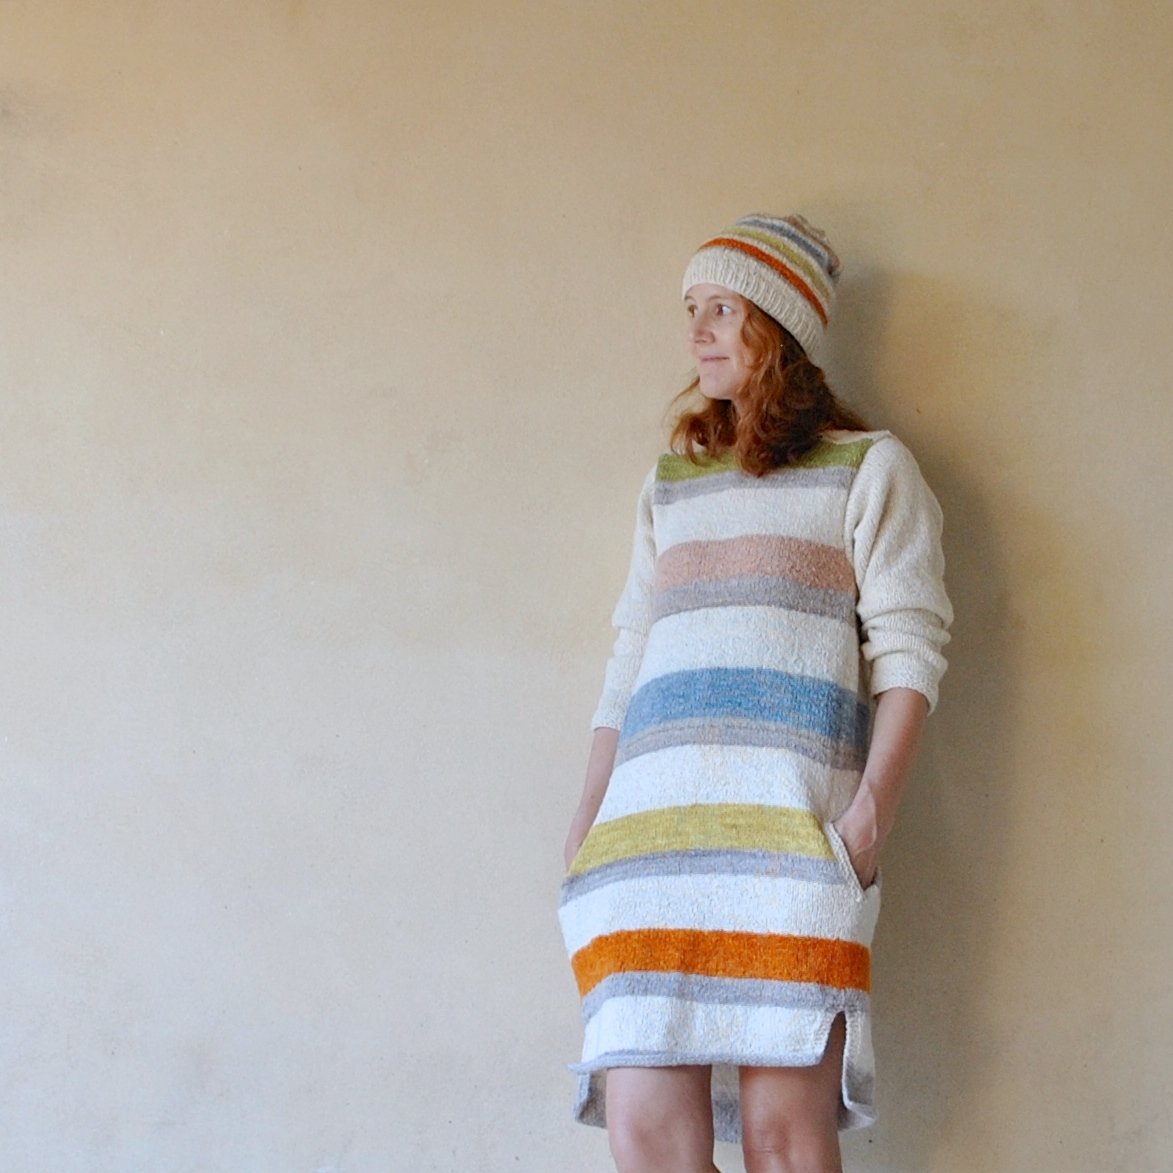
What did I make: a simple knitted dress and a matching beanie, showcasing my dyeing experiments in stripes.  I just wanted my hard-won colours to shine on their own merits equally without competing with each other, and individual stripes separated by the blankness of the natural undyed ivory just seemed a good way to accomplish this.

My shoes, bag and underwear were all made for last year, and also comply with the rules of the challenge.

Sources; I obtained all my handspun merino yarn from Bilby Yarns, which is an absolute treasure trove for West Australians interested in local wool products and supplies.  My yarn is from Western Australian Merino sheep; born, grown and shorn right here in the south-west of WA.  The raw fleece is transported to Bilby Yarns in Willagee, where local spinning enthusiasts can purchase it, spin it in their own homes, and sell it to people like me back through Bilby Yarns.  It’s such a great scheme!!  All my yarn was spun by the talented Beverley L. whose yarn I also used last year!  Some of my yarn this year was leftover from last year, and I managed to buy some more of her’s this year…. I’m so pleased I was able to purchase so much of her gloriously lovely handspun!  I bought mostly undyed natural white, and some natural grey.  The grey is quite rare, and I was lucky to get hold of this!  I used the grey to highlight each colour; I like how the grey stripe adds a bit of trompe l’oeil 3D-ness to the coloured stripes, like a shadow underneath each one.

So! I had my natural ivory and grey yarn, now for the colours!  All my dyeing experiments are outlined in this post here.  I didn’t end up using all the colours I produced… leaving something for the next 1year1outfit maybe??  The colours I chose from my experiments are, from the hemline going up, are:

Orange, from Coreopsis flowers;

Acid yellow; from sour grass stems and flowers,

Blue, from Japanese indigo, and I’m so grateful to Nicki for the use of her dye vat,

Pink, from avocado pits,

and that lime-y green colour at the neckline, and seen in closeup a few pictures down, was the result of over-dyeing, soaking some of my spare indigo yarn in a sour grass (oxalis) dye bath and then with just a single coreopsis flower (orange) tossed in to give it a bit more oomph when I realised the yellow was a bit weak.

The design: is my own!!  I did about a million calculations first but even then there was plenty of unravelling and re-doing bits until I was satisfied with it!   I wrote down my final pattern below, just in case I ever want to revisit this pattern, or if anyone is interested in knitting an entire dress for themselves!  It’s ok, I wouldn’t blame anyone who didn’t but still…  The only thing is that it’s only got the one size.  That lower hemline with slightly forward slits?  yes, it’s pretty obvious that my hemline is totally inspired by the Named patterns Inari tee dress, a pattern I have made five times now and unequivocally LOVE.   I just really like the way the Inari dress slits do the job of a walking vent, but is visually more interesting and obvious than your regular, garden variety, centre-back walking vent … and I really like the terraced high-low look of that longer back and shorter front.

The dress is mostly stocking stitch, with the lower edges, the sleeve edges, and pocket opening welts highlighted with various width rows of garter stitch.  Those sleeves!  OK, I’ll confess these almost did me in  … initially I had other ideas, resulting four false starts on the sleeves before the final design decision.  Four!! It was a bit gut-wrenching, each time I would be chooffing merrily along with a sleeve, before the dawning realisation that my previously thought-to-be cool idea was actually going to look really really stupid.  Gut-wrenching!  SO MUCH UNRAVELLING!!  But I refused to give up, I kept reminding myself that this HAD to work, I’d put so much into it already and I just could not abandon it in its hour of need.  Finally I hit upon this sleeve, a very simple, and plain, , unadorned long-sleeved style , which worked out just right, I think.

Pockets; of course it has pockets!!  the dress is knitted in the round, so there are no side seams, but I left openings at the front hip to knit in the pockets later.  There are little extension “flaps” at the pocket openings, for a continuous look when you’ve got your hands in the pockets and may catch glimpses of the pocket insides; and the pockets are just little “bags” made by picking up stitches along this edge, knitting a simple rectangular strip and folding it in on itself.  The garter stitch “welt” was knitted on before stitching the pocket piece closed.

The neckline; just wanted something really simple and streamlined, so I did one single row of chain stitch embroidery around the neckline edge.

The beanie: is a slightly loose and slouchy beanie, as I love this look and have decided this style of beanie suits me quite well, I think… hope!  The arrangement of the stripes is the same as the dress, just on a smaller scale.  This got unravelled and re-knitted only once before I worked out just exactly how I wanted it to look.

Le Whole Shebang, with accessories and all:


Shoes and bag; I’m wearing the same shoes and bag I made for last year’s project.  At first I worried that they wouldn’t “go” but well; I reckon they go just fine.  I carved my shoe bases from Manjimup pine and made the felted tops in natural white and black merino fleece and handspun, as described here.  The matching bag is of the same felt.

Underwear: yep, same as last year.  Well, I’m not going to make a new pair when I never wear this set at all!  However, it is totally 100% local so I’m counting it as part of my totally local outfit again for this year, hehe.

So that’s it!!  Am I going to take part in the “1 year 1 outfit” project again next year? well I do have ideas, but confess I’m a little exhausted, by, well…  everything, at this point.  Maybe, maybe not.  The truth is that I actually do have enough totally local materials still, to produce something… so maybe…  yes?! We’ll see!

fun fact; the small tree with bright green leaves behind and to the right of me in the picture, is called a Snottygobble.  Yes, really!! #weirdAussienames

Following is my free pattern for this knitted, slightly A-line dress with inset, welted pockets, split hem, long sleeves.  Includes pattern for optional beanie also.  Please link back to me and credit me if you use this pattern, thank you so much  🙂

Knitted dress + beanie

Location;  Leeuwin National Park, in the south-west of Western Australia… although the picture immediately below is actually taken in our own garden, since I forgot to take my bag with me when I went to the park, doh!!

Now, you may be wondering… Carolyn, isn’t it the height of summer?  Aren’t you absolutely roasting alive like a broiled lobster in that warm and ultra-cosy-looking woollen ensemble??  The short answer to those questions is; yes, and again, yes.  Ahem.   The maestro of Seasonally Inappropriate Sewing strikes yet again.

pinterestmail

Japanese linen-gauze shirt dress

My dear friend Yoshimi sent to me a beautiful birthday present last year; some really beautiful, deep indigo blue linen gauze…   The colour is quite glorious, not a solid colour but mottled and variegated with plenty of depth and character; and the texture is ultra light and sheer, quite breezy and with a slight stiffness very similar to organza.  It’s utterly lovely.


It’s taken me quite a while to decide what to make with this precious stuff…  I would take it out and pet it, thinking of a million options.  I layed out several different patterns onto it, only to pack them all up again… obviously it had to be perfect, also I really wanted to make the absolute MOST of every little bit using a pattern resulting in as little waste as possible!  I finally settled upon this Burda pattern, Shirt Dress 03/2016; 112B, The pattern pieces fitted on my piece of precious fabric PERFECTLY!!

However.. modifications happened along the way.  Of course they did.   My dress has the same bones, but the original is actually a very boxy design, with quite a pronounced dropped shoulder.  I’m sure it’s a lovely design for the right fabric; as in, something with plenty of natural “flop” that allows those shoulder seams to drop gracefully down over your upper arm.

My fabric doesn’t want to flop in the slightest; while super-breezy it stil has quite a bit of oomph and structure.  It works beautifully in the tailored details of a shirtdress, but really the shoulders did not drape in the desired manner at all…  So I ended up taking quite a bit of width off from each shoulder and side, and slimming down the sides of the dress bodice too, so my final dress is more like a gentle A-line shape.  I couldn’t say I “self-drafted” the armholes, that just sounds terribly pompous when it was basically just tonnes of super careful pinning and multiple tryings-on.  I’m so so happy with the final result though.  I think the more fitted, yet still loosely relaxed shoulders, the slimmer bodice and A-line shape is perfect for the fabric.

Other alterations: I inverted the pleat the other way in the centre back, also left off the placket to hide the buttonhole band.  Fun fact; my pattern is the German version, and while I plugged the instructions into Google translate I actually couldn’t make head nor tail of them, haha!!  I think I’ve made enough shirts that I managed to put it together ok though  🙂

I LOVE the sleeves which are unchanged from the pattern, they’re only very slightly gathered at the top, and blouse-y at the elbow, with deep pleats taming that blousiness into the bands.  I also love the petite little collar.  The collar stand is the tiniest I’ve ever made, so skinny and narrow, only about 1.5cm deep.  I was slightly terrified how this would go, fortunately, the linen gauze was an absolute delight to sew and eased beautifully everywhere I asked it to.  Like sheer heaven.

I found these awesomely cool yet delicate brass buttons at Fabulous Fabrics.  I’ve previously used these very same buttons before, on my khaki linen “army” shirt; five and a half years ago!!  I’m so glad they still are stocking these; they’re quite old-fashioned-y, a bit dinged-up and antique-y looking, so very much to my taste!

I also made a little matching belt, which is basically an interfaced waistband with just one button and two buttonholes.

With the fabric being the divine will o’ the wisp that it is, my new dress needed a slip; so I hemmed it so as to work well with my ivory crepe Ruby slip.  You can see the slip when I’m wearing it, but hey; you were going to see any slip I wear with this ultra-sheer dress! so it may as well be a nice one!  I really love the way the ivory underneath lightens and brightens and highlights the variegated blues and really brings them to life.

I absolutely adore my new dress; thank you so much, Yoshimi!!


Details:

Dress; Burda Shirt Dress 03-2016;112B slimmed down a bit, Japanese indigo linen gauze
Slip; pattern scissors cloth Ruby Slip, a free pattern available here; ivory crepe, details of mine here
Shoes; made by me and my own design, details here

Location, the Crawley boatshed, Crawley, Western Australia

yes; it was blowing a freaking gale, not really ideal but I had the photo opportunity so *shrug*…

Funny story; this is a very popular spot for wedding parties and also for tourists to stop and take pictures.  I rocked up and there was a Chinese man taking pictures, so I waited at a little distance for him to finish… once he had I went over and put my camera on the steps.  However he hung around for a bit, then came back and started gesturing to his camera and at me; at first I thought he was asking if I wanted assistance with my pictures and I assured him that I was fine, gesturing that I had my remote, etc.  However, no! what he wanted was for me to be in his pictures!!  eeeek! he demonstrated where he wanted me to stand and how he wanted me to pose, gazing up into the sun and beaming like a stereotypical sun-worshipping Aussie.  He took quite a lot of pictures, so if you ever see me popping up in some Chinese guy’s holiday photos, that’s why!!!

pinterestmail

pink/navy DKNY dress

Terrible post title, I know.  Every now and then, inspiration strikes and a fabulously perfect Word that describes my new “thing” to a T springs to mind instantly.  Other times I just plump for the obvious.    Today, inspiration was like a wispy breathe of smoke in a dark shadow of the night.  Barely present, fleeting and rapidly lost amongst the dusty cobwebs in ye olde brain.
But, enough of that… wot abart the dress eh??

Pattern; Vogue 1351; bought aaaaaaaages ago. With the intention of making it up immediately, funnily enough! but more on that later…

Fabric; a slightly stretchy crepe from Fabulous Fabrics.  Also bought aaaaaaaages ago with the intention of making it up immediately, sigh.  The aqua and indigo, sorta-floral/sorta-galaxy border print runs along one selvedge of the fabric, so to retain that I cut out the pieces across the grain, rather than on the bias as recommended in the pattern.  I just really love the colours in this fabric… but! I know pink doesn’t suit me, in fact I’m already anticipating that my Mum will have A Few Words to Say just as soon as she sets eyes on me in this sick-making, blemish-enhancing shade of pink.  What can I say? I agree, but sometimes I just can’t help myself, I just LOOOOOOVVVEEE pink and navy together, and like a lemming I occasionally toss myself over that cliff.  It’s one of my favourite colour combinations, with a lovely and natural yin/yang balance.    Frivolous and girly; pitched against sombre and slightly masculine.  Like a perfect summer sunrise over the ocean.  It speaks to me.

Anyway, no doubt drawn to that; at some point about mumblemumble years ago I spotted it, oohed and aahed, and naughtily bought some.  And cut out the pieces for Vogue 1351 that I’d recently bought in a club bmv sale.  Honestly, I barely remember doing any of these things, but obviously I did and it’s been folded up and tucked neatly away in my fabric cupboard ever since.  Then about a week ago I “found” it, and just set to, whipped it up.  Whipped it, I say!  Kt-chaaaaaaaaa!  … that’s a whip-cracking sound effect there by the way, just in case it’s not immediately obvious, hehe.

Alterations; downsized the bodice.  Hey, it’s Vogue,  and something of this kind is an always-requirement for me in Vogue.  Their patterns are designed for a more busty lady than I; but you know, I still want to use their patterns!  Often I handle this by shaving something off princess seam curves, or doing some other variation of small bust adjustment.  In this case, the bodice is one-piece with that draped neckline being the only feature, actually it’s the only feature of the whole dress…! So to avoid having to diddle around with that and possibly lose something essential to the neckline, the easiest thing to do is simply downsize.

I lined my dress fully with pale pink, polyacetate lining fabric, also from Fabulous Fabrics.  The design of the lining is quite clever, the way it’s a little fitted around the décolletage and with a nice smooth joining seams still allows the drape to spill out over the top.  It’s impossible for the lining to flip up or peek out in any way.  Very clever.  I love Donna Karan’s aesthetic, and am quite sad that we will no longer see her designs for Vogue patterns.  She really knows how to flatter a woman.

Also! can I just say with regards to the issue of those of us with Autumnal colouring wearing Pink = A Really Bad Idea thing…  see below how I’ve deviously dealt with it, by wearing it with my little teal cardigan.  Whammo! instantly counteracting and negating the death-warmed-up effect.  I think the pink actually looks quite OK on me like this!

Details:

Dress; Vogue 1351, printed crepe
Cardigan; Audrey in Unst, knitted by me, all details here
Wedge sandals, made by me, all details here


out in the wild…  I wore it out to lunch with my friend J today  🙂
location; South Perth foreshore, Western Australia

pinterestmail

french navy, french navy orla

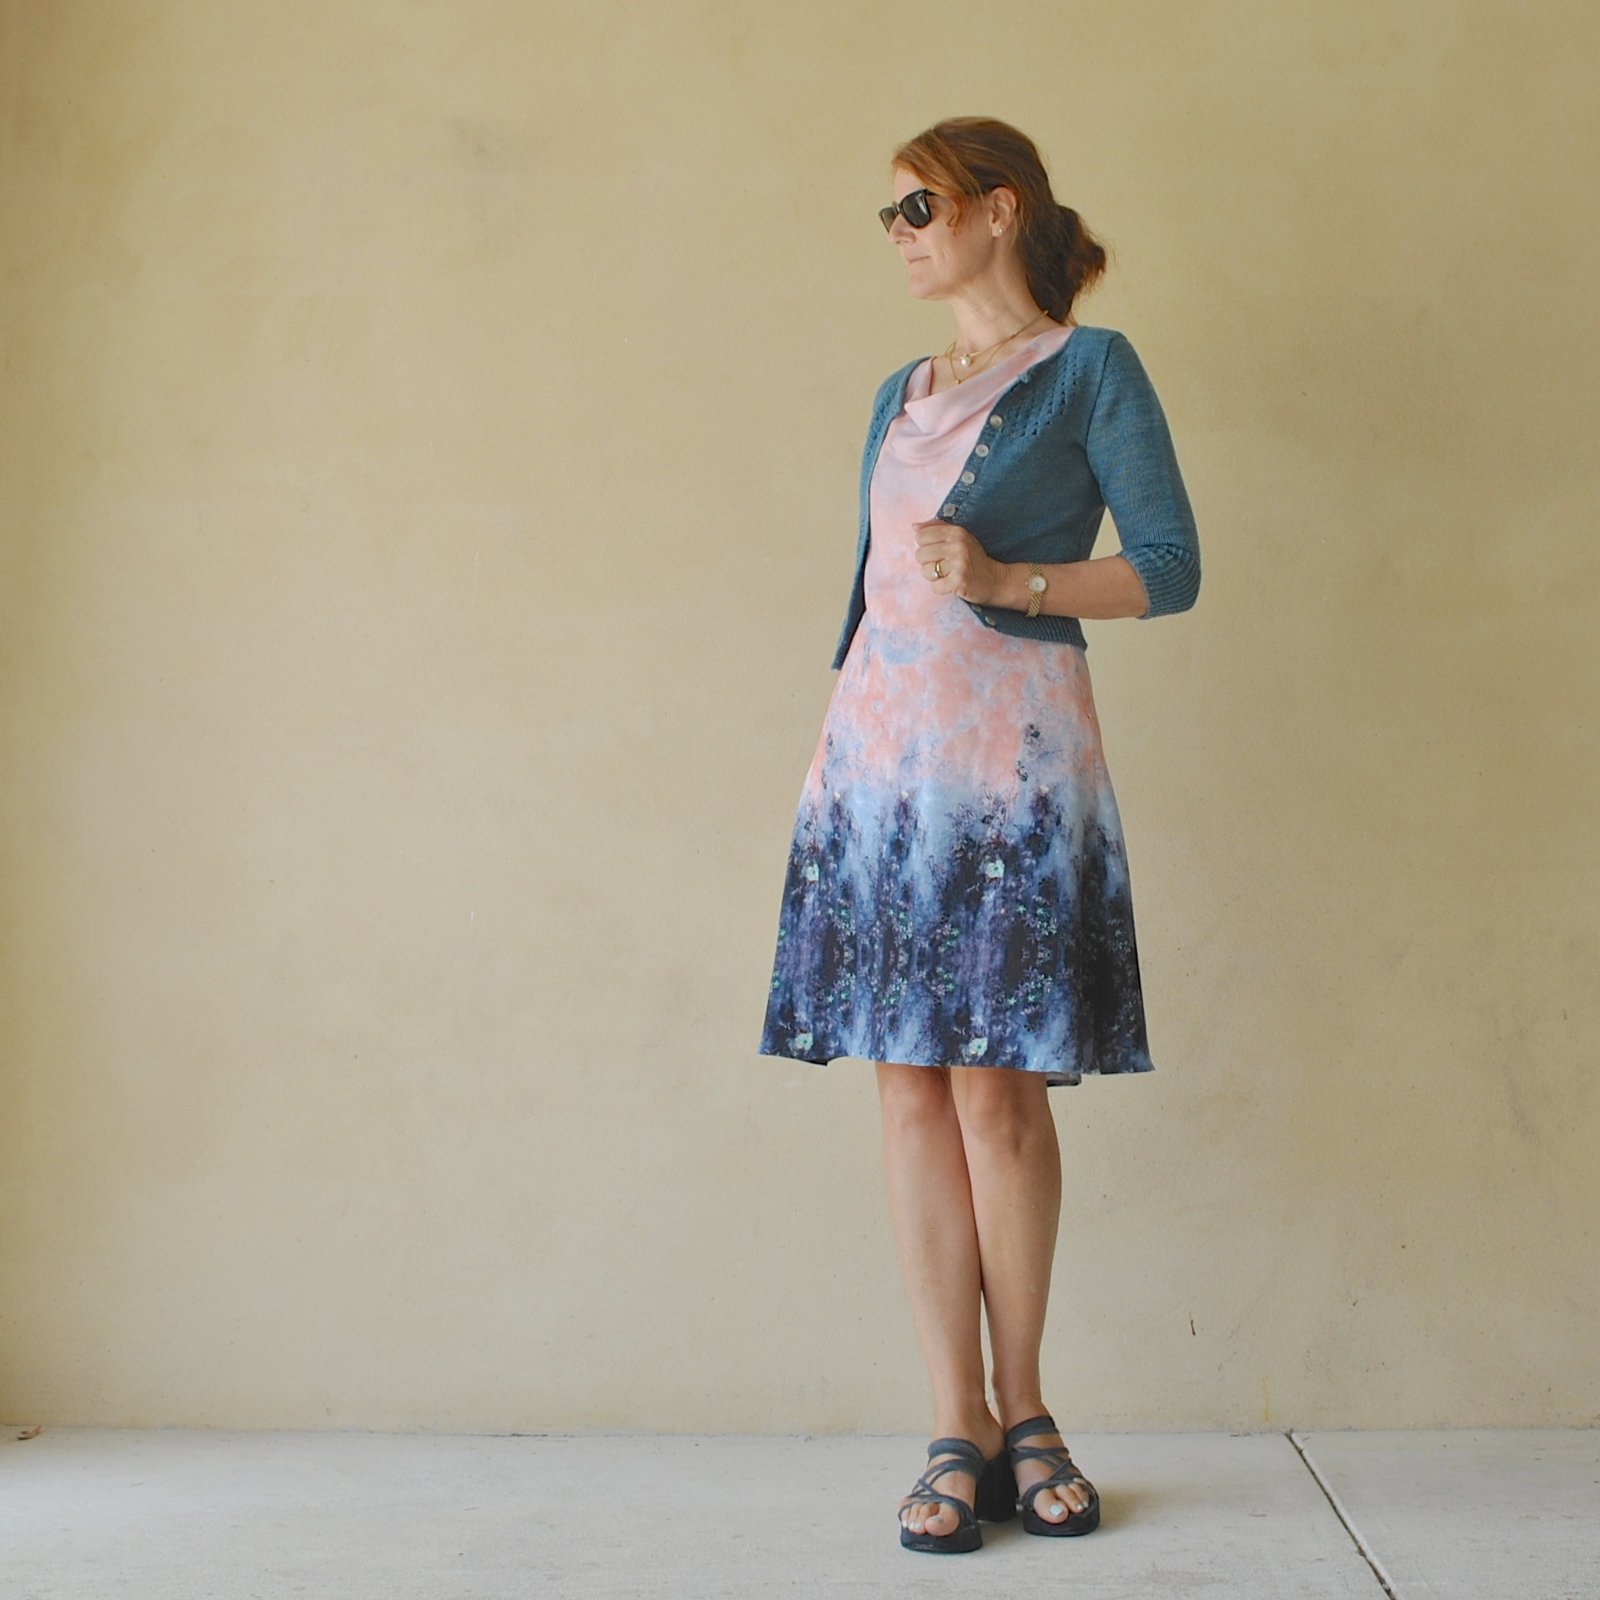
Partly because of the colour.  And partly because the designer is also French Navy.  Truly!

So, recently I discovered Sarah of french navy .. she has a chic, pared back style; easy, casual, uncluttered, slightly sporty, one that I love and very much can relate to; and it was exciting to see that she has lately decided to dabble in a little pattern designing.  Her first pattern, the Orla dress, is a free pattern,  I decided to give it a whirl; stat!  hied myself over to her site, printed it out… and boom! Made it!
Fabric; a piece of thin, lightweight cotton drill given to me by my friend L when she was doing a big clean out out of her garage and “discovered” a large stash of fabric…  I was so thrilled that she offered it to me! #insanefabricaddict  Don’t you just LOVE friends like that?!  She’s like, what IS this pile of junk? hey maybe my friend Carolyn would like it…  😉  So my fabric was free too.  Basically, apart from the invisible zip, my dress was fabulously FREEEEEE!!!!!  #miser

The Orla is a super quick and fun little pattern which is exactly what I wanted to cleanse my palate, so to speak, after my mad Christmas making-fest… Featuring a gently fitted bodice, rather pert short sleeves, which I think I would be rather nice in elbow length too; a highish waistline, and with a gathered rectangle skirt.  I think the low scooped neckline is really lovely, it’s my favourite thing about the pattern.  I added 3cm in length to my skirt… just because I thought the gathered skirt gave it a rather young look and I’m.. well, you know. not.  Hehe, to be honest I agonised over the length of this skirt, you don’t want to know for how long.. at least as long as it took to make the whole dress.  I pinned and tried on, contemplated; re-pinned, re-tried on, re-contemplated…  I finally settled upon keeping some extra length that I’d added while cutting out, but I’m still partially tossing up the idea of re-hemming it shorter again.  Man, I am SOOOOOO indecisive sometimes, I drive myself batty… I think I’m going to be ok with this length… FOR NOW, she intones, dramatically.   I may or may not change it up on a whim, whenever.  But maybe not.  Might do, though.

Oh, I added inseam side pockets.  Goes almost without saying, yeah?  Everything’s better with pockets!

The neckline is finished with a bias cut strip, topstitched on the outside, and I added a hook and eye closure at the top.  Normally I’m sloppy about that sort of thing but every once in a while I rouse myself to add these proper little extra touches.

oh HELLO you gorgeous thing..  yes you are a BUNCH more interesting than some old sewing details yes you are you big boo-fful fluffy ol’ booffy booff you…  (cuddles ensue)

Ahem…  So yes; now I have a new, sorta minimalist little frock, to be dressed up or down as the occasion demands.  Knowing my lifestyle, most likely down. hehe.  Seriously, at this time of year I LIVE in easy, just throw-it-on little dresses, and this is a great new colour for my current wardrobe too.   It’s nice to have a few different silhouettes to choose from too and this one is a little different from my current crop of sack-like summer dresses; more fitted, loosely-waisted, with that low scooping neckline, feels a bit more “classic”.  Hey, no judgement, I love my shapeless sacks too! but just that it’s good to have some variety.

And I’m looking forward to seeing what Sarah designs next!


Details:

Dress; the Orla dress by French Navy, in french navy cotton chambray, a free pattern available here
Hat; Vogue 8844, in ivory corduroy, details and my review of this pattern here

location; Eagle Bay, Western Australia

pinterestmail

… some clothes for Cassie

… and finally, I made some clothes for Cassie for her Christmas pressies too.  At first I had wanted to make some luggage or a travel set for her too; but we were hanging out in Spotlight together, you know as you do… and I discreetly sounded her out about the particular fabric that I had in mind for her.  And she basically nixed it.  Aaargh!  So I had to change tack.  Realistically, she probably needs clothes more than she needs a travel set, anyway!

Particularly she needed little separates and dresses for work.

Et voila…

1. a little spotty top.  The pattern is the cap-sleeved crop top;  Burda 02/2015; 127 and is one I’ve previously made for myself, here.  This one is sized to fit her and lengthened by about 5cm too.  The fabric was a surprise goodie from Spotlight.  I prefer polka dots to be irregular in some way, either in size or arrangement.  When I spotted (hehe) this one, well I just couldn’t resist!  A lovely soft grey crepe, with ivory spots in a satisfyingly random, non-grid pattern, and feels very luxe, just like silk.  I don’t think it is actually silk but it does feel exactly like it; lovely, slippery and whisper-soft.

Funny story; I made this nearly two months ago… and risked posting it on IG for bpsewvember “spots and stripes”… I don’t know what I was thinking … that she might be too busy at work to notice it or something? but she did! and commented “thanks, Mum!” eek!  I proceeded to just keep quiet about it and hope she wouldn’t actually come around asking for it, and luckily she didn’t think to do that!

that IG pic… with my own striped skirt

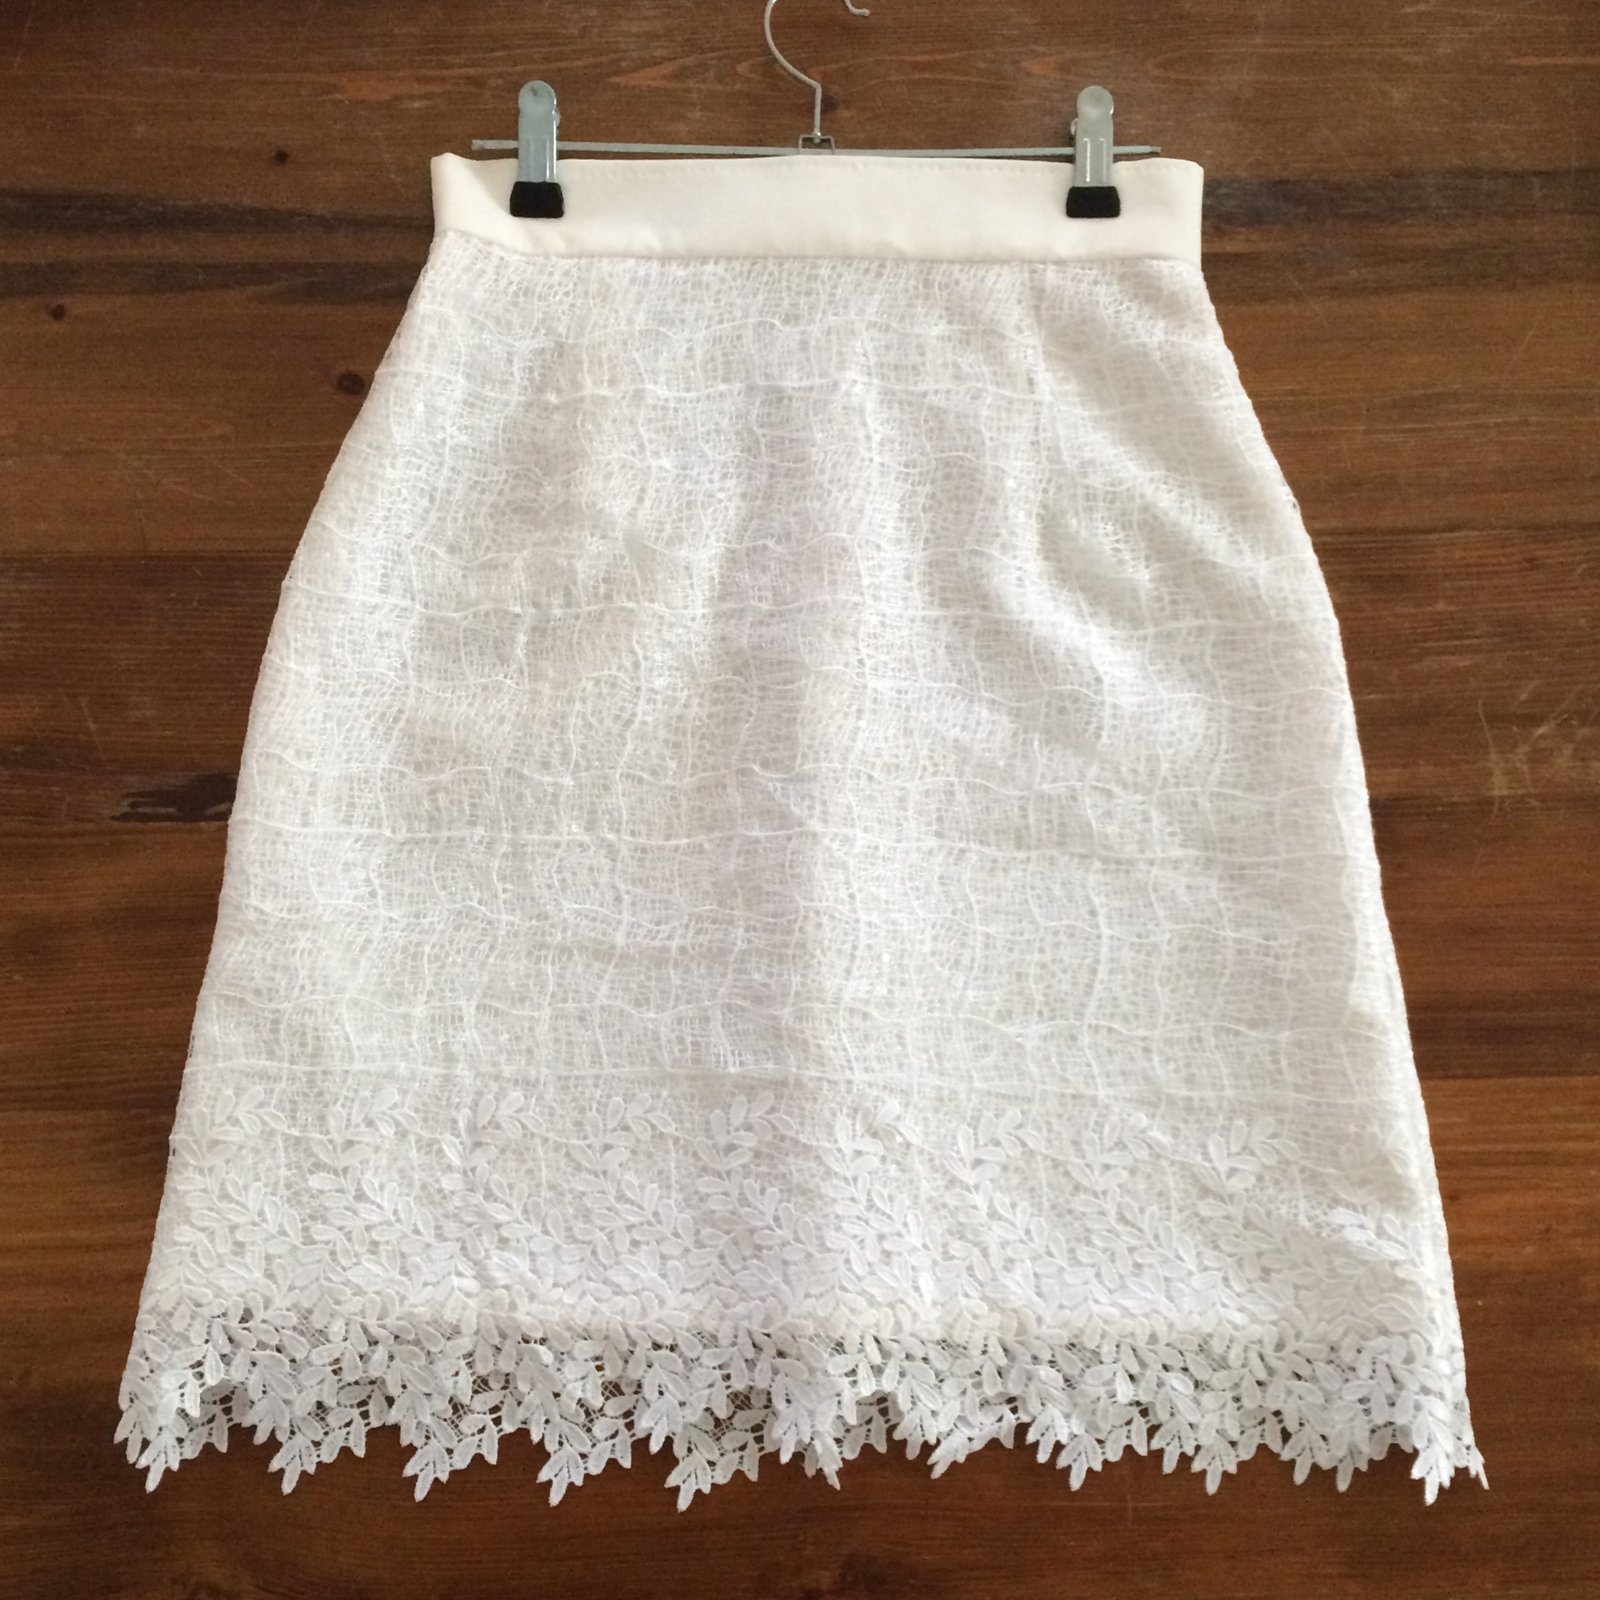
2.  a white cobwebby, lace-y skirt, with a very pretty border.  I used Vogue 1247… again! and spliced the pattern pieces together so there’s just one seamless front, and the two back pieces with one centre seam for the zip.  The white lace shell and cream suiting gabardine lining/underlining fabric are from Fabulous Fabrics.  The waistband is cut from the same cream fabric.  I like the cream peeping through from underneath the pure white lace, I think it makes a really nice, tonally subtle contrast.  The waistband looked a little bland by itself but I didn’t want machine topstitching, I thought it would look a little… I don’t know, like it would lower the tone of the skirt or something.  But it needed something.  So I did some hand-picksitching along the top edge… and really like how this looks; it adds a little bit of something, a certain handmade je ne sais quoi, and practically speaking achieves the stabilising effect of topstitching without the regimental look of machine topstitching.

note: shoes are Melissa

3.  finally a plain pink Tshirt. Looks boring, but she was over the moon with this!  This is my attempt to clone her favourite and beloved Cotton On Tshirt style and make a pattern from it for her… she has several of these and they’ve all been loved almost to rags!  I borrowed one that hadn’t been stretched out toooooo badly, and made a pattern from it; this was also a Christmas gift for her  🙂  I think it turned out pretty good , the fit and style is just about identical to the Cotton On one, so yay!  There’s nothing quite as valuable as an excellently fitting Tshirt pattern! and, bonus; they take barely an hour to whip up.

I finished the hems and sleeve edges with my twin needle, and since I was too lazy to wind up a new bobbin of pink, the double topstitching has one strand of pink, one of white.  You can only really tell if you look right up close! and I kind of like it.

And that’s it for my Christmas pressie making this year!

Oh! I almost forgot! not a Christmas present, but a few months ago I also made a Named pattern Inari tee dress for her.  This isn’t for work obviously, it’s just a casual, slop-around-at-home thing… the fabric was leftover from a hoodie that she made for herself previously, and she bought it in Tokyo during one of our holidays there.  I added a kangaroo pocket at the front because, well you know; pockets! and finished the neckline and opening edges of the pocket with a bias binding; left off the slits and finished the bottom gently curving longer at the back than at the front, mimicking the high-low hem of the original pattern.

It’s not a very exciting dress, but she likes to wear it on the weekend, or in the evening when relaxing, or to watch tv and stuff. An after-work, but pre-pyjamas thing.

Ok, now that’s really it.

Now, to make something for meeeeeeeeee!  she skips with a clear conscience to the sewing room, self-indulgent frippery in her heart… 

(btw; I apologise for the terrible quality pictures.  I just snapped most of these very quickly with my phone, on Christmas Day, as she tried everything on.  I’m hoping she will give me a little time for me to take some nicer pictures sometime… but she’s currently away and I reeeeeally wanted to get these blogged before the end of the year, to round all my “made” things off!  This post to be updated, in time!)  Update; DONE IT!!

pinterestmail

acton dress, in the folds

acton-3

Hello, I’ve made a new sundress.  Hmmmm, how do I love thee… let me counactont the ways.  It’s easy. It’s breezy.  It’s the palest of soft cloud-grey with teeny ivory stripes.  It’s crinkly-linen-tastic on the outside, and lusciously silk-lined on the inside.  It’s a midi length #currentcrave  The skirt can be styled in multiple different ways.

That’s a lot of different ways.

Pattern; a few weeks ago Emily, the designer behind In the Folds contacted me, asking if I would like to review her new pattern, the Acton dress.  Obviously I said yes!  I love trying out new patterns! and this one looked like so lovely and elegant for summer, long clean lines, an interesting skirt, tres chic

acton-fabrics-2

Fabric; a crinkly linen bought at Tessuti’s in Melbourne a few years ago during a trip over there with Mum and Cassie.  I remember I was going to make a shirt for one of my boys from it, but it wasn’t really the best fabric for that and I ended up buying pinstriped linens for them all instead, which was far more suitable.  And by doing so, I then had the fabric all for my own selfish little self, while maintaining the virtuous position of having actually bought it unselfishly for someone else, mwahaha.  My dress is fully lined with an ivory, silk crepe from Fabulous Fabrics.  Actually leftover from my Ruby slip; and I just needed to buy a little more to get out the pieces.

actn-lining

For the straps and the ties; I used 1.5mm wide, white grosgrain ribbon.  The pattern provides pieces and instructions to cut these out as bias-cut strips, but I chose to make them the cheat’s easy way.  I overlocked all raw edges inside the dress, and hand-stitched the hemline in both skirt and lining

acton-lining-2

Thoughts and alterations:  the pattern has two variations, or four if you count the fact that the bodice has two variations, and the skirt another two.  Along with the fact that the skirt on variation B can be tied differently in several different ways itself, that adds up to …um, let’s just say “lots” of slightly different looks, to suit lots of different tastes, pick your favourite.   I love having options like this in a pattern!

I made my dress with skirt B and bodice A that has a lower back.   As recommended in the pattern, I used the skirt A pieces for my lining.  There is an invisible zip in the CB seam, but with the lowered back of bodice A, I have found I can actually just slip the dress on and off over my head without having to zip it up or down.  BONUS!!  and darn that perfectly aligned invisible zip!

skirt wrapped and tied at front

acton-front-tie-back

The pattern is only available as a pdf; which I reckon is absolutely brilliant for those of us who want something NOW, however has the unavoidable downside that you have to tape all those pages together *sad trombone*   If you’re printing out both skirt options as I did,  because I was using skirt A pieces to line skirt B this is a whopping 64 pages in total.  Yes, that’s a lot!   Though, this is the entire pattern, and  if you’re making the skirt unlined you wouldn’t have anywhere near that many  🙂   Also, of course you can always go the A0 route; take the file to a copy shop like Officeworks and pay a small amount to have it printed on three A0 size pages.  This reduces the amount of taping to almost nothing.  Me being the impatient bod that I am, yes: I printed at home and taped… and I save time and tape by cutting out and only taping together the bits that I absolutely have to.

I used to find pdf’s a bit of a pain but the instant gratification is undeniably a big plus and I consider myself an expert at this taping biz now.

skirt wrapped and tied at back

acton-back-tie

My measurements put me at a size C, and as mentioned, I can just slip the dress on over my head.  I do have narrow shoulders it’s true, and my crinkly fabric does have a tiny amount of give, but the bodice does have that easy-wearing, loose-ish fit, which I reckon is a good thing for summer, or if you want to wear it over a Tshirt as I am pictured below.  I found it necessary to do just a slight small bust adjustment; I did this by the simple expedited method of flattening the bust curve by shaving about 1cm off of the bust curve.  Not very scientific, but it works fine for me…

skirt wrapped and tied at back

acton-back-tie-back

I also lengthened my outer skirt pieces about 7cm at the lower hem, to give a nice long midi skirt, just because I’m currently in a midi sort of a mood.  A mood for midis  😉  Speaking of the skirt, let’s get into these skirt variations… what are these different ways in which it can be styled?

skirt loose and untied

acton-loose

Firstly, there’s just with the side pieces hanging down completely loose and with the ties tied up in themselves to keep them up off the floor.  This is easy and comfortable, excellent for large Christmas dinners! and gives that sort of loose, flowy, “Lagenlook” to the dress.

Secondly and thirdly, wrap and overlap the side bits around to either the front or the back of the dress… (in photos higher up)  I’m undecided as to which of these I like the best.  They both look equally cool, I reckon.  Craig likes them wrapped to the front (below).

skirt wrapped and tied at front

acton-front-tie

Finally; I’ve been seeing all the cool, fashion-conscious kids of the world wearing their long-line spaghetti strap midi dresses with a little cap-sleeved Tshirt on underneath, so thusly decided to give it a whirl (below)… and I really love it like this!  It was too hot to wear it in Broome with the additional layer underneath, but right now in Perth our sorta-warmish-but-not-hot springy weather means it’s simply perfect to wear a sundress with Tshirt, for that little bit of extra coverage.  And the ties, for this “look”, I just tied them very loosely at the back without “wrapping” the side bits over each other.  This does look nice too, I think, more casual and allows the long sleek lines of the dress to hang more gracefully.  I actually think this could be my favourite way though it’s a close one.  I do really like the way the skirt can be worn such a lot of different ways and plan to mix it up every time I wear it!

skirt not wrapped but loosely tied at back

acton-dress

Now, for some business-y notes.  Emily kindly offered me an affiliate link for the Acton; and while up until now I have earned not one single cent from my blog and I have often said I wouldn’t do affiliate links, I have decided it’s time to give it a go.  So my links to the Acton pattern will pay me a very small commission if someone chooses to buy it through that link.  Please bear in mind that the commission paid to me is NOT an additional cost to the pattern; if you buy the pattern the price is exactly the same whether you buy through my link or otherwise.  I just wanted to explain that just in case anyone was unsure and was wondering how it works.  If you have enjoyed reading about and looking at my sewing projects over the years and also wish to buy this pattern, then please do not rule out this option  🙂

The Acton dress pattern is available from Emily’s site here; and you can also read more about Emily, an honours graduate in fashion and textiles from the University of Technology Sydney, and her other designs here

loosely tied at back

Details:

Dress; the Acton dress by In the Folds, in grey striped crinkly linen, lined with silk crepe
Tshirt; the Nettie, white jersey, details here
Hat; Vogue 8844, ivory corduroy, details and my review of this pattern here
Sandals, in the beach pics; designed and made by me, details here
Clogs; in the garage pics; designed and made by me, details here


actonnettievogue8844

I took these beachy photographs on Cable Beach in Broome; a place which captured my heart during our holiday a few weeks ago and from which I did NOT want to come home.  I’m not even joking. I’m getting that happy, eternally-summer vibe all over again, just looking at these pictures *sigh*  Minimums 25C, maximums 32C every day; huge beach, squeaky white sand, almost completely deserted.  Heaven!!  I want to go back!!

Bonus picture; husband was intending to stay well out of the way but still managed to inadvertently photobomb, haha

craig

LATER EDIT: the dress has had a minor update!  I sliced off the wings, angling from the waist seam in a straight line out to the unaltered hemline… so the dress still has those lovely handkerchief points in the hemline, but is a little more streamlined about the waist and hips.

LATER EDIT:

the dress has had another update!

fairly major this time… it’s been worn quite a lot and I was getting a little bit tired of it…  so it got rather summarily dunked into the dyepot… from which it somehow managed to emerge totally transformed into something newly amazing and magnificent to my eyes…  I’M SO IN LOVE WITH THIS DRESS ALL OVER AGAIN!!!!

pinterestmail

white inari

white-inari

named-inariMum and I went shopping together on my birthday; her for my birthday present, and me for her birthday present!  yes, our birthdays are just a few days apart so this is a bit of a tradition.  We went to Fabulous Fabrics.  Haha… well how unexpected!  *wink*

After much lengthy and highly enjoyable hunting, comparisons and consultations with each other, Mum chose this really beautiful fabric for me.  it is thick but very light and airy, has a nubbly, ultra slubby texture and is as pure white as the driven snow.  I absolutely adore it, in fact I’d been salivating over it whenever I saw it, ever since it came in.  Getting a little bit to give me is extra thoughtful of Mum when you take into account that she doesn’t think white really suits me at all.  I kind of agree with her up to a point… however!  I still totally adore it, because I’m a dreadfully contrary soul… no not really, I just have this thing for white clothing, particularly for summer, I love it with a fierce and burning passion…even a white-hot passion!  Mum knows I do, so I thought it pretty sweet that she overrode her feelings to give me something I really love.

white-inari-back

Pattern is the Named patterns Inari tee dress.  This is my “real” Inari, for which I ran up my previously blogged red striped “muslin”! though of course they are both wearable since I found I needed to make only minor changes to the pattern for it to be perfect.

sleeve-cuff

Something I mentioned in my red-striped inari post, the dress made as per the pattern rides up a bit when you lift your arms, so for this version I made the following simple modification to the sleeves to help reduce the problem:

What I’m doing here is adding width to and reducing the height of the sleeve cap slightly, and doing so without altering the armscye.  Diddling about with both the sleeve and the armscye is possible if you really know what you’re doing #idonot; however can be quite complicated and so I tend to not go there…  I would prefer to substitute an entirely different, tried-and-true sleeve cap and armscye from another pattern if it came to that!!

inari-sleeve-altfrom L to R, top to bottom:

1) Trace the sleeve, and draw a line from the shoulder seam junction mark near the apex of the sleeve cap down to the lower edge, parallel to the grain line.
2) Cut from the lower edge up, leaving a scant few mm at the upper edge still attached.  Pivot the two halves open; I allowed a gap of 4cm (2″) in width, although you could stand to go a little wider, if desired.
3) Tape a piece of paper to fill and fix the gap
4) redraw that lower hem to curve smoothly in a similar line to how the sleeve was previously, and trim
5) Original sleeve and new sleeve, juxtaposed.  You can see how the sleeve is wider; and not seen, but the height of the sleeve cap has been reduced by 2.5cm (1″).
6) Very important!!!  remember to measure the length of the new lower edge and cut the sleeve cuffs accordingly!  They’ll be a bit longer than the sum of the original width and the width of the gap created in step 2.

Demonstration of results (below); The dress does still ride up a little bit however not nearly as much as previously, at right.  To lessen the ride-up even more, you could go even further with widening the sleeve and “flattening” the curve of the sleeve cap even more.  Or alternatively of course, you could always substitute an armscye and sleeve cap from another pattern, at a pinch!

I’m pretty happy with this though  🙂

whiteinari-arms-up

Finishing details:

I still didn’t use the neckline facing, but turned in the seam allowance and finished with a piece of bias-cut white linen.  Similarly at the lower hemline, the raw edge inside is bound with bias-cut white linen and then handstitched, this looks nice if anyone happens to catch a glimpse of that back hem inside.. which lets face it, is quite possible because of that low-hanging back edge,  and also eliminates the bulk that you’d get if you turned the fabric under twice.

binding binding2

Bonus picture, photobombing daughter…

dsc_0021

Fun fact, she made the dress she is wearing here; it is a cute and interesting tank dress with tucking up one side and side split detail on the other, made in blue marl jersey that she bought in Japan.   She’s wearing it over the skirt that I made for her, here.  Honestly, she makes the most lovely things, but doesn’t really share them on any social media.  Occasionally I persuade her to pose in something she’s made, like the time she made this really divinely beautiful ivory cut-out lace top

cassies-lace-top

Gorgeous, isn’t it?

Details:

Dress; Inari tee dress by Named patterns, white slubby cotton mix
Shoes; designed and made by me, details here
Sandals in top picture;designed and made by me here.    this picture taken on Cable Beach during our recent holiday

and hmmmm, I’m sorry that I’m closing with my dress here… bit of an anticlimax after Cassie’s top!!

dsc_0035

pinterestmail
Switch to mobile version
↓