Category Archives: Sewing

I sewed selflessly

So, I sewed some stuff!

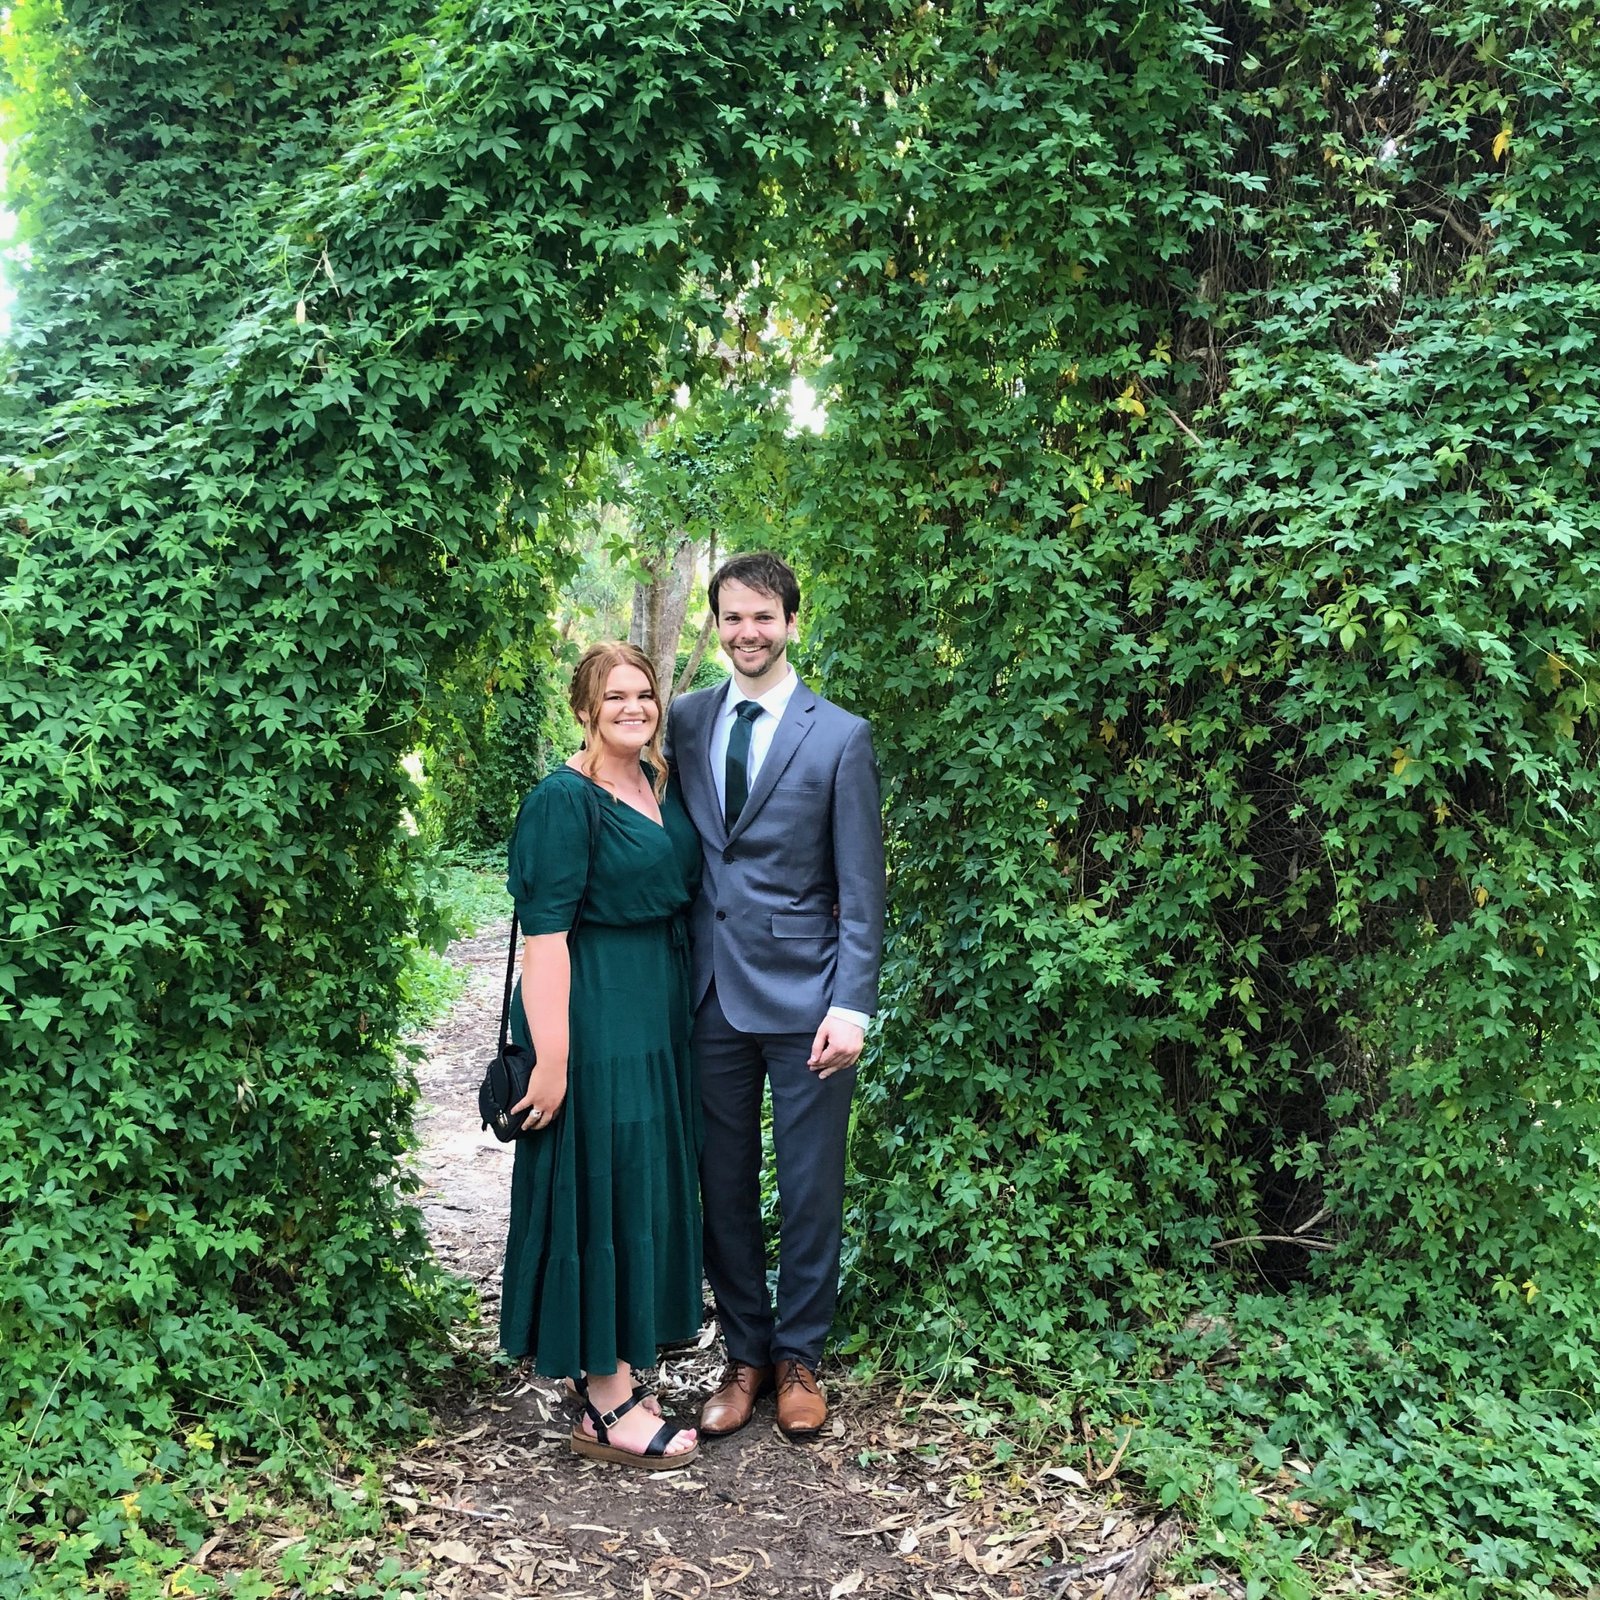
Item A; a dress for Mum to wear to Cassie’s wedding…

I started out with Burda style 09/2019; 109 because I thought the sleeve cuff really lovely; however I ran up a muslin – actually 2 –  and we decided the cut-on sleeve just wasn’t that nice and that a set-in sleeve would be much better.  So I ended up re-tracing and -fitting the Esme pattern from Lotta Jansdotter’s Everyday Style book again since Mum had really like the one I made for her previously.  I just adapted the sleeve to have the Burda cuff on the sleeve end.

The fabric is a really beautiful, green polka-dotted ivory crepe from Fabulous Fabrics; Mum and I went in together and chose it one morning.  Fun!  I didn’t use the neckline facing pieces, opting in stead to fully line the dress with an ivory lining that I already had in my stash, the lining negated any need for a facing…  Mum kindly hemmed the dress herself since I was seriously running out of time by the end of it!  The dress shell has french seams throughout, though I used the overlocker for the lining.

At the same time that we bought the fabric, Mum bought a length of emerald green chiffon and finished it with a hand-rolled hem to make herself a lovely matching scarf.

I thought she looked absolutely lovely!

Item B; a shirt for part of Cassie’s birthday pressie…

For her birthday, we went out together and bought a few lengths of fabric which I was to make into some simple work outfits for her.  Of course now she’s working from home but that’s ok; at least she’s still working!

This is pattern 02/2015; 113, adapted to be much slimmer in the body due to the fact that I didn’t buy enough fabric, ahem… that’s fine since the style is so super wide I think Cassie would have requested it be slimmed down anyway!  This thing is BOXY!!  I also had to leave off the sleeve cuffs, but Cassie absolutely loves it just as it is  :)..

The gorgeous polka-dot fabric is a linen from Fabulous Fabrics.  The buttons are leftovers from Kelly’s wedding dress!

I did manage to snap one photo of her wearing the top! kinda a miracle given how crazy busy we were before the wedding, and then I’ve barely been able to see her after the wedding during these virus social-isolation times… this is her on the eve of her wedding, when she was preparing to practice her father/daughter dance with Craig… yes, she’s wearing her wedding shoes of course  🙂

I actually made a little video on the making of this blouse, which was fun.  I’m hoping to make more of these for my YouTube channel  🙂

Item C; some shorts for Cassie’s birthday.  For these I started with the Closet Case patterns Pietra shorts and did the same elastic-waist elimination that I did for my own shorts… shown here.

The fabric is a cotton twill from Spotlight, in Cassie’s favourite duck-egg/mint green colour.

Item D; another little top for Cassie… this is the Closet Case patterns Cielo top, lengthened slightly. This is a lovely little pattern and I will definitely be using this one again!  No other adjustments.

The pretty rose-print is a linen from Fabulous Fabrics.  I should say, that while these pieces are all a gift from me to Cassie, she did choose the fabrics herself.  We had a lovely fun morning checking out fabrics and chatting about work-wardrobe possibilities!

Items E & F; I made two different masks for myself.  I haven’t used them very much but am really trying to get more used to the idea!  When we’ve visited Japan I’ve seen lots of people wearing masks all the time of course, and while I think they’re a great idea, especially in our current virus-centric lives, we’re just completely unaccustomed to wearing them here in Australia and it’s really hard to get used to it.  I find them very claustrophobic and a little difficult to breath in them!

The first one, above; I used this pattern/tutorial on the Makers Habitat YouTube channel, it has a lining with an opening so you can insert a filter inside.  It’s a nice straightforward pattern, very quick and easy to make.  I added a skinny channel to the top, and cut a short length of wrapped florist’s wire to insert in there for a nose support; this can be removed for washing.

This second one I used the Trend patterns free mask pattern, here.  This is also a nice pattern, very “designed” and I really like it, but I did find I had to fold a quite wide dart in the under-chin piece to get a good fit.  Also it is a more complex and involved thing to make than the previous pattern,  For both masks I used a leftover piece of cotton from my stash, the most tightly woven and with the densest thread count I could find!   They are both lined with cotton voile.  The ties are just thin strips of cotton jersey, cut with my rotary cutter, left unhemmed, threaded through the side channels and simply knotted.

pinterestmail

paper-bag waist

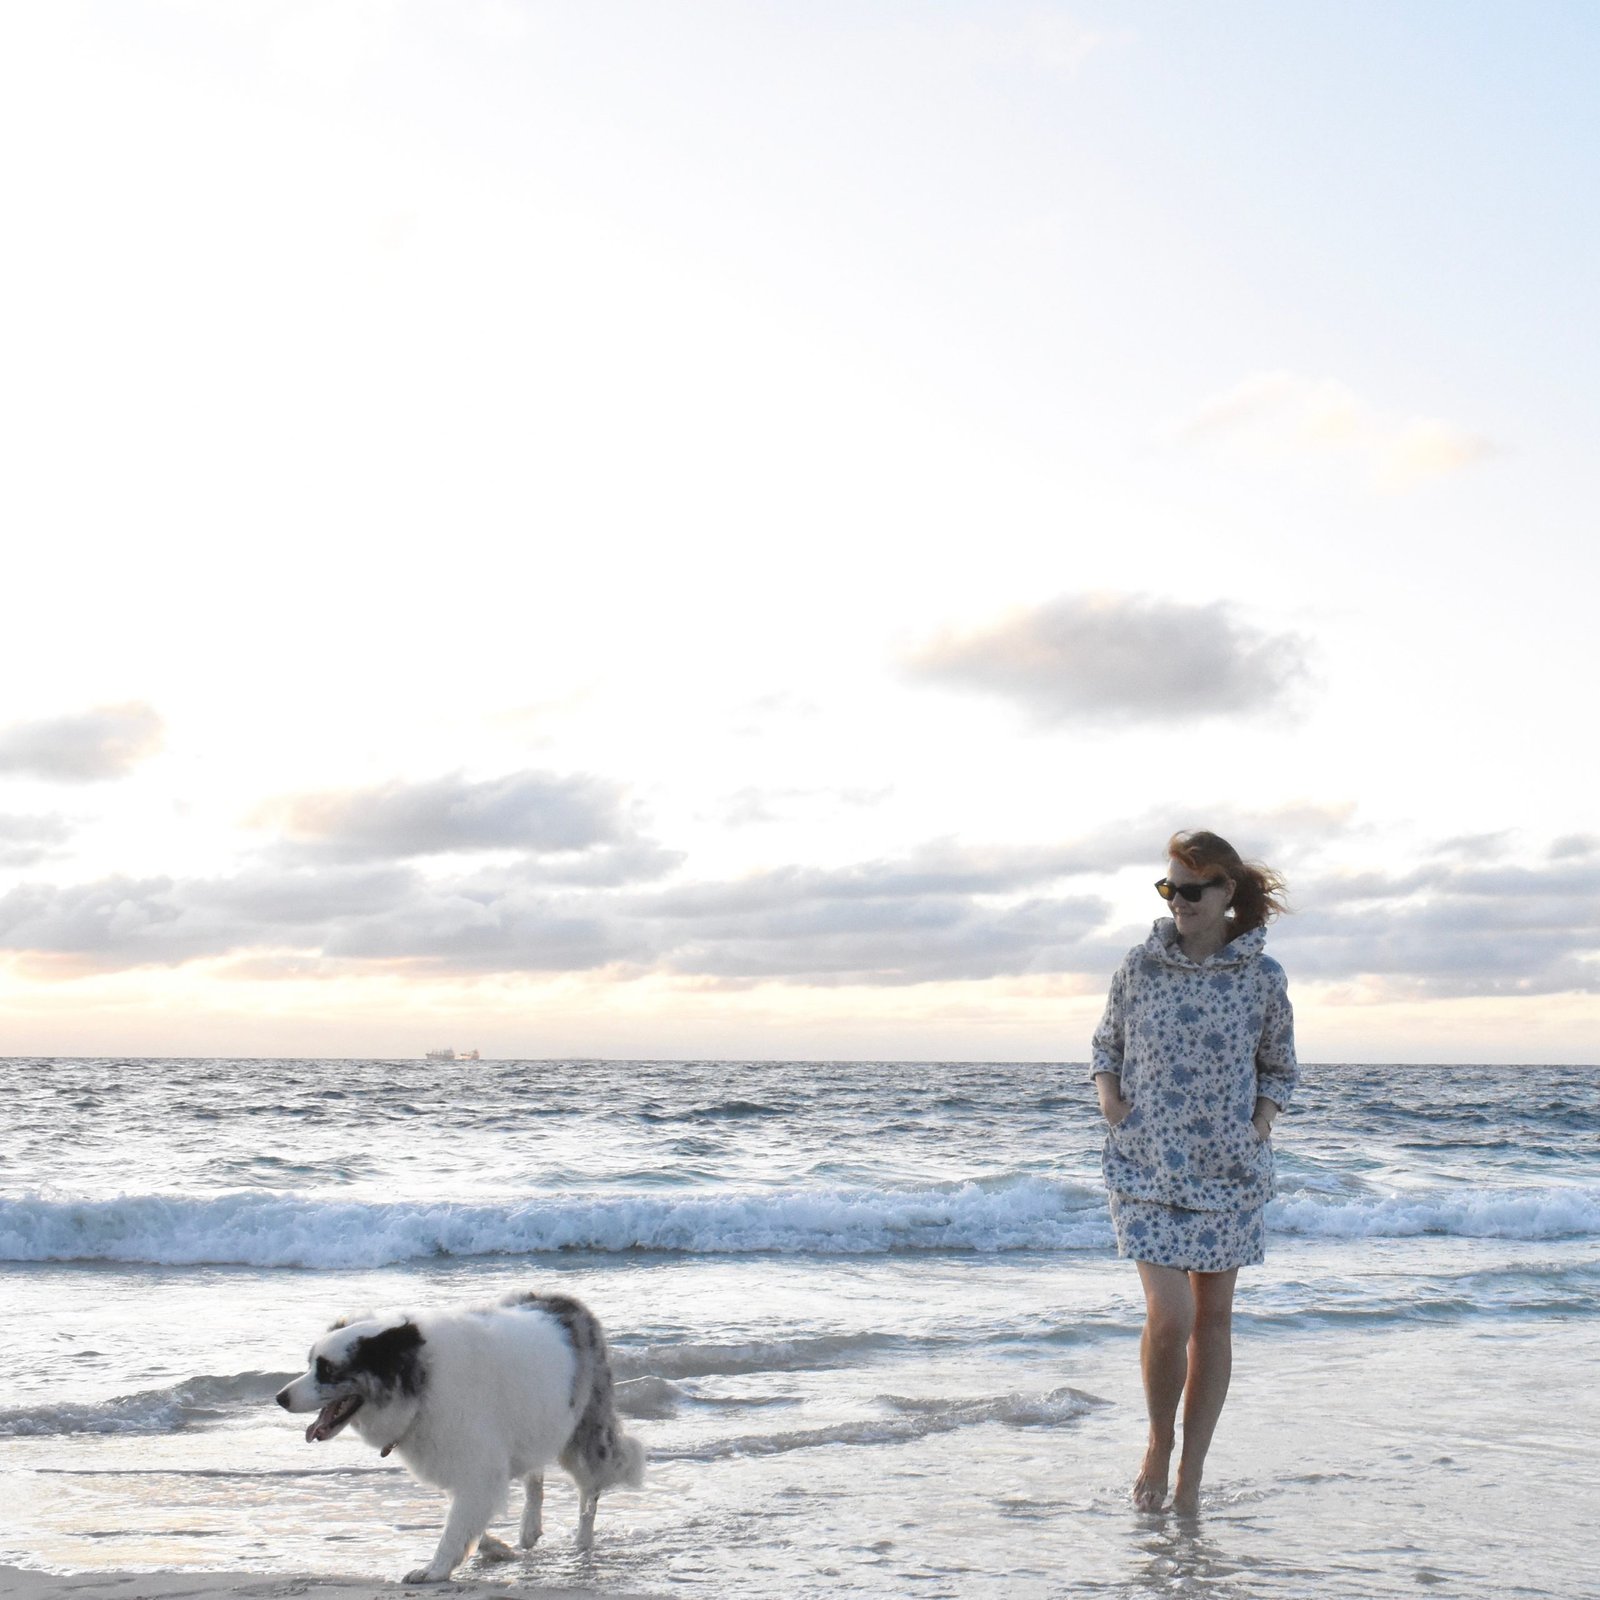
I’ve just made these ridiculously comfy trousers!  perfect for lounging around while you do your work-from-home thing in these newly strange and scary times.  I adore them unreservedly.  Well, it’s the paper-bag waist, have had a soft spot for them since the 80’s… incidentally, you know how they say that if you remember a trend the first time around then you should scrupulously avoid it the second time around?  Well, what a load of tosh!  There’d be no trends left for us if we followed that crazy advice!

Because yes indeedy, this is actually a familiar little style that pops its head up pretty frequently to the joy of us who do love for our trousers to be comfortable but at the same time have an abiding aversion to an elastic waist.  Personally, I reckon the paper-bag waist isn’t so much of a “trend” any more but can rightfully claim the classic tag.

I made them using this really gorgeous, quite thin, bottle green cotton corduroy from Minerva Crafts… it’s absolutely beautiful stuff. Then again I’ve always been a huge corduroy fan, it’s one of my favourite fabrics of all time actually, for winter things I mean.  It’s like velvet, but better; easier to sew and wear, and to care for too.  I ordered quite a lot of this colour way and I have enough leftover for a simple little dress or a tunic or something.  Hmmm. brain clogs a whirling!!

The pattern is the Jasmin trousers, by Fibremood.  Fibremood releases a great little range of patterns each season for women and children, I really look forward to their releases and love checking them out.  Each issue caters to a range of sewing levels, usually featuring some easy-wearing basics and styles that are both chic and comfortable, and a nice scattering of surprises with every issue.  I thought this style was one of the surprises, but I just found myself homing in on it straight away!  🙂

These ones have very up-to-the-minute, turned-up cuffs on cropped legs, a good amount of room in the seat without being excessively baggy – remember these?  although I ended up adoring those too, once I’d taken them in a bit!!  The Jasmin trousers are easy and straightforward to make and I thought the fly front very well explained.  I often find it helpful to draw and cut out a stitching guide for the topstitching of the fly front curve if a pattern does not provide it, and this one doesn’t; however it’s a simple matter to draw one up.

The pockets are nice and and roomy enough.  I hand stitched the top edge of mine to the waistband facing edge.

I love how the paper bag waist is cinched in with a big wide self-belt to define the waist.  Acting on instinct I cut my belt out for the biggest size with a plan to shorten it later if it proved too long.  It may or may not be ok, partly because I don’t have the required D-rings of the right width to finish it, and I didn’t really want to head out to Spotlight during these isolation times, just for D-rings; so I’ve had to resort to just tying the belt in a knot.  I might shorten it still but just going to see how it goes for a little while.

I happened to have a perfectly matching zip in my stash! which is super lucky because I meant I didn’t need to go out for that either.  🙂  This is one I inherited from Mum yonks ago, and it had a real vintage tag.  Sometimes I worry about truly vintage zips, that they’re going to break straight away, from being rusty, or brittle.  It seems fine so far, and it doesn’t have to take any strain so I’ve got my fingers crossed!

wow… I can assure you that all that random fluff is actually quite invisible to the naked eye!

I just couldn’t resist the Paper Bag Shot!  It’s a pretty rare thing where I have ever had to stand or walk with a covering over my head like this and actually I found it quite difficult to keep my balance!  Was very disorienting, and made me wonder about learning to balance without the visual cues of your surroundings…

Anyway; I LOVE my new trousers, and they’re wonderful for comfortable working from home on the couch.  My own work has dropped off a little lately, but I have taken up learning a language to fill in some of my extra time.  I’m using the Duolingo app on my phone, a free one; it’s a great little system, sending me daily reminders so I have to keep up the pace.  What language, do I hear you ask… I’ll give you one guess…

🇯🇵

Well, of course, Japanese!  It’s super difficult.  I think the only thing I’m going to learn to say with any real competency is “Professor Maria can speak Japanese and English”  This should stand me in good stead for the future, a future in which I hope I can go over there for fabric shopping again!  Let’s think positively!


Details:

Trousers; the Jasmin trousers by Fibremood, in green corduroy from Minerva Crafts
White top; the nettie, but Closet Case patterns, details here
Beige shoes; designed and made by me! details here
old favourite mustard top; the Sudley blouse, by Megan Nielsen patterns, in a silk crepe from Tessuti, details here
Sandals; from an oppy, many yonks ago

Note; was even harder to paper-bag balance in heels!

out in ze wilde….

pinterestmail

Cassie’s wedding dress

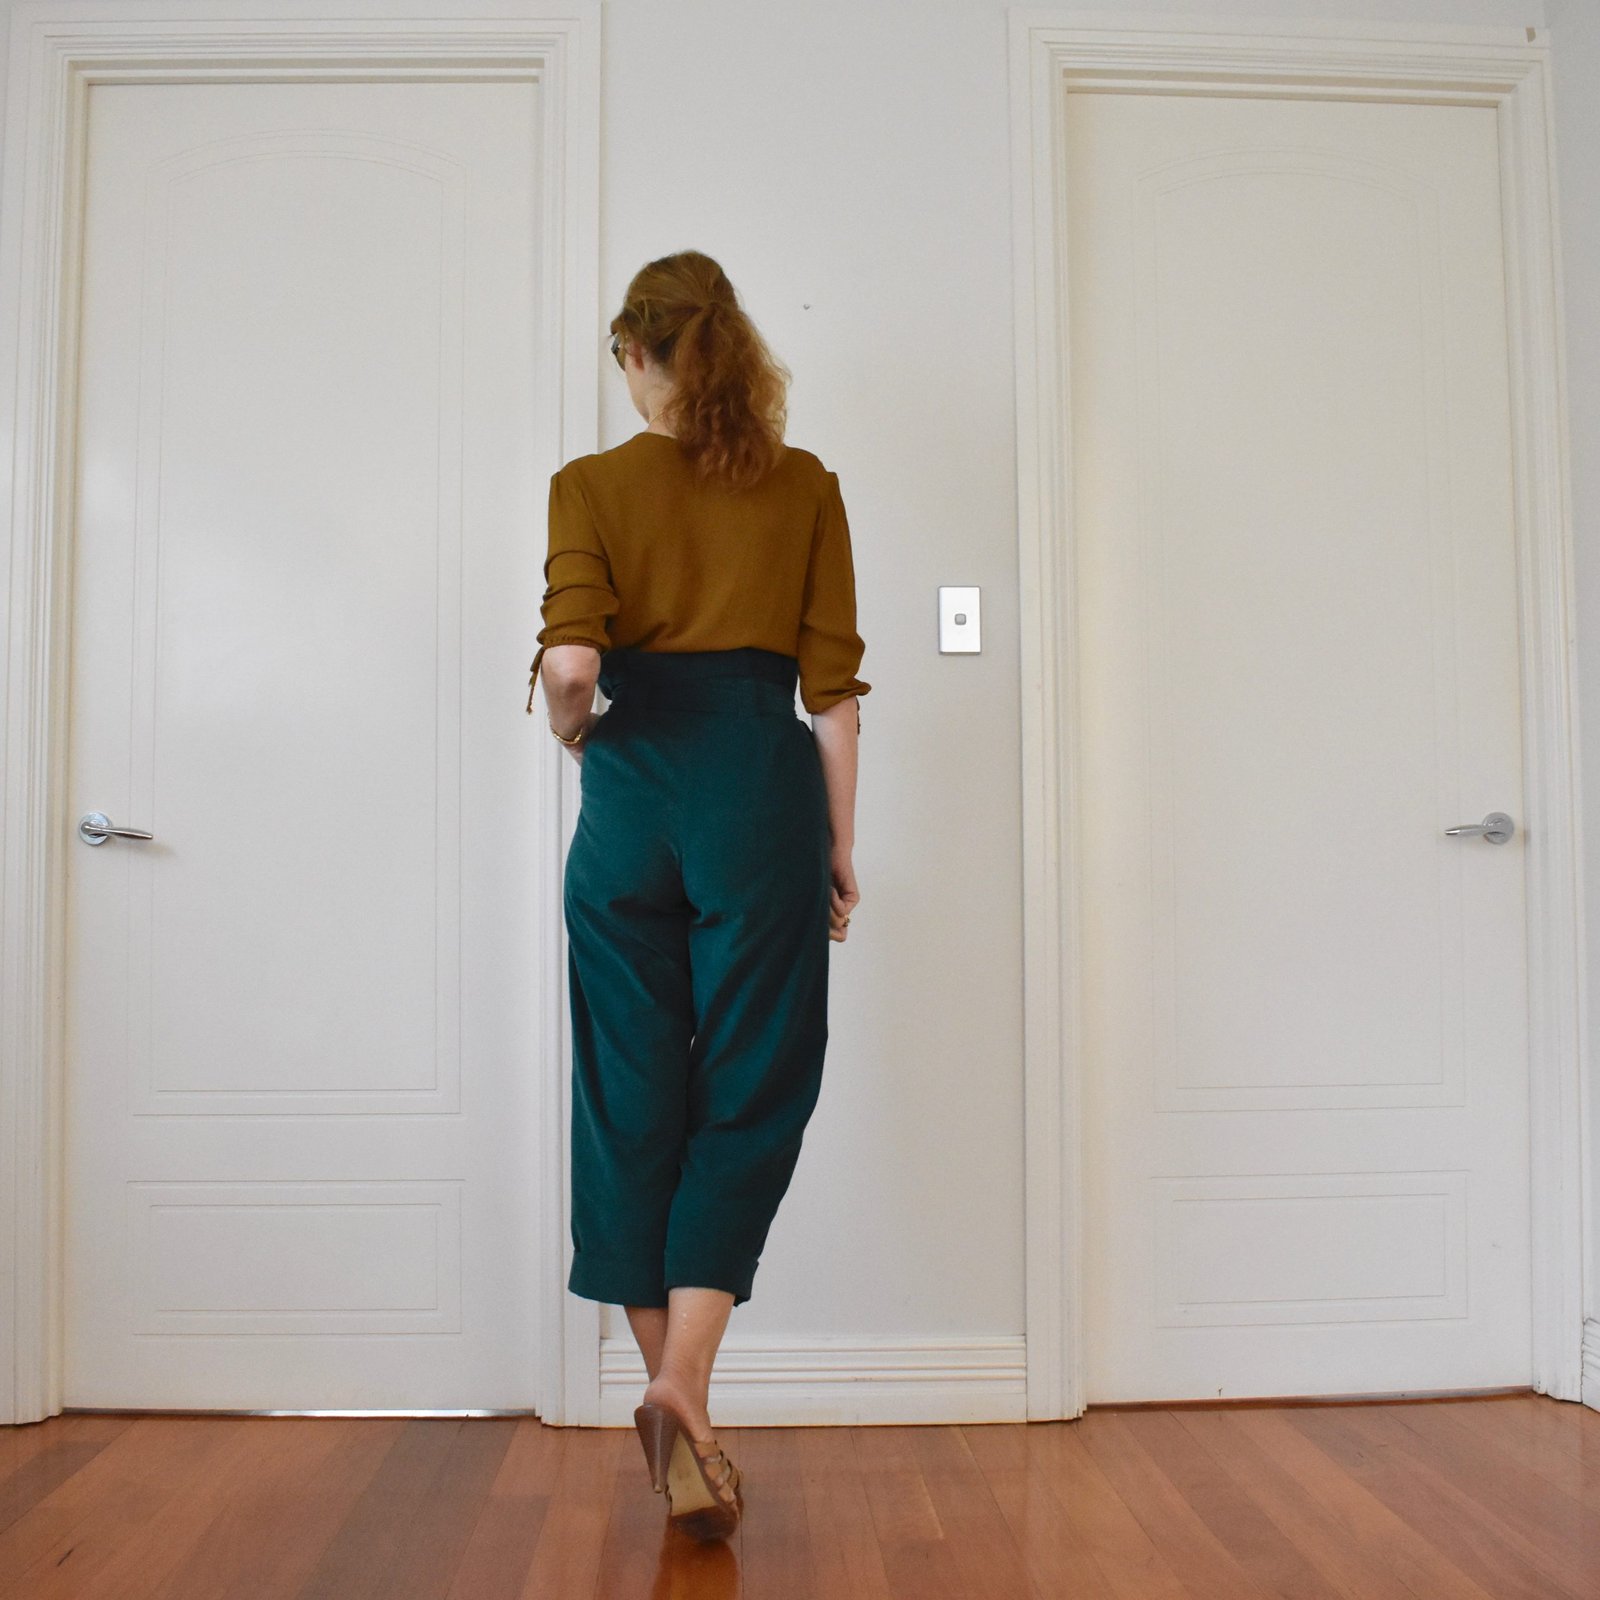
Oh hey!  I made a dress for my daughter! it’s a rather special one actually…  😉

So where to begin…well of course I’m teasing; my darling girl recently married her man D and this is her wedding dress, that I might have mentioned before once… or maybe twice, tops.

I’ve already written about making the petticoats, three of them, in fact.  Cassie loves to dance and was determined to do lots of it at her wedding, so wanted a beautifully twirly skirt.  She also decided she wanted a shorter skirt, hitting above the ground, and wanted it to stand out full and stiff in a 50s sort of a way, which meant plenty of oomph underneath was required.

I made a very full tulle petticoat, and two simple full circle cotton voile petticoats; one to go underneath the tulle petticoat, close to her skin, for comfort; and the other one to go over the tulle petticoat to smooth out any lumps and bumps that the tulle might form underneath the silk skirt.

Full details of making these can be found here

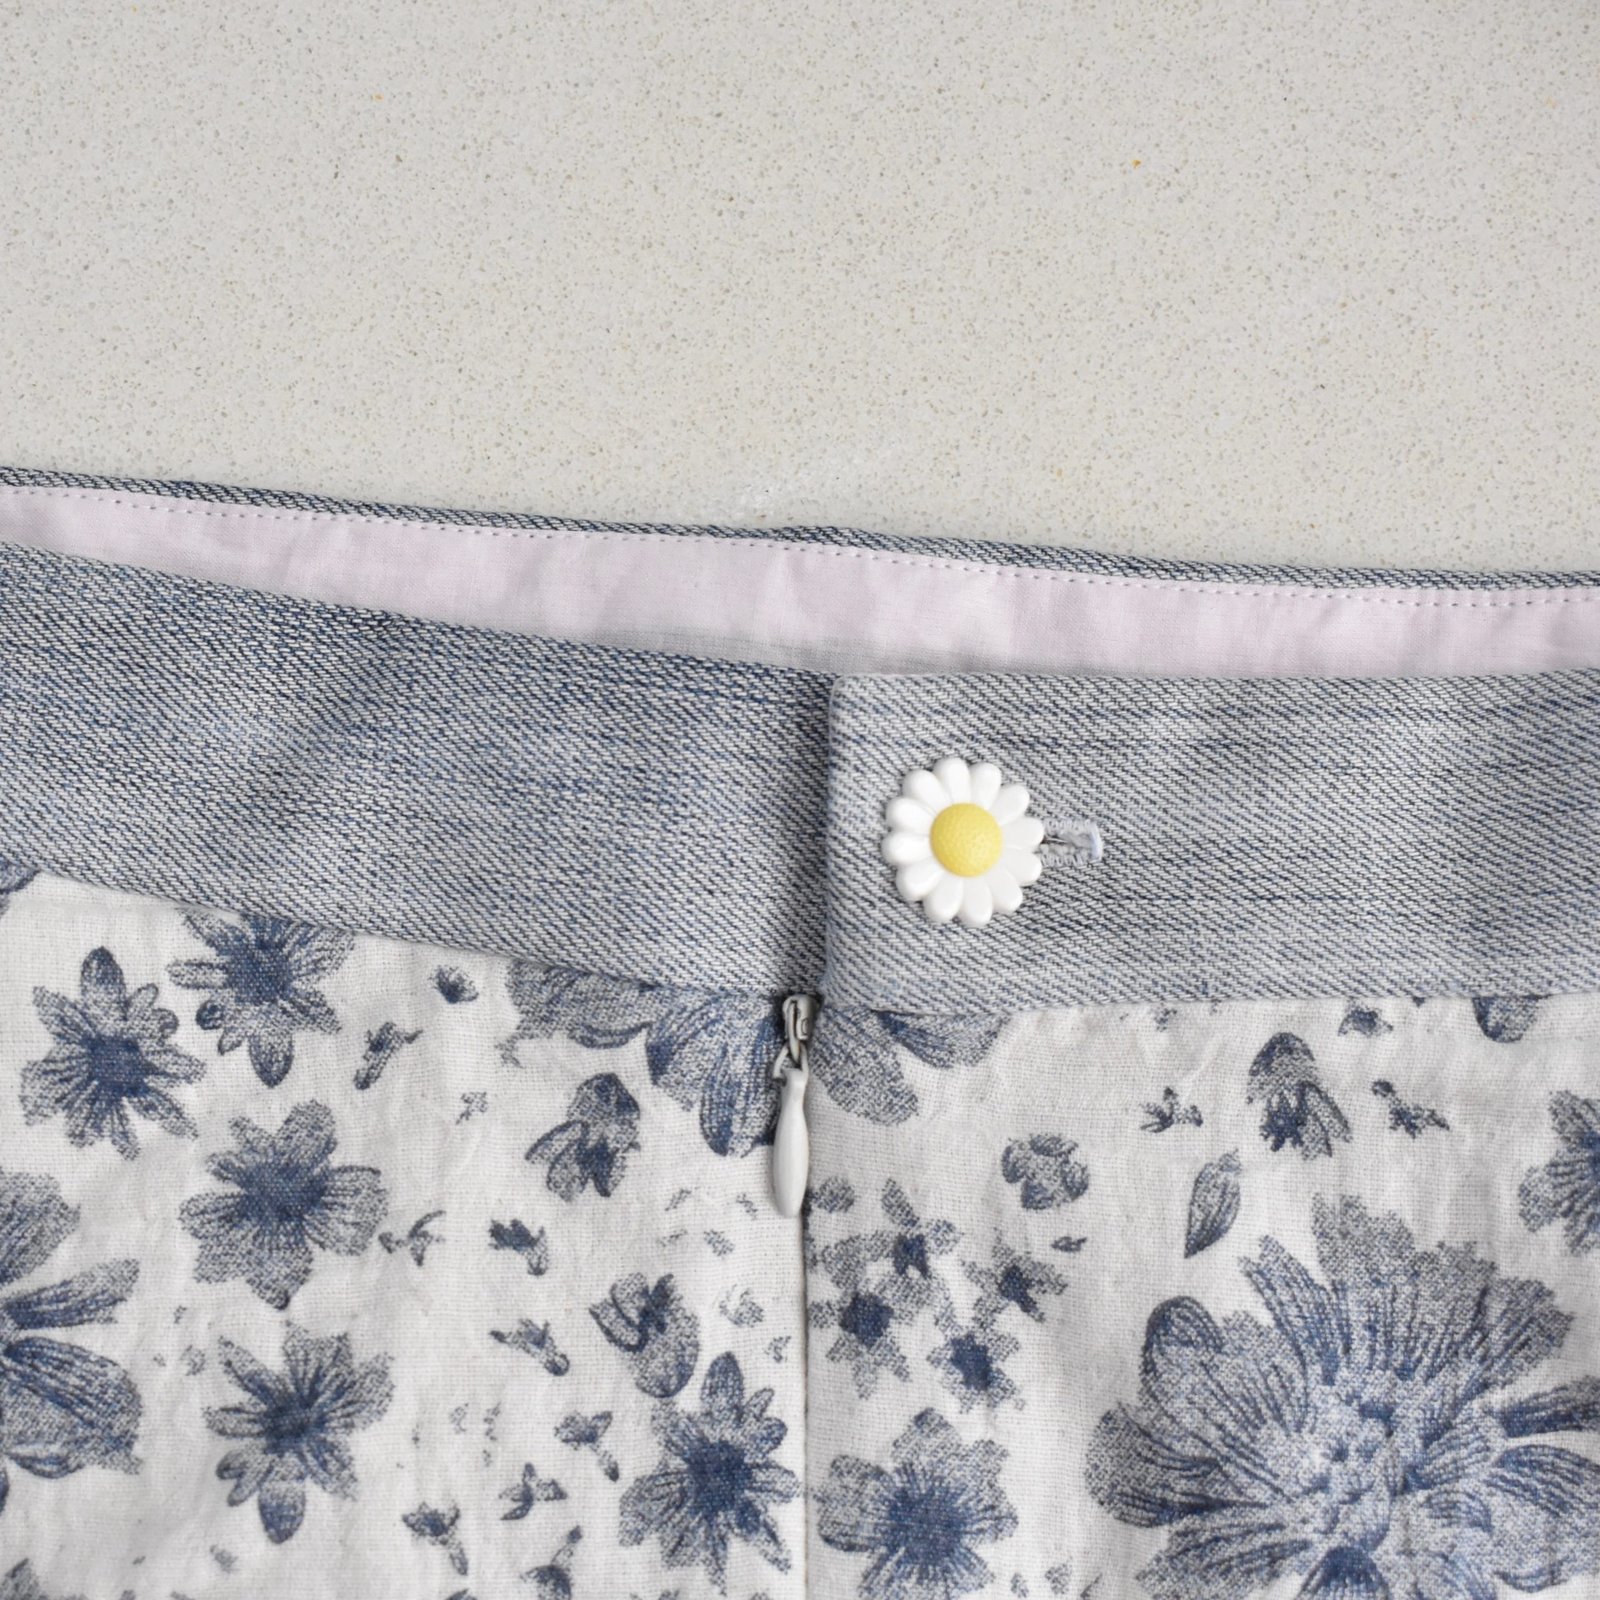
I’ll just quickly slot some shoe talk in here; when she decided upon a shorter skirt, the shoes became an important consideration… we searched and searched, trying on multiple pairs of lovely wedding shoes but then Cassie decided she wanted green shoes; and not just any green.  She had the exact shade of green she wanted in mind, and anything else was just not going to cut it.  What do you do in this circumstance? well you dye your own shoes, of course!  We found a pair of pale bone/beige coloured suede sandals at Hobbs, with a nice low heel and straps to make them perfect for dancing, Cassie bought some Kelly green Rit dye from Spotlight, and over several painting sessions and rinsing in between, finally achieved the perfect shade of minty green.  Aren’t they gorgeous?!

Now back to the dress … maybe I should start with the fabrics?  All were purchased at Fabulous Fabrics, and shortly after her engagement Cassie and I spent a highly enjoyable morning there playing with lots of beautiful laces and silks.  And she chose the most beautiful of them all!! which we proceeded to cut up, overlay each other and generally re-arrange to become something totally and completely and utterly different from how they started.  Sigh.  That seems to be the story my wedding dress-making life, so far!

The bodice itself underneath all that lace is made of beige silk charmeuse, and the skirt itself is heavy duchess silk satin, just about the most divinely heavy and lustrous fabric I could imagine.  So beautiful!!!

For a pattern, we started with Vogue 8470, and almost totally altered it of course.  Just as I did with Kelly’s dress, Cassie had a firm vision about how she wanted her dress to be, and so we hunted for a pattern that had the right bones and started hacking.  The bodice fronts of the pattern come down in a gentle V and are gathered underneath the bust into the middle bodice, and we gently re-shaped this into the shape Cassie wanted – she wanted more low-cut, for a start; and tailored to fit her which entailed a small bust adjustment, and made the gathers into a smooth dart instead.  The middle part of the bodice is different too, a little shallower and with a flatter curve, to fit with the lace placement that she had designed.  The bodice back of the pattern is a quite low-cut scoop, which we transformed to a full coverage back with a much higher neckline, right up to the nape of her neck.

I love the slight bustle effect of the lace peplum at the back! My favourite part of the back view  🙂

The skirt of this pattern is simple enough; a full circle, and I added large pockets.  Pockets! in a wedding dress! just about every girl’s dream, right?!  I’m not sure if she actually put anything into them, maybe just her hands I think! but at least they were there.

With the placement of lace on the bodice; this is 100% Cassie’s artistic vision and mostly her work too!  Cassie wanted heavy coverage of well-defined “structural”-looking large scale lace over a gridded background; and I think she did an absolutely magnificent job!  I had very little to do with this bit, just some technical advice and I did occasionally pick up the dress and do a little bit of hand stitching of lace when she wasn’t around; but the artistic placement and nearly all the stitching is totally her effort.  My clever daughter!!

I did do that “grid” bit in the middle of the bodice… we had some pre-beaded grid from one of our purchased laces, which we used here and there as a background in other parts of the bodice, but it was in small bits and pieces and the size of the remaining pieces weren’t enough to cover this part of the bodice.  So I re-created the same look with hand-embroidery and -beading over beige netting for this bit.  Those bias strips of duchess satin were pinned down before attaching the lace, then hand-stitched on afterwards.

I had a tiny headache with the zip; Cassie wanted the bodice to be quite tight-fitting so I’d stupidly made the bodice quite tight-fitting; and didn’t take into account that fully hand-appliqueing something has a tendency to shrink it in a little bit.  Halfway through all that hand-work one day, she tried it on and we could barely get the zip up … it was awful, I was terrified it was going to split!  Fortunately, even though I’d been too dumb to think about the shrinkage thing, I had been smart enough at least to leave a nice wide seam allowance for the zip… so I could unpick the zip and re-insert it, letting it out a bit.  Disaster averted! and when you’re hand appliquéing a random lace design like this it’s a simple matter to take off, re-arrange and add more lace motifs to cover up an alteration in an invisible way!

pre-appliqué…

Just like I did for Kelly’s dress, I added a grosgrain belt to the bodice/skirt seam allowance inside, with a sturdy skirt hook/eye to carry the weight of that skirt.  It’s hidden underneath the bodice lining for the most part, and emerges just either side of the zip in two little buttonholes in the lining, so the girls could hook it up at the back before doing up the zip of the dress.  I didn’t take any pictures of this bit unfortunately, but you can see what I mean in the post on Kelly’s dress here.

I was smart this time, and didn’t stitch on the hook and eye until AFTER I’d pushed the grosgrain ends through the button holes.  I don’t think I mentioned this for Kelly’s, but when I made hers I stitched on the hook and eye very firmly and ultra-securely before trying to push them through those buttonholes in the lining.  It took aaaaaages to carefully tease the metal hook and eye through those slightly-too-small holes! but I was determined and eventually got them through.  It was like giving birth though; a tight squeeze!  This time I did it right, though!

I don’t know what else to say… oh maybe only hemming the dress?  This took a surprisingly loooooong time… like I think it was a whole full weekend, from memory; and by that I mean two full seven-eight hour days.  I made a long cotton voile bias strip and stitched this to the raw skirt edge first, bound the edge, and then handstitched a lovely deep hem.  The skirt is just the teensiest bit shorter than the tulle skirt, because we both love the look of just a hint of tulle peeping out underneath.  Of course, on the day I realised that when you’re standing up and looking down at the skirt from a normal head-height like every single person at a wedding, you can’t even see that tiny hint of tulle! it’s visible only when you’re lying down with your head on the floor dressmaker-style carefully measuring a hem!  Haha!!

But I’m not even the slightest bit unhappy about that of course, my only thought when looking at these pictures of Cassie is that she is the most beautiful thing I’ve ever seen, and that making her dress was both a lifelong dream come true and the greatest and happiest sewing creation of my life.  Oh dear, and now I’m NOT going to cry!  Here, have a massive overdose of pictures instead!

this completely spontaneous snap is my favourite picture of Cassie and her cousins… yes I made their dresses too! all details of their dresses here

These earrings; this was her something old and something borrowed… Mum had some pearl earrings, and she also had some pearl earrings she had inherited from her own Mum; my grandmother and of course Cassie’s great-grandmother.  Mum had great-Granny’s earring re-made from a clip-on to a pierced backing, so Cassie could wear one earring from her grandmother and one from her great-grandmother at her wedding.  This is so so special, it makes me well up a bit just to even think about this…

I actually made this polka-dot blouse for Cassie quite recently, I just haven’t blogged about it yet.  Also; that Stormtrooper toiletries bag?  I actually made that for Daniel a few years ago! the pattern is part of the Portside set by Grainline patterns

Wearing the earrings… also; Cassie’s hair…

Something blue; I embroidered a commemmorative patch to go inside Cassie’s dress, just like I did with Kelly’s… want to hear something crazy?  I stitched, unpicked, and re-stitched this SIX times…

the three pieces of my heart…

I can’t wait to see all these precious peeps again…

Sam and his lady L… L kindly acted as one of our models for the Perth dress

I regret that Mum isn’t in this picture mostly because that would have been so lovely, and also because I made her dress too…

pinterestmail

bridesmaids

Cassie wanted her three cousins, my brother’s three daughters, to be her bridesmaids; and look how beautiful they are!  It was so much fun and a totally lovely and enjoyable experience for me to make these dresses for my gorgeous nieces.  I’d occasionally made little things for them when they were tiny, but truthfully it’s been a while.  It made me very happy to create lovely things for them, and for Cassie’s special day too  🙂

We had lots of discussions about the dresses; initially we were thinking of the traditional identical dresses, but thinking on it further, the idea of different dresses seemed a lot more practical.  Three sisters, who can and often do! borrow each other’s clothes, would find a lot more use for three different dresses, than three identical dresses.  And everyone wants for the bridesmaids to get further use from the dresses!

We did however, make the dresses the “same” in the sense that I used the same pattern for each dress.  Namely; view B of Simplicity 1195.  This is actually just the “slip” designed to be worn underneath the “proper” lace overdresses of the pattern, but it gave us the perfect, spaghetti-strapped, princess seamed bodice with a nice twirl-irific A-line skirt that we were hunting for.  Side note; it’s amazing how a lovely simple basic pattern like this is actually quite rare; we searched ALL the pattern books and this was basically the only one that fit the bill!  Amazing!!

Even then, it still needed a few tweaks… the pattern is actually a little drop-waisted and the girls wanted a true waist seam.  Luckily, a very easy adjustment.  Also I made each dress to be fully lined, obviously.  And the pattern runs quite large; I traced out the correct size for each girl and it was really quite baggy; I had pin in all the seams quite aggressively to get the bodice to fit.

I wanted the three dresses to look the same on each girl, so I made muslins for each one to perfect the fit.  My Mum early on said; it’s going to be so easy to make their dresses because they’re all the same size!!  And I was immediately like; No Mum, they are NOT the same size!  Mum; But they wear each other’s clothes all the time!  Yes, they can wear each clothes reasonably easily; which is great! because I love the thought that they are going to be able to swap and wear each other’s dresses in the future.  But that does not mean they have the same bodies, because they are actually very different, sharing none of the same measurements.

So I made three muslins too.  I hardly ever make muslins, only for the most important of important-est of items.  So this is a stupendous honour, just so you know  😉

Fabrics!  All the dress fabrics were bought at Fabulous Fabrics.  We had a great fun morning searching for the perfect colours … well; I actually left the four girls to play with fabrics and make their choices while I happily browsed fabrics and pattern books by myself.  And just handed over the credit card at the appropriate time. And successfully managed to not buy anything for myself at the same time! A very good day!  Cassie had made a mood board for her wedding, and chose the three colours from those on her board.

Also, it’s funny; but finding the matching lining fabric for each colour was almost as as much of a hunt as anything else!  We found the perfect yellow lining fabric at Fabulous Fabrics at the same time as we bought the dress fabrics, but not any of the other colours … I eventually found a good sage green match at Spotlight, and the pink dress is actually lined with ivory lining fabric, that I had already in my stash.  All three matching invisible zips I found at Spotlight.

T’s dress, in sage green; and J’s dress, in golden yellow are made in the same crepe-back satin as each other, and the pink fabric for C’s dress is a much lighter weight, slightly crinkly crepe.  Cassie was quite worried that the pink was a different fabric but it was exactly the right colour so I assured her we could make it work.  And it worked out absolutely fine, of course!  Because it is a much more lightweight fabric with a tiny amount of crinkle-based stretch to it, I did need to make a few changes to the construction technique of this one… for example; to stabilise the bodice of the pink dress, I constructed it so the lining plays a far more structural role with the dress/lining sewn firmly together at the waist seam as well as at the top edge.

Also, the pink spaghetti straps had a slightly elastic quality, and I did NOT want for them to stretch out over wear obviously!, so I threaded a length of cotton crewel thread through the straps, and stitched it to the straps themselves very firmly at the bodice junction; so this behaves like an ersatz “backbone” that provides hidden support and stops the straps from stretching.  Just a little secret tip/trick that no one would ever know!

I also took the step of hand-basting the seam allowances of the pink bodice down after grading.  I can’t explain exactly why I chose to take this extra step, just call it a hunch about a difficult fabric.

The green and yellow satin-backed crepe is a far more stable fabric, so these dresses have the more traditional lined dress construction, with dress and lining free from each other from top edge down.

I attached ribbon hanging loops to the waistband of each dress; this was leftover ribbon from my stash.

It was a lot of work making the three dresses, but I thoroughly enjoyed it! the fact that they were three different colours made it so much more enjoyable than if they had been the same, I think.    I machine-stitched the lining hems, and I want to give a big shout-out to Cassie who then hand-hemmed the dresses themselves for me.  This is always a much huge-er job than you originally anticipate, so I’m so grateful that she stepped in and took over this important, and arguably rather fiddly part of the process.  Thanks, darling!

These are the bouquets for the wedding, constructed by Daisy Hill Flowers… aren’t they the most stunning?!!  I was blown away when they were delivered!  And I love how the colours of the girls are selected in the bouquets too.

Daisy Hill Flowers also decorated the wedding cake. The wedding cake was a doughnut cake! made by Krispy Kreme!  this was what D, Cassie’s new husband wanted.  His one request, as it were…  😉  I think it turned out absolutely gorgeous, and the doughnuts were delicious too!

Cassie made the cake stand herself … she searched and searched for a nice stand online and in stores but nothing was just right.  So, she made it herself, as you do.  Or should I say, as we do?!  She’s such a product of her family…!!  Sam took her to the Men’s Shed one day; he does a lot of woodworking projects there, and she cut out the rounds.  She brought them around to our place, where she painted them all white, and then got the perspex rod cut into the appropriate length, and drilled and screwed them together.  Bam!  I’m so proud of my resourceful and clever daughter…

BTW; if you haven’t read it already, my previous post addresses the covid-19 situation with regards to this event…

pinterestmail

delicious Delice

Hello!  I know I said wedding sewing would be the next thing I posted here but I’m not quite ready to write about that yet.  However yes, we had the wedding, it was wonderful and all is well.  In the meantime I’m just quickly jumping in with a new little something, a fun number I finished probably two to three weeks ago now but haven’t really worn it much because the weather has simply been too hot for it.

And now it’s not; et voila…

This pattern is the Delice dress/blouse pattern by Super Bison cousou main; a new-to-me pattern company, and can I just say right now, even apart from anything else like some really nice patterns the name of the company is practically irresistible!  Super Bison!  So cute!  I’m just getting this mental image of a bison with a cape zooming superman-like from out off the prairie grasses and into the sky and it’s giving me a much needed laugh…  🙂

no capes!

My fabric is beautiful, a purpley-chocolate/burnt-orange/raspberry-red/blue brushed cotton plaid… I LOVE the colours here.  I bought this fabric from the Fabric Store in Melbourne on a trip over there with Mum and Cassie, several years ago.

The pattern has three sleeve variations, and I did want to make the long sleeved version but in what is probably the story of my sewing life, I did not have enough fabric…  doh!  I made the sleeves as long as I possible could, and then I even managed to cut another strip to add onto the bottom to make it look like the sleeves have a sort of faux cuff extension too.  It’s a bit of a random feature but I really love it!

Ah plaids; of course I absolutely adore plaids but they come with their own plaid-specific issues and let’s just say it; there is very little plaid matching accomplished here, just the barest of essential areas like the side seams. I simply didn’t have enough fabric for such extravagance.  It’s funny actually kinda serendipitous; when I’d cut out the front bodice, to get all the pieces cut out the front plaid had to be off-centre.  I thought this would bother me but in the end I’m glad actually.  I think it turned out a better look than if everything was perfectly centred and lined up.

I absolutely love this little dress, it’s cosy and comfortable, quite fun to wear, and I think it looks pretty cute as well.   The colours are quite autumnally scrumptious! and in winter I’m going to try it with a long sleeved wooled T-shirt underneath too.

The one little downer sort of a thing is, it must be said, the sad absence of pockets.  I did attempt to put inseam pockets in the side seams but they just did not work actually, and I had to take them out and repair the side seams.  It’s ok, I haven’t quite given up all hope yet though… I still have the pocket bags and just enough fabric to fashion some welts for welt pockets.  I’m going to give it a crack pretty soon, but just wanted to write this blog post anyway; while the spirit was willing, so to speak.

I’m so glad to get this long-petted fabric out from the fabric room and into … um, well into a different room in the house?!  The wardrobe!  😀

Later edit; I added the pockets! so much better now  🙂

wearing it here with my me-made tights, raincoat, scarf and cardigan, and rtw boots


I’m really only including this next picture because of The Eye.

Details:

Dress; the Delice pattern by Super Bison cousin main, brushed cotton plaid from the Fabric Store in Melbourne
white shoes; designed and made by me, details here

pinterestmail

floral frikka with matching skirt

… so here are a few things I made earlier! like; along with everything else that’s been going on I can barely remember when I made them.  Honestly, I’m really missing writing for my blog lately, and “engaging” with other sewing folks on instagram – please note correct use of appropriate buzzword – with all the wedding sewing I’m doing it’s all I can do to keep up with just my daily outfit blog … and keep the pantry stocked … and some sort of food on the table each night… wait.  Actually that is rarely happening nowadays, whoops…

Also, a pre-warning, after the wedding there’s going to be a veritable avalanche of sewn items popping up here.  An avalanche I tell you!!

Anyway!! I’m just gonna go with stream of consciousness blogging again and see how we go.

This is the new Frikka hoodie pattern by Fibremood… funny thing; when the catalogue came out I immediately homed in on the Becky dress and was like, YES!  that’s the one for me!! at that point noticed that it was for child’s size 2-14 … womp womp.  So I chose the adult sized Frikka hoodie obviously.  As it turned out, I had just enough fabric to cut out a little matching skirt, and so I’m pretty chuffed I ended up with a sort- Becky look after all.  Win!

pseudo-Becky

My fabric is a surprisingly cosy cotton double gauze from Minerva.  Suprising, because you wouldn’t ordinarily think cotton gauze would be warm.  In my experience, it’s a lot warmer than you think!  And so soft and cuddly, mmm.

note to self; wearing the hoodie up with a pony tail looks, um weird….

Some sewing notes; I added a kangaroo pocket on the front…  #pocketho

I stitched the sleeve hem quite deep hem on the sleeves, a. because I really love a three quarter length sleeve, and b. so when cuffed/rolled up the right side of the fabric shows.

I didn’t have a matching cord on hand for a drawstring in the lower casing, and may not even bother actually.  I think it’s fine just the way it is.

I really like the hood construction on this thing.  It’s fully self-lined, in a very innovative (to me) yet intuitive and simple to construct way; with the two sides being cut on a fold, opening edge on the fold.  Very clean and easy.

With the matching skirt; I didn’t have enough fabric for the waistband as well, so cut one from an old pair of jeans.  The colour is a perfect match, and also denim is probably a better fabric for a waistband anyway.

I stitched on a, in retrospect rather insane daisy button, because it seemed appropriately fun and random at the time, but I may switch it out at some point.  The petals are really knobbly so it’s kinda tricky pushing it through the buttonhole…


I also fully lined the skirt with ivory/grey polyacetate lining fabric, because the gauze is naturally quite “sticky” and I do plan on wearing it in winter, with tights.


Note to self; 40 minutes for a blog post.. not too bad!  Now to get back to the wedding sewing!!


Details:

Hoodie; the Fibremood Frikka hoodie, made in this cotton double gauze
Skirt; kinda based upon Vogue 1247, except with no pockets or horizontal seams, same fabric, and lined
Poppy dress (only the skirt seen); Vogue 1351, poppy print silk chiffon, details here
Pink twist top; the Pattern Magic 1 twist top, thin pink stretch stuff, details here
Shoes; made by me and my own design, detail here

pinterestmail

cute little love hearts

So, I’m full on in the midst of a mad maelstrom of sewing for Cassie and D’s wedding right now, but managed to whip up another little something for myself… and this is the second of my nominated make-twelve fabrics that I want to sew up this year… yay!  Just quietly, I have also made up a third one too but that one is a secret and I’m not going to reveal it just yet, mwahahahaaaaa!

This is made using my fave underwear pattern of course, the Watson pattern by cloth habit… I always love whipping up a few of these! such a quick and enjoyable project and with no attendant guilt trip either, since it’s a basic essential wardrobe item that is incidentally filling a desperate need at the moment too … I really need to make a few more actually!

I bought the pretty heart printed pink cotton jersey in Spotlight during last year some time, washed it immediately and it has been sitting beside my machine wrapped around the elastic and all the bits and bobs for the bra for probably eight or nine months, haha.  I lined the bra with cream coloured poly stretch that I’ve had for yonks; using a method I developed so as to enclose the seams inside, details here.

Normally, I do not stitch the cup and its lining together along that central seam, haven’t found it necessary, but this time I decided to do it.  I used a hand pick-stitch, stitching in the ditch of the seam, and I really like how the stitches form  a series of very subtle spots along the seam.

Here is my updated make-nine twelve graphic for the year so far!

pinterestmail

rusty lace Cissy dress (Homer and Howells)

I’ve made this rather awesome new dress, if I say so myself!!   Paprika!!  Rust!!  Kinda… burnt orange/dark red/burgundy/wine!!!  It has a strongly autumnal-flavour in colour and feel, but actually it’s beautifully cool and breezy enough for summer too.  I wore it today and it was super comfortable in spite of the 38C heat.  Phew!

The pattern is the Cissy dress pattern by new company Homer and Howells; I discovered and started following them on instagram a few months ago and was thrilled when they asked if I would like to try out this particular design… because I knew it would make a lovely summer frock  🙂

I had this glorious richly-coloured lace that’s been languishing in my stash for hmmm goodness knows how long … I can barely remember its purchase!  I’m pretty sure I bought it at Tessuti’s in Melbourne on one of my holidays over there with Mum and Cassie.  Like about 95% sure.  #youknowthingsarebadwhen…  It’s one of those fabrics I’ve taken out and petted every now and then, even laid out pattern pieces on it before having second thoughts, but finally I felt this particular project was just the right thing.

The pattern is an exceptionally easy thing to make.  It does have pockets, beautiful great big pockets too, absolutely perfect; but in the spur of the moment I just couldn’t think of a way of inserting them nicely or invisibly enough into my underlined lace dress, so left them out this time.  Who even am III????!! but really.  I’m a little ashamed I didn’t think a bit harder, because right now I can think of two separate ways I could have made it work, hmmm.  But I’m feeling too stressed out to unpick all that overlocking to put some in right now.  Maybe later.  After the wedding…  🙂

Of course I needed to underline, because it’s lace, and therefore completely see-through.  I had a length of white cotton in my stash too, inherited from Mum’s stash; that was just the right sized piece, and I thought the white underneath would be really cool.

But you know what? it wasn’t … when the dress was finished, I decided the white cotton was actually really awful; just too harsh of a contrast.  So I dunked the completed dress into a dyepot of mixed orange/red/brown/hot pink dyes.  And now I think it’s lovely!  the underlining is almost the same colour now, just a shade lighter than the lace, and I think absolutely perfect.  I’m really going to enjoy wearing this chic thing!!

Notes; I shortened the sleeves by about 9cm, and the dress by about 17cm from the top edge.  At full length, the dress was just a little too “granny-ish”, and yes I know I AM now an actual granny! but there’s granny-chic which is cool; and then there’s just “granny” but not in a chic way.  The lace that I chose, combined with the long skirt tipped the original look into the latter but I do really love it at this slightly shorter length!  I actually do have fabric in mind for this pattern at the designed-for longer length, but that will probably not happen until after Cassie and D’s wedding… ha!  I have so much to do!!!  #notevenlaughing  #cryingjustabit #ineedaholiday

I managed to incorporate the natural scalloped lace edge into the hemline, which I think is super pretty! but sadly didn’t have enough lace do the same for the sleeves.  They’re just hemmed.

Details:

Dress; Homer & Howells Cissy dress pattern, lace with dyed cotton underlining
Shoes; caramel/ivory clogs are made by me, and my own design, all details here. White shoes are also made by me, at a shoe camaraderie workshop, all details here

pinterestmail
Switch to mobile version
↓