Category Archives: Sewing

Carole in blue velvet

Should that be “Carolyn” in blue velvet??  well I think it should!  Because this thing is so very very me!  LOOOOOOVE!

Actually, this is the Carole pattern, from the new issue of Fibre Mood magazine, available for purchase here.

The fabric is a totally GORGEOUS deep blue velvet that I bought at the Morrison fabric sale from.. ooh, maybe a few years ago?  I forget.  This also happens to be the only piece of fabric I had big enough for this pattern.  Lol!  Same as for the Faye dress, this pattern is a HUGE fabric hog!  It doesn’t show up too much, but there is a centre back seam on every back piece; the bodice, the middle piece, and the skirt piece.  This is not ideal, but was completely unavoidable.  The skirt piece alone is ginormous!  Even trickier; the pattern is designed for fabric 150cm wide, which my fabric was NOT ahem; it’s important to comply with this simply because the skirt piece is too big to cut out with fabric any narrower.  I only managed it by flipping the skirt pattern piece by 90 degrees and having a centre back seam.

Even one of the front middle pieces is also pieced down the centre, but I sneakily arranged for it to be the left front, the one that is covered up once the dress is all wrapped up closed.  You could never tell! except that I’ve now told the whole internet, right here, woops…

Technical deets:  I omitted applying iron on interfacing to the skirt opening edges.  Well, I did actually apply it, but thought it looked too stiff and did not allow the skirt to flow and undulate elegantly in the way I desired it too… so I peeled it off.  I think the skirt turned out so much better without it!

I had precisely zero velvet left after cutting out the main dress pieces, so cut the bodice and neckline facing from an old pair of Sam’s work trousers, which was the perfect shade of inky navy blue.  I’ve previously used these same trousers for the piping and buttons on this dress here.  Waste not want not!

For the ribbon tie closure, I bought a length of navy blue cotton twill tape, and zig-zagged the raw ends so it won’t fray.  The hem is hand-slip-stitched in place.

I absolutely LOVE this dress!  I almost, almost wish the weather was colder, so I could start wearing it in earnest… but well, I could never truly wish for colder weather, really.  Not with a straight face.  However, I shall very much look forward to wearing it next year.  Truthfully, I actually finished making this quite a while ago… like a few weeks ago #oops but have been completely unable to take a picture of it.  Partly that’s me being lazy.  It’s been so hot!  unseasonably so, and I just didn’t want to put it on.  I did try to take pictures indoors, at my now usual photo spot; but they were terrible.  I LOVE velvet but obviously it’s like a black hole when you photograph it, soaking up all light and basically looks just dark and completely featureless.  This is an example of what I’m talking about…

hehe, only including the picture because it’s got my beautiful Sophie in it, really…

Another thing is .. well, you guessed.  The wedding dress.  As well as the wedding consults and planning.  We helped a lot with advice and as a sounding board for Tim and Kelly when they were planning theirs; and now of course, Cassie being our daughter, and the lion’s share of planning a wedding generally falling to the girl; fair or not that’s just how it is! well of course we’re fully into the details of this one too.  I’m just getting more and more behind on everything! and my sewing/blogging schedule is all over the shop.  I’m not complaining, far from it! but just explaining I suppose.  Life is currently quite FULL, for us.

Hmmm, got carried away and off the subject just a little bit there…  I should just delete all that, but I’m currently in the mood for stream of consciousness blogging, so I guess it should stay.  Ha!  That’ll teach me!

Details:

Dress; the Fibre Mood Carole dress, in deep blue velvet
Tights; made by me, details here
Boots; Sempre di, from Zomp boutique

Also, I’m part of a link party… check out the other creations people have made from the magazine!

pinterestmail

I made a cool white dress

O haiiiiii!!  As per the title of this post I have indeed made a cool white dress.  Noice, huh?

IN other news, in an attempt to be more time efficient I am now aiming to write this blog post in the swiftest time possible, and with minimal to-ing and fro-ing and correcting and proof-reading.  Since normally I’m about as slow as a wet week.  Let’s see how I go… it is now 16:17…

So this is Burda 08/2017; 119; also known as the “miscellaneous dress” on the Burda style website.  I was idly browsing on the website and spotted it, and instantly fell in love.  I almost almost clicked buy now for the pdf, when I thought to do a last minute check on the Burda magazines I have in my collection.  Bingo.  Of course I already have it.  WIN!!

I had a length of white cotton sateen sent to me by Minerva; it’s very thin and a little crisp, and perfect for a highly detailed little summer dress like this design, I think, with some twists and folds and pleats and things that are perfectly highlighted in a plain colour.  Or,should I say, non colour?  with black and white, I never know whether it’s technically correct to call them colours actually, but my personal feeling is that both ARE colours and should be awarded that title.  Why should the most commonly used shades in apparel not be considered official colours anyway?  Weird.  But I digress.  I’m never going to write a nice swift blog post at this rate!

So, my dress.

I love designs with a twist and/or something unusual/asymmetric/weird about them, which is the reason I chose this design since; it’s chocka with stuff like that; obviously it has that belt/cummerbund thingy at the waist, and there is also an apparently full length asymmetric fold running all the way from the left shoulder right down to the hemline.  it’s not really a full length fold, that’s just an optical illusion since it’s chopped off and restarts in the waistline, but I love how it does look like it runs all the way through.

This Burda pattern is quite a challenge actually, and I scratched my head several times as to what I was supposed to be doing.   My advice is to mark the seam NUMBERS carefully and accurately; yes, those corners on a Burda pattern where there is a 1, 2 etc; those are the seam numbers which are often used in the instructions.  In my view, having them marked in this pattern is imperative to success.  Attaching the front bodice and skirt to the ride side middle piece and the right front middle piece, and the tab piece is pretty darn tricky to get your head around.  I’m not even sure if I got it exactly right in the end, but it “looks” pretty good and that’s all that matters really.

And truthfully I love a challenge though, something you can really get your teeth into  🙂

Clara asks; does my bum look big in this?

I also have a little feeling I should have done some sort of small bust adjustment, but am probably just splitting hairs here; I’m actually very happy with the final result and am positive I’m going to wear it a lot.  You know one of those dresses that it’s almost impossible to take a bad picture of it?  It felt a bit like this when I was reviewing the pictures of this one.

The fabric had just a little bit of stretch, just enough that I risked sewing  up most of the centre back seam, and only put in a short, 15cm zip at the top end near the neckline, enough that I could fit my head through it.  This worked out great, I can pull the dress over my head and it stretches just enough that I can wriggle into it just fine!

The back is really pretty plain; kinda blah with nothing special going on at all.  I think in a perfect world I would have chosen for this design to have something equally visually interesting at the back too, but well, you can’t have everything.

The first day I wore it, I paired it with my handmade slides/sandal things that I made at my first shoe camaraderie workshop… I love how they look together!

So that’s it!  It is now 16:45; not too terrible… oh but I haven’ t counted the time it took to take and upload pictures. Damm!

I am actually in this picture here, posing like a boss somewhere back there.  There just happens to be a subtle, unobtrusive bit of photobombing going on at the same time…

Details:

Dress; Burda 08/2017;119, in slightly stretchy, thin white cotton sateen
Shoes: white slides made by me! details here 

pinterestmail

deep golden Faye dress

I’ve just finished making this dress… it’s rather gorgeous, isn’t it?

Just before going away, I was contacted by the lovely Sophie, who asked me if I’d like to make something from the autumn issue of the Fibre Mood magazine… would I?!!  Fibre Mood is a newish Belgian sewing magazine, with a nice variety of designs suitable for different sewing skills, some quite simple, and some more funky and cool with interesting details.  I chose the Faye dress – I have to admit partially influenced by the totally divine sample! printed it out before going away, but got no further until the day I got home again …

and literally as soon as I got home, like the very same day… I got onto it and finished it.  Again, maybe influenced by the sample; I dug out from my stash this silk crepe in just about exactly the same colour.  Copycat?  Moi?  Well, I may have also been influenced by the fact that it was literally the only piece in my stash large enough for the pattern layout too!  I’d originally bought it from Tessuti’s in Melbourne, during one of my girls’ weekends over there with my Mum and Cassie.

It’s so autumnal!!  I’m incredibly into autumnal tones right now, I think probably influenced by all the beautiful fall foliage images we’re getting from the northern hemisphere right now, but also of course because I am an “autumn” myself.  I do think these tones suit me pretty well  🙂

pockets!!”…  in a hoarse drug-dealer-on-the-street-corner voice…

The design is slightly 80’s, in a really good way in my opinion! reminding me of the comfortably loose-fitting midi shirt-dresses with gorgeous wide and swishy pleated skirts from ralph lauren 80’s collections…  the Faye design IS a true shirt dress too actually; with a long concealed button band, and with both the bodice and skirt pleated into the waistline.  And, of course, and at the risk of sounding fanatical; HUGE pockets in the side seams, above  🙂

The bodice has what look like pocket flaps on the front, but which are actually faux flaps, and are more of a design feature.  The back bodice has a matching horizontal seam, and a rather cute hanging loop as a purely visual feature.  I love small interesting details like this!

well, hello gorgeous!  Sophie likes the dress too…  🙂

I didn’t have matching golden buttons in my stash, and am trying to use my stash rather than always buying new – holiday souvenir shopping notwithstanding!! – so I dug out some black buttons from my stash.  It may sound counterproductive to stitch very visible buttons underneath a button band constructed specifically to conceal them! however I actually like this look of them peeping out a a lot.

The sleeves are stitched with a very wide hem, which is then turned up to for a self-cuff.  I really love the almost “safari” shirt vibes of the bodice.  This photo also shows the nice pleats in the bodice and skirt fronts.

The only part of the design I found a little too scantily explained was the hemline… there were basically no instructions as to how to finish the hemline with that concealed button band as well as the button band itself either.  I know from past experience this is something you do have to address a lot earlier than the very last step! this sort of thing requires stitching the corners right sides together and turning out, and at least a little bit of hand-stitching things down.  The instructions for Faye pretty much leave all of that entirely up to you.  I also decided to hand stitch the concealed button band pieces together at the lower edge too, to make it all look a bit neater and seamlessly finished off.


Also, in my  opinion, the nature of the button/buttonhole band construction makes for a very thick area at the front of the waistline… because the button band and concealed buttonhole band are cut-on with the bodice and skirt, and then seamed together at the waistline… when you create all those multiples folds that are inherent in a button band, not to mention that of the concealed buttonhole band, well let’s just say there’s a heck of a lot of layers in there.  If I was going to make this again, I would probably cut the button/buttonhole bands separately and in one long piece, no waistline seam, and attach them to the centre front edges of bodice and skirt after they’re joined together.  The way it’s done in Faye is not actually terribly terrible, because this is the kind of dress you wear a belt with it, and a belt hides the waistline anyway; however I think this approach would make for a less bulky and cleaner waistline.

The hem, I made as a super skinny rolled hem, finished with tiny fell-stitches.  My crepe is the kind of fabric that when you press your very narrow finished hem, thus flattening it out from 3D to 2D, it morphs out to a much wider hem, seemingly by magic.

Summary; I love my autumnal new dress! and may even dare to wear it as a spring-time dress… I think it will work equally well!

Details:

dress; Fibre Mood “Faye” dress in a golden silk crepe from Tessuti’s in Melbourne
Tights; self-drafted using my own custom fit pattern and black polyester stretch from Spotlight
Belt; super old one from Country Road
Boots;  Officine Creative from Zomp boutique, a birthday gift from Craig

the swish is amaaaazing!  I’m so into the swish right now!

pinterestmail

“Moroccan tile” skirt and a little white top

Something I really wanted to do before my trip to the United States was to make a new outfit for meeting with other seamsters… with two days to go; I did!  I made a skirt and a little white top ensemble… each piece was actually pretty simple and the whole process from go to whoa took about half a day each.  Bam! I really  love sewing projects that just whizz together super quick like that.

I used Vogue 1486; a Nicola Finetti design.  Nicola Finetti is an Australian designer, and when have I ever seen an Australian designer collaborate with Vogue??  I’m pretty sure, never.  I decided this was a collab I absolute needed to support by buying the pattern…

For the skirt; I’d ordered 3m of cotton from Minerva.  I thought the print looked quite divine on the website, when it turned up it was actually a bit of a surprise, to be honest!  The print was divine; however it was also far far smaller, I mean, on a smaller scale, than I had imagined.  I’d sort of pictured the squares being each about 10cm, sorta like real Moroccan tiles, actually they’re more like 1cm.  Hey ho though; I still had hopes it would work out ok…  The colours are quite luscious, and very very me!  Mustard, terracotta, burnt orange, turquoise, green, a tiny dash of coral pink… honestly could this possibly get any more my sort of palette!

The fabric is beautiful quality, as good as I could have hoped for; soft, and still crisp enough, densely woven and yet still with a very nice drape.  It was also very generous width, however I still didn’t manage to cut the skirt pattern pieces out from my 3m length!! I know, right?!  You’d hardly believe it to look at it, but it’s a HUGE fabric hog!!  I had to piece a smaller section onto the end in order to cutout the back lower skirt piece.  The join is not perfect, but pretty good; plus it’s positioned so it’s hidden inside a side pleat, so it’s really quite invisible.

For the little crop top I used some slubby white cotton I bought years ago, from Fabulous Fabrics, and a navy blue chunky metal zip from Spotlight.  The top was super easy and fun to make.  You had to shorten the zip; and the instructions showed how to do this with a pair of pliers.. however I just could not pry the metal teeth off of the zip tape.  I struggled and struggled with this, but eventually gave up, and in the end simply cut the zip off at the right point and stitched a good solid bar tack in the gap between teeth to keep the zip pull firmly trapped where it needed to stay.  And I lOVE how the zip looks at the back of the little top!

innards…for some reason this sight is enormously pleasing to me….

You were supposed to put an exposed zip into the skirt too; however I decided this might all be a bit too much; overpowering the delicate print.  I just used a dark green invisible zip here instead.

And just saying; the skirt has fabulous pockets.  Fab -U -Lous…!

So I’d mentioned I whacked this outfit together in a matter of days… of course I haven’t made this pattern previously and didn’t really bother to do a careful fitting on myself either.  I’d picked a size 12; my correct size according to the size chart.  Usually I pick a 10 for Vogue patterns.  And I don’t know why I decided upon a 12 because, of course, turns out I should have picked a 10 for this one too… I knew I usually go a 10 for a reason!  the waistband is a little bit baggy on me, and – is it my imagination? – but I feel the top looks quite big on me too.  Not that this is going to stop me from wearing it, but just; you know.  For next time.

The day we’d planned to meet with sewing girls in San Francisco was a lovely warm day of 28C… so I felt so lucky I could wear my new outfit!!  however we only had the one warm day during out entire visit and that was it!  I was happy that I could wear it for one sewing meet-up, but just a wee bit disappointed it didn’t get another outing.  Like, the days we met other sewing peeps in New York city it was just too cold for it (sob)  so I had to make do with other things I’d packed…

from left: Yoshimi is wearing Vogue 2900, Beth is wearing one of her favourite dresses, a Butterick pattern, and Shams is wearing her Style Arc Stevie jean jacket

Later on we headed over to a cafe where Shams had organised an afternoon tea..

from left: and I apologise I did not catch what everyone was wearing this time … I think Rose is wearing a Cashmerette top and Jilly is wearing a tessuti patterns Lily dress?? 🙁

Wendy, Shams, Yoshimi, me, Rose, Jilly, and Catherine is taking the picture… I knew I should have taken over the camera so she could be in the photo!

And that brown paper bag, clutched in my  pawsies??  Yup, you guessed it… it has a nice little stash of fabric tucked away…;)

Yoshimi took this picture on the train platform, after fabric shopping in the Bay Area with Shams and Beth.  I thought it was such a nice picture!  In fact the whole day was such a fun day!!  I wish I could hang out and gossip and chat and go fabric shopping with all these ladies more often!

pinterestmail

Sienna maker jacket

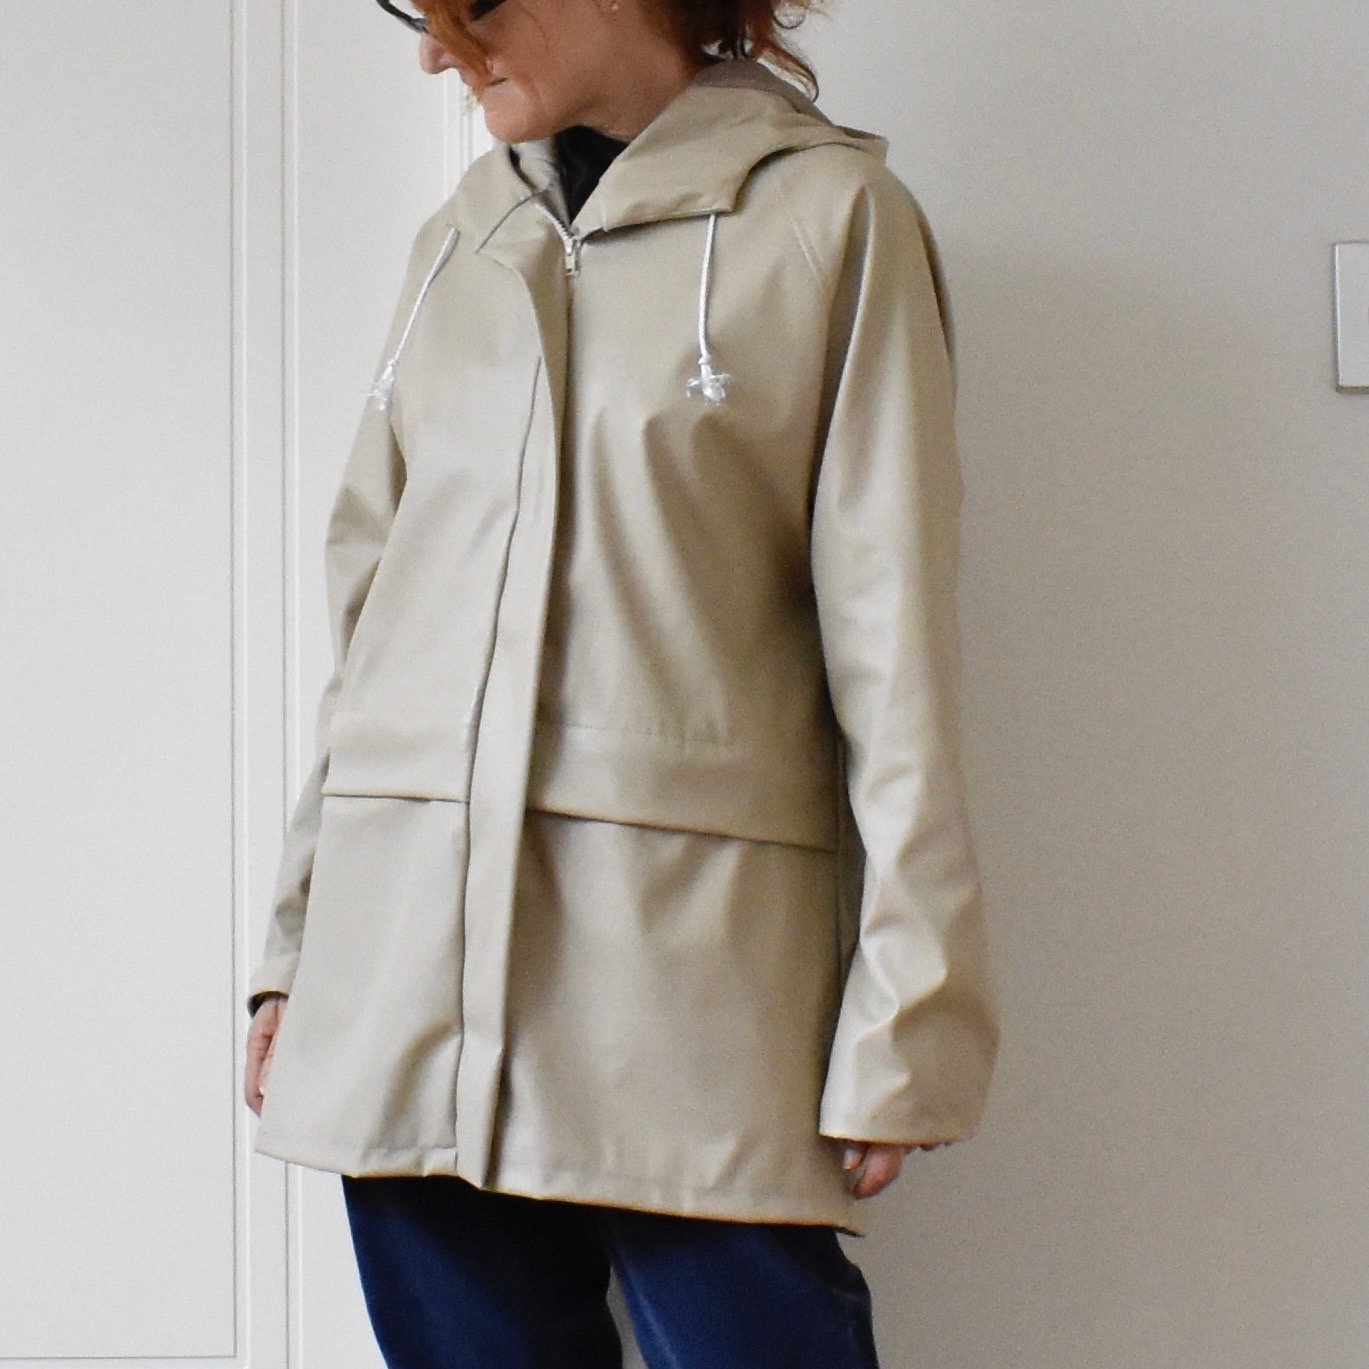
Ok, hopping straight to the crux of things; I absolutely J’FREAKINADORE this jacket!!  This is the new Sienna maker jacket pattern from Closet Case patterns, and I was lucky enough to be chosen to test the pattern.  This is view B, made using a deep bottle green cotton twill bought at Potters Textiles.  I actually found this in the remnant bin, believe it or not… yeah, Potters often does really BIG remnants.


We’re not supposed to reveal our tester versions of a pattern until it has been released, but I simply just could not resist sneakily wearing it! and have been (im)patiently waiting until I could chat openly about it… in fact, I took it on holiday with me recently when I visited the USA with Yoshimi on our sort of sewing-tour, because I really really wanted to include it in my travel wardrobe.  Also, I knew that Heather, with a bit of luck, was actually going to release it right about the timing of our trip.  And she did! yay!  so I was able to indulge my love of it in full.

photo taken in San Francisco by Yoshimi

And I wore it, literally Every Single Day.  This thing could most probably walk itself around San Francisco and New York by now!

The design is fabulously comfy; loose and stylishly slouchy, just slightly oversized in a good way, with two piece sleeves, notched collar, and a veritable tonne of pocket real estate.  A small but nice detail is a handy hanging loop included in the pattern pieces and instructions.

The belt from views A and B is pretty cool, snaking through a neatly faced slit opening, before wrapping around your waist and attaching itself to a little tab on the side.

Above can be seen the paler olive green poplin I used to finish the raw edges inside in a bias bound finish.  I kinda wish I’d hunted out  deeper bottle green that would match more closely the colour of the jacket, but both Yoshimi and Cassie reckoned the paler colour looked really good, so I guess it’s ok then.  I bow down to better, more stylish opinions than my own.

I flat-felled the side seams, centre back seams and both sleeve seams; I chose to do both sleeve seams because I knew I’d be wearing the sleeves rolled up most of the time, and wanted it all to look nice on the outside.

In fact, the only spot where I used the overlocker was the armscye; I figured these would remain pretty much totally hidden, most of the time, so meh…

I love how neat and almost … ?military? the jacket appears when firmly belted…

… and I enjoy wearing it open too, with the belt tucked into a side pocket.


OR, you can wrap the belt around your back only, just to pull in the back pouffiness a little, and tie it to the tab.  I often find with a jacket that I develop a strong preference for either open or closed, however with this one I tried wearing it all different ways on different days, and really liked it equally worn any which way.

As mentioned, the pocket situation is pretty fabulous.  There are enough pockets in this thing to satisfy the most fanatical and ardent of pocket-lovers, honestly.  View B has two ginormous patch pockets on the hips, a small breast pocket pictured above, and a large inner breast pocket picture below too, nicely big enough for your passport, phone, bus/train pass; well just lots and lots of stuff really.

But wait! there’s more!!  The jacket also has two quirky little pockets on your sleeves!!   ok, so you’re probably not going to use these ones super frequently, but they are there!  I guess you could store an electronic pass in there, for one thing, so you only have to brush your arm up against the detector without getting it out.  And they look pretty cute!

For my buttons, well, I was on a use-up-the-stash mission in the lead-up to my holiday, since I knew I was going to blow that one right out of the water during our holiday! anyway, I had some old wool-covered buttons in my stash, long ago cut off an old cardigan, and I coloured them in with a felt-tip pen to blend in nicely with my green drill.

To be honest, I had actually wanted to make the long version of the jacket, however my piece only allowed me to cut this shorter version.  I was initially a little sad about that, however I’m so in love with the finished version I couldn’t possibly remain sad for long.  And I am still keen to make the longer version!  I don’t very often want make the two views of things straight away like that, so if that’s not true love, I don’t know what is!

Interesting factoid, well to me anyway; my Stylebook app tells me I’ve worn it 17 times already and I’ve only just blogged about it.  Unbelievable!!!

    Details:

in holiday photos, I am wearing my cockatoo top and skirt, details here
White sandshoes by Trenery,
Black booties by nylon, bought at Zomp boutique
Prada gold hand bag

other photos:

Mustard tee; the Nettie pattern by Closet Case patterns, mustard merino, details here
Skirt; Vogue 1247, in outback wife barkcloth, details here
Tights; self drafted from my custom-fit pattern details on how to make your own here
Boots; Roberto del Carlo, bought at Zomp boutique

photo taken in New York by Yoshimi

pinterestmail

mustard pietra shorts

Hack attack!

Despite initial appearances, my new shorts are actually based upon the Pietra shorts/pants pattern by Closet Case patterns… I loved this pattern immediately, loved the high waisted flat front with no waistband, and those cool side panels with pockets.  However, I was not quite so much in love with the elasticated back … or perhaps I should specify I was not quite so much in love with my own rear view in the aforementioned elastic waist version of the pattern?!

Yes, I did make up a test version with the elastic waist first … for version number one, I cut up an old linen dress given to me by Mum.  Unfortunately I decided I’m tragically allergic to elastic waistbands, with the one and only exception of pyjama bottoms.  Although looking at these pictures now my rear view is not as offensive to me as it was when I first looked at them!  at the same time, I am still much happier with the rear view of my second, non-elasticated and more streamlined version.

side view…

I was pretty sure I would be able to alter, modify, wrangle a de-elasticised waist with a bit of finagling… putting an invisible zip in the centre back seam and removing a whole lot of real estate from the back waist area, retaining that lovely flat front and pockets completely.

the front view looks exactly the same as the original, unsurprisingly since this is basically unaltered…

I shall now proceed to explain my butchery… and please note that these measurements laid out here are tailored to my own personal waist measurements and will obviously be different for other people.  Specific measurements for each of these modifications can best be determined from your own waist and hip measurements.

I removed 6cm from the waist of the back piece; and actually swung the side edge out towards the hem edge at the same time, adding a bit of flare to the back view of the shorts…

I also removed 2cm from the top/back edge of the side pieces, tapering off to nothing at the top edge of the pocket.  This wedge was also removed “mirror-image” from the front facing, shown already stitched on at the left…

I put a dart in the back piece… while my picture illustrates it to be 10.5cm, I actually stitched it a bit longer, closer to 11.5cm at its end point

… the dart is situated 10cm in from the centre back raw edge and is 3cm in width at its top edge

… I used the existing back waistband piece to cut my two new back waistbands to fit the new size…

… inserted an invisible zip into the centre back seam.  Note, the centre back seam is essentially unaltered, except that the back waistband now has a vertical centre back seam too.

Because I whimsically fancied something a bit different for the back of my waistband, specifically a V-shaped cut-out effect at the centre back … I put in the zip a bit lower and stitched the top edge in an angle like so…  Yes, I’m very much oversimplifying here, because making my two sides exactly identical actually took aaaaages and some super precise measuring.  I even unpicked one side completely and re-did it because it’s amazing how even 1 or 2mm difference will show up as a glaring inconsistency.  Hint; making a little paper template made it a lot easier to get everything perfectly mirror image; which yes, seems super obvious in retrospect!

corners trimmed and turned out…

I hand stitched the waistband self-facing down with tiny fell-stitches…

To finish; the side seams were pinned, and the already-understitched front facing was wrapped around over the top and over the back waistband piece.

Side seams were then stitched, corners trimmed and seam allowances finished etc. before pulling the whole thing right sides out.  And that’s it!


Oh! of course, the ever important fabric notes… this is actually just a super cheap cotton drill from Spotlight… I LOVE the orange-y mustard colour of course, SO MEEEEE! and the random vertical dashes.  The pattern sorta reminds me a lot of this felted wall hanging I made, many moons ago; my vision was of a sort of poem carved by an artistic cave man, in a language or alphabet wrought in colours and strokes of differing lengths and groupings.  This is still hanging up in our front room! and you can read more about it here

Details:

Shorts; both the Pietra shorts/pants pattern by Closet Case patterns
Drapey white top; based on the loose drape top no.1 in the Japanese pattern book “drape drape”, by Hisako Sato
Hat; Vogue 8844, in khaki drill
Plain white tee; Nettie tee by Closet Case patterns, white jersey

pinterestmail

a pink pinny

So, I loved my red velveteen pinafore so much… it’s such a lot of fun to wear.  I can’t believe I worried a little that I was too, er mature, for such a garment and I thought I might become the butt of mutton-dressed-as-lamb commentary but you know what? I wasn’t, and I’ve throughly enjoyed having a “pinny”.  So I made another! though I believe this is an improvement even upon its predecessor’s near-perfection because the pockets are a tonne better, in my opinion.

Again, I used the pauline alice Turia dungarees pattern for the bodice section, and modified so the bottom part is a skirt.  I put the pinafore on and pinned carefully so as to achieve the ideal proportion to suit my figure, but it actually turned out identical to the shape of my red one!  I’m really really happy with the shape and length of this, it’s absolutely perfect for me,I think…

I really love the front bib pocket of the Turia pattern, I think it’s super cute.

For the pockets, I got out the pattern pieces for Vogue 1115; the shape construction and placement of these pockets is also close to perfection, in my opinion!  I like my pockets to be a bit bigger, but instead of cutting the pockets bigger, I simply stitch the with a 6mm (1/4″) seam allowance instead of the regular 15mm, and boom! I have bigger pockets!

Fabric; cotton corduroy in the most totally divine shade of dusky pink!!  I saw it on Potters’ Textiles instagram and raced in immediately to snap some up!  Then, for some bizarre reason that I have absolutely no explanation for, I bought only 1.5m.  Sure; it’s quite wide; but still I was struggling to cut my pinafore out of such a small piece, especially since you do have to be strict about following the corduroy’s nap when laying out your pieces.  To be honest; I totally would have cut my pockets bigger, but was dealing with mere scraps after getting out my big, important pieces first.  Anyway, I did get everything I wanted successfully, thank goodness…  Normally you’d think, oh I can always get more fabric! but while I was buying it the lady in the store specifically mentioned that they were nearly out!

Like with my red pinny; I chose to line this one fully.  I cut the lining using three of Craig’s discarded old business shirts.  I’m kind of a stash-busting mission lately; really making an effort to reduce pieces in there that have been kept “just in case”; and particularly; fabrics/garments from my refashioning bag.  I carefully harvested all the buttons off the shirts first, of course…

these matching sets of buttons are quite valuable if you make shirts for the menfolk in your life; particularly the shirts that have those mini-buttons often found on the sleeve plackets and button-down collars.  It’s almost impossible to find the two sizes in complete matching sets like this in haberdashery stores.


So you’d think there’s loooooooads of fabric in 3 shirts; and surely more than enough to line a little pinafore??  but of course unless I want my lining to be a heavily patched/seamed, and therefore rather bulky thing, I could really only use the largest swathes of fabric from the backs of the shirts, and still had to join!  But that’s ok; I still feel good about using up at least a little bit more of the refashioning bag!  The lining for my straps was harvested from one sleeve.

THIS! is a cautionary tale…. so, when you’re making welt pockets, and you come to the all-important, ever-so-precise task of cutting the welt opening in your dress fabric?  It’s a good idea to check that your lining fabric has been flipped up out of the way first.  Yeah.  *kicking myself BAD over this disaster…. I used my rotary cutter, and cut the most beautiful clean neat welt pocket opening through the front of my pinny…. AND THE LINING UNDERNEATH AT THE SAME TIME TOO.  Fortunately this only happened once, on just one pocket I mean, and I realised straight away.  If I’d done it for both pockets, I would have seriously considered replacing the lining, for real.  Anyway; I bandaid-ed the problem by ironing on a strip of iron-on interfacing and indulging in some furious and thorough zig-zagging.  Not the most beautiful of repairs, but experience has taught me that this is both a durable and efficient method of fixing a cut like this.

Miraculously, I unearthed a very small length of pink, bias cotton cotton voile from my stash, that I made so long ago I barely remember it.  But it was just enough to finish the hem!!  STOKED!!!

So happy with my pinny!!!!!  I’ve worn it a couple of times already, and am over the moon with it!

I am wearing it here with one of my wool-mix Nettie tees, probably one of my most worn winter tees! my self-designed and -made black tights, and my favourite motorcycle boots.

Now… for something completely different!

Recently I had a conversation with my good friend E.  Now, E is one of my closest friends, we’ve been so for decades and I hold her opinion in high regard.  At the same time! she doesn’t even know I have a sewing blog really, and though she knows I have an instagram account I’m totally sure she has never looked at it… why? because the topic of our conversation on this day was about her recent holiday with her husband, and as an extension of that; how she feels super strongly that “instagrammers” are ruining the world and are just beyond despicable, in her eyes.  In her own words; she despises instagram, because people are obsessed with taking their pictures in the most beautiful places and are thus destroying these places for everyone else, in both the taking of the photos, and the damage they do while doing so.  And not to mention they look ridiculous in their ballgowns and long tresses blowing in the wind, out on the moors, or in front of a particularly picturesque cottage, that’s not even their cottage, or whatever…..  Now… on the one hand I can certainly see her point, especially when it comes to people monopolising key beautiful tourist spots, setting up tripods and preventing other people from enjoying the view because they are prancing around right in the middle of it.  Our conversation didn’t even touch on people leaving rubbish behind, or treading on and damaging delicate flora or anything physically destructive like that! though of course that is a problem too.  My friend blames instagram completely for all this.

Now of course, I have thoughts!  I personally love instagram! though I can see too that all of her points have validity.  I know exactly the type of instagrammer to which she is referring… I have seen them myself too.  And secretly thought how silly it all looks.  And I know I might well be accused of being one of “those prancers” sometimes…!!   HOWEVER; I would argue not! since I take great care to take my own photos in complete private.  I think this is something not many readers of my blog or viewers of my instagram understand about me; I am actually a very shy and quiet person; and would be terrified to take photos of myself in front of other people.  I need complete isolation!  If there were other people there enjoying the view and taking their own pictures or whatever, you can bet your bottom dollar I am NOT going to be getting in their way, or taking my own pictures.  So while the evidence is there on my blog that I do indeed take pictures of myself in beautiful locations, I’m not really making a spectacle of myself in the action of doing it; if that makes sense.

It’s always felt logical to take photos of my new creations in my favourite spots.  It just gives me lots of pleasure to make this happen.  Should I stop? because I’m being ridiculous? or continue because it gives me joy?  rhetorical question btw, no need to answer… I don’t even know why I’m going got all this effort to explain myself really, except maybe to lay out my own thoughts coherently.  Did she strike a nerve?  maybe.  I have a sense of the ridiculousness of it all, even while I’m doing it.  But at the same time, I want to take pictures of my clothes, and I like the idea of nice photos, though my commitment to this waxes and wanes. I did actually go for a fairly long period of time where I only took pictures in my own garage, or in our own house and garden.  I don’t know if it even went noticed on my blog here because I am fortunate to have some quite picturesque corners in my garden, but yes; I went off the idea of ” real” photos “out and about” for nearly a year…

And obviously; I am super opposed to damaging the environment in any way.  If I love a beautiful spot, I definitely want it to stay beautiful for the future!  Leave only footprints and take only pictures.  Am a big proponent of that.

I’m not sure what the right answer is, but I guess I should just continue to be super vigilant and careful about taking my photos only when alone.  It’s easy to “say”, like many people do in this time of (over?)-sharing; that I don’t care what other people think of me, but obviously that would not be true!

What a weird, double life I’m living!  Maybe I should just delete all this?!

pinterestmail

a raincoat for Cassie

Yes, I may be modelling it here, since maybe I stole it for a few days after finishing it, hehe, but this raincoat was always for Cassie and is now safely residing in her wardrobe, where it should be!  I ended up finally giving it to her a coupla weeks ago.  Luckily I had taken photos of me wearing it because it’s just not so easy anymore to take photos of her, now she’s moved out of home… *sob*  She popped over today for some Mum/daughter time and I asked her how it’s been.  She says it’s waterproof, it’s a good size to wear over regular winter clothes which is just what you want from a raincoat, and she loves it, all three of which are always very gratifying to hear!

Materials; So, I’ve had this beige pleather in my stash for aaaaaaaaages, so long that I barely even remember buying it! although I do remember it was from Spotlight.  I’m in a real stash-busting frame of mind lately, so TIME TO GET THIS STUFF MADE UP AND OOOOOUUTTA THERE!  It’s pretty hideous stuff to sew; slightly stretchy and with that “sticky-ness” of pleather so it doesn’t move nicely under the sewing machine foot at all.  I used strips of tissue paper for each and every top-stitching seam…  see here for my tips on sewing leather or pleather

Lining fabric from the deep stash; have no idea now whether I bought it originally or whether it was one of Mum’s throw-outs.  I used a slightly different beige lining fabric, also deep stash; for the sleeves.  All three zips, hood cord, cord stops and eyelets are all from Spotlight.

I couldn’t find the same seam sealer I’ve used for all my other raincoats; BCF is now stocking the above sticks of wax for the job.  I couldn’t help thinking they were basically candles without the wicks and maybe I could use one of the many candles I have already! but bought one anyway.  It proved not very easy to use, since it was quite “firm”, not really soft enough for the job; and  you have to rub it quite vigorously over the seam to get it insinuated into the stitch holes which seemed to stretch the fabric out a little.  Then, I tried melting it a little in a (real) candle flame, before dripping it over the seams, then eventually moved to softening the wax stick in the flame just a little before commencing to rub it in.  The last wasn’t particularly easy either, because the wax only stayed softened for about five seconds away from the flame before it hardened up again, and needed another “soften” in the flame; but in the end I decided this was the best way to get the wax well-worked thoroughly into the seam holes.

But it works! the raincoat is waterproof and that’s the main thing.  Though if I had a choice, I would probably choose the chemical seam sealer over the wax stick… actually I only just had a thought; I have some real beeswax somewhere, and wonder if this would actually work better?  It’s quite soft naturally and so might prove easier to massage into the seams….  something to think about trying next time!

Pattern; is my own.  I’ve made this up three times previously, my first go is here, my second, also for Cassie! is here, my third is here.  I’ve added little improvements and modifications each time I’ve made it up; this one is, dare I say, the nicest yet… although it’s always had the most awesomely practical and deep pockets, if I do say so myself!  I gave this one a big upgrade when I lined it fully with golden beige polyactate lining fabric.  This makes it quite delicious to wear, and makes me wish I’d properly lined my own raincoats with something more traditionally “dressmaker-y” like this.  I lined my first and second raincoats with a soft mesh, which is very nice, but the lining fabric is definitely silkier and far more luxurious against the skin.  Again… next time!

o hey you gorgeous thing!  fluffy photo bombers are always welcome!!


I also gave it an internal pocket, just a simple patch pocket on the left breast; simple but extremely useful.  Yes, ahem; I am realising this raincoat IS most definitely far nicer than my own!  I should have kept it!  jk

.. cheekily wearing it “out” another day!  I wore it to the sewing guild meeting with my dp studio “Eve” dress, my handmade black tights, and the booties Craig bought for my last birthday present…

pinterestmail
Switch to mobile version
↓