Tag Archives: Pockets

some snuggly corduroy goodness…

I’ve made a few new things!

I was sent a length of lovely snuggly corduroy from Minerva; it is soft, quite lightweight, fluid and drapey and a little fluffy, and of course the most gorgeous and delicious shade of burnt orange/terracotta imaginable!  this very stuff, in fact…

Soooo happy with my pocket-elicious new ensemble!  hmmm, why the new (non)word, you might ask?  Well, because there are SO many pockets on my newest outfit that it’s borderline ridiculous…  AND I LOVE IT!!!!!

Patterns; I really love the practicality, utilitarian urban vibe of Waffle Patterns and have bought quite a few… now I can shift a few more off my list of “want to makes”  and into the list of “yay finally made!”  namely the Arare hoodie and the Anzu skirt.

Both these patterns come with a lot of variations; the Arare hoodie can be a hoodie or just have a high collar, and you can do either front welt pockets or a big kangaroo pocket with flap.  I opted for the hoodie and the welt pockets, and there’s also a little sleeve pocket.  That’s where I stuck my circa 2022 label  🙂

I didn’t really have enough fabric to line the hood, well not if I wanted to make the skirt too, which I most definitely did!  so I used some nice, autumnal floral viscose from Mum’s stash … given to me when she cleared it out a few months ago.  I really love how this looks peeping out inside the hoodie  🙂 I also used this same fabric to line the pockets.  I didn’t add a cord to the hood mostly because I didn’t have the perfect coloured cord;  I did put in the eyelets though, just in case that perfectly matching cord ever does show up!

I’ve had a tendency in the past to do welt pockets my own way… or a way that is a conglomeration of various big 4 patterns I’ve used over the years… the welt pockets on the Arare were a little different and took a little getting my head around.  And they turned out absolutely perfect!  I’m thrilled with how well they turned out.

For the skirt… I opted for the knee length, zip-fronted option, with inner slanted hip pockets.  The other pocket options I went for were; the zip pocket, the “flap” pocket which comprises a bellows pocket with a partitioned off “non-flapped” section, three layered patch back pockets, and a double tool pocket.  So, I just had to pause to add this up… this make for a 13 pocketed ensemble.  I know right?!  It’s crazy!  And amazing!

Now, while I really wanted to make the skirt in this corduroy it was actually a little on the lightweight side to make a good cargo skirt.  I applied lightweight fusible interfacing to every piece and this gave the perfect amount of stability to make this structured design work well.  This had the slightly unfortunate side effect of make the wrong side of the fabric a jarring shade of white, obviously… now I know you don’t really see inside a skirt to notice something like this but it still bothered me.  So I lined it with a dark brown lining fabric…. kinda overkill but it’s nicer like this.

One thing I should mention; I had to substantially alter the top of the back skirt piece.  I’m not sure if I did something wrong at some earlier point, or whether it’s something to do with my slight sway back; but the back bulged in a very weird way before I scooped out a considerable crescent from the skirt back, before adding the yoke.  And here’s a handy tip; when making any skirt at all I’ve always found it a good idea to try on for fit BEFORE you’re about to embark on any substantial seam finish and/or topstitching/flat-felling and/or overlocking raw seam allowances together.   It’s SO much easier to make adjustments without having to unpick any of this!  Ask me how I know! spoiler alert, I learnt the hard way…

Although it hasn’t shown up too well in any of my photos because it’s in a toning caramel colour; there is masses of topstitching in this outfit.  I used up almost an entire roll of upholstery thread!

I’m rather thrilled at how very 70’s this outfit turned out!  really that’s my only excuse for some of these poses…. honestly I don’t really go out of my way to make stuff that’s very obviously costume-y but am always quite chuffed when something does have an unexpectedly unusual and possibly even unfashionable flavour to it!

I shall sign off with a few pocket details…

the “flap pocket”

the “zip pocket”

and lastly but most importantly of all, my darling little grandson wanting to join in posing with me…

other me-made items worn in this post:

  1. my raspberry Paprika patterns Jade mini skirt
  2. my forest green merino, long sleeved t-shirt
  3. self-drafted tights
pinterestmail

brown

Yes, it is still extremely hot here.  And I am dying a little bit in these photos.  But what can I say?  I found all of these coordinating fabrics in my stash -mostly leftovers! – and each one was the perfect size to cut out the individual pieces for the skirt.  Win!  And I also had the acorn brown merino, that I’d bought last year during a sale from the Fabric Store.  So I feel like this is a totally seasonally inappropriate outfit that was nevertheless just crying out to be 🙂

The skirt pattern is the new FibreMood Crystal skirt… with some alterations, of course!  Let me explain… the pattern is very simple really; the front and back are the same except mirror images, and the waistband is straight.  Very uncomplicated.  I’ve made several skirts like this in the past and they’ve usually been fine.  However, nowadays I have higher expectations of my skirts, and I really really want for all my skirts to have pockets.  I know pockets can sometimes be a bit of a hot-button topic.. I’ve been seeing sewing peeps on instagram lately saying that they usually leave off pockets?! and that they hate them?!  amazing! but well to each their own.  This is why we make our own clothes, yes? not someone else’s.  I personally, love to have pockets, so I set about plotting how I could add them to the skirt.

I cut my waistband at my regular size, but cut the skirt pieces a size bigger than I would normally go for to allow for hands in pockets. I also cut and put in slanted pockets, and added darts to the skirt front and back to bring in that extra width to the waistband.  Instead of a zip, I made the skirt closure to be part of the pockets, as per this side-opening-over-a-pocket tutorial that I published previously here.  It’s quite a good method for adding pockets to a skirt actually  🙂

Added bonus is that my skirt fits really well now too, thanks to the darts!

I bound the edges of the pockets with some other brown cotton from my stash, which appears mysteriously to be grey in these pictures, but honestly it’s a deep black/brown.  I used the same brown cotton to bind the hemline.

My top is, of course, my usual modified Closet Core patterns Nettie.  This time I used my twin needle to finish the sleeves and hem, instead of bands.  I used thread from stash also rather than go shopping just for new thread, and the close-ups show how it doesn’t really match very perfectly… but honestly, the difference doesn’t show up quite that much!  Actually, all the close-ups here make the different browns look shockingly different, far more so than they are in real life!

Of course I added some of my new date-stamp labels.  Love these!


the caramel corduroy at the top of the skirt was leftover from these jeans, and the two middle cotton canvases were leftover from my Blanca flight dress and my Issey Miyake trousers… the dark brown, lightweight cotton corduroy that I used for the frill at the bottom was not a leftover, but one that Cassie had bought for me from Tessuti during a trip she took to Melbourne one year.  And, as mentioned, I bought this acorn merino last year.

Taking into account that I do have some leftovers still; these two pieces used up about 3m of fabric from my stash…  meaning this outfit brings me up to 13m for the year!  17m to go!

pinterestmail

creamy broderie anglaise…

Oh, hey, I made a dress!  and not just any old dress but this the final thing in my little mini make-nine challenge which of course was actually make-twelve!  So happy I managed to squeak it in for the end of the year!  Phew!

This is sorta based on the Named Inari tee dress pattern, and the fabric is a heavy clotted cream coloured, broderie anglaise cotton that I bought in Mood when I visited New York with Yoshimi on our holiday there last year.  GORGEOUS fabric.  I feel like I’m wearing a wedding cake, in a good way!

I’m so thrilled with how my dress turned out… in the end!  It has a few features that I shall now proceed to explain…

a. the shoulders have a sort of raglan effect, but still with the set in sleeves.  There is a reason for this that I shall delve into further, later… ahem…

b. I utilised the broderie edging as much as possible, in the sleeve edges, the hem edge at the bottom, and to form the upper edge of the patch pockets.  Love how this turned out!

c.  To get the best effect of the broderie “stripes” I did not make the inari with its traditional stepped hem . ie. longer at the back and shorter at the front; because I wanted the broderie edge to finish the entire hem, and also wanted the broderie pattern to match along those side(-ish) seams.

Btw, to digress for a bit… when it comes to pattern/stripe matching, I admit to being a fiend for this in the past, however lately I’ve felt a little ambivalent towards the rabid mania for extreme pattern matching that seems de rigeur for the sewing world.  Sure, there are definitely times when strict pattern matching is necessary, but I’m starting to crave the artistic possibilities that come with a less rigid approach.  For example, when a patch pocket is so excellently pattern matched that you can’t even see it’s there.  WHY?!  Sometimes I just find myself wishing for something a bit more exciting.

That’s not relevant to this, my latest thing though, because I decided a good pattern match was indeed essential to the dress looking good, so I went there.  There is no pocket matching whatsoever with the pockets and I like this look a lot.

Now to be real here; my initial “make 12” plan actually included a different pattern Vogue 8968, and I really did make this fabric up in that pattern too.  And it looked … absolutely terrible.  Behold the awfulness.

Yeah, it looks kind of ok on my dummy but on me it looked pretty bad, like a big broderie anglaise circus tent.  No modelled pictures because twas only “finished” for a minute or so before I starting cutting it up anew to make this.  To be honest, when I first did my make 12 plan I did not plan very thoroughly, and just chose 12 patterns and 12 fabrics with the thought I was just going to jam them together and make it work somehow, and unfortunately the last pattern and fabric were not a good match for each other after all.  I absolutely love this beautiful fabric though, so I’m very happy to have “saved” it!

see that little patch of bias-cut cream muslin sitting behind my label?  I had to put it there because without it you could see the red back of the label through this very lightweight fabric!

As it is, it’s absolutely essential to wear a slip with the dress.  I’m wearing it here with my ivory slip dress, the pattern is the free Ruby pattern by the very generous Sheryll of pattern scissors cloth, available here…

Oh, so the change of pattern is kinda the explanation for the funny, half raglan, half set in sleeve look.  True, Vogue 8968 doesn’t have raglan sleeve, haha; but bear with me.  I decided a raglan sleeve would look better than the big cut on, non-sleeve of the pattern.  Does it sound like I took a bit of a dislike to V8968? hmmm I think so, yes.  Anyway, I changed it to a  raglan sleeve.  Then when cutting out the Inari, I ended up keeping the perfectly finished bias-bound neckline of the original dress along with the raglan seams, and still cut out the armholes for the Inari too.  The Vogue dress was so big I was able to cut out my amended inari sleeves from the original sleeves too.  I got the patch pockets from the extra hem length cut off the sides.  So that was a bonus!

Of course, in peak 2020 style I made a little matching mask.  We’re not yet wearing them over here in Western Australia because of zero community spread, but who knows what the future holds?  I’m slowly building up a small collection of masks to have ready, just in case.

So that’s it for my little mini “make nine” challenge for this year!  Yay, I did it!

The thing is that I say “mini” challenge but it turned out to actually be a bit of a bigger challenge for me  than I thought, for some reason.  I can’t quite put my finger on it, but I think it’s something to do with the fact that spontaneity and the whim of the moment are important motivators for me when it comes to making things.  And when the spontaneity and whimsy are not there then I actually find it … well, not quite a “chore”  but something quite close to that anyway.  Terrible, huh.  Truthfully though, in spite of making it sound like (back-hand to brow) oh how I struggled! … I did not, because I love sewing and I really love all the things I made during the challenge.  However I don’t know if I will do a make nine again next year or not.  Maybe I’ll think of a new challenge… hmmm….I’ll have to give it some serious thought, because I only have one day to decide!

Details:

Dress, sorta Inari tee dress pattern by Named patterns, cream cotton broderie anglaise from Mood fabrics in New York
Mask, from this tutorial
Shoes; ancient, from an op shop

 is this thing even working?!  *camera click* 


pinterestmail

golden yellow Jade skirt

… sooo, while I was knitting up my new blue-flecked jumper I was all the time envisioning it worn with a brightly little coloured little skirt.  Only problem was that I currently did not have such a thing in my wardrobe.

Ta da!!  Problem solved.

I got out one of my favourite little winter skirt patterns, the Paprika patterns Jade skirt, and bought a length of cotton jersey from Spotlight in the most perfect shade of bright golden yellow.  I’m having a bit of a thing for this colour at the moment actually, since I also bought a few new cushions for our couch in this exact same colour too, and turfed out a few of the old, drab, neutral ones.  I’m in the mood for BRIGHT! and FUN! and CHEERFUL!  I think my new skirt hits the spot beautifully!

This is my fourth time making up this little pattern, I love it so much.  This time, I added a gold coloured jeans zip to the centre back seam… it was a pity I couldn’t find one with a gold coloured tape too but you know, options are severely limited here in Perth.  NYC we are not!

I’ve always thought the only downside to this otherwise perfect pattern was the lack of pockets, and to be fair it’s damn near impossible to add them “nicely”.  I took a punt with this skirt and stitched some patch pockets onto the back.  I’m pretty sure they’re going to bag out and look terrible very quickly, especially if I actually use them?! lol, but I figure that when that happens I’ll just take them off.  Maybe I’ll substitute pockets made of more sturdy fabric, we’ll see.  Actually, to be honest, this cotton jersey, while it is indeed the most perfect colour! is none too stable full stop, and so I’m not sure how long the skirt’s going to last.  In retrospect I should have used a different lining fabric, so it’s my fault.  I’m hoping it will be good for at least this winter and spring, and I’ll be on the lookout for better fabric to make up another!

Details:

Jumper; the raglan sparkle sweater pattern by Krysten Ritter via We Are Knitters, in 100% merino superwash, details here
Skirt; the Paprika patterns Jade skirt pattern, cotton jersey from Spotlight
Tights; my own design, made in black stretch poly, details here
Boots; Roberto del Carlo, from Zomp boutique
Striped sweater below; my own design, made using a yarn advent calendar by Dingo Dyeworks, details here

this is how I wore it yesterday… I’m pretty happy it looks really nice with my striped jumper too!


pinterestmail

adding the almighty pocket

So, recently I’ve been on a bit of a pocket binge.  You see, one has a phone which has rapidly become the ruler of one’s Life, and one has decided that this little autocrat needs to be on one’s person at all times.  So if something doesn’t have a pocket?  BAM! it’s getting one, like it or not!  Take that you pocketless fiends you!  Picture, if you will; pockets raining down upon Le Wardrobe, with lightning bolts and attendant thunderous cracks and booms as they attach themselves fiercely and fearlessly to the offending garments cowering on their hangers… ahem, my apologies.  Maybe I’ve been isolating too long.

Anyway, meet the victims:

please note; The Eye…

Firstly, my plaid Delice dress

I’d already promised to myself that I would add pockets once I got around to it… it’s a loose-fitting little thing, and while the attempted side-seam pockets did not work I knew welt pockets would be fine.  I just needed to get onto it!  and finally, voila. I still had the pocket bags, and I cut welts on grain from the very tiny amount of fabric I had leftover.  Both welts and the opening area of the pocket were interfaced with iron-on interfacing for stability – this fabric is basically a brushed cotton flannelette and so it has pretty poor stability actually,  A pocket bag on a welt sans interfacing stood a good chance of becoming a gaping, saggy mess, so I used nice firm stiff stuff, and the pockets turned out a charm.  No I didn’t take any progress pictures.  Bad me.

Secondly, my rusty coloured Sabrina skirt


this has always been a little on the baggy side for a pencil skirt, I think I might have selected the incorrect size in the first place because I’m slightly terrified of making a thing too small or too tight; a problem which is practically unfixable, and the fabric was kinda precious to me.  I mean, if you make something slightly too big, that is a problem that is eminently fixable down the track.  Except that “down the track” never seems to come… anyway, flash forward to a few days ago when I realised that same slight bagginess could easily accommodate some inseam pockets.  So I went for it!  I did remember to take some pictures of this one for posterity…

Firstly cut out the pockets lining at the size of pocket you want.  Stitch to the skirt front seam allowance at the place where you want your pocket to be in a skinny seam allowance, and press towards the skirt front.

Cut the pocket itself from the self-fabric, with an opening extension that covers the width of your side seam allowance once it’s laid over the pocket lining.  My side seam allowances for this skirt are actually quite huge, showing that I really truly overestimated how much wriggle room I needed; but since that mistake resulted in such a good prognosis for future pocket insertion, I forgive past-me.  Trim to fit, and finish the raw edge.  Stitch to the back seam allowance, right sides together in a skinny seam allowance, and leave it laying towards the front.  Check the pocket piece and pocket lining piece are aligned perfectly.

Now open the two pocket pieces apart and gently rip open the skirt side seam.  Leave at least 1cm closed at both top and bottom edge of the pocket pieces, and then reinforce the side-seam stitching at these points both top and bottom with some quick forward/backward stitching so the seam doesn’t open any further.

Now; open out the back skirt side seam allowance and as far as possible, stitch the skirt back and the pocket piece together, using the previous pressed seamline on the skirt back as a stitching guide.  Be sure to keep the skirt front free from this stitching!!

Lay the pocket pieces over each other again, and stitch them together around the curved edge, commencing and finished the seam at the skirt side seam, taking care to not go over it and into the skirt itself.  Finish the raw edges as far as possible on the overlocker.

Now open out the side seam allowances away from the skirt front and back, and at the top and bottom edges of the pocket, perpendicular to the side seam: stitch the pocket to the front skirt seam allowance up to the side seam line, and the pocket piece ONLY to the back skirt seam allowance up to the same seam line.  These short seams are indicated in white on the previous picture.

Ta da!

And, while I still had the machine threaded with chocolate brown thread… victim number three.  This is a great little corduroy skirt, very simple and plain and useful.  Except that it had no pockets!  Problem solved!  For this one, simple patch pockets were the go; but slanted at what I find to a optimal angle for my hands.  I used some of the leftover corduroy from which I made my wide-leg Sashas, and even though it doesn’t look like it I spent ages and aaaaaages aligning them to be perfectly symmetrical.  Yes they probably look a bit weird but I have pockets so I care not.

That’s it for now, until next time!

pinterestmail

a pretty outfit (cielo and sixtine)

So I made an oh-so pretty, fluttery, flower-strewn outfit of the most perfectly spring-worthy persuasion! but wait…  am I not currently still on the downwards slope to the dark dank pit of winter?  well yes, so we are just barely into July, and I am OVER winter already.  *sigh*
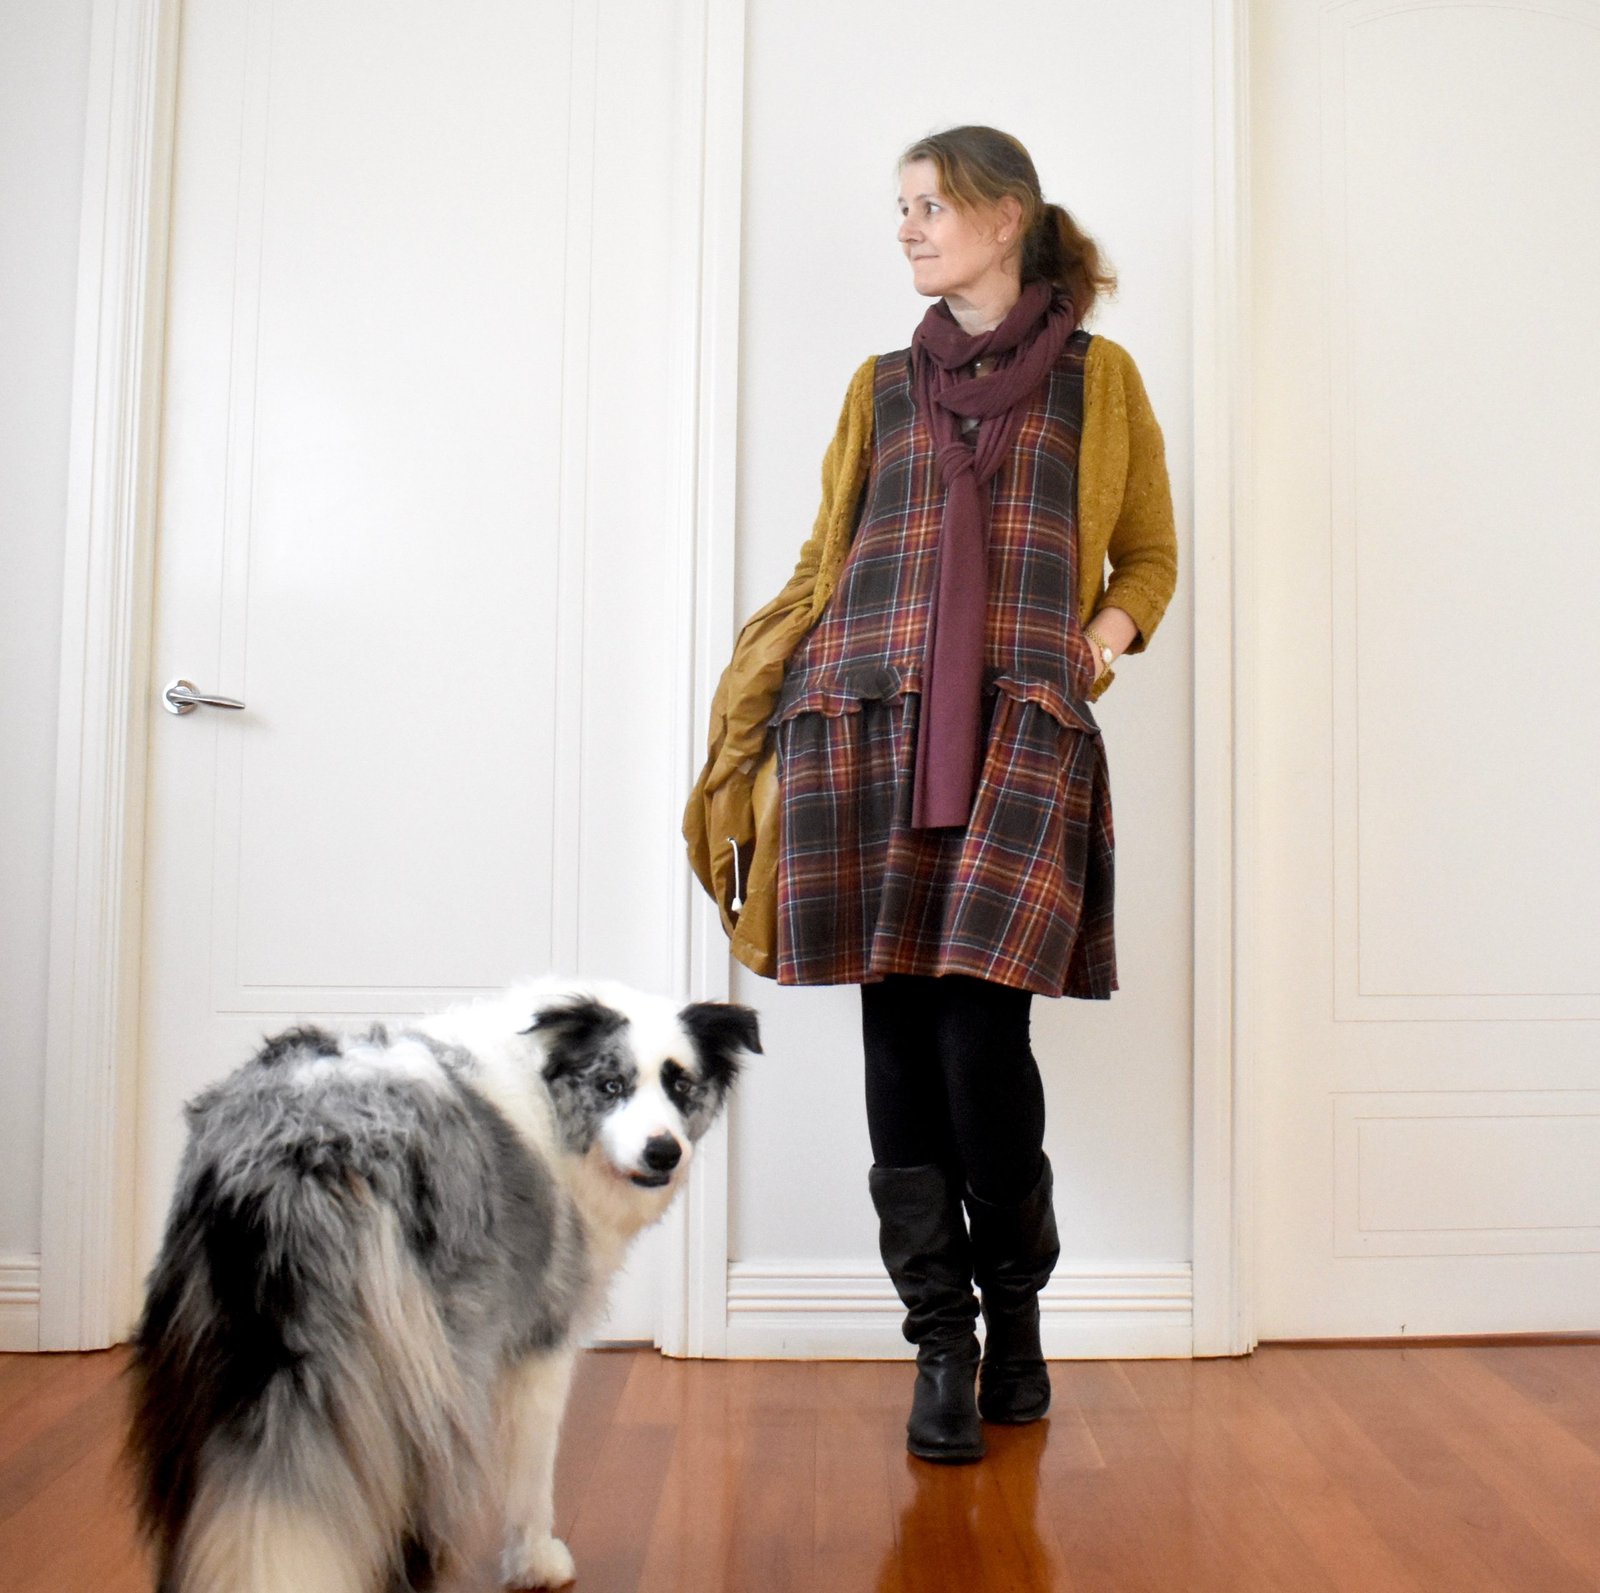
Really I expect I’ll be making winter-y things soon but I just don’t feel like it right now, and I just want to think about fun summery things still.  Terrible, isn’t it?  Anyway, I bought this lovely rose-y rayon-linen in Spotlight, back when Perth was sort of half in isolation.  I’d been feeling very down, gone shopping for some essentials and just spontaneously decided buy something pretty and non-essential at the same time, to cheer myself up.  As it turned out, we had hardly any cases of the covid-19 virus in Perth, which is of course wonderful; but we were all as terribly worried at the time as if there were and buying something lovely lifted my spirits quite a lot at the time.

I cut out the ruffle-tastic new Sixtine skirt by Coralie Bijasson patterns and then had just enough left for a plain little top, which is the best counterpoint for all that ruffle anyway.  I’d recently had success making the Closet Case patterns Cielo top for Cassie so traced out the  next size up for me.  And I really love how they go together!  The Sixtine pattern is a simple, completely symmetric, true wrap skirt, with the most amazing ruffle and a half action going on.  Actually when I say ruffle and a half, that is quite literally what it is; there’s a ruffle, and then another half of that same ruffle on top.  Ruffle and a half! And my fabric worked out so nice! it is quite fluid and soft, which was just right for the ruffles; they have just exactly the right amount of body and zero limpness.The Cielo top is a great little basic, I can already tell I’m going to make stacks more.  Simple, but perfectly so.

I don’t really have much else to add, both these patterns are unambiguously straightforward designs with no tricks to speak of.  With the Sixtine skirt, I think you were supposed to place the buttonholes and buttons so the buttons popped out on the outside of the waistband when buttoned up, but I used very plain sheer flat ones from my stash, both ancient and inherited and not very pretty, so I positioned them so they button up on the inside of the skirt.

Oh, I also finished the lower hemline of both ruffles using the triple-stitched narrow hemline, explained in this post here.

I have one more sort of interesting thing I can say about sewing this; normally when you’re cutting things out from a print you carefully make sure all your pattern pieces are aligned with the “up” side in the same direction, yes?  Well I would definitely do that for fabric with a nap, but for a fabric with a print I’ve often preferred the look when I do not adhere strictly to this rule, but lay pieces so as to alternate up and down placement.  That way you avoid that “double-ing up” up of an identical motif that can look absolutely terrible and obvious when it occurs in a pieced garment.  Obviously this really only works if the print doesn’t have an obvious “right way up” design, but while it’s only a little thing it can make a noticeable difference.  As soon as I looked at my pictures here I could see a couple of instances where an upside-down motif is not too far away from a right-way-up motif, and if they’d been both oriented the same it would have looked strange.  So I’m glad!  I hope I explained that OK!

Anyway, I love this new ensemble and honestly can’t wait til the weather is hot again so I can actually wear it.  In the meantime perhaps I should start finally turning some attention towards more wintery projects  (sigh)


Details:

Top; the Cielo top by Closet Case patterns
Skirt; the Sixtine skirt by Coralie Bijasson patterns
Shoes; both super old now but still much loved

Later edit; so I added some pockets to this skirt! They’re patch pockets, with a slightly gathered top, drawn in by a little olive ribbon, which I happened to have in my stash.  They’re simple but of course useful.  Who doesn’t like a little bit pf practicality along with their floomph?!

Here’s a brief overview…

the pockets are cut to fit my mobile phone in, and are about 3cm wider at the top…

I snipped a little hole in the outer layer of the upper hem/casing..

the gathering ribbon emerges from this hole

align the raw ends of the ribbon inside with the raw edges of the upper pocket hem/casing

ensure the ribbon ends are stitched down firmly along with the pocket… gently pull up the excess pocket width at the top and tie off the ribbon…

camouflaged but not totally, and I think it looks kind of pretty when you do notice it   🙂

pinterestmail

a pink pinny

So, I loved my red velveteen pinafore so much… it’s such a lot of fun to wear.  I can’t believe I worried a little that I was too, er mature, for such a garment and I thought I might become the butt of mutton-dressed-as-lamb commentary but you know what? I wasn’t, and I’ve throughly enjoyed having a “pinny”.  So I made another! though I believe this is an improvement even upon its predecessor’s near-perfection because the pockets are a tonne better, in my opinion.

Again, I used the pauline alice Turia dungarees pattern for the bodice section, and modified so the bottom part is a skirt.  I put the pinafore on and pinned carefully so as to achieve the ideal proportion to suit my figure, but it actually turned out identical to the shape of my red one!  I’m really really happy with the shape and length of this, it’s absolutely perfect for me,I think…

I really love the front bib pocket of the Turia pattern, I think it’s super cute.

For the pockets, I got out the pattern pieces for Vogue 1115; the shape construction and placement of these pockets is also close to perfection, in my opinion!  I like my pockets to be a bit bigger, but instead of cutting the pockets bigger, I simply stitch the with a 6mm (1/4″) seam allowance instead of the regular 15mm, and boom! I have bigger pockets!

Fabric; cotton corduroy in the most totally divine shade of dusky pink!!  I saw it on Potters’ Textiles instagram and raced in immediately to snap some up!  Then, for some bizarre reason that I have absolutely no explanation for, I bought only 1.5m.  Sure; it’s quite wide; but still I was struggling to cut my pinafore out of such a small piece, especially since you do have to be strict about following the corduroy’s nap when laying out your pieces.  To be honest; I totally would have cut my pockets bigger, but was dealing with mere scraps after getting out my big, important pieces first.  Anyway, I did get everything I wanted successfully, thank goodness…  Normally you’d think, oh I can always get more fabric! but while I was buying it the lady in the store specifically mentioned that they were nearly out!

Like with my red pinny; I chose to line this one fully.  I cut the lining using three of Craig’s discarded old business shirts.  I’m kind of a stash-busting mission lately; really making an effort to reduce pieces in there that have been kept “just in case”; and particularly; fabrics/garments from my refashioning bag.  I carefully harvested all the buttons off the shirts first, of course…

these matching sets of buttons are quite valuable if you make shirts for the menfolk in your life; particularly the shirts that have those mini-buttons often found on the sleeve plackets and button-down collars.  It’s almost impossible to find the two sizes in complete matching sets like this in haberdashery stores.


So you’d think there’s loooooooads of fabric in 3 shirts; and surely more than enough to line a little pinafore??  but of course unless I want my lining to be a heavily patched/seamed, and therefore rather bulky thing, I could really only use the largest swathes of fabric from the backs of the shirts, and still had to join!  But that’s ok; I still feel good about using up at least a little bit more of the refashioning bag!  The lining for my straps was harvested from one sleeve.

THIS! is a cautionary tale…. so, when you’re making welt pockets, and you come to the all-important, ever-so-precise task of cutting the welt opening in your dress fabric?  It’s a good idea to check that your lining fabric has been flipped up out of the way first.  Yeah.  *kicking myself BAD over this disaster…. I used my rotary cutter, and cut the most beautiful clean neat welt pocket opening through the front of my pinny…. AND THE LINING UNDERNEATH AT THE SAME TIME TOO.  Fortunately this only happened once, on just one pocket I mean, and I realised straight away.  If I’d done it for both pockets, I would have seriously considered replacing the lining, for real.  Anyway; I bandaid-ed the problem by ironing on a strip of iron-on interfacing and indulging in some furious and thorough zig-zagging.  Not the most beautiful of repairs, but experience has taught me that this is both a durable and efficient method of fixing a cut like this.

Miraculously, I unearthed a very small length of pink, bias cotton cotton voile from my stash, that I made so long ago I barely remember it.  But it was just enough to finish the hem!!  STOKED!!!

So happy with my pinny!!!!!  I’ve worn it a couple of times already, and am over the moon with it!

I am wearing it here with one of my wool-mix Nettie tees, probably one of my most worn winter tees! my self-designed and -made black tights, and my favourite motorcycle boots.

Now… for something completely different!

Recently I had a conversation with my good friend E.  Now, E is one of my closest friends, we’ve been so for decades and I hold her opinion in high regard.  At the same time! she doesn’t even know I have a sewing blog really, and though she knows I have an instagram account I’m totally sure she has never looked at it… why? because the topic of our conversation on this day was about her recent holiday with her husband, and as an extension of that; how she feels super strongly that “instagrammers” are ruining the world and are just beyond despicable, in her eyes.  In her own words; she despises instagram, because people are obsessed with taking their pictures in the most beautiful places and are thus destroying these places for everyone else, in both the taking of the photos, and the damage they do while doing so.  And not to mention they look ridiculous in their ballgowns and long tresses blowing in the wind, out on the moors, or in front of a particularly picturesque cottage, that’s not even their cottage, or whatever…..  Now… on the one hand I can certainly see her point, especially when it comes to people monopolising key beautiful tourist spots, setting up tripods and preventing other people from enjoying the view because they are prancing around right in the middle of it.  Our conversation didn’t even touch on people leaving rubbish behind, or treading on and damaging delicate flora or anything physically destructive like that! though of course that is a problem too.  My friend blames instagram completely for all this.

Now of course, I have thoughts!  I personally love instagram! though I can see too that all of her points have validity.  I know exactly the type of instagrammer to which she is referring… I have seen them myself too.  And secretly thought how silly it all looks.  And I know I might well be accused of being one of “those prancers” sometimes…!!   HOWEVER; I would argue not! since I take great care to take my own photos in complete private.  I think this is something not many readers of my blog or viewers of my instagram understand about me; I am actually a very shy and quiet person; and would be terrified to take photos of myself in front of other people.  I need complete isolation!  If there were other people there enjoying the view and taking their own pictures or whatever, you can bet your bottom dollar I am NOT going to be getting in their way, or taking my own pictures.  So while the evidence is there on my blog that I do indeed take pictures of myself in beautiful locations, I’m not really making a spectacle of myself in the action of doing it; if that makes sense.

It’s always felt logical to take photos of my new creations in my favourite spots.  It just gives me lots of pleasure to make this happen.  Should I stop? because I’m being ridiculous? or continue because it gives me joy?  rhetorical question btw, no need to answer… I don’t even know why I’m going got all this effort to explain myself really, except maybe to lay out my own thoughts coherently.  Did she strike a nerve?  maybe.  I have a sense of the ridiculousness of it all, even while I’m doing it.  But at the same time, I want to take pictures of my clothes, and I like the idea of nice photos, though my commitment to this waxes and wanes. I did actually go for a fairly long period of time where I only took pictures in my own garage, or in our own house and garden.  I don’t know if it even went noticed on my blog here because I am fortunate to have some quite picturesque corners in my garden, but yes; I went off the idea of ” real” photos “out and about” for nearly a year…

And obviously; I am super opposed to damaging the environment in any way.  If I love a beautiful spot, I definitely want it to stay beautiful for the future!  Leave only footprints and take only pictures.  Am a big proponent of that.

I’m not sure what the right answer is, but I guess I should just continue to be super vigilant and careful about taking my photos only when alone.  It’s easy to “say”, like many people do in this time of (over?)-sharing; that I don’t care what other people think of me, but obviously that would not be true!

What a weird, double life I’m living!  Maybe I should just delete all this?!

pinterestmail
Switch to mobile version
↓