 So, black Oxford shoes, mark 2. This version was made with the help of my beautiful new lasts! Or I guess I should say, old lasts? ha.
 Design, my own, based upon a classic Oxford shoe style. My tutorial on how I made my shoe pattern is here.
Materials: black pleather from Spotlight, leftover from my moto jacket. I would describe this as butter-y soft, but of course since it’s not real leather that just sounds a little pretentious, non? Lining in faux chocolate suede, leftover from my chocolate suede top. Rubber for soles and heels, contact adhesive, PVA glue from Bunnings, , insole and shoelaces from Coles. Toe puffs and heel counters created from stiff, non-fusible interfacing and stiff cotton denim, and lots of PVA glue!

Method: I’ve been watching lots of online shoe-making videos. I’ve particularly enjoyed Andrew Wrigleys’ youtube series on How to make a Shoe by Hand, absolutely brilliant. I enjoyed this more than any blockbuster movie I’ve seen in a long while! Even though I don’t think I would ever go to that level of internal engineering when it comes to my own shoe-making effort, it was just fantastic to see a a traditional process broken down, step by step. Honestly, mind blowing. If you’re at all interested in making shoes then it’s a must-see. Many times I was just speechlessly shaking my head in awe and admiration, reflexively muttering “oh my god” and will never ever EVER complain about the high cost of a shoe, EVER AGAIN!!
I also found Marcell Mrsan’s video Basic Shoemaking Method – the Cemented Construction to be particularly useful for my own project, as my own efforts run more to the cemented/glued approach as opposed to the traditional method of completely sewing a pair of shoes. I was going to say the lazy way, but naturally making one’s own shoes could never be described as a “lazy” thing to do!
 Detailing: I sewed the outer and lining layers right sides together, and turned them right sides out. Then, using black embroidery floss, I topstitched by hand around all edges in a long running stitch, in a way that a very narrow ridge of the faux suedette shows all the way around the edge, as a kind of faux piping. I absolutely love how this looks, peeping out 🙂
My shoe puffs and counters; in both videos they are using leather and some form of starch; I researched this a little bit more and learnt that PVA glue is also often used as a fabric stiffener too; I had plenty of this on hand so went this route. I made mine using stiff, thin, non-fusible interfacing, and some stiff cotton stretch denim, leftover from my Ginger jeans. And lots of PVA glue! The first layer of interfacing was glued over the lining, then coated itself with PVA glue, then I stretched a denim layer smoothly over this. I allowed this all to dry, then snipped and glued down the underneath, allowed this to dry a little and then trimmed and shaved the folds underneath down nice and as smooth and flat as I could. Similar to what they call “skiving” in leatherwork, but I don’t know if I can rightfully use that word for fabric? More like I was just trimming away bulk and bumps. Last step was to coat the topside of the denim with a smooth layer of PVA glue, and allowed this to dry overnight, with the outer flipped back out of the way. This has done the trick beautifully, and my toe puffs feel just perfect, hard and stiff and very unlikely to cave in. I made the counters in the same way. It was very helpful that my denim has just a little stretch, which enabled me to pull and stretch it nice and smoothly around my lasts.
Note; these are the toe puffs for my NEXT pair of shoes… but they look pretty much the same as the ones in these shoes 🙂

I didn’t glue the outer and lining together, so the middle bit, what they call the “waistline” is quite soft and not very stiff. This feels very comfortable and I think it does give the shoes that “feminine” look. I like it as a nice change although maybe the shoe overall could have used that little extra bit of stiffness that the glue gives.
As usual, I covered some insoles with the chocolate suede lining fabric. This is so soft and tough, and just perfect for lining! I’m using it for my next pair too 🙂

Thoughts ; I’m actually fairly pleased, I think they turned out quite elegant, especially when compared to my previous Oxfords! These feel more stepping-out-worthy, and even like I wouldn’t be horrified to wear them in public, dare I say it. Ideally I would like the heels a little higher, but this height is fine really, and will be very practical. To get a higher heel I’m starting to realise I would need a different set of lasts … o man, the need for and accumulation of more new equipment continues… *sigh*
I’m extremely happy with my hand-stitched detailing, I just love the handmade look of this. I’m preeeeeetty happy with the finishing although, obviously, it’s still not to the level where I would like it to be. But I’m starting to realise this could be a lifelong lament. 😉
Note, I still have not cut into any of my actual leather!! What a wuss, eh? It feels too scary. I’m still not ready. I feel like I’m working towards that… like training for Mt Everest or something, ha.
Anyway. Ever onwards and upwards!


 This gathered pocket sits inside and at the side edge of a loose-fitting garment such as an unfitted dress or tunic top, and can be adapted to go in a loose, flowy skirt also. It is best suited to lightweight fabrics.


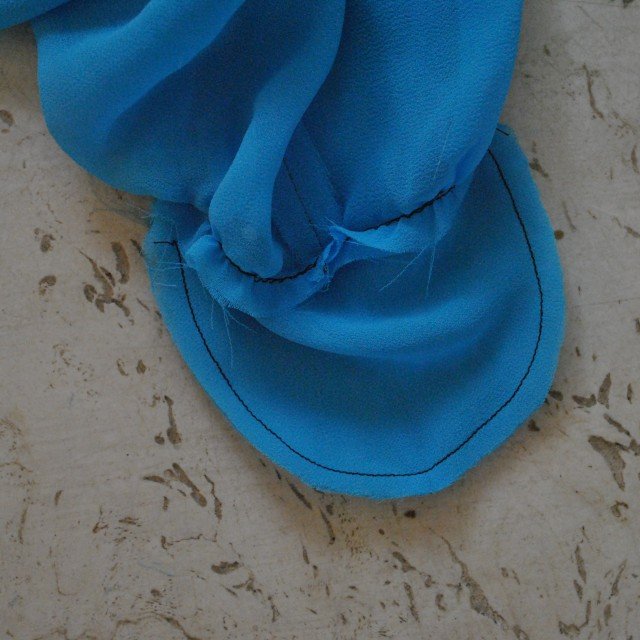
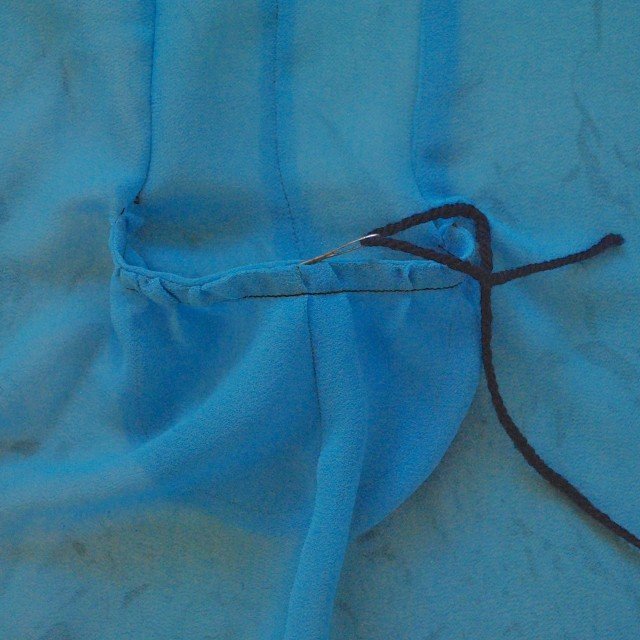


 I’ve made a softly floaty blouse 🙂 of course just as summer is on the way out… o no, wait, actually summer is over! However we’re still getting days of 40C. Not that I’m complaining, mind you. I love the warmth! Only thing is that I’m getting tired of all my summer things thus the decision to make a new summer thing, ha. #seasonallyinappropriatesewingforthewin It’s light and pretty and easily breezy; and delightfully cool. I fully expect the weather to turn cold now.


 Sizing; they are moulded to my own feet, so obviously the sizing is good on me. They are sized to fit my just-slightly-larger right foot. My feet are a touch wide compared to the average so the shoes look a little wider than most you see in the shop; actually I was so worried about making them too tight I think I overcompensated and made them just a touch loose… ! This is ok though, since I’ll need to fit warm winter socks in there at some point and at least they are very comfy and totally not tight!

 Yes, there is a next pair in the works,


 Woa, crack out the sunnies! So, my second pair of sneakers. Bit bright, eh?!
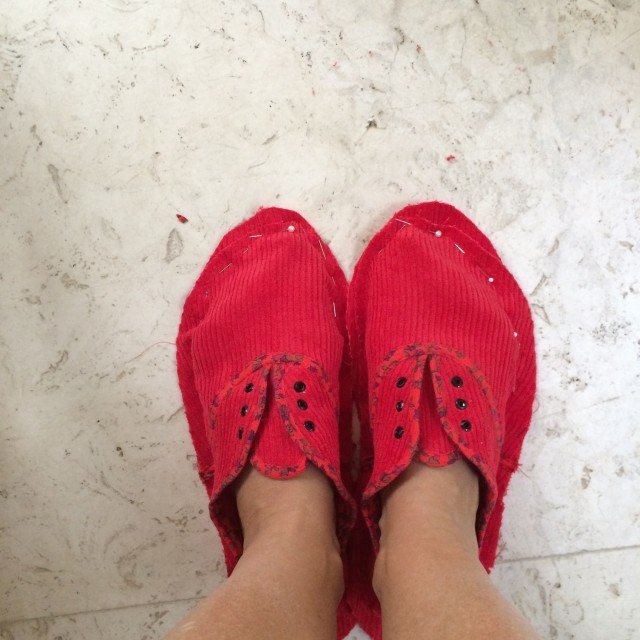


 Hello! I’ve made some more shoes! floral sneakers.


 n, I’m so happy with it!! It turned out just exactly how I hoped, and was the most wonderfully cuddliest, comfiest thing to have with me in our recent visit to Japan; I loved bundling up in it each day in Tokyo and used it as a snuggly rug while on the plane… without a doubt the warmest coat I’ve ever made formyself, evah. Like wrapping myself in a fluffy blanket, and I was perfectly snug enough even in the subzero temperatures of Hokkaido.

 wrt this one; well I’ve wanted to make a shearling jacket for oh, about ten years now. Ever since the first time I clapped eyes upon one belonging to our friend S; a colleague of my husband’s who is always super suave and cool and has a slightly alternative, very hip and happening taste in clothing. He owns a beautifully thick, oversized shearling jacket that he’s had for years and years and trots it out every winter once or twice. Every single time I see it I’m struck all over again by how awesome it is and have harboured a secret desire for one of my own…


 I made the sleeves extra long, so I could turn them up and have a woolly “cuff” on the sleeve ends, and also made wrist strips. These are sewn to the sleeve, then wrapped around and buttoned to themselves. The seam allowance of the cuffs are topstitched down for a neat look when they are turned back, and then I stitched-in-the-ditch of the sleeve seam down to the sleeve so the cuffs stay folded up permanently.






































