Category Archives: Sewing

grey gardens

greygardens

vogue1152I’ve made a new dress… a sweet little autumn dress.    It’s  a quiet dress, and demurely plain in colour; which really throws up the details of the design into the spotlight.  The colour fits in with my current clothes-making criteria; to have things in my wardrobe that go with as many of my self-made shoes as possible! since I will be wearing only my own shoes this year and some of my shoes are kinda colourful and not basic.

Pattern; Vogue 1152, with minor modifications.  This is the second time I’ve made the pattern up for myself, my previous version has just been transferred to the “possible good sammies pile” since I realised I barely wore it last year.  The additional modifications I made to the pattern for this new version are in line with the things I grew to dislike about my first version.

Fabric; soft slubby cotton from Fabulous Fabrics.  I love the grey; a soft and warmish, almost yellow-y kind of a grey, if that makes sense, and one that actually suits me, I believe.   This fabric originally came out in four colours; red, blue, white and grey, and I bought some of each colour! pretty groundbreaking stuff for me, I generally would not be so extravagant but the fabric really is beautiful quality so I just had to!  Actually I’ve just revised my memory; it came in black too, which I did NOT buy and did kick myself over shortly after..  Doh!  This is the last piece I bought to be made up… I’ve previously made up the blue as a dress here, the red as another dress here and the white as a shirt and shorts set here.

Pattern mods;  the V-neck in my first version was so low-cut as to expose the bridge of my bra; so I either had to be sure to wear a pretty, colour co-ordinating bra that day, or a scarf knotted at the front.  So this time I raised the height of the V-apex by about 2.5cm…  at least I’m decent now.

greygardens front

Sleeves; left off the cuffs, removed about 12cm in width from the middle of each sleeve and lengthened them by 10cm; instead of lots of pleats at the top there is just one single inverted (box) pleat at the top of the sleeve cap.  I also made a separate tab or strap that is sewn near the lower edge of the sleeve and wraps around it, catching in the fullness of the sleeve and buttoning upon itself.  Shell buttons from my stash.  A buttoned tab is not the kind of thing you see on a dress sleeve very often, it is the same principle to the tab/strap that you put on the end of coat sleeves, but I like to be different, appropriating and subverting details like that here and there and thus customising my clothing in some small way.  Just one of the reasons I sew for myself!

grey gardens sleeve

Also, maybe I’m just a rebel, I hardly ever follow a pattern obediently and just always have to deviate in some small thing.  Just one little bit of me in there, somehow, somewhere.

I added an extra row of elastic casing in the back to pull it in more, like I did for the first version, because otherwise it all just looks a bit pouffy back there.Also; added inseam side pockets – well naturelment!.. and lengthened the dress by about 15cm.

greygardens backBelow is my full outfit for today… I included it here because I’m absolutely loving how the grey looks with my mustard cardigan! so much so that I’ve worn this same outfit twice this week, throwing it on again the minute it came off the clothes line!  There’s just something about mustard and grey together, I just have a thing for it.  Though I’m sure it will go really well with all my other cardigans too.  As well as my shoes and some tights.  It’s a real autumnal dress, and I can’t wait to mix and match it with all the rest of my more cool weather-y stuff during me-made May.  Hurrah for new dresses!  🙂

Details:

Dress; Vogue 1152 with slight modifications, see my first version and original review of this pattern here
Cardigan; the Miette, a free pattern by Andi Satterlund, details here
Shoes; sandals worn below made by me here, black thongs in the first picture made by me here

ootd

pinterestmail

Magdalena Dusk; an Alabama Chanin project

alabamachanin2alabamachaninstudiobook

Finally! my Alabama Chanin outfit! It’s finished, and now done and dusted!  Yay!  I may look all cool, calm and collected on the outside here but on the inside I’m cheering like a madman.

ac1

Phew. This project has been quite an undertaking… quite an undertaking, to say the least. I had received a length of beautiful Alabama Chanin cotton jersey in colour Dusk from the lovely Lisa, of Lisa’s Carolina, and I really wanted to do the fabric justice, to honour its Alabama origins and make something worthy and not to do things by halves. I decided I just had to go the whole nine yards and make another full-on ensemble. The Full Monty Alabama Chanin. Obviously!

There was enough of the blue to make one skirt and a few bindings, so I needed to make some more colours…. I bought some plain white cotton jersey from Spotlight, cut some scraps and played about with dyeing; experimenting with greys, greens, greeny-blues, blue-y greens, blue-y greys and greeny-greys, plus I’d also had some pink cotton that I dyed blue, to get some purple-y blue into the mix too.

candidates!

dyeing

Ultimately I rejected my purple- and grey-toned experiments and settled upon greens; shades of teal and sea green, which I thought subtly highlighted and championed the dusky blue the absolute best, toning it without drowning it amongst other shades of blue. I think; if you’re trying to showcase a colour in an ensemble/design, then it’s best for that colour to be the only one of its shade, and for the contrasting colours to be all a different shade and variations of each other, not of the showcase colour. As clear as mud? Yep, I thought so! Sorry, maybe that’s not making much sense, but at least I know what I’m talking about.

acdetail

Pattern; all patterns are from the book Alabama Studio Sewing + Design, by Natalie Chanin. I made a full-length skirt, a fully-embroidered mid-length skirt and a fitted tank.  Every single component is sewn by hand, in the Alabama Chanin way  🙂

alabamachanin1

So: the mid-length skirt! Which is the biggie in my ensemble, taking a few months to embroider the pieces! The skirt itself is my precious Dusk Alabama Chanin cotton jersey, and the motifs I’d dyed some white cotton jersey from Spotlight to be a teal/sea-green and to purposely be a little variegated with strong tones paling to lighter tones appearing shaded in an ombre kind of a way across the piece. All the details of the stencilling and early preparations pre-embroidery, are fully described in this post here.  This part actually took aaaaages, or it felt like it at the time. Obviously, once I got embroidering then that was the bit that REALLY took ages! I had decided upon blanket stitch embroidery to attach the motifs, using light tan Gutermann’s upholstery thread. I liked the colour and the look of the embroidery, but this particular stitch was probably not the ideal choice.  It is an enormously time-consuming stitch and I found myself questioning my own sanity/stupidity in choosing it, many a time. I’m glad I did persevere now though, since I really do love how it looks.  Although it did take a lot of time, it wasn’t too bad, since our trip to Japan involved several plane, train and bus rides with hours and hours and hours of enforced sitting, so I got plenty of embroidery done during those times… I had completed two whole skirt panels by the time we got home! YAY!  I then would have finished pretty quickly if I had then not dropped the ball for the next few weeks… oops.  But once I put my mind to it and got going again I finished the embroidery pretty soon; and with the embroidery done the whole ensemble felt practically home and hosed!

IMG_9852

I joined the pieces, hand-felling the seams using the same light tan upholstery thread as the embroidery;and I found a light yellow/beige fold-over elastic at Spotlight that looked quite nice for the waistband binding.. not that you’re ever likely to see that bit! It’s actually button elastic, for waistbands, and has buttonholes in it along the fold, but that’s ok. The colour is great, and since fold over elastic is a rare beast in Perth, in any colour, I counted myself pretty lucky to have found it!

acwaistbands

The full length underskirt: originally white cotton jersey from Spotlight, and I dyed it to be just slightly variegated, strong teal-y/sea-green. I wanted it to be a little bit uneven in its shade, so as to fit in with the whole handmade, rustic aesthetic of Alabama Chanin. The underskirt is entirely handsewn with emerald green upholstery thread, with felled seams, and a single strip of randomly hand-ruched/ruffled cotton jersey around the lower edge. I’d originally stitched on three evenly spaced strips of ruffled cotton, but removed the upper two, because three rows didn’t look as nice as I’d hoped. The upper edge of the petticoat is finished with teal elastic, handstitched on with herringbone embroidery stitch. This was the first piece to be finished in this ensemble, believe it or not!

btw, I’ve had some feedback already that some think the underskirt is too long… opinions?

acpetticoat

Tank top; white cotton jersey from Spotlight, dyed in the lightest shade of eau-de-nil green, and with armhole and neckline binding in the Dusk blue Alabama Chanin cotton jersey. The tank top is handsewn with light tan upholstery cotton, the same as the skirt embroidery, with felled seams and herringbone embroidery to attach the neckline and armhole binding.

All the details, summed up succinctly in just one pic:

magdalena dusk

So that’s it re the outfit…

And now for a little story about that weird and bizarre, modern-day phenomenon, the blog photo shoot…

ac3

I’d delayed posting this because I wanted to take some really nice pictures with a pretty background, something better than just these ones taken in our boring old garage… so I pick an absolutely beautiful location at my parents’ house … and a hopefully beautiful time of day … dusk would be an appropriately poetic time of day, yes? because the colour of my Alabama Chanin fabric is named “dusk” Ok, perfect! However turns out dusk is actually a terrible time to take pictures, … all my first batch of pictures were a giant fail… everything very dark and you can hardly see a thing, ha! So I disconsolately packed up to go back to the house; to try again the next day.

And did I mention my chosen photo shoot location is a paddock quite a long walk from the house? Honestly, the things we do… I walked down in jeans, disrobed, re-robed, in the paddock, as you do…. TWICE, on two consecutive days… all under the bemused and intensely interested gaze of a mob of kangaroos.  Well obviously, they must have been admiring my Alabama Chanin finery? hmmm?

hey guys!

roos

The second day I timed my arrival to be just before sunset, with that lovely pre-dusk golden glow … and wasn’t til I’d got all set up and going with my pictures I realised I’d left my sunnies back at the house and so I’m squinting in Every Single Picture… (groan)

And in the end I felt like the “boring” garage photos weren’t really all that bad and actually the details show up pretty well against that quiet blank background, so I’m posting a few of those too.   Sorry for the picture overload.

Moral of the story; blog photo shoots can verge on the ludicrous

Anyway!! it’s done…  Thank you so much to my friend Lisa, of Lisa’s Carolina, for the gift of the Alabama Chanin cotton. It’s such a gorgeous colour and I hope I managed to make something that is worthy of the fabric 🙂

alabamachanin6Details:

alabamachaninstudiobookTank top, skirt, underskirt; all patterns from the Alabama Studio Sewing + Design by Natalie Chanin. Blue cotton jersey is from Alabama Chanin, other fabrics from hand-dyed by me. Embroidery design, half of the Magdalena design by Alabama Chain, embroidered in blanket stitch.

ac3

pinterestmail

Lucy Heartfilia

Cassie Lucy

Who is this??  I barely recognise my daughter in her fabulous cosplay outfit!  For ComicCon this year, Cassie decided she wanted to go as Lucy Heartfilia, from Fairy Tail; the anime/manga conceived by Hiro Mashima.  And she has been busy busy busy, working solidly on her costume… isn’t it gorgeous?!!  I think she looks absolutely amazing!

Lucy Heartfilia from Fairy Tail; artwork and character by Hiro Mashima

lucy_heartfilia___fairy_tail

And yes, Cassie’s costume is all made by herself, with just a few pattern adjustment and sewing suggestions by me.

burda8548 burda8175

Patterns; adapted Burda 8175 for the skirt, and adapted Burda 8548 for the vest.  The corset top and the sleeves are self-drafted.  Actually, the “corset” top is more like an abbreviated bodice than a corset; with princess seams and unseen skinny gold shoulder straps, that are hidden underneath her vest, and closure is at the centre back by white hook and eye tape.  The sleeves are two pieced and double layered, with the white layer longer so it comes out at the bottom, and with elastic in a channel at the top so they stay up on her arms.  The long gold straps on the sleeves are purely decorative.  You want to see what the pattern piece for the sleeves looks like? No? well I shall show you anyway  😉

sleeve

You cut two of each per sleeve, so the bottom flared bit of the sleeve is almost a full circle.  A circle skirt for your arms! haha  And yes, she hemmed the lot too, I think she stayed up until the wee small hours doing that job!   The white and blue layers are joined together at the top with a casing for elastic, so they stay up on her arms.  The gold straps were sewn on afterwards, they’re pretty much decorative.  But don’t they look great!

sleevebands

Fabric; quilting cotton from Spotlight.  Mainly chosen for the just-right colours, of course!

I’m so proud of her, because the whole costume is properly and beautifully made, and she did not take the easy way out in any part.

DSC_2658The dark navy blue, pleated skirt has an invisible zip closure and an interfaced facing.  I suggested she make it a little longer, so she could at least wear it as a normal skirt too; but no; the costume had to be as faithfully executed as possible!

Those keys are an integral part of Lucy’s costume, and a part of her character’s story.  Cassie was so thrilled when she spotted the key set in a store; and pounced… perfect for her costume!!  Belt; surreptitiously extracted from her brother’s wardrobe mwahaha.

The camisole/corset top was self-drafted to fit her perfectly, and it fits like a glove! and then she drew the lines for the blue heart and gold edging on her muslin and cut it up to get the individual pieces.  Meaning; they are not just appliquéd on but are all separate joined pieces; and the top is completely lined in white cotton.

Cassie as LucyShe used a blouse pattern for the vest, mainly because the collar was right for the costume; it had no collar stand and was the right shape and lay in the right spot.  The front and back pieces were easily modified to be a vest shape, and she individually drew out the gold edging pieces to fit, and with self-fabric facing throughout.

back

Really, I am so proud that she put so much care, thought and diligence into making it and finishing it all off perfectly and beautifully.

Cassie as Lucy 3This is a character driven pose; it means “I’m watching and I’ve got your back”… and that symbol on her hand is also a key component to her character too.  I freehand drew it on for her this morning, because you know; right handed, and it had to be on her right hand! It’s in pink ballpoint pen.  I can’t wait to hear how her day was…. I’m sure she will be one of the best dressed at the convention!!  As we drove in to drop her off, we saw stormtroopers and a Joker strolling down the esplanade on their way to the convention, laugh!  It’s fantastic how everyone who goes makes a real effort to dress up in amazing costumes and really look the part… oooo I so wish I could be there to see all the costumes!!

Cassie as Lucy 2

pinterestmail

sheeplefeet

shearling slippers

Baa-aa-aa!

So, I was thinking of calling these Uggspadrilles.  You know… uggs? espadrilles?  Haha. YeeeeeeeeaNo.

Anyway.  I’m fulfilling a need for some slop-around-the-house winter footwear.  All winter, I usually LIVE in my sheepskin ugg boots at home.  I wanted, nay, needed something like that for my year of handmade!  I had some leftover shearling from my shearling coat, that I made for Japan, and for the soles I used an insulative foam kind of stuff.  It’s black foam, that has one side covered in a thick silver foil-y type of coating that’s both quite tough and waterproof, so I used it silver side down.  This was cut from some very small scraps given to me by my friend Megan recently. They were actually not just small scraps but awkwardly shaped ones too, and I’m pretty sure she will be rather surprised that I managed to get two soles out of it!

shearling slippers2

The slippers are a pretty basic design.  An espadrille really must be the simplest style of shoe design, after the humble thong.  They are beautifully snuggly warm, thanks to the shearling, and the sole underneath will provide some degree of waterproofing, if I need to leave the house briefly.  Obviously they will be mostly inside the house footwear, but they’ll be ok to go outside and onto the wet paving sometimes, to hang out the washing, take out the rubbish, check the letter box, you know.  Stuff.

They’ll do  🙂shearling slippers 1

Also, I wanted to give a quick report on my latest Alabama Chanin project… the last time I wrote, I promised that I would have finished it by the end of March, which is today!  Anyway I am happy to say that I met my deadline and I have finished! the only thing is that I’m not ready to write a blog post about it yet.  I took a few pictures of my new ensemble in our boring old garage… *yawn* and then just decided it really deserved something better.  So, in the meantime, while I get my act together in the photography department, here is a little sneaky-peaky glimpse of a some details…  I can promise, it is a multi-shaded, multi-textured, multi-detailed ensemble and I am super proud and super happy with it all!

Thank you so much to my lovely friend Lisa of Lisa’s Carolina, for the gift of the lovely blue Alabama Chanin cotton  🙂

magdalena dusk

pinterestmail

paprika suede desert boots

paprika boots

I’ve made some boots!  or kind of like, shoe-boots, really.  Desert boots.

Ok, I have to be honest; I’m so proud of these I think I might just explode with happiness!!!  Finally, a pair of winter shoes in which I have complete satisfaction and pride and joy.  I’m so so so so SO immensely pleased with how these turned out!

Woooooooooot!

Ok, calming down a little.  The lowdown.

paprika bootsMaterials; my friend Megan had given me a few small bits and bobs of sturdy fabrics, including some thick and stiff, paprika coloured suedette upholstery fabric.  I immediately envisioned boots of course, hehehe; my mind nowadays almost totally taken up with thoughts of shoes and how I can bend whatever materials I catch sight of into making them.  I used the paprika suedette for the outer, and the boots are lined completely with faux chocolate suedette, a far more flowy and lightweight fabric, the leftovers from this little cropped top.  The outer and lining lightly glued together; plus I covered a pair of insoles with the chocolate suedette too.  This fabric originally from the Fabric Store in Melbourne.  Laces and insoles from Coles, all glues and the black rubber from which I cut the soles and heels from Bunnings.  I cut an interior layer and one layer of the stacked heels from some thin cork placemats.  Do you like the one layer of brown in the heels, from the cork? I did this on a whim, and while my husband and family thought it looked a bit weird, like a mistake; I absolutely LOVE this little feature.  Kinda gives my own little touch  :)Topstitching; I used upholstery thread, in a shade of burnt caramel.  I like the contrast and that it doesn’t match the paprika.

paprika boots5Eyelets; rather than add metal eyelets, I left the holes raw. Most of the desert boots I’ve seen are like this and I prefer that look.

Pattern, I drafted my own, using my new (old) vintage lasts.  It looks like this:

desert boots pattern

For my own future benefit, since this procedure actually worked very well with these particular materials: a rough run-through of the construction…

Glue uppers and lining pieces together leaving the front of the vamp free so as to create the toe puff later, and back part separate so as to sew the back seam together later and then create the heel counters… topstitch edges, punch eyelets, sew pieces together.

boots1

Sew quarters to vamps with some sturdy reinforcing at the point where the eyelet closure joins on.  By the way; this style of shoe in which the eyelet closure sits OVER the vamp is known as the Derby style, as opposed to the Oxford style in which the eyelet closure sits underneath the vamp.  My previous lace-up shoes have all been in the Oxford style, except for the yellow ones which were also Derbys.  Learn something new every day, no?  🙂

boots2

Sew the back seam of lining and upper separately, sew the lining to a fabric underfoot piece, glue the upper and lining together behind the heel and topstitch the upper edge, back of the heel.

boots3

Create the toe puffs and heel counters.  I used stretch cotton denim and several layers of PVA glue.  My heel counters (not seen) stretch around to “just” join onto the toe puffs here.

boots4

Glue uppers to the lining, stretch and shape the fabric over the toe puffs and heel counters as much as possible.  I spent an evening in front of the TV just stretching by hand.  Then stitch the uppers to an underfoot layer of self-fabric (if sturdy) or leather.  When stitching leathers and leather-like fabrics in any project, be it shoes or bags or anything; a double up-and-down stitch with two threads is employed.  So, stitch a running stitch one way all around, then return and stitch back over the same stitching, in the same holes, completely the double row of stitching.  This can also be done with the stitching going in one direction and employing two needles, doing each stitch twice, one at a time.

first row of stitching, sorry for the blurry picture, I swear it didn’t look blurry when I took it!

boots5

aaand, the second row of stitching, complete.

boots5a

Then I trimmed away the excess, cut a cork inner sole and glued it to the under-foot layers with contact adhesive, then made a bias binding strip of black quilting cotton and glued this all round the edge (PVA glue).  You can leave the stitching and edge visible and raw and unbound, which is a more authentic desert boot look; but I wished for a neater finish plus visually to have a stronger black line here to tie the touches of black in the shoelaces and (future) soles and heels together more visibly.

boots6 boots7

Up until now, most my glueing has been using PVA glue, but for the stacked heels and to glue the soles to the underneath of the shoe I used contact adhesive.

boots8

DSC_2637

Last step was to cut foam inner soles to fit, cover with the lining fabric and insert into the shoes…

paprika boots4The height of the heel was determined by the fact that I will wish to wear them with my favourite flared jeans…  my lasts are not reeeeally designed for a high heel so I went as high as I dared while not destroying the line of the shoe.  I’m very happy with this height as it looks with my jeans!  🙂

paprika boots with jeans

They are a little loose-ish on my bare and stockinged/tight-ed feet but fit nice and snugly with my hand-knitted socks.  I will want to wear it with both tights and with socks, so this is perfect for me  🙂

Yes, I knit all my own socks too.  Well, been making my own clothes for years so I’ve built up a supply of literally everything.

paprika boots3

I’ve kept a few old shoeboxes from old rtw pairs for my self-made shoes, so they stay nice and unsquished by other pairs of shoes in the bottom of my wardrobe.  Here they are, all snuggled up and ready and waiting for winter.  I can hardly wait to wear them!

paprika boots in box

pinterestmail

better black shoes

black oxfords So, black Oxford shoes, mark 2.  This version was made with the help of my beautiful new lasts!  Or I guess I should say, old lasts?  ha.

lastsDesign, my own, based upon a classic Oxford shoe style.  My tutorial on how I made my shoe pattern is here.

Materials:  black pleather from Spotlight, leftover from my moto jacket.  I would describe this as butter-y soft, but of course since it’s not real leather that just sounds a little pretentious, non?   Lining in faux chocolate suede, leftover from my chocolate suede top. Rubber for soles and heels, contact adhesive, PVA glue from Bunnings, , insole and shoelaces from Coles.  Toe puffs and heel counters created from stiff, non-fusible interfacing and stiff cotton denim, and lots of PVA glue!

black oxfords 3

Method:  I’ve been watching lots of online shoe-making videos.  I’ve particularly enjoyed Andrew Wrigleys’ youtube series on How to make a Shoe by Hand, absolutely brilliant.  I enjoyed this more than any blockbuster movie I’ve seen in a long while!  Even though I don’t think I would ever go to that level of internal engineering when it comes to my own shoe-making effort, it was just fantastic to see a a traditional process broken down, step by step.  Honestly, mind blowing.  If you’re at all interested in making shoes then it’s a must-see.  Many times I was just speechlessly shaking my head in awe and admiration, reflexively muttering “oh my god” and will never ever EVER complain about the high cost of a shoe, EVER AGAIN!!

I also found Marcell Mrsan’s video Basic Shoemaking Method – the Cemented Construction to be particularly useful for my own project, as my own efforts run more to the cemented/glued approach as opposed to the traditional method of completely sewing a pair of shoes.  I was going to say the lazy way, but naturally making one’s own shoes could never be described as a “lazy” thing to do!

DSC_2649Detailing:  I sewed the outer and lining layers right sides together, and turned them right sides out.  Then, using black embroidery floss, I topstitched by hand around all edges in a long running stitch, in a way that a very narrow ridge of the faux suedette shows all the way around the edge, as a kind of faux piping.  I absolutely love how this looks, peeping  out  🙂

My shoe puffs and counters; in both videos they are using leather and some form of starch; I researched this a little bit more and learnt that PVA glue is also often used as a fabric stiffener too; I had plenty of this on hand so went this route.  I made mine using stiff, thin, non-fusible interfacing, and some stiff cotton stretch denim, leftover from my Ginger jeans.  And lots of PVA glue!  The first layer of interfacing was glued over the lining, then coated itself with PVA glue, then I stretched a denim layer smoothly over this.  I allowed this all to dry, then snipped and glued down the underneath, allowed this to dry a little and then trimmed and shaved the folds underneath down nice and as smooth and flat as I could.  Similar to what they call “skiving” in leatherwork, but I don’t know if I can rightfully use that word for fabric?  More like I was just trimming away bulk and bumps.  Last step was to coat the topside  of the denim with a smooth layer of PVA glue, and allowed this to dry overnight, with the outer flipped back out of the way.  This has done the trick beautifully, and my toe puffs feel just perfect, hard and stiff and very unlikely to cave in.  I made the counters in the same way.  It was very helpful that my denim has just a little stretch, which enabled me to pull and stretch it nice and smoothly around my lasts.

Note; these are the toe puffs for my NEXT pair of shoes… but they look pretty much the same as the ones in these shoes  🙂

toe puffs

I didn’t glue the outer and lining together, so the middle bit, what they call the “waistline” is quite soft and not very stiff.  This feels very comfortable and I think it does give the shoes that “feminine” look.  I like it as a nice change although maybe the shoe overall could have used that little extra bit of stiffness that the glue gives.

As usual, I covered some insoles with the chocolate suede lining fabric.  This is so soft and tough, and just perfect for lining!  I’m using it for my next pair too  🙂

DSC_2623

Thoughts ;  I’m actually fairly pleased, I think they turned out quite elegant, especially when compared to my previous Oxfords!  These feel more stepping-out-worthy, and even like I wouldn’t be horrified to wear them in public, dare I say it.   Ideally I would like the heels a little higher, but this height is fine really, and will be very practical.  To get a higher heel I’m starting to realise I would need a different set of lasts … o man, the need for and accumulation of more new equipment continues… *sigh*

I’m extremely happy with my hand-stitched detailing, I just love the handmade look of this.  I’m preeeeeetty happy with the finishing although, obviously, it’s still not to the level where I would like it to be.  But I’m starting to realise this could be a lifelong lament.  😉

Note, I still have not cut into any of my actual leather!!  What a wuss, eh?  It feels too scary.  I’m still not ready.  I feel like I’m working towards that… like training for Mt Everest or something, ha.

Anyway.  Ever onwards and upwards!

black oxfords1

pinterestmail

gathered pocket; a tutorial

gathered pocket
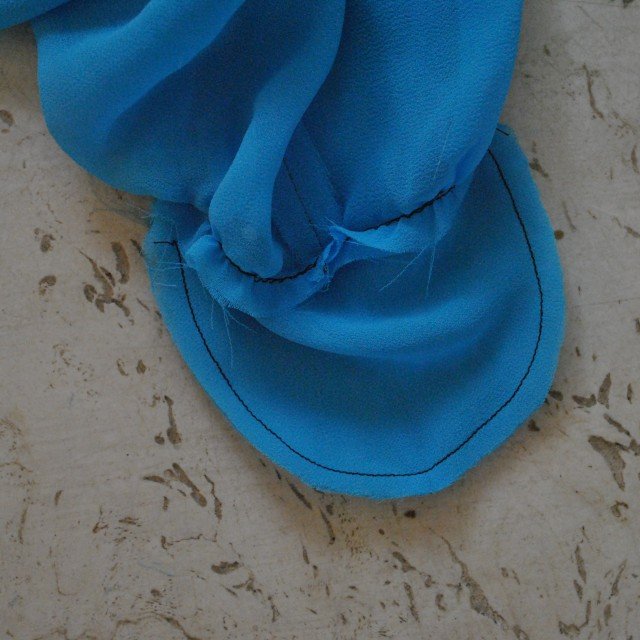
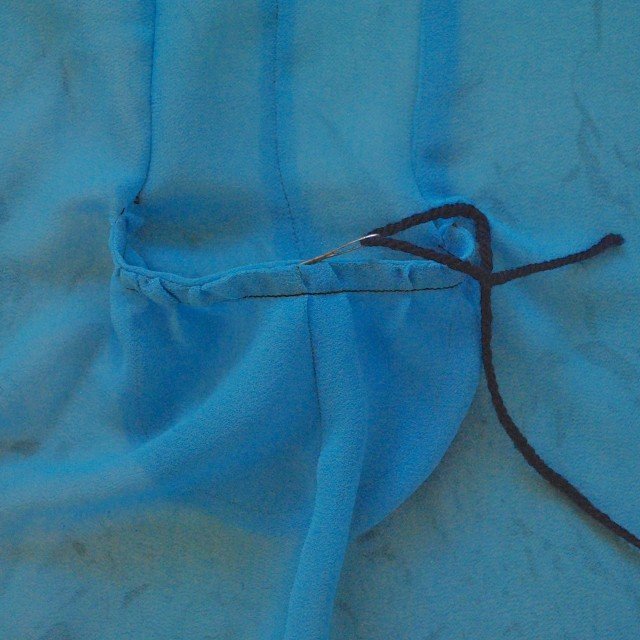
This gathered pocket sits inside and at the side edge of a loose-fitting garment such as an unfitted dress or tunic top, and can be adapted to go in a loose, flowy skirt also.  It is best suited to lightweight fabrics.

Firstly, making the pattern pieces…  start with an A-line dress pattern.  I used dress R from the Stylish Dress Book by Yoshiko Tsukiori; which has gently A-line side seams that curve outwards towards the lower hemline, but this design would work equally well for a straight, diagonal side edge too.

gp1

For both front and back pieces, both sides, draw in the above, straight lines;

blue line:  starting from the the innermost point of the armscye curve, vertically straight down to finish at the level where you wish for the top edge of the pocket to hit.  As a rough guide I find around 5cm (2″) above hip level to be generally a pretty good upper pocket point.

green line: horizontally, at the level where you wish for the top edge of the pocket to hit.  The “bagginess” of your pocket is a personal choice; as a guide; my green line is 15cm (6″) in length which coincided with the degree of “flare” of the dress at the hemline.

red line: vertical line from the outer edge of green line, straight down.  This is the new side edge of the dress/top.

orange curve; from the blue green intersection, draw a gentle pocket curve to intersect with the original side of the dress edge.  As a guide, I made my pockets 20cm deep.

purple line: vertical line from the lower edge of the pocket, up to the green line.  This is the centre fold on which you will cut the pocket piece.

The grey lines of the side front and side back represent the original lines of the pattern pieces.

gp1a

These lines define the new pattern pieces as show above; at left is the new side edge of the dress front and back, now defined by the blue line, green line and red line.  Only one side is pictured, if you want the pocket to be on both sides then obviously cut this profile both sides of the garment.  Side fronts ( 2), and side backs (cut 2) are defined by the blue line, orange curve and the original side edge (grey curve), and pocket pieces (cut 2) as defined by the orange curve, with a centre fold along purple line.  Remember to add seam allowances!

warning; hideous fabric alert… my apologies.  This blue stuff was a handy small scrap,  I also used black thread because I didn’t bother to change the thread in my machine  it stands out and can be clearly seen against the blue fabric…   🙂


gp2

Also, for the drawstring ties cut 4 strips of lightweight fabric on the bias; Mine are each 41cm (15 1/2″) long by 2.5cm (1″) wide.

Construction:

ties

Pocket drawstring ties;  stitch the long edge and turn right side out.  My tips and method for turning out skinny spaghetti strap ties can be found here

(below L) Stitch front and back together along the red line, press open.  Stitch side fronts to side backs along side edges, press seam allowances open.

gp3gp4

(above R)  Stitch side front piece to front along the blue line, finishing at the top edge of the pocket.  Repeat for side back piece to back.  Clip to end of stitching, press seam allowances to front/back.

(below L) Run a long, gathering stitch along the pocket opening stitching line (green line).

gp5gp6

(above R) Pulling up this gathering stitch slightly to fit, stitch a pocket piece along the pocket top edge in two separate lines of stitching, leaving a short 2cm (7/8″) gap in the centre between the two.

(below L) Turn pocket piece to the inside and gently press along stitching line.

gp7gp8

(above R) Inside, line up pocket lining and side front/back piece along the curved lower edge and stitch together.  Finish pocket seam allowances and side front/back seam allowances if desired.

(below L) Pin the pocket piece to the dress along the top edge of the seam; and, keeping the side front/side back free, stitch together with a row of stitching 1cm (3/8″) in from the top edge.  Effectively creating a 1cm width channel  between dress and pocket.  Insert a tie into each side of the channel, starting from the gap and coming out at each end.  Apologies for the scraps of yarn used in this little blue sample pocket, for the real thing I did make proper turned out bias strips, really!

gp8gp9

(above R)  Secure the tie ends in place by stitching a few passes of back and forward stitching on the outside of the dress, through all layers.

With the ties, pull up the excess width of the pocket edge to fit and tie in a sweet bow or whatever.

And done!

gp12

Thank you to everyone who expressed an interest in how I made these pockets;  I hope this is a useful and/or interesting tutorial.  If you find it so then please leave a comment and let me know.  🙂

floatytop3

pinterestmail

light as a cloud

floatytop1

stylish dress bookI’ve made a softly floaty blouse  🙂  of course just as summer is on the way out… o no, wait, actually summer is over! However we’re still getting days of 40C.  Not that I’m complaining, mind you.  I love the warmth!  Only thing is that I’m getting tired of all my summer things thus the decision to make a new summer thing, ha.  #seasonallyinappropriatesewingforthewin  It’s light and pretty and easily breezy; and delightfully cool.  I fully expect the weather to turn cold now.

floatytop3

Pattern; based upon dress R from the Stylish Dress Book, by Yoshiko Tsukiori.  I’ve always had luck with the patterns from this book.  But this time … well the pattern is for a short dress, and it’s quite pouffy too, and in this particular fabric it looked just like a nightie! eeeek! this fabric is far too lovely to be a nightie! So I gave it just a little chop and now it’s a top.   Much much better like this… I had also added some rather interesting gathered side pockets to the dress and managed to keep them perfectly intact.  I pinned this picture of a gathered pocket a while ago and have been itching to have a go at incorporating it into a design at some time… And I have! with an added drawstring.  I decided the drawstring was needed with this embroidered fabric, it felt kind of lacking without it.

gathered pocket

Fabric; a rather gorgeous fully embroidered Japanese silk/cotton, bought from the remnants table at Potters Textiles, years’ ago.  Probably about four years ago.   Fully embroidered with a floral motif, the background is very light and fine, quite sheer actually; so a full and voluminous design is just the ticket.  The yoke and bias cut ties on the pockets are ivory crepe from Fabulous Fabrics, cut from the leftovers of my studio faro dress.

floatytopback

Modifications; Shortened to be a blouse.  Also the front and back are supposed to be gathered into the yoke… I tend to steer clear of gathering.  Instead I folded the excess width into box pleats.  There are four at the front, evenly spaced and close to the centre front, and one in the centre of the back.  And I added those two gathered pockets at the sides.  I love the design of these; interesting and practical, and pretty too without being excessively twee, and they’re a little bit different from your average inseam pocket and patch pocket.  I think they add a certain visual “something” to the top that it needed.

I’m thinking of writing a tutorial to show how I made them…  coming soon  🙂

IMG_1263

stylish dress book DSC_2624burda7723-1

Details:

Blouse; based upon dress R from the Stylish Dress Book by Yoshiko Tsukiori, embroidered ivory silk/cotton
Shorts; Burda 7723, green cotton gingham, details here and my review of this pattern here
Thongs, made by me, details here

floatytop4

pinterestmail
Switch to mobile version
↓