Tag Archives: Top

Purple-y top

purple
Here I am, waiting for the ferry to head off into town, and so I took a quick, in-the-wild photo of my new top.  Thanks, random bench! for being a good little makeshift tripod, and I don’t mind at all that you snuck into my photo!

OK.  Remember how I said I had enough of the purple-y, wine-coloured silk/linen knit leftover after making this skirt for a little matching top? except with contrasting sleeves? well ok yeah; that explains the whole project, actually.  Probably no need for me to babble on any longer!

Well, maybe just the bare details…

Fabric; silk/linen knit from KnitWit.  Black pleather for the sleeves from Spotlight, leftover from some of my shoes and my moto jacket.

Pattern; the epaulette cut and sewn, pattern 4 from “she has a mannish style” by Yuko Takada.  I just wanted a loose-ish, boxy kind of a plain Tshirt, fairly featureless.  I have a pretty good, tried and true, woven Tshirt pattern that I tend to use, NewLook 6483; but I really wanted something with no bust shaping darts.   I really really like the Named Inari tee pattern, which is super popular in the sewing community right now; for a good reason of course! however since I had this book already I thought I’d give the epaulette tee a whirl as a possible Inari tee stand-in.  So I traced it up and boom…. done.  Super easy.  And I really like it! and will no doubt use the same pattern again.   🙂

The only variation I made was to leave off the eponymous epaulettes, haha.  Maybe next time…

Finishing nitty gritty: 1) I left off the facings, and just overlocked the raw edge then stitched down a simple seam allowance inside the neckline.  Simple, neat, and not bulky at all.   neckline

2) Pleather sleeve edges were clean cut using my rotary cutter and left raw.  sleeve edge

3) Lower hemline; turned under twice in a deep hem and hand stitched;

hemline

So that’s it!  Simple easy, unexciting, but then again the most useful things often are.  Leftovers and scraps, so basically “free”… yay!  I really like the sleeves, and hopefully they do add just some little bit of je nais se quois…  and don’t just look like a random add-on because, you know; not enough fabric.
epaulettemannish stylepaprika jade skirt

Details:

Top; top 4, the epaulette tee, from She Has a Mannish Style  by Yuko Takada.  The English translation re-named this book She Wears the Pants, and I’ve previously ranted here on my blog about what a bad, bad, or at least awfully misleading title this is; since the book contains very few patterns for any actual pants.  grrr
Skirt; the Jade skirt by Paprika Patterns, same purple knit, details here
Bodysuit (under) the Nettie by Closet Case patterns, black stretch, details here
Gloves; hand knitted by me using a 60’s pattern, charcoal merino, details here
Tights; my own design, black stretch, details here and my tutorial for making your own custom-fit tights pattern is here
Boots; made by me, details here

purple back

pinterestmail

blush pink twist top

blush pink top 3
Ok, so; new top.  Running down ye checklist…

It’s blush pink.  Blush pink is so hot right now!  Note; ticks “colour so trendy it hurts” box

It’s twisty. Twisted is ME!   Note; ticks “my kinda thing” box

Do I need it?  well, it’s still winter and freezing cold and the thing is; I still do not have very many long sleeved Tshirts.  If I had a wardrobe gap, and of course I don’t really have a wardrobe gap since I sew for myself… anyway, IF I had a wardrobe gap then long sleeved Tshirts would be the nearest thing to it.  Note; ticks “useful and needed thing” box.

Pattern, the twist top from Pattern Magic, the conceptual fabric and pattern manipulation book by Tomoko Nakamichi.  This is my fifth version of the twist top, it’s another one of those patterns which I seem to make up a new one every year.  Previous versions are here, here, here and here.  With the exception of version one, which was my wearable muslin and which I eventually threw out because the fabric was too thin to suit the design really, I wear all of them quite frequently in winter and LOVE them.

Fabric; a ponte, slightly sponge-y and with a crinkle-y, crepe-y textured surface, from Fabulous Fabrics.  And, even though blush pink is NOT my colour and I can already hear my mum telling me NO! Carolyn, pink does you NO favours! well blush pink is a big trend for spring and I just kinda wanted it, illogically and randomly.  Something trendy and up to the minute.  This one may not turn out to be a staple like its big sisters because, you know; Me, plus Pink, equals “oh my god are you ok? you look so tired…” but there’s no doubt it will get at least a few outings this winter and spring.  Hey, I can always dye it  🙂

pattern magicburda7863-4mccalls 5276

Details:

Top, the twist top, from the Japanese pattern book Pattern Magic, by Tomoko Nakamichi
Jeans; Burda 7863, ivory stretch denim, details here and my review of this pattern here
Shearling jacket; McCalls 5276, details here
Gloves; knitted by me, details here
Socks, knitted by me, details here
Desert boots; made by me, details here

blush pink top back

pinterestmail

the incredible raspberry woman…

superhero

Haha!   I lolled pretty hard at this outfit above, but decided to share anyway.  I look like some kind of burgeoning superhero or something yeah?  All I need is the cape.  “NO CAPES!!” *  (Edna Mode, of course)

Fear not, fellow fashion victims, I will not be wearing my new top and tights together like the above example, well maybe for fancy dress.  Or, if facing the general, unsuspecting and innocent public, then not without a lot more garments layered over here and there to break up the expanse of raspberry pink anyway, woof.

raspberry set

aaaa, oh  dear, calming down now.  See here’s the thing… I wanted to make some more coloured tights.  I really enjoyed my bright paprika tights, when I had them, even did a 6-different ways post on those things once!  I wear black tights a TONNE, like everyone else, but have found it’s absolutely terrific to have a bit o’ variety in the tights department, to have some more colours for layering in my winter wardrobe.  I’m embracing a small pink and plum trend in my wardrobe lately, so bought this piece of poly knit during Fabulous Fabrics recent sale with a view to some Intentional Wardrobe Matching and Planning… oooo so organised!  Not like me at all  😉

yesterday’s outfit, wearing the tights

raspberry tights

I laid down my custom-fit tights pattern and then of course discovered, as you do; that I had enough around the sides that I could probably squeeze a t-shirt out of it as well.  Waste not want not!

For the tee; I used my Closet Case patterns Nettie, which I’ve also made tonnes of times  I’ve fine tuned the fit over and over so much it’s barely the same pattern anymore.  You could call it a vestigial Nettie.

So, the tights are fabulous, and I’m happy, yay! however the top is a so-so thing that I’m a teeny bit meh about.  Stretch poly is excellent stuff for tights, but actually pretty horrendous for a top.  It’s slightly thick and beefy, doesn’t press at all, and is that ultra slippery slinky stuff, that slips and slides over itself, and the whole two metres of it will slither right off the table in an avalanche of fabric if so much as a small corner starts to slide over the edge.    grrr.  I made up the tights, easy peasy.  When it came to the top, oh god, horror story stuff.  I’ve re-done that bottom edge three times… THREE TIMES.  The fabric just wouldn’t take anything.  Attempt number one; ye olde trusty twin needle.  Except, no.  It kept skipping stitches something awful.. so I gave up and moved to attempt number two, a small discreet zig-zag.  It stretched out and looked disgusting, so I unpicked that with much muttering and growling under my breath. Attempt number three was to turn under twice and hand stitch it, which is usually a failsafe for me.  I think this will be ok.  If not, I’m going to move onto plan four, which will be a folded band all around the bottom edge, same as I’ve done to lengthen and finish the sleeves.

Essentially a extra-long, folded cuff.

sleeve cuff

Anyway, it’s done.  I kinda regret not using the excess fabric for underwear now.  I actually think it would have worked a lot better for lingerie, than as a Tshirt.  Well, we live and learn!

Details:

pattern magicpaprika jade skirtwinter boots

1) above

Top; Pattern Magic twist top in charcoal ponte, details here Skirt; Paprika Patterns Jade skirt, in wine silk/cotton knit, details here Tights; own design, my tutorial for making your own custom-fit tights pattern is here
Boots, made by me, details here

2) below

nettievogue1247winter boots

Green top; Closet Case patterns Nettie, in green cotton mix stretch, details and my review of this pattern here
Paprika cardigan; my own modifications on the Closet Case patterns Nettie, details here
Raspberry top; Closet Case patterns Nettie, with sleeve and neckline modifications
Skirt; Vogue 1247, blue corduroy, details here
Tights; black poly, own design, my tutorial for making your own custom-fit tights pattern is here
Boots; made by me, details here

today’s outfit, wearing the Tshirt

raspberry top

pinterestmail

some tops, and a collar pattern

ivory nettie 2 I’ve been busy making a few tops…

nettieSO!  Exhibits A and B; two Nettie tops,both made in a really gorgeous, pale cream knit from Fabulous Fabrics, given to me by Mum.  Now, I know I’ve said a gazillion times before that I have SO MANY white tops I should never ever need to make another one, but you see; a full-sleeve-length ivory Tshirt was one of my most worn wardrobe items last year.   So, I’m pretty confident that these two boring things are probably going to be two of the most worn things in my winter wardrobe this year too! #ivorytopaddict.  I managed to squeeze two tops from out of my piece of fabric, yes! *air fist punch*

I’ve fine tuned my Nettie pattern now for my own figure, but I still have to sorta “start from scratch” with fitting when I’m cutting out a fabric with a different stretch factor than those I’ve used previously with this pattern; and this fabric has quite a low stretch.  So to be cautious I upsized quite a bit, cutting approximately and roughly a size 20, and then pinned the sides in to fit me.  Also; my fabric was just big enough for the two Netties, but only-just-and-not-quite-perfectly-enough!! you know how it is… you MAKE IT WORK.  They both have long sleeves coming right down to my wrists, but I had to cut Nettie B (below) just a little shorter at the hemline, so that I could get the two tops from my one piece of fabric.  It sits at my high hip; Nettie A (above) is longer, plainer, with a high crew neck, finished with a grainline-cut band, applied as for this method here.

DSC_0007DSC_0002Along the back edge only, I topstitched the seam allowance down to the top, just inside the seam line.  In both cases, the raw edges of sleeve and lower edge are finished with the overlocker, than turned under once and invisibly hand-slipstitched in place.

Nettie B, below, is slightly cropped and has a wide, boatneck collar.

ivory nettie 2

I had some interest for this collar/neckline on instagram, so I’ve drawn up a pattern for it… it’s kinda rough-looking and I do plan to improve the presentation but just wanted to get it up here for now.  It does however, work! and so I hope it does prove useful for someone!

neckline:collar

ivory nettie 1 collarThe method is as follows:

This is a collar/neckline designed for a close-fitting Tshirt in stretch knit fabric; the collar is a standup folded collar, and the neckline is wide and shallow. The idea is that you use your tried and true Tshirt pattern just ignoring the given neckline and substituting this neckline/collar for the one in your pattern.  I used the Nettie pattern by Closet Case patterns, although any Tshirt pattern would do.  Align the pattern pieces so the line of the shoulder seams and the centre front/back lines of this pattern are correctly aligned with the shoulder seams and front and back centre folds of your Tshirt pattern, and cut the neckline accordingly.  Seam allowances are 1cm (3/8″), so if the Tshirt pattern you are using has a different seam allowance, align shoulder stitching lines (dotted lines) lines of the shoulder seam, rather than the cutting lines.

Cut the neckband/collar, with the short edges on the grain line.  Sew the collar short edges together, right sides together.  Fold the resulting “ring”of fabric in half lengthwise, wrong sides together, aligning raw edges… pin to the Tshirt neckline right sides together; distributing the length of the collar evenly around the neckline.  Stitch using a 1cm seam allowance, and finish the raw edges with overlocking or zig-zag, as desired.

If you use this pattern, then please do leave me a comment and let me know how it goes.  I’m always thrilled to get feedback  🙂

Now for some more tops, hoodies…!  Smug self back-patting for unselfish sewing commences right here, since neither of these are for me

sams hoodie

Exhibit C; I made a grey hoodie for Sam, to fulfil his birthday request… this is the same self-drafted pattern I’ve used previously for hooodies for each of my boys; and the seventh and eighth time I’ve used the pattern.  The best thing about these hoodies in my opinion is the rather nice combined collar/hood, and I’ve previously written a tutorial on how to make this collar, here.  Sam wanted grey, and the addition of a bit of red was my idea.  I just liked the idea of some little contrast and the red seemed cheerful and fun for winter, and a bit more interesting than if it had just been plain grey.  The rather gorgeous warm, grey terry fleece is from Spotlight, and the red is cut from an old Tshirt from my refashioning bag.

sam hoodie pocketsam hoodie

rayman

aaaaand Exhibit D; a Rayman Hoodie for Sam to wear to ComicCon.  The same pattern, and again to fulfil his specific request!  I bought some warm purple Tshirt ribbing from Spotlight, simply because it was the perfect colour.  The white circle and the red hoodie bit were both cut from two old Tshirts from my refashioning bag.

And that’s it!… well; for now, mwahahahahahahaaaaaaa. *she twirls her cape and dramatically sweeps off to the sewing lair, maniacal laughter radiating in her wake*

Details of all clothing in this post:

1)

nettievogue1247josharp garter jacket

Top; modified Nettie by Closet Case patterns
Skirt; Vogue 1247, yellow corduroy dyed caramel, details here
Tights; self drafted, details here and my tutorial for making your own tights pattern is here
Boots; made by me, details here
Cardigan; hand-knitted by me in Jo Sharp yarn, details here,
Cowl; my own design, mustard yarn, details and pattern here

2)

nettiepaprika jade skirt

Top; modified Nettie by Closet Case patterns
Skirt; Jade by Paprika patterns, details here

3) and 4)

Hoodie; self drafted pattern, my tutorial for making the combined collar/hood is here

pinterestmail

little white tank

hunter tank top front
hunter tankI’ve made this new top! rather cute and feminine with a sweet little tie front at the waist. Yes, it’s linen, it’s plain, and it’s white.  I just can’t help it, I’m a diehard white or off-white top kind of a girl… I’ve got stacks of them and keep on piling new ones in t the ol’ wardrobe because I never have quite the right one, and always feel like I could use just a few more, in different styles and fabrics.   Also; white fabrics; honestly, sign me up for the Addicted t
o White Fabric club, asap!  Every time I sort through my fabric stash I say to my husband and to Cassie; please, DO NOT let me buy white fabric, ever again!!!  I think I have enough to last me a lifetime of sewing nothing but white or at least off-white or ivory or just plain pale clothing for myself… and yet,when making something I find I never have that just-right type and find it necessary to head out to the fabric store to search for it…. aaaagh!  I’m going to the fabric store later today, just to buy elastic and am steeling myself to Stay Away from the fabric area… *giving myself a stern talking to*
This particular fabric is fine-grade handkerchief linen; a long term resident from my stash thank goodness.  Provenance long forgotten, ahem.

The pattern; so, recently I was contacted by Jen, of Jennifer Lauren Handmade, who asked me to review her latest pattern the Hunter tank top, and this is it!  Cute, non?  I reckon so.  Mine is view 2, with the skinnier shoulders.

hunter tank top back
It’s a simple and rather classic design, with that front tie feature to distinguish itself; all cut on the bias and with centre front and back seams because there is a bit of shaping in it.  I LOVE the teeny little breast pocket on it! so very cute! not that I’ll ever be putting anything in it but it’s a sweet decorative touch; which I reckon a plain white tank top NEEDS.

DSC_0017

I followed the instructions, which are very thorough btw; and aimed at someone who knows how to sew but is still relatively new to making clothes.  I did the French seams and flat-felled seams where indicated throughout, and one of those super skinny hems at the bottom that look really nice in linen, made by stitching three times.  So, it’s rather beautifully finished.  That’s something else about very plain and basic items; they really should be finished well in order to stay the distance.  I took my time and made sure I did, even to the point of unpicking several bits and doing them over.

you could probably wear it untied too, looks kinda dramatic

hunter tank top untied

Thoughts; it’s a lovely classic design with very good bones, and a lovely fit and drape, thanks to the bias cut and subtle shaping through the centre seams.  I think the design does need fabric that has a bit of “grab” to it for that tie to stay tied up.  My linen does, but it does tend to loosen over time too, so I think in a soft, slinky, slippery fabric like crepe de chine the tie might slip out pretty quick if you didn’t anchor it somehow.

hunter tank top side

It is quite short, designed to sit at the natural waist, so is very nice to wear with a high-waisted skirt or jeans.  I have a few things that fit the bill, so yay!  I’m also planning to make it lengthened a bit by next summer and without the tie-feature, to wear with some of my more low-slung things as well.  Actually, lengthened possibly even to dress length!  while making this one I was already hatching plans for a tank dress using this pattern… mwahaha.

NOT a white one!

hunter tankvogue2894

Details:

Top. the Hunter tank top by Jennifer Lauren Handmade, white linen
Skirt; Vogue 2894, red floral cotton, lined with purple cotton, details here
Shoes; made by me, details here

hunter tank top

pinterestmail

Magdalena Dusk; an Alabama Chanin project

alabamachanin2alabamachaninstudiobook

Finally! my Alabama Chanin outfit! It’s finished, and now done and dusted!  Yay!  I may look all cool, calm and collected on the outside here but on the inside I’m cheering like a madman.

ac1

Phew. This project has been quite an undertaking… quite an undertaking, to say the least. I had received a length of beautiful Alabama Chanin cotton jersey in colour Dusk from the lovely Lisa, of Lisa’s Carolina, and I really wanted to do the fabric justice, to honour its Alabama origins and make something worthy and not to do things by halves. I decided I just had to go the whole nine yards and make another full-on ensemble. The Full Monty Alabama Chanin. Obviously!

There was enough of the blue to make one skirt and a few bindings, so I needed to make some more colours…. I bought some plain white cotton jersey from Spotlight, cut some scraps and played about with dyeing; experimenting with greys, greens, greeny-blues, blue-y greens, blue-y greys and greeny-greys, plus I’d also had some pink cotton that I dyed blue, to get some purple-y blue into the mix too.

candidates!

dyeing

Ultimately I rejected my purple- and grey-toned experiments and settled upon greens; shades of teal and sea green, which I thought subtly highlighted and championed the dusky blue the absolute best, toning it without drowning it amongst other shades of blue. I think; if you’re trying to showcase a colour in an ensemble/design, then it’s best for that colour to be the only one of its shade, and for the contrasting colours to be all a different shade and variations of each other, not of the showcase colour. As clear as mud? Yep, I thought so! Sorry, maybe that’s not making much sense, but at least I know what I’m talking about.

acdetail

Pattern; all patterns are from the book Alabama Studio Sewing + Design, by Natalie Chanin. I made a full-length skirt, a fully-embroidered mid-length skirt and a fitted tank.  Every single component is sewn by hand, in the Alabama Chanin way  🙂

alabamachanin1

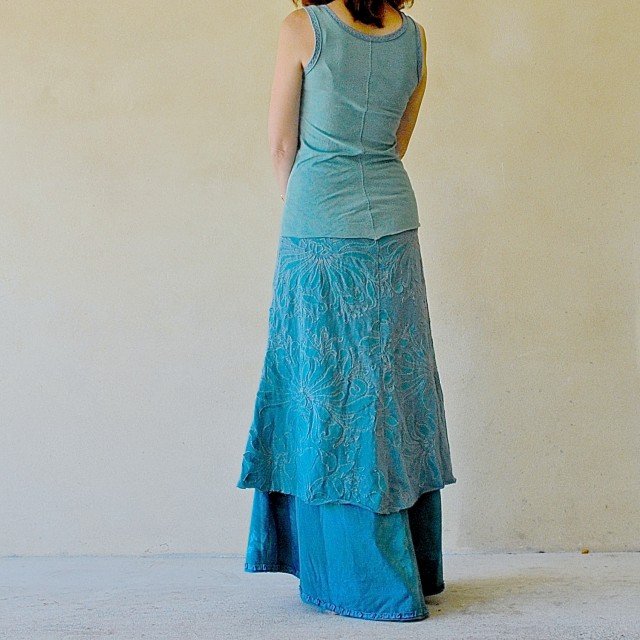
So: the mid-length skirt! Which is the biggie in my ensemble, taking a few months to embroider the pieces! The skirt itself is my precious Dusk Alabama Chanin cotton jersey, and the motifs I’d dyed some white cotton jersey from Spotlight to be a teal/sea-green and to purposely be a little variegated with strong tones paling to lighter tones appearing shaded in an ombre kind of a way across the piece. All the details of the stencilling and early preparations pre-embroidery, are fully described in this post here.  This part actually took aaaaages, or it felt like it at the time. Obviously, once I got embroidering then that was the bit that REALLY took ages! I had decided upon blanket stitch embroidery to attach the motifs, using light tan Gutermann’s upholstery thread. I liked the colour and the look of the embroidery, but this particular stitch was probably not the ideal choice.  It is an enormously time-consuming stitch and I found myself questioning my own sanity/stupidity in choosing it, many a time. I’m glad I did persevere now though, since I really do love how it looks.  Although it did take a lot of time, it wasn’t too bad, since our trip to Japan involved several plane, train and bus rides with hours and hours and hours of enforced sitting, so I got plenty of embroidery done during those times… I had completed two whole skirt panels by the time we got home! YAY!  I then would have finished pretty quickly if I had then not dropped the ball for the next few weeks… oops.  But once I put my mind to it and got going again I finished the embroidery pretty soon; and with the embroidery done the whole ensemble felt practically home and hosed!

IMG_9852

I joined the pieces, hand-felling the seams using the same light tan upholstery thread as the embroidery;and I found a light yellow/beige fold-over elastic at Spotlight that looked quite nice for the waistband binding.. not that you’re ever likely to see that bit! It’s actually button elastic, for waistbands, and has buttonholes in it along the fold, but that’s ok. The colour is great, and since fold over elastic is a rare beast in Perth, in any colour, I counted myself pretty lucky to have found it!

acwaistbands

The full length underskirt: originally white cotton jersey from Spotlight, and I dyed it to be just slightly variegated, strong teal-y/sea-green. I wanted it to be a little bit uneven in its shade, so as to fit in with the whole handmade, rustic aesthetic of Alabama Chanin. The underskirt is entirely handsewn with emerald green upholstery thread, with felled seams, and a single strip of randomly hand-ruched/ruffled cotton jersey around the lower edge. I’d originally stitched on three evenly spaced strips of ruffled cotton, but removed the upper two, because three rows didn’t look as nice as I’d hoped. The upper edge of the petticoat is finished with teal elastic, handstitched on with herringbone embroidery stitch. This was the first piece to be finished in this ensemble, believe it or not!

btw, I’ve had some feedback already that some think the underskirt is too long… opinions?

acpetticoat

Tank top; white cotton jersey from Spotlight, dyed in the lightest shade of eau-de-nil green, and with armhole and neckline binding in the Dusk blue Alabama Chanin cotton jersey. The tank top is handsewn with light tan upholstery cotton, the same as the skirt embroidery, with felled seams and herringbone embroidery to attach the neckline and armhole binding.

All the details, summed up succinctly in just one pic:

magdalena dusk

So that’s it re the outfit…

And now for a little story about that weird and bizarre, modern-day phenomenon, the blog photo shoot…

ac3

I’d delayed posting this because I wanted to take some really nice pictures with a pretty background, something better than just these ones taken in our boring old garage… so I pick an absolutely beautiful location at my parents’ house … and a hopefully beautiful time of day … dusk would be an appropriately poetic time of day, yes? because the colour of my Alabama Chanin fabric is named “dusk” Ok, perfect! However turns out dusk is actually a terrible time to take pictures, … all my first batch of pictures were a giant fail… everything very dark and you can hardly see a thing, ha! So I disconsolately packed up to go back to the house; to try again the next day.

And did I mention my chosen photo shoot location is a paddock quite a long walk from the house? Honestly, the things we do… I walked down in jeans, disrobed, re-robed, in the paddock, as you do…. TWICE, on two consecutive days… all under the bemused and intensely interested gaze of a mob of kangaroos.  Well obviously, they must have been admiring my Alabama Chanin finery? hmmm?

hey guys!

roos

The second day I timed my arrival to be just before sunset, with that lovely pre-dusk golden glow … and wasn’t til I’d got all set up and going with my pictures I realised I’d left my sunnies back at the house and so I’m squinting in Every Single Picture… (groan)

And in the end I felt like the “boring” garage photos weren’t really all that bad and actually the details show up pretty well against that quiet blank background, so I’m posting a few of those too.   Sorry for the picture overload.

Moral of the story; blog photo shoots can verge on the ludicrous

Anyway!! it’s done…  Thank you so much to my friend Lisa, of Lisa’s Carolina, for the gift of the Alabama Chanin cotton. It’s such a gorgeous colour and I hope I managed to make something that is worthy of the fabric 🙂

alabamachanin6Details:

alabamachaninstudiobookTank top, skirt, underskirt; all patterns from the Alabama Studio Sewing + Design by Natalie Chanin. Blue cotton jersey is from Alabama Chanin, other fabrics from hand-dyed by me. Embroidery design, half of the Magdalena design by Alabama Chain, embroidered in blanket stitch.

ac3

pinterestmail

Lucy Heartfilia

Cassie Lucy

Who is this??  I barely recognise my daughter in her fabulous cosplay outfit!  For ComicCon this year, Cassie decided she wanted to go as Lucy Heartfilia, from Fairy Tail; the anime/manga conceived by Hiro Mashima.  And she has been busy busy busy, working solidly on her costume… isn’t it gorgeous?!!  I think she looks absolutely amazing!

Lucy Heartfilia from Fairy Tail; artwork and character by Hiro Mashima

lucy_heartfilia___fairy_tail

And yes, Cassie’s costume is all made by herself, with just a few pattern adjustment and sewing suggestions by me.

burda8548 burda8175

Patterns; adapted Burda 8175 for the skirt, and adapted Burda 8548 for the vest.  The corset top and the sleeves are self-drafted.  Actually, the “corset” top is more like an abbreviated bodice than a corset; with princess seams and unseen skinny gold shoulder straps, that are hidden underneath her vest, and closure is at the centre back by white hook and eye tape.  The sleeves are two pieced and double layered, with the white layer longer so it comes out at the bottom, and with elastic in a channel at the top so they stay up on her arms.  The long gold straps on the sleeves are purely decorative.  You want to see what the pattern piece for the sleeves looks like? No? well I shall show you anyway  😉

sleeve

You cut two of each per sleeve, so the bottom flared bit of the sleeve is almost a full circle.  A circle skirt for your arms! haha  And yes, she hemmed the lot too, I think she stayed up until the wee small hours doing that job!   The white and blue layers are joined together at the top with a casing for elastic, so they stay up on her arms.  The gold straps were sewn on afterwards, they’re pretty much decorative.  But don’t they look great!

sleevebands

Fabric; quilting cotton from Spotlight.  Mainly chosen for the just-right colours, of course!

I’m so proud of her, because the whole costume is properly and beautifully made, and she did not take the easy way out in any part.

DSC_2658
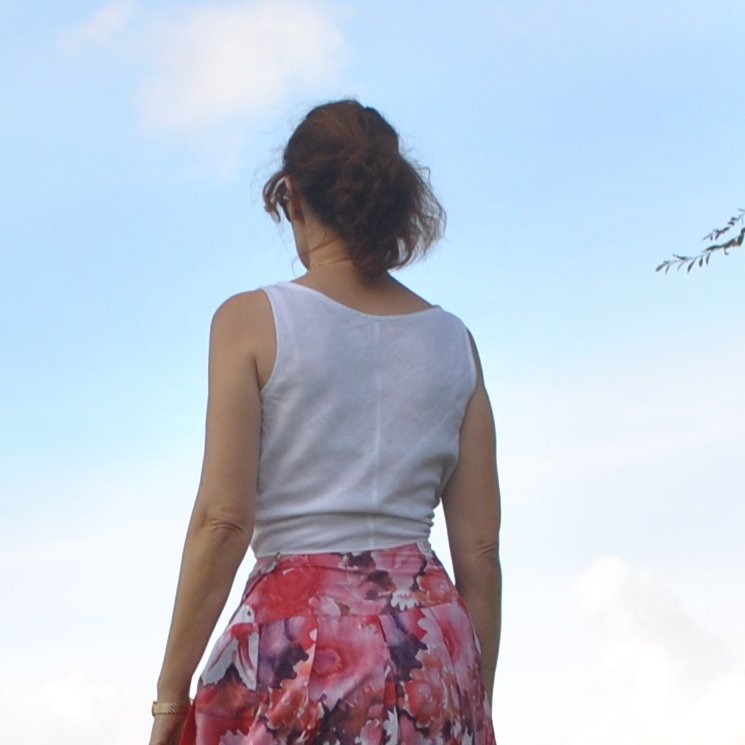
The dark navy blue, pleated skirt has an invisible zip closure and an interfaced facing.  I suggested she make it a little longer, so she could at least wear it as a normal skirt too; but no; the costume had to be as faithfully executed as possible!

Those keys are an integral part of Lucy’s costume, and a part of her character’s story.  Cassie was so thrilled when she spotted the key set in a store; and pounced… perfect for her costume!!  Belt; surreptitiously extracted from her brother’s wardrobe mwahaha.

The camisole/corset top was self-drafted to fit her perfectly, and it fits like a glove! and then she drew the lines for the blue heart and gold edging on her muslin and cut it up to get the individual pieces.  Meaning; they are not just appliquéd on but are all separate joined pieces; and the top is completely lined in white cotton.

Cassie as LucyShe used a blouse pattern for the vest, mainly because the collar was right for the costume; it had no collar stand and was the right shape and lay in the right spot.  The front and back pieces were easily modified to be a vest shape, and she individually drew out the gold edging pieces to fit, and with self-fabric facing throughout.

back

Really, I am so proud that she put so much care, thought and diligence into making it and finishing it all off perfectly and beautifully.

Cassie as Lucy 3This is a character driven pose; it means “I’m watching and I’ve got your back”… and that symbol on her hand is also a key component to her character too.  I freehand drew it on for her this morning, because you know; right handed, and it had to be on her right hand! It’s in pink ballpoint pen.  I can’t wait to hear how her day was…. I’m sure she will be one of the best dressed at the convention!!  As we drove in to drop her off, we saw stormtroopers and a Joker strolling down the esplanade on their way to the convention, laugh!  It’s fantastic how everyone who goes makes a real effort to dress up in amazing costumes and really look the part… oooo I so wish I could be there to see all the costumes!!

Cassie as Lucy 2

pinterestmail

light as a cloud

floatytop1

stylish dress bookI’ve made a softly floaty blouse  🙂  of course just as summer is on the way out… o no, wait, actually summer is over! However we’re still getting days of 40C.  Not that I’m complaining, mind you.  I love the warmth!  Only thing is that I’m getting tired of all my summer things thus the decision to make a new summer thing, ha.  #seasonallyinappropriatesewingforthewin  It’s light and pretty and easily breezy; and delightfully cool.  I fully expect the weather to turn cold now.

floatytop3

Pattern; based upon dress R from the Stylish Dress Book, by Yoshiko Tsukiori.  I’ve always had luck with the patterns from this book.  But this time … well the pattern is for a short dress, and it’s quite pouffy too, and in this particular fabric it looked just like a nightie! eeeek! this fabric is far too lovely to be a nightie! So I gave it just a little chop and now it’s a top.   Much much better like this… I had also added some rather interesting gathered side pockets to the dress and managed to keep them perfectly intact.  I pinned this picture of a gathered pocket a while ago and have been itching to have a go at incorporating it into a design at some time… And I have! with an added drawstring.  I decided the drawstring was needed with this embroidered fabric, it felt kind of lacking without it.

gathered pocket

Fabric; a rather gorgeous fully embroidered Japanese silk/cotton, bought from the remnants table at Potters Textiles, years’ ago.  Probably about four years ago.   Fully embroidered with a floral motif, the background is very light and fine, quite sheer actually; so a full and voluminous design is just the ticket.  The yoke and bias cut ties on the pockets are ivory crepe from Fabulous Fabrics, cut from the leftovers of my studio faro dress.

floatytopback

Modifications; Shortened to be a blouse.  Also the front and back are supposed to be gathered into the yoke… I tend to steer clear of gathering.  Instead I folded the excess width into box pleats.  There are four at the front, evenly spaced and close to the centre front, and one in the centre of the back.  And I added those two gathered pockets at the sides.  I love the design of these; interesting and practical, and pretty too without being excessively twee, and they’re a little bit different from your average inseam pocket and patch pocket.  I think they add a certain visual “something” to the top that it needed.

I’m thinking of writing a tutorial to show how I made them…  coming soon  🙂

IMG_1263

stylish dress book DSC_2624burda7723-1

Details:

Blouse; based upon dress R from the Stylish Dress Book by Yoshiko Tsukiori, embroidered ivory silk/cotton
Shorts; Burda 7723, green cotton gingham, details here and my review of this pattern here
Thongs, made by me, details here

floatytop4

pinterestmail
Switch to mobile version
↓