Tag Archives: Wardrobe Refashion

a fabulous Mr Fox

Hello !  I’ve just finished making this cute little fox for Theo. And he has a nice little outfit too.  A reversible waistcoat and a pair of smart trousers, no less.   Quite dapper little chappy, no?


I was recently the lucky winner of the James Fox pattern from a giveaway run over on instagram by his designer Lisa of A Sewing Life, along with the patterns for his trousers and waistcoat.  So I thought since I made a bunny for Arthur not that long ago, I should make some sort of an animal for Theo too.

I couldn’t find any appropriately coloured felt in the shops here, so I ordered some.  I ended up getting some hand-dyed wool felt from Indigo Inspirations; this is the Rust colourway, and I ordered some plain white from the same shop at the same time, for his chest and the other white detailing.  His gloves and boots are dark chocolate brown cotton corduroy, leftover from my recently made brown skirt, originally from Tessuti, in Melbourne? I think?  It was a gift from Cassie..  Buttons are old stash.

I redid his nose several times until I was totally happy.  Faces can be tricky and I’m very happy with how his turned out in the end!

His trousers have POCKETS… oh my gosh how gorgeous is that?!  Of course I had to pose him with his paws shoved insouciantly down into them.  He looks exceptionally debonair like  so, in my humble opinion…

hide and seek…

He has fully articulated limbs, which make it lots of fun to pose him.  He doesn’t really stand up by himself very well; in fact he topples over at the drop of a hat.  I’m not sure if I overstuffed his head, making it too heavy? but I do know from experience that you have to stuff a doll’s head very firmly in order for it to look any good at all.  So I don’t know how the instability could be avoided?  Anyway, he props against a wall very well.

“paint me like one of your French girls…”

Achieving the aforementioned articulation was a little fiddly, because of the difficulty of manipulating a needle through two buttons inside half-stuffed arms and body, but it turned out ok in the end, I think.  My first go at stitching up the backs of his fully stuffed arms wasn’t very neat, and it’s an area that’s really on show on the finished fox. Before giving him away, I unpicked my previous stitching and carefully redid it to be a lot neater.

All his clothes are made from some of Craig’s old shirts; which I always keep for the buttons as well as for the (usually) beautiful quality fabrics.

I hope Theo enjoys his new fox, and I can’t wait to see him played with!  I wonder what his name will be?

pinterestmail

made some stuff…

thank you so much everyone; all your kind words about Sophie mean so much more to me than I can say…


just a few more pictures:

Now:

I really should blog about these few things that got made, in some cases, weeks ago!… and just for something a little bit different I’m just going to go with short and sweet, bullet point kind of blogging.  Ready set go!

Item 1!

  • a new raspberry pink skirt…
  • piece 9 in my #make12 capsule wardrobe from my stash challenge that I proposed at the beginning of the year, hurrah!
  • self-drafted
  • upholstery fabric from Spotlight stores, and the leftovers from my fibremood Heaven dress that I made previously here
  • I bought absolutely zero new things for this skirt!
  • huge pockets
  • fully lined!
  • added a nice bias bound finish to the bottom edge before hemming
  • used the same wine-coloured cotton to line the waistband
  • actually very pleased with the lining to invisible zip attachment this time
  • LOVE IT and already worn it several times
  • am thinking of making this into a pattern and writing an accompanying tute for how to do the zip this nicely!

Item 2!

new onesie for little Theo!

  • own design, the same one as this one
  • cute sloth cotton jersey from Piermont fabrics in San Francisco… I bought this when I was out shopping with Shams, Beth and Yoshimi, during Yoshimi’s and my joint trip to USA together.  Wow, I wonder if we will EVER travel overseas, ever again?!
  • I did the back opening a little differently from the last time, and it is not as good.  Definitely sticking to the way I previously from now on
  • nonetheless this is a HUGE success and both he and I (and Cassie) all love it!

Items 3 & 4

little T-shirt and pants for Arthur…

I used some of Tim’s old trousers for the pants… I actually love doing this recycling old clothes/fabrics sort of thing and really want to get back to doing this more again.

  • self-drafted pattern, using a pair of his rtw leggings to gauge the size needed
  • I added pockets! so cute …
  • to line the pockets and make a kind of facing for the faux fly, I cut pieces from an old purple shirt of Tims… recycling/reusing for the win, or what
  • T-shirt based on one of his currently well-fitting T-shirts.
  • white cotton jersey thrown out from Mum’s stash, when she did her big cleanout
  • I bought absolutely zero new things for this cute little outfit too!

That’s it for now!  I’ll be more talkative next time, I promise!  🙂


pinterestmail

Indian patchwork jacket

So, I made a jacket! the beauty of which is all due to the magnificent fabric.  Which has been recycled, and recycled again.  To explain…


… so many years ago, like fairly early on in our marriage I think; we bought a patchwork wall hanging at one of those stores that sells all sorts of random imported things, I’m pretty sure it was in Margaret River actually.  Definitely somewhere down south anyway.  We had it hanging on the wall for years.  I’ve always loved the beauty in each of its amazing little patches, each one I imagined was once part of a much loved and cherished sari once upon a time.  Lots of the patches were very fragile and there were missing and broken beads and sequins, and worn frayed patches everywhere.  The patchwork pieces were united by a sort of “hank” of red thread that wound its way through the patches,  dividing and bordering them all.  The red hank was bound to the piece by a fairly roughly stitched length of black cord.  The wall hanging was backed with plain red cotton, and the same stuff bordered the piece as a whole, roughly and loosely stitched on in HUGE stitches.

Side note that adds nothing to the sewing story but says something about Australia; several times during its time on the wall I took it down for dusting, only to discover large spiders, and nests of spiders hiding behind it.  Such is life here!  I would brush it down outside into the garden – never kill a spider! spot clean any little eggs off, and hang it up again.

At some point I got a little tired of it, and took it down, folded it carefully and stuck it in the linen cupboard.  I thought I’d hang it up again someday, but never did.  Every time I sorted through the linen cupboard I’d think, hmmm maybe I’ll turn it into a little jacket one day, then would I re-fold it and stick it back in.

Anyway, obviously and anti-climactically; that day finally came!  I got a copy of the FibreMood Molly jacket pattern, a boxy little thing with patch pockets.  The instructions assume you’re making a double layered jacket with the potential to be reversible, with the edges bound with bias binding for a perfectly reversible finish.

It was actually touch and go as to whether the pattern was going to fit onto the patchwork piece! I printed out the pattern, and taped extra pages to the back centreline, and also traced out another front, sleeve and pocket piece each, so I could lay the pieces down onto the patchwork piece to be absolutely sure.  After I’d removed the red border from the outer edge, I just managed to squeeze the pattern pieces out, with literally nothing to spare between the pieces for the most part!  Honestly I couldn’t believe it… it was like it was meant to be!   I know I probably say that a lot, because a lot of the time I will not cut out a thing until I’ve found a piece of fabric for it where there are basically NO leftovers, but this was the tightest pattern layout I’ve had in a long time… almost like the patchwork piece was made specifically for this pattern!

Cutting out was quite a challenge too… lots of the sari pieces were SO fragile that they had been literally glued to a piece of cloth underneath, for stability I suppose.  Which made it unforgivingly stiff and inflexible in spots.  Also, I had to temporarily remove beads etc. from some of the more heavily beaded bits just so I could cut, and later seam, the jacket together.  I also removed all the beads from the seam allowances and saved them, to stitch on later and fill some of the barer gaps where beads had been lost over the years.

For the bias bound edging, I started by piecing as much of the red backing as I could for the edging, and managed to bind the top of the pockets with this.  Once I’d joined the jacket though and got to the stage of edging the sleeves and long edge of the jacket, I realised it was going to be absolutely impossible to get together enough red leftovers from the scraps to do these too… so I found a length of dark red poplin from my stash and used this instead.  I considered unpicking the red from the top of the pockets and using the dark red poplin to edge these too, but decided I liked it just the way it was!  Perfectly imperfect!

For closure… obviously buttonholes were a complete impossibility, so I settled upon snaps.  I kinda feel like these do look a little jarring and incongruous, but hey, they’re fine for the moment.  If I’m feeling enthusiastic one of these days I might just remove them and add some bias fabric loops and small unobtrusive buttons inside the bias bound edge, which would probably look nicer.

Once I’d finished the jacket, I hand stitched on all the beads and sequins that I’d managed to save.

I’m so glad I managed to make something with this piece after all, and something that I think shows off the unique beauty of these precious scraps once again!


Details:

Jacket, Fibre Mood Molly jacket
Dress; Named patterns Inari tee dress, white cotton, details here

pinterestmail

stuff for Arthur…

those little pursed lips!!

So, Kelly had lent me one of Arthur’s onesies so I could make a better fitting pattern than the Burda one I’ve been using up until now… for some reason that pattern makes for a very short, wide onesie.  And I guess he could be a very tall, skinny baby?  Although I think the sizing could be a bit off, because he looks like a perfectly normal shaped baby to me?!

Anyway, my first go was using one of Tim’s old T-shirts, above.  To be honest, these are my favourites for babies, teenage T-shirts are so cool and so they of course make for very cool babies’ onesies too!  I used some of the details for the new onesie, even the little Rusty tag which I un-picked and re-stitched into the sleeve seam.  Cute!

Then I made him a new one using new fabric.

So, dilemma… The new one will be a lot more robust, because of being made of new fabric, obviously.  The ones made out of old T-shirts are a little fragile, since the T-shirt itself has been washed and worn, over and over and over by the time you’re refashioning this much-loved thing, with all its sentiment and memories, into a new thing for your much-loved baby.

The new onesie, though it’s going to be a “better”, has none of that, so it’s just not quite as cool or interesting.  I kinda love the refashioned ones the best, though you know they just can’t wear them with as much confidence in durability as the new.  Hmmm.  Anyway, he still looks cute in them both!

And, I have a reasonably good pattern now.  The clincher, which gives it a really great fit, is that gusset bit.  To make the neckline fit over his head, it is one of those open ones, where the front laps over the back at the shoulder, but is otherwise not stitched together.  It works really well.

Also, I’m looking forward to making Cassie’s baby some things out of the new pattern too.  When/If I get time!

pinterestmail

funsies with onesies

I’ve made another little onesie!  Looks a bit goth, you say??  well, there’s a story…  🙂

The sewcialists blog had this fun, little mini-challenge last weekend; you spun the wheel to get a colour and then you had the weekend to whip up something with your colour.  I spun and got:


I’m sorry to say I felt very uninspired at first, and just left it for a few days.  And yes, it did say you could spin again and again, in fact as many times as you like to get the colour you want! but that’s just not me… I’m a stick-with-what-you’ve-got, kind of a person, and spinning a second time would have felt like cheating.  Stubborn? oh yes, but you know, gotta own what you are!

Then it occurred to me… make something else for the new baby!!  Now if that’s not a fun motivation I don’t know what is!!  So, you know I’ve got a huge bag of the family’s old clothes that are still very good quality fabric, and I fished out this old T-shirt of Tim’s…

I had this idea he might like for his new baby to have a little something of Dad’s when he gets here… pretty cute idea, huh?  Well, I thought so.  🙂  No sooner did I post a picture on instagram, than Tim sent me this one picture of himself wearing the T-shirt.  The grim-looking persona here is all an act, honestly; he’d dressed as a rocker for a dress-up party, haha.

Pattern; I again used the pattern Tim and Kelly had given me; Burda 9434, the 1 month size, except this time I cut the front as one piece, so as to maintain the cool tree/crows motif on the front of the T-shirt; and put 3 snaps in the crotch for closure.

I also made the little ivory beanie; using part of an old dress of Cassie’s.  No picture of that one in its original condition sadly; and it’s already been cut up in the past for a heap for other things; in any case, this is totally a very recycled and eco-friendly outfit for the new bub!

Just some boring construction thoughts:  I did have to cut and piece a little bit near one shoulder, because for some reason the motif had been placed super high on the T-shirt; so close to the neckline edging that you couldn’t possibly cut out the narrow baby onesie piece AND keep the motif intact otherwise.  You’d think the manufacturer’s would consider that people might want to cut out a baby onesie when they print their T-shirts, wouldn’t you; sheesh.  So inconsiderate!  Really, in retrospect I should have pieced BOTH shoulder pieces, which would have centred the motif better, but oh well; you live and learn.  I think it’s super cute, and honestly, I can hardly wait for Tim to be holding his new baby wearing this onesie! seems like full circle, you know?  That is; the baby wearing the onesie, not Tim, obviously!

addendum; aaaaaaaaand, I’ve just finished another shortie onesie… and matching beanie. Reason number one; Kelly and Tim really did buy SO MUCH of this fabric! and reason number two; because I’ve made a salient discovery; you can never actually get tired of making baby onesies.

So, the beanie matches the very first “long-ie” onesie I made, obviously, because it’s from the same fabric; and this onesie also matches the above, ivory beanie; because I used the ivory fabric for the binding… I stitched on miniature sew-on press-studs for the closure on this one because I’ve always had a love-hate relationship with the hammer-in ones, and am currently residing in the hate phase…

pinterestmail

box of socks; the June edition. plus a bag!

Pair of no-frills socks, but look at those pretty stripes!  LOVE those bright pastels!!  Making these has dutifully used up some more of the leftovers from my advent jumper, from the Dingo Dyeworks advent calendar of last year…  pretty cute and frugal, huh? *self-back-pat*  and this yarn is so soft and divinely snuggly.

the box of socks is looking quite colourful!

Oh! and I also ran up a little bag, specifically for my sock knitting.  I’ve been using my pink bum bag for this purpose ever since Japan, which was… fine, I guess, but still not ideal.  It wasn’t really big enough, for one thing, and had zero pockets.  Hmmm, yes; ordinarily a zero-pocket bag would have its days very much numbered, except that I’m kinda sentimental about it since Mum and Dad gave it to me when I was quite a young teenager and it’s always been … well, one of those forever things, you know??  Anyway, I digress…  What I really wanted for my knitting bag was one identical to the one I made for Mum, blogged here.  So I rummaged through the old clothing chuck-out bag and came out with a pair of old chinos that I used to wear when the kids were really little. Haven’t worn them in decades and don’t really know why I kept these hideous things but probably for the usual reason, that the fabric would come in handy some day.

The new bag is terrible really; slapdash, ugly, just thrown together in a very uncaring way.  But man, it was so much fun to do a bit of rough, random, whatever sewing!  Quite a therapeutic project, in fact!   And/or cathartic!  Slicing, dicing and cutting on the fly, drawing straight onto the fabric, machine-stitching rather wildly, minimal measuring, if any.   FELT SO GOOD.  THIS HOUSE, IS CLEAN!!!

I used the back of the chinos, and gave the bag a “bottom”, so it can stand up by itself.  It is self-lined, using more of the same fabric from a leg of the chinos, and has five pockets including the two outside patch pockets with buttoned flaps, that were originally in situ on the seat of the chinos.  Inside, I stitched two new, rectangular open patch pockets to the lining, as well as the tiny and rather adorable coin pocket that I painstakingly unpicked from the chinos just because it was so super cute.

I slipped a few coins in there for … I dunno, just in case

The other pockets hold my kindy scissors, my notebook and pen, a wool needle, and my personal, basic knitting pattern.  Which is near-identical to the Patons one I’ve been using for years, but has one or two mods that I’ve developed along the way to make my own idea of the perfect sock.  Actually I recently re-typed it all into a new word document so I can print it out for myself any time, and now I no longer have to decipher the old photocopied one from the Patons pamphlet that is almost falling to bits from un-folding and re-folding, and has multiple crossing-outs and arrows and modifications and notes scribbled chaotically in the margins and on the back.  Hurrah!

The inside waistband of my old chinos had  a rather nice bias bound strip finishing, so I kept this and used it to edge the, also recycled zip for the bag,  Goodness knows why I once went to the trouble of ripping out and stowing away an old zip just in case, but hey.  I did indeed find a use for it in the end!

So, cute bag? or piece of trash?  completely rhetorical questions btw since I know that; yes it is a pretty rubbishy sort of a thing!  It’s nowhere near as nice as the one I made for Mum, which I did measure out, cut carefully, and sew somewhat meticulously, and also had really nice fabric going for it.  But it only cost me some thread and half a day, and it will do for now.  And I had a lot of fun making it!  Maybe I’ll treat myself to a proper one, one of these days.

couldn’t resist taking a picture showing my ever-present companion, wondering what the heck I’m doing…

pinterestmail

a celestial dress, and some other things

So, I made a dress… or something?!  I’m not 100% sure about this one.  Is it a dress? or a nightie? or maybe a choirboy/celestial angel robe?  The jury is out!

One thing I am sure of is that it’s delightfully floaty and breezy to wear.  And very comfortable.  Another thing I’m sure of is that on its own it’s scandalously see-through… ! so if I’m going to wear it out of the house it requires at least a petticoat or something.  Fortunately, I made a beautiful Ruby slip once upon a time, a few years ago, from ivory crepe.  I actually wear this slip TONNES, and once again it’s come to my rescue.  Thank you Ruby slip!  maybe I should make some sisters for you!  Take the pressure off!

The pattern I used for the new dress is dress R from the Stylish Dress Book by Yoshiko Tsukiori, and the fabric is a lovely ivory/cream coloured micro-pleated silky stuff from Fabulous Fabrics.  For the yoke, which needs to be more stable and “solid”, I used a small scrap of old jeans, leftovers from the small stack that have previously been harvested to produce this dress and these jeans too.  To keep up with the recycled jeans vibe, I added double rows of topstitching to all the joins etc, using the same coppery-brown Guttermann’s upholstery thread that I’ve used on previous jeans like my beloved Morgan boyfriends.  The yoke lining is the striped shirting cotton that I used for Sandi’s Perth blouse and for Ms Summer’s summer frock.

I’m also wearing with it my matching denim shoes, also made from old jeans #oldjeansfanfromwayback

oh hey gorgeous girl!

I actually had quite a bit of leftover of the pleated silky stuff, so at the same time I traced out the size 8 of the same pattern and whipped up a quick top for Cassie too.

looks a bit small here but it’s far more oversized on my petite little daughter

Actually, this top started out as a dress too, but surprisingly she wasn’t into it as a dress.  I’d gone to great lengths to find a piece of matching cream-coloured fabric for the yoke for hers, and was very pleased to unearth an old cushion cover of a really nice cream coloured cotton damask from my stash.  Normally, Cassie prefers, nay demands! cream- or ivory-coloured tops, so I was a little nonplussed when she suggested the yoke be dyed!  Who is this person and what have you done with my daughter?!  However I could appreciate that the all cream number as a dress was a little, um choirboy, thus the snap decision to lop off the bottom to make it a top.  Fortunately she was satisfied!


Soooo, what else have I been up to?  Well, my friend L had requested that I whip up a simple little dress for her, a replica and replacement for a favourite that had worn out.  She bought the green floral from Fabulous fabric, and I found some black silk for the tie.  I really enjoyed making this for her, though the silk I used for the tie was, no joke, the worst stuff I’ve dealt with for a looooong time.  It was so hideously fray-tastic, and just that little bit too grippy to slide right side out very easily.  It took me almost as much time to turn out the tie as it did to draft the dress pattern and make it up!  Exaggerating?  not by much!

I don’t have a picture of her wearing it, but she did have it on for one of our recent morning teas and she looked gorgeous!

again, looks way better on L…

What else have I been up to??

Well, I’ve been wanting to do this for a while…. my pale grey Acton dress has been worn a lot, but I’d been starting to eye it lately with a jaded, “meh” eye.  SO I took the plunge.  Or, I should say, my dress did.  In to the dye-pot it goes!  Et voila!!  Now I’m newly enamoured with it all over again!  It’s just like having a new dress!!  It’s interesting to me how the different components either took or didn’t take, the dye… For instance, the linen shell of course took up the dye superbly, but the grosgrain ribbon shoulder straps did not.   The zip pull even took on a shade of pink, but the zip itself; well, zip.  The body part of the lining dyed up very intensely, but the bodice part did not!

who is that short-haired doggie?!!   she loves her new summer ‘do!!

Is that all?  Finally, I believe it is!

pinterestmail

a knitting project bag

It’s sometimes quite difficult to think of gifts for Mum because she will say, without fail; please DON’T GET ME ANYTHING FOR MY BIRTHDAY.  But… I have to think of something!!!  Besides the fact that she’d probably be little bit upset if I actually did give her nothing, haha  😉

Mum is always knitting, and she’s still particularly keen on knitting socks… whenever she comes up to stay she brings her knitting, usually stuffed in some flimsy plastic shopping bag; and works on it pretty solidly, at all hours of the day or night.  And inevitably, she will ask to borrow my scissors and a wool needle… btw, I don’t mind at all hunting these things out for her, but really it would be so much better if she had them with her and at hand already.

Lightbulb moment… Mum was in urgent need of a knitting project bag!!

It’s only recently I even became aware that knitting project bags were a thing, after I discovered a few knitting podcasts on youtube… where knitting project bags are an absolute must have!  I’m a bit embarrassed to admit that my own knitting bag is just a daggy old, small shop tote thing, that shops put your purchases into… it can be seen in this post here.  It’s not very good, and Mum’s isn’t any better.

I perused Le Stash, and my hand fell on some lovely garden-green raw silk, mainly because I knew I had a matching zip in my zip stash already too.  The green silk turned out to be a pair of trousers, that Mum herself had originally give to me to use for fabric sometime.  She’d originally bought them in Italy, while on holiday, and got many years of good use out of them.  It occurred to me I could make a really good little project bag, utilising the trousers’ existing welt pockets and waistband…  bonus that this lovely fabric is boomeranging its way back to Mum in a new, and newly useful form.  Full circle! I selected some brushed tartan cotton for the bags’s lining, and inserted a new zip underneath the waistband facing inside, along with a wrist strap, so she can have the bag hanging from her wrist and still knit from it.  I think the really interesting thing about the bag though is the accessories; I added three little tabs inside, two with swivel clips, to which I attached a pair of scissors, and a pack of wool needles, and the third has a D-ring to which I’ve sewn a tape measure.  I left the original back welt pockets intact on the outside (above), so she can tuck small extra things into those pockets, things she might not want to go rattling around the inside of the bag.

I think she will have everything she needs!

I wrote a little tutorial, in case anyone reading this wishes to have a go at a similar refashion for themselves.  It’s a very useful thing for a knitter, whether for yourself or a gift for someone else, it’s easy and kinda fun to make, and I think it turned out quite cute too! In fact I would really like one for myself!

I used:

a pair of trousers with a waistband,
piece of brushed cotton for lining (around 52cm x 25cm),
stiff interfacing (52cm x 25cm)
30cm zip
2x 13mm swivel clips
1x 20mm D-ring

Extra accessories to finish; a tape measure, pair of scissors, pack of wool needles

To start with, unpick the side seams of your trousers, and cut out the seat.  Cut the waistband off at the side seams too, allowing the same seam allowance as the side seams.  Note; I then trimmed down my piece to about 52cm x 25cm (inc waistband) which made a bag with a finished measurement of approximately 20x20cm, and with a base of 20cmx8cm.

If your trousers have welt, or other pockets, that’s a bonus!  Cut a piece of lining fabric the same size and shape, using the trouser piece as a template.  If the fabric is on the floppy side, apply stiff fusible interfacing to the lining, and if your interfacing is anything like as unreliable as mine, it’s a good idea to stitch/quilt the interfacing and lining together to be sure they stay together as one layer.

Unpick and open out the lower edge of the waistband facing, and stitch up the side seams, including the waistband and waistband facing, in one continuous seam.  Stitch the lower bottom seam.  Likewise, stitch the side seam/s and bottom seam of the lining.

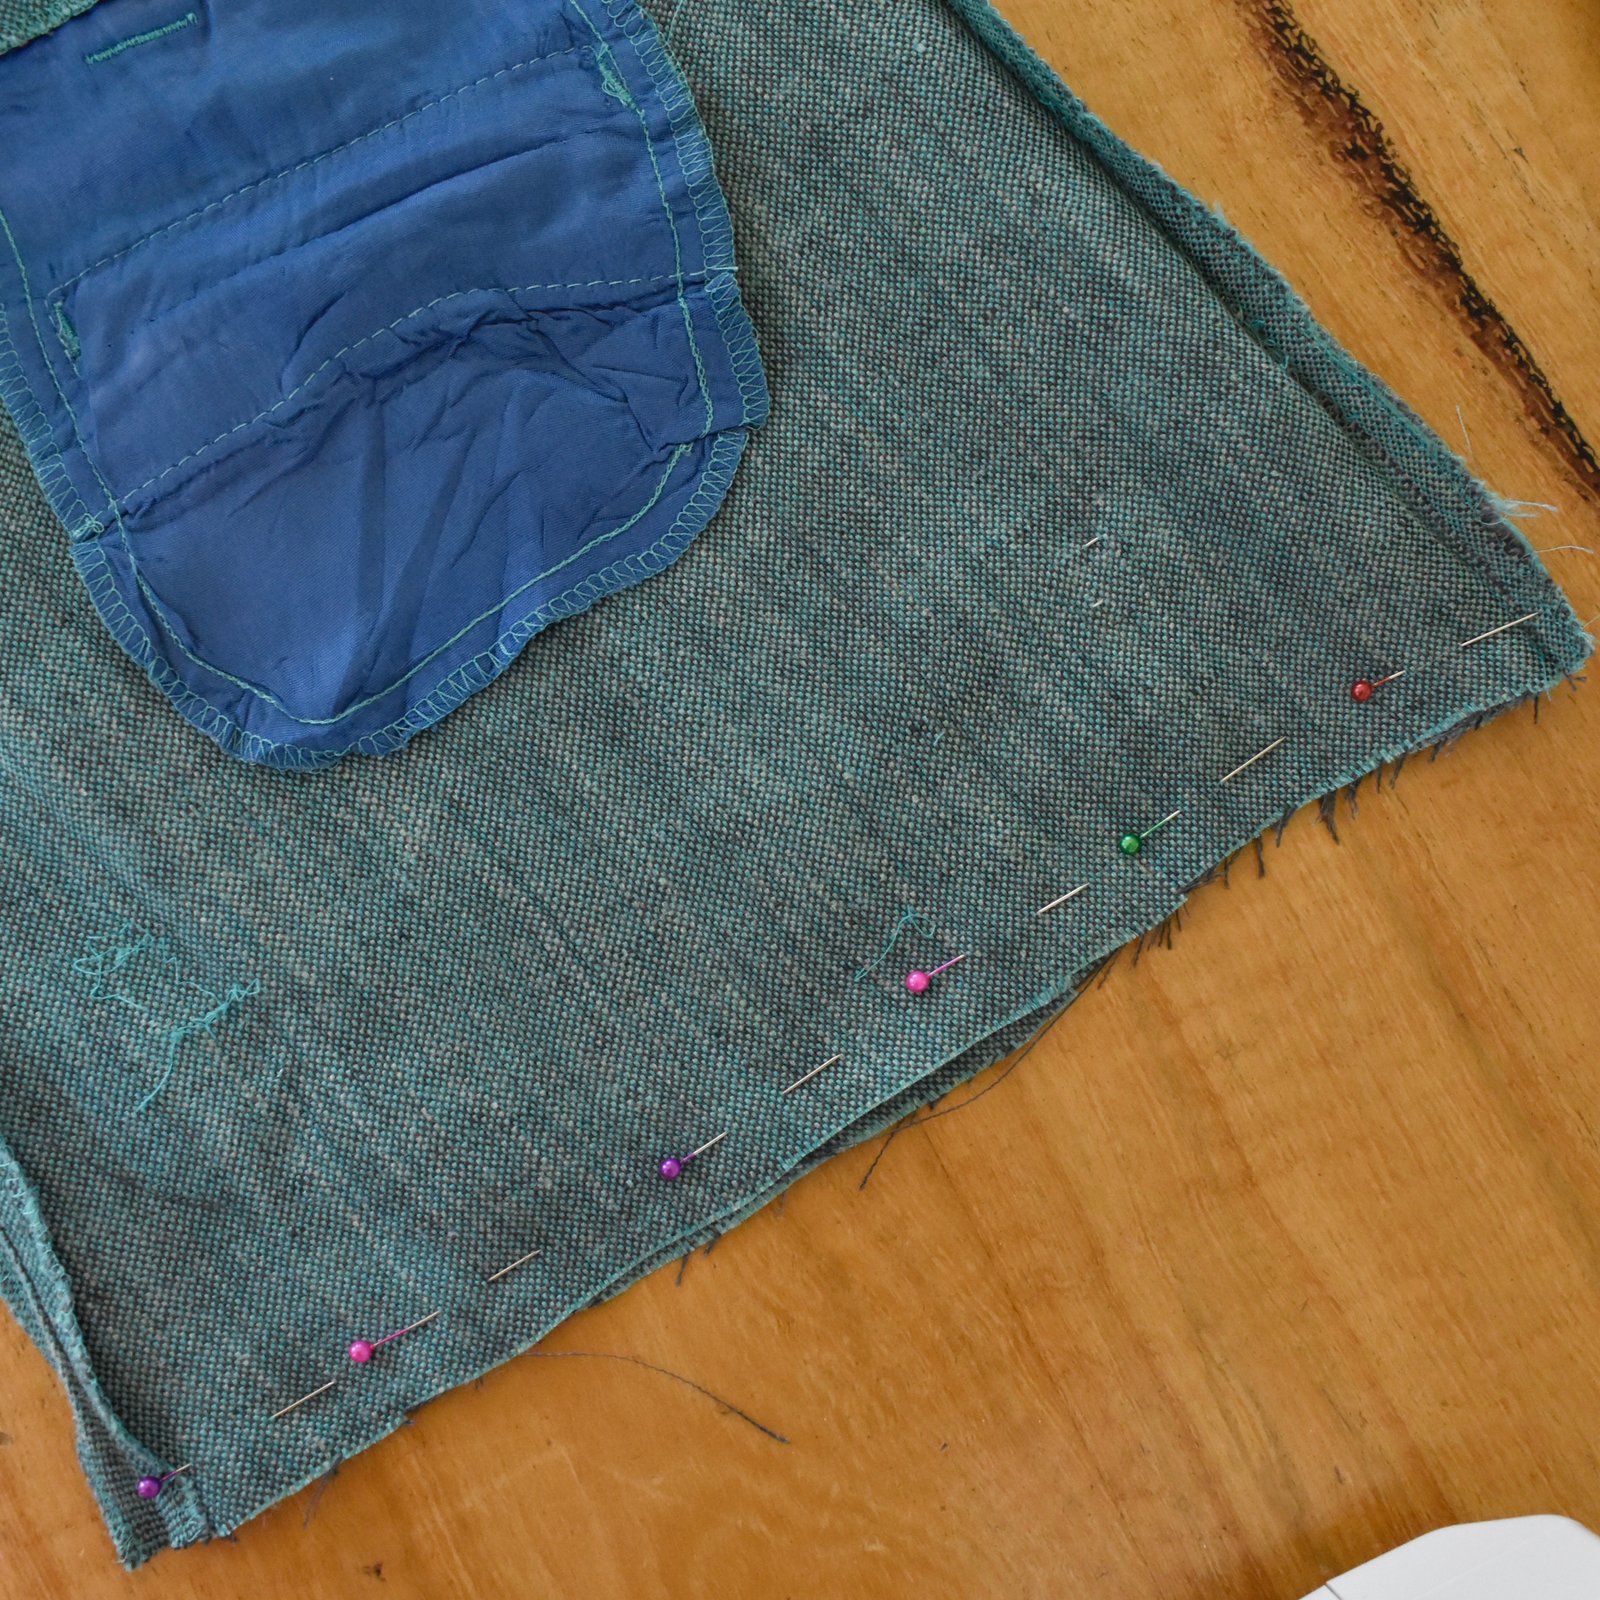
Determine the desired width of the bag bottom… this should be at least equivalent to, or even a bit wider than the bag opening.  I made mine 20cm.  Measure this length along the bottom edge of the bag, centred so that the excess on each side is the same.   Bring the side seam and bottom edge seam to meet, right sides together, and pin.  Determine the side edges of the base of the bag, by marking two straight lines at the end points of the bag base, perpendicular to the bottom seam.  (shown on the bag lining, below) Measure each carefully to ensure they are going to be the same length, if there are differences then adjust and re-mark until they  are equivalent.  Mine are 8cm long from pin to pin.

Stitch.  Construct the lining bag to be exactly the same.  Trim off the corners.  Pin the bag and bag lining together along the bottom side edges, wrong sides together, and stitch together along the previous stitching, ie. the short side edges of the base of the bag.

Turn the bag right sides out, so the lining bag sits inside the outer bag, attached at the base but not yet attached at the top.  You can optionally stitch the bag and bag lining together along the long bottom seam as well, however I found this to be quite fiddly…

Make the wrist strap and tabs for the bag’s accessories to hang off…  my
dimensions are:

strip 1: 8cm x 37cm
strip 2: 4cm x 10cm

Construct each as follows: fold strips in half lengthwise and press, open out and fold both raw edges in to meet the pressed centre line, press.  Fold the strip in half along the first fold line and press, topstitch close to each long edge of the strip.

Cut the narrower strip in half, giving two 5cm strips. Thread each through the closed top of a swivel clip, and baste raw edges together.   Cut 5cm off one end of the first, wider strip for the tape measure tab, thread this piece through a D-ring, baste.  Stitch the tape measure onto the D-clip.  The remainder of the wider strip will be used for the wrist strap.

Bag: open up the remainder of the waistband facing away from the waistband.  Pin the ends of the wrist strap to the waist band facing adjacent to either side of one side seam, baste in position close to the raw edge.  Take the zip, and pin each side of the zip to the waistband facing, aligning the top and bottom ends of the zip with the side seams of the bag, and ensuring the opening end of the zip is adjacent to the wrist strap, and with wrist straps folded back against the waistband facing; topstitch zips in place, stitching over the wrist straps.  Leave a gap of 1.5cm each side at the bottom end of the zip to enable the end to sit on the outside.  Trim the zip, leaving a 2-3cm tail.  Cut a small square of fabric and use it to wrap and enclose the trimmed bottom edge of the zip; fold, pin, and stitch it in place.

Open the zip; take the three previously made tabs with swivel clips and D-ring attached and pin them around the top of the lining bag, raw edges even, right sides together, and with the swivel clips/D-ring hanging down inside the lining bag.  Fold down the waistband facing enclosing the raw edge of the lining bag and top edges of the accessories tabs inside the old waistband.  Pin waistband facing back to its old position on the original waistband of the trousers.  Ensure the upper ends of the zip tape are tucked up inside the waistband, also check you are happy with the position of the tabs with swivel clips/D-ring before stitching the old waistband facing back in place.  This can be a little fiddly around the top and lower edge of the zip, but just take care and stitch as far as possible.

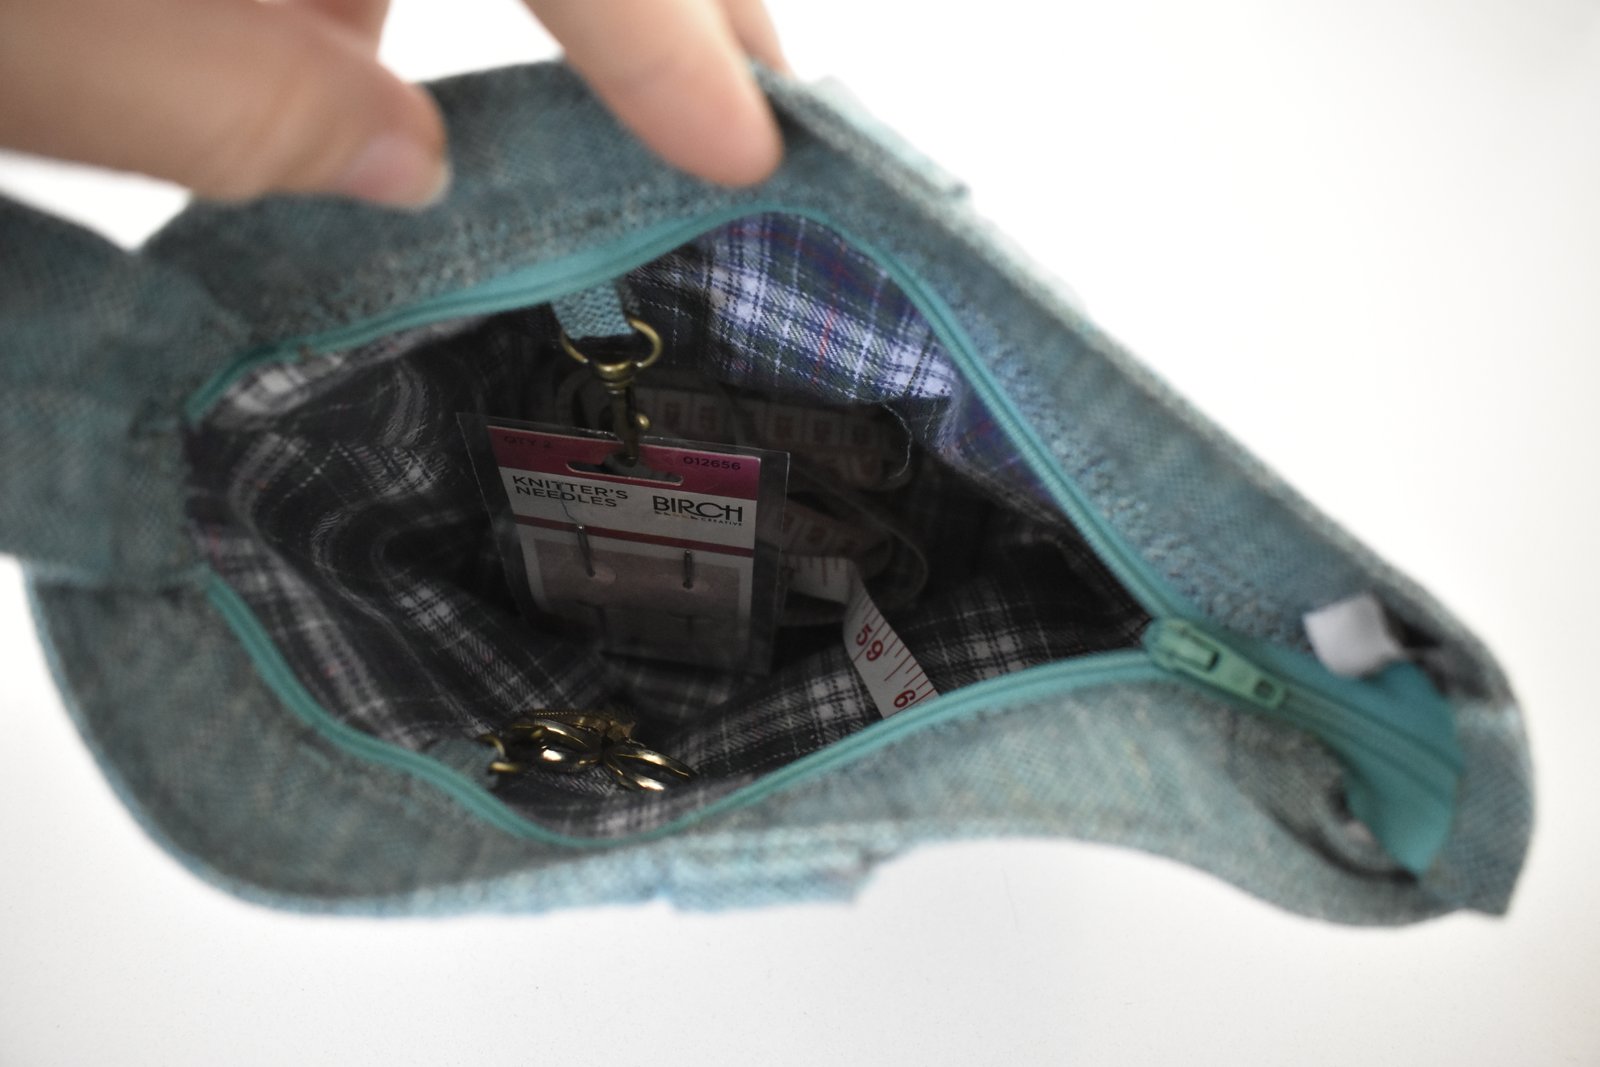
The final step is to clip a small packet of wool needles and pair of scissors to the swivel clips.

Aaaand, done!!!  Now, I really really want to make one for myself too!


pinterestmail
Switch to mobile version
↓