Tag Archives: Wardrobe Refashion

jenny overalls/jeans/trousers

I’ve made some rather cra-a-a-a-zy, and yet rather out-there groovy-baby jeans!

And they double up as overalls too! should I ever feel the urge to wear a pair of overalls… 🙂  Sneaky conversion between the two by way of a few flat buttons inside the waistband coupled with buttonholes on the bib and straps…  #havingmycakeandeatingittoo

So, these are the Jenny overalls/trousers pattern by the ever clever and uber-cool Heather of Closet Case patterns.  Actually I made TWO pairs of Jennys!… but first things first; this blue denim pair are my first.  To be honest I don’t know if I’m ever going to blog my second pair because I’m suffering from a retroactive hate for the fabric I used… but we’ll see! Heather asked for us to make them with the bib if at all possible, since she wanted to check out how the bib bit looked on chests.  So I bravely went there.  Initially I was pretty sure I would prefer to wear them as jeans, but now I’m actually a bit torn since the bib bit is rather cute?!  I’m just not sure if I’m “cute” enough to get away with it, you know?  I think I have a good grasp on what my style is, and “cute” is likely a stretch for me.  I’m keeping my options open, but so far I’ve only worn them out in the wild sans bib #notbrave

The upper part of the legs I cut from a piece of blue cotton denim that was given to me by my friend L when she cleaned out her garage, but it was a smallish piece, not big enough for the whole jeans.  So obviously, I had to make up the difference somehow.  Remember my maisa jean jacket?  well I actually kept all those leftover bits, most of them were the original pockets and waistbands; and I had great fun cutting and arranging and cobbling them together to make up the diff…  all that patchwork does make the legs a little heavy, because of the double layers of fabric in the pocket buts, plus embroidery and rivets and belt loops, but overall (haha, see what I did there) it’s not too bad!  My love of how they look outweighs the weight… if that actually makes sense!

I’ve worn them a couple of times already, whoops!  It’s not that long ago I would not allow myself to wear things until I’d blogged them; must be mellowing out in my old age, hmmm.  They’ve actually attracted several individual, real-life compliments from random passers-by on both occasions… this is extremely rare for me, and it’s pretty nice to hear!

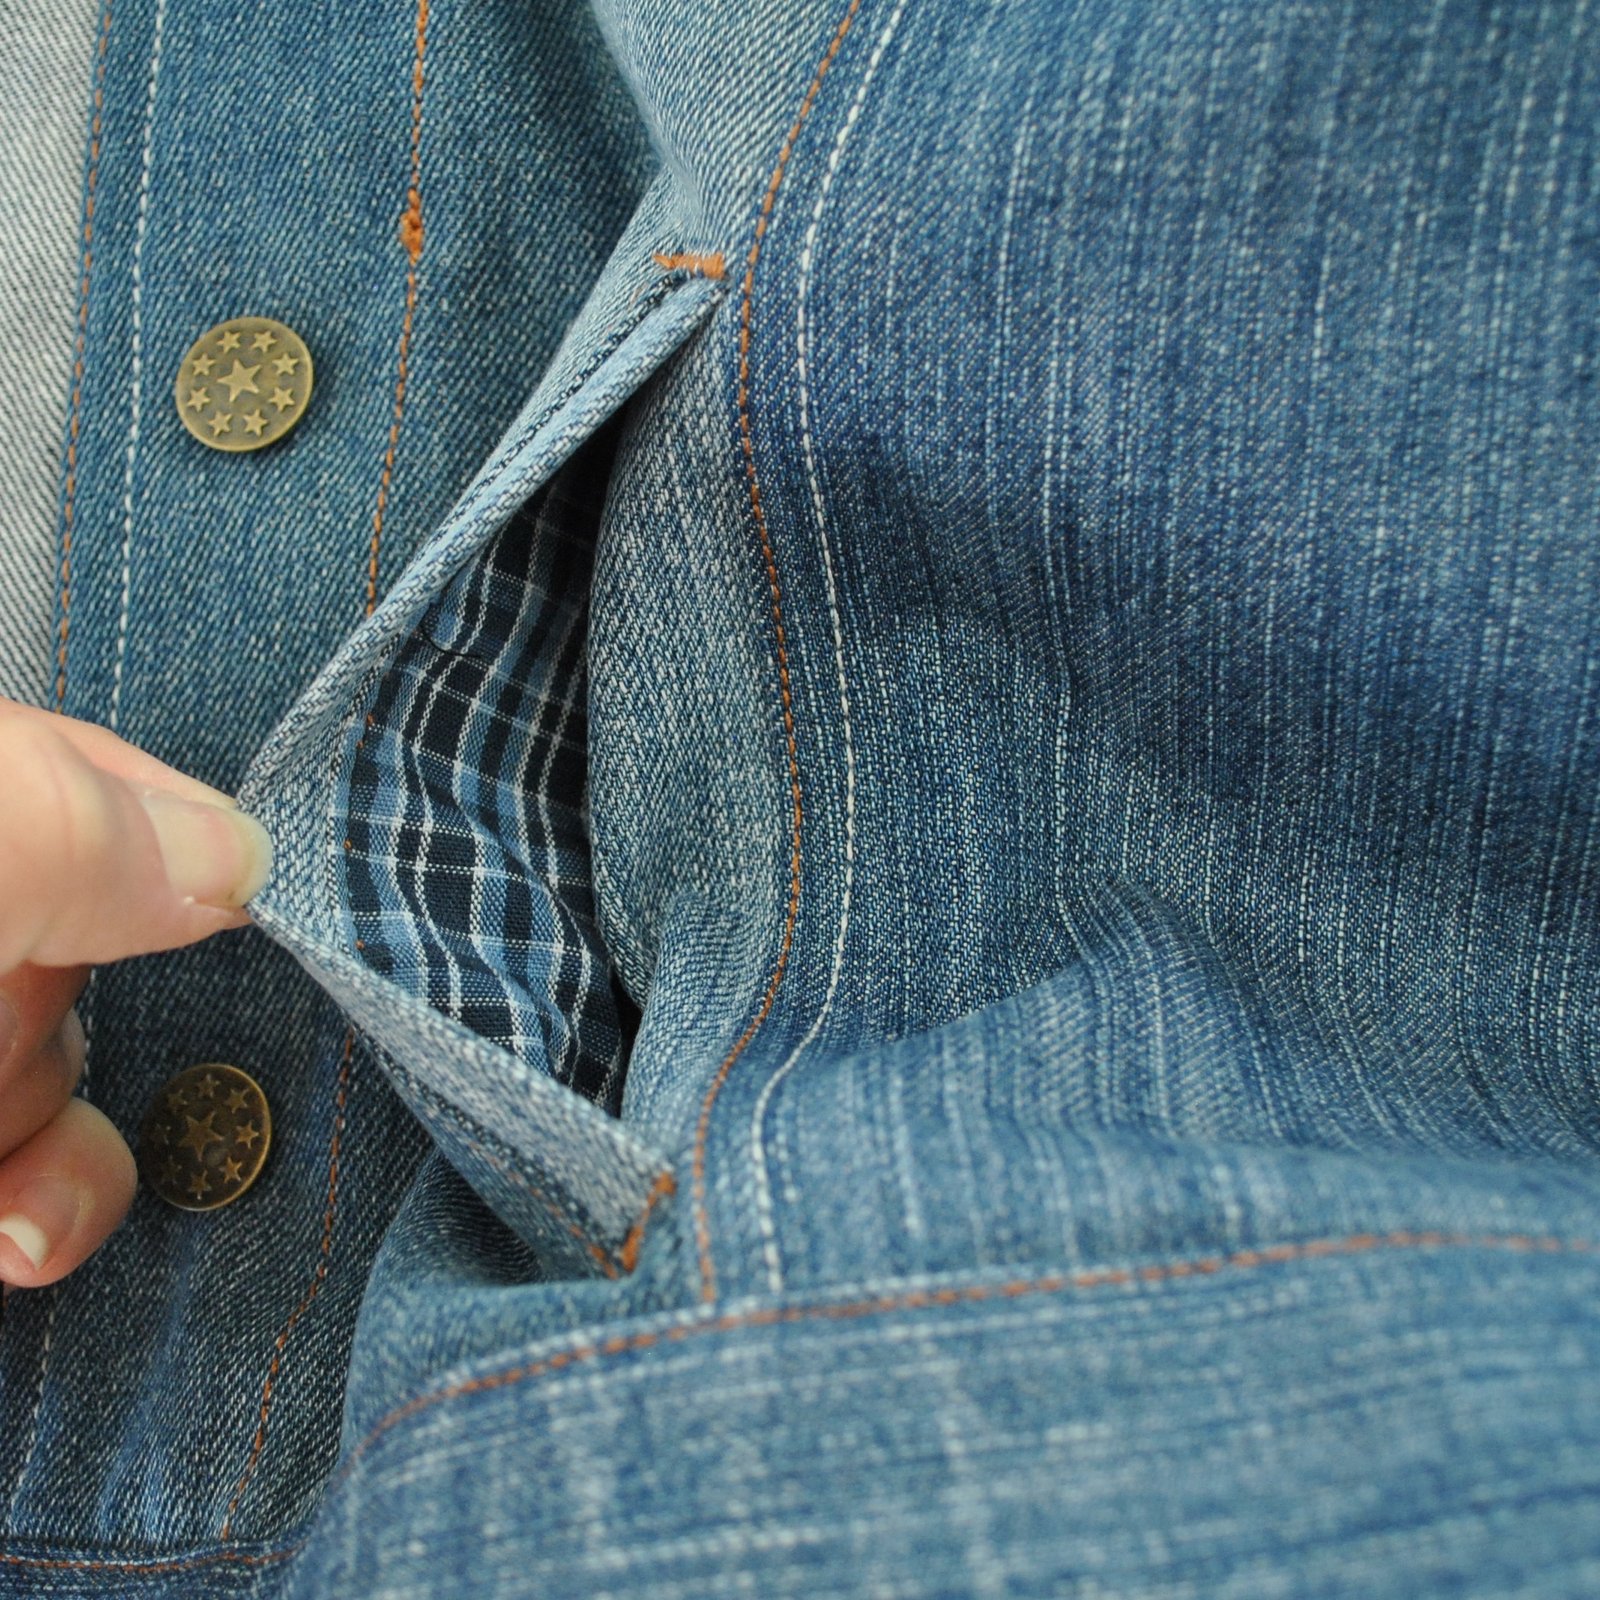
In the below picture you can see the closure; a lapped zip in the side seam and disappearing inside the pocket.  I really love this discreet and clever feature, although being right-handed I find it a little awkward to do up that waistband button situated where it is slightly to the back of the right side of my body.  On subsequent pairs I think I’ll probably switch this closure to the left side of the trousers.  Having said that though, the instructions for inserting the lapped zip are outstanding!  I’ve inserted about a million lapped zips in my time, to the point where I barely follow instructions anymore, however I followed these ones to the letter, without “thinking about it” (you know what I mean) and my lapped zip is immaculately and perfectly aligned.  I should follow directions more often!


Details:

Jeans/overalls; the Jenny overalls by Closet Case patterns, cotton denim and recycled old denim jeans
Tee; the Nettie by Closet Case patterns, white jersey, details here
Cardigans; both the Miette, a free pattern by Andi Satterlund, details of the red one here, the mustard one here
Shoes; made by me, details here

Soooo; I usually like to get at least one ” out in the wild and actually wearing it” photo of the things I make… well, the little monster, I mean; Clara, and I were waiting for Craig to finish scoping out Bunnings (baby door for the patio at the beach house)  and on the spur of the moment I just propped my iPhone up in the grass outside.  Bam, photoshoot, DONE!!!  Who needs a fancy camera and a tripod, anyway?!  Oh, OK, if I’m going to even pretend to be a blogger then I guess I gotta keep up appearances, at least some of the time…  😉   Anyway it’s not a particularly good shot of my jeans, more like flipping’ terrible; but on the other hand Clara happens to be looking rather beautiful in a wolf-prowl-y sort of a way…  Please admire that her coat is looking momentarily spiffy and fluffy and washed and brushed!   #didntlast

btw, people often accuse her of giving side eye in my pictures.. it’s only because her eyes are actually half blue, half brown! which makes for a particularly side-eye-y sort of optical illusion!

SaveSave

SaveSave

SaveSave

SaveSave

SaveSave

SaveSave

SaveSave

SaveSave

SaveSave

SaveSave

pinterestmail

high heeled black oxfords (shoes), plus some other stuff

I’ve made some new shoes!

These have had a bit of a journey in the making, with a gap of about five months in the middle of it when I did absolutely nothing to them!  Several things; feeling torn as to the colour I’d chosen, as well as a little overwhelmed with the thought of actually finishing them, when it was actually all pretty quick and simple and painless once I got over that…

So obviously, they’re black.  However! my original plan back in December of last year was to make some two-tone saddle shoes.  I cut out my pieces using the same beige upholstery suede that these shoes are made in, and dyed the pieces respectively caramel brown and “black”, though the latter turned out to be more of a deep charcoal really.

I thought the combo would be pretty cool… but once I’d formed them on the lasts and it came time to sole and add heels, I was starting to go off the saddle idea already.

I already suspected that what I really wanted was for some plain black heeled oxfords in my shoe collection… but it was summer at the time, too hot for winter shoes to be a tempting project anyway, and truthfully?   Christmas had exhausted me a bit and it just all seemed too hard, so I just chucked the half-made shoes into a drawer and basically didn’t touch them again for the next five months…

Fastforward to last week; winter has started to creep in with cold, probing tentacles, and with it the need for warm shoes.  I got the half-made saddles out of the drawer where they’d lain, idle and ignored, and re-assessed.  Carving the heels was the next step, that had been such a stumbling block to me, and really? it’s not that hard of a one.  I bought some wood from Bunnings, got Craig to help me set up the sander on the triton, and sanded myself some heels… hilariously to me, after all that procrastination it took about an hour, tops!  Soled my shoes, glued and nailed on the heels.

oh hey Clara!! and NO, lovely girl…. these are NOT for eating!

I painted the heels with a coat of black satin enamel paint.  I probably should have just painted the whole shoes themselves at this point too, but I still had that tiny shred of uncertainty that I might still want saddles …?  but nope.  Seeing the heels painted a beautiful pure black made the dyed suede look quite muddily unattractive, banishing all doubt.   I went right ahead and did a few more coats taking in the whole shoe, using the same black enamel paint.  Bunged in a foam insert, covered with the same chocolate brown suedette that I’d used to line the uppers, and FINALLY FINITO.

I’ve worn them four days straight already!  A coupla times they’ve got drenched in the pouring rain… in the past this would have filled me with horror but nowadays I have more confidence in the strength and durability, and importantly the waterproof-ness of my shoes! and of course they’ve held up beautifully.   Seriously, I’m totally chuffed! could not be any happier with them!!

Having said that, well of course theoretically I could actually be happier… they’re not perfect and I can certainly see little bits that I could have done better.  But with each and every pair of shoes I really do feel like I’m improving – to see my shoe-making journey, it’s all here under the tag “shoes” – and these ones are very satisfying to me.  They are exactly what I want to wear right now!

This is how I wore them for their maiden voyage… out to lunch on Friday with my friend J, and then later on to book club with a larger group of my friends… I felt pretty cool and chic!  No one asked me if I’d made my shoes! which means any one of three things; they look OK enough to pass for rtw (yay!) or SO bad that people are just too embarrassed to say anything (not-so yay).  The third and most likely option is that no one actually noticed them.  I’m ok with that option, to be honest  😉

Details:

Dress; V1351, floral chiffon, details here
Cardigan; the Miette, a free pattern by Andi Satterlund, all details here
Tights; my own pattern, details here, and my tutorial for making your own custom-fit tights pattern is here
Shoes… MADE BY ME!!!!!

SO, while I’m here and writing stuff… I’ve been making some other things lately too, that I haven’t got around to mentioning so far.

I discovered this pattern for little sockettes that you wear with ballerina flats; the Sytt & Prytt Florens Ballerina Socks, designed by Lena Lundvall.  I found this through a mention from someone doing me-made May on instagram, though for the life of me I cannot remember who it was.. so if that person is reading this then I’m sorry not to give credit!  Anyway, I looked up the Sytt & Prytt Etsy shop and bought the pattern.


This blue pair is made up exactly to the pattern; my toes are covered… JUST

It’s a super quick and extremely easy thing to make, though I altered the pattern somewhat to make them exactly what I wanted…  specifically, the socks as they are quite “skimpy”.  To be fair, I think this coverage is perfectly adequate if you’re wearing them with ballet flats, which is totally what they are designed for.  However, for me personally, I’m really so not a ballet flat person, and I wanted to wear them with my oxford shoes, that have higher sides and cover the top of my foot too, and so I wanted my sockettes to have more foot coverage too.

I wanted EXTRAAAA!!!

Adding on a good inch nearly all the way around and reducing the elastic length gave me this!  much better suited to the kind of shoes I wear.

my white oxford shoes, blogged here

I made nine pairs overall, including my trials runs, which I’m still going to wear, ‘cos it’s not like anyone can see the less-than wonderful ones in situ.  With the exception of the white ones, which is fresh fabric, the others are all made from old Tshirts.

Thanks for helping me with my pictures, Clara!! xxx

And finally… !

I made a toiletries bag for a friend for her birthday, using the dopp kit pattern from the Grainline Portside Travel set… I’ve made quite  a few of these, see my previous versions here.  The cool crackle print is cotton canvas hand painted in Zambia, I bought it at the Fabric Store in Melbourne during my holiday there with Mum and Cassie, and made a skirt for Cassie for Christmas.  This is the very last of it!

I lined it fully with plastic waterproof stuff from Spotlight, and made little zip pulls for fun, using beads and earring wires leftover from my jewellery making days.  I think it turned out pretty cute, and my friend professed herself very happy with it too  🙂

SaveSave

SaveSave

SaveSave

SaveSave

SaveSave

SaveSave

SaveSave

SaveSave

pinterestmail

I made some stuff…

So, what are the latest whatevers to wing their way out of the atelier, hmmm?  Well, I’ve been making LOADS of things, just nothing much to show for it, as yet.  Remember I mentioned I was making a pattern?  Well, making a pattern comes with making a truckload of muslins, of course.  I’ve actually made 13 dresses in the last month alone, albeit they’re made from old sheets and are a bit rough, but still.  Am I going to count these in my “one refashion a month” resolution? no, that wouldn’t be fair.  How’s the pattern coming along? swimmingly! which is fab… I’m almost at the testing phase, I will be incredibly happy to get there after 8 months of preparation.  8 MONTHS!

In more tangible making results, I made a little romper for Sarah’s new little boy…  Sarah LOVES stripes, so the descent into stripe-matching madness struck once again.  I used Butterick 6372, which I’ve made twice previously, and just altered it slightly to be a romper, and added that cute little pocket.  Would you believe I re-did that little pocket THREE flipping times??  First I made a curved bottom pocket, which was pretty awful, followed by a flat bottomed pocket.  Equally awful.  I do really like the pointed bottom pocket though, I think it’s super cute.  It’s my favourite part about the whole romper actually!

The striped cotton terry is from Spotlight, hopefully the last piece of fabric I will buy this year, given Project Stash Reduction is a goal this year.  The red cuffs and pockets were culled from a Wildcats Tshirt from my refashioning pile.  Thus partially fulfilling my once-a-month refashioning resolution #virtouslyRubbingFingernailsOnChest.

There was a little bit of leftover striped fabric, so I also made an adult sized beanie, using a pattern made by Andrea of fabric epiphanies.  I’m afraid though that I couldn’t for the life of me work out how to print it up so the sizing square was the correct scale… three attempts later, and eventually I settled for “pretty close”.  I estimated my beanie is actually about 7-8% bigger than the pattern, and then Sarah informed me it is too small! aaaagh!  It is a pretty cute pattern though, I will still probably give it another go one day  🙂

The stripes do match up all around though, both inside and out, a matter of personal pride for me.  I bound the beanie using a strip of blue merino, given to me by Mum.

So, after cutting the romper cuffs and pocket from the Tshirt, I still had quite a chunk of Tshirt leftover, well this wouldn’t do!  I immediately realised, as you do; that I could get two pairs of knickers and a bra from the leftovers.  Well, I’m sure that is the first thought anyone would think, hmmm?

I used the cloth habit Watson pattern, and cut out a bra plus two sets of matching knickers… yes, it was an XL Tshirt. I avoided as much of the advertising as possible and tried to stick to just the Wildcats logos as much as I could.

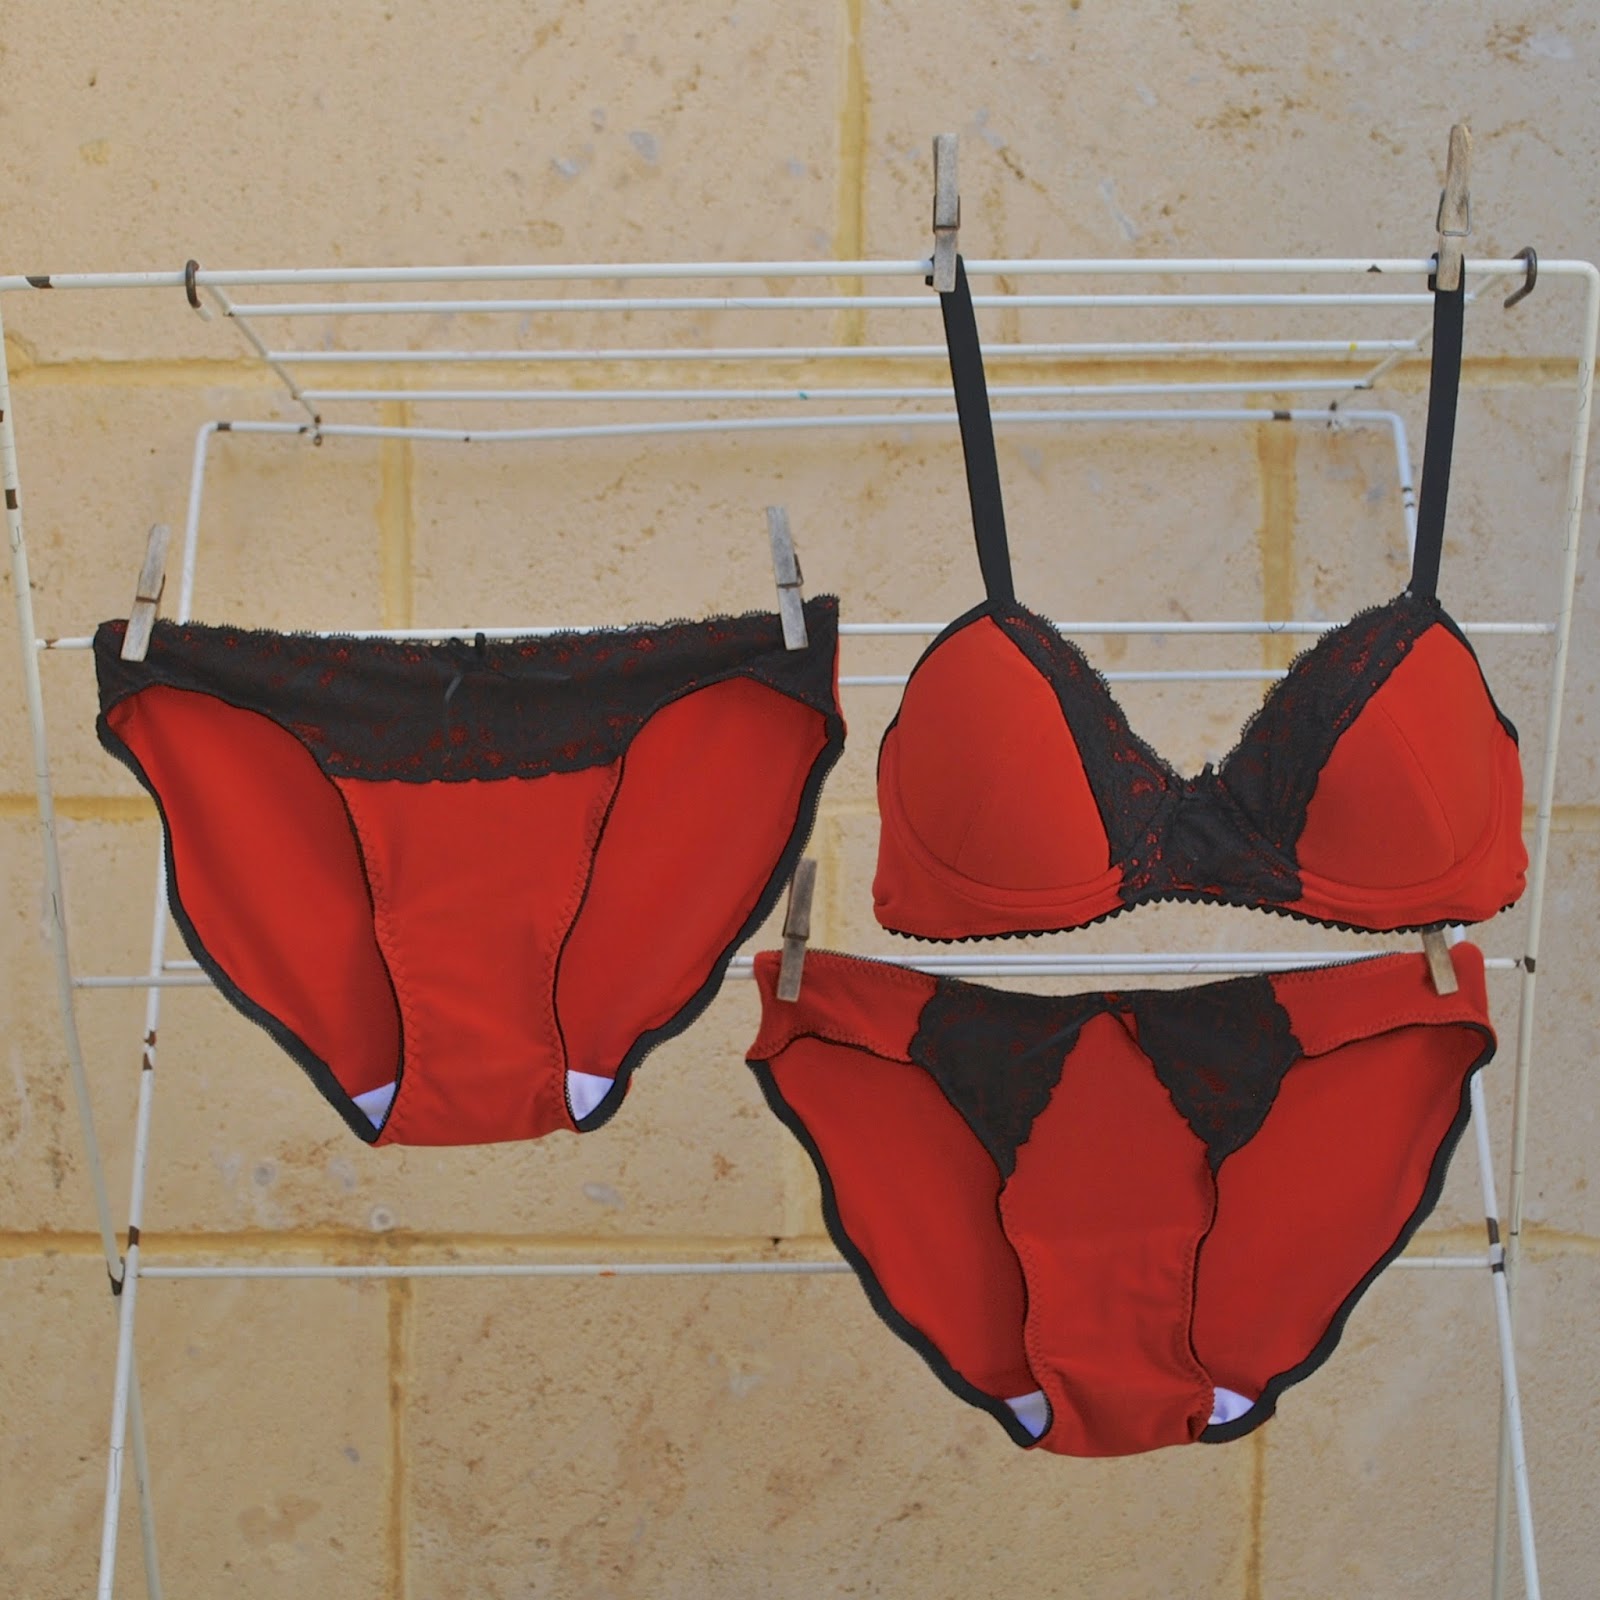
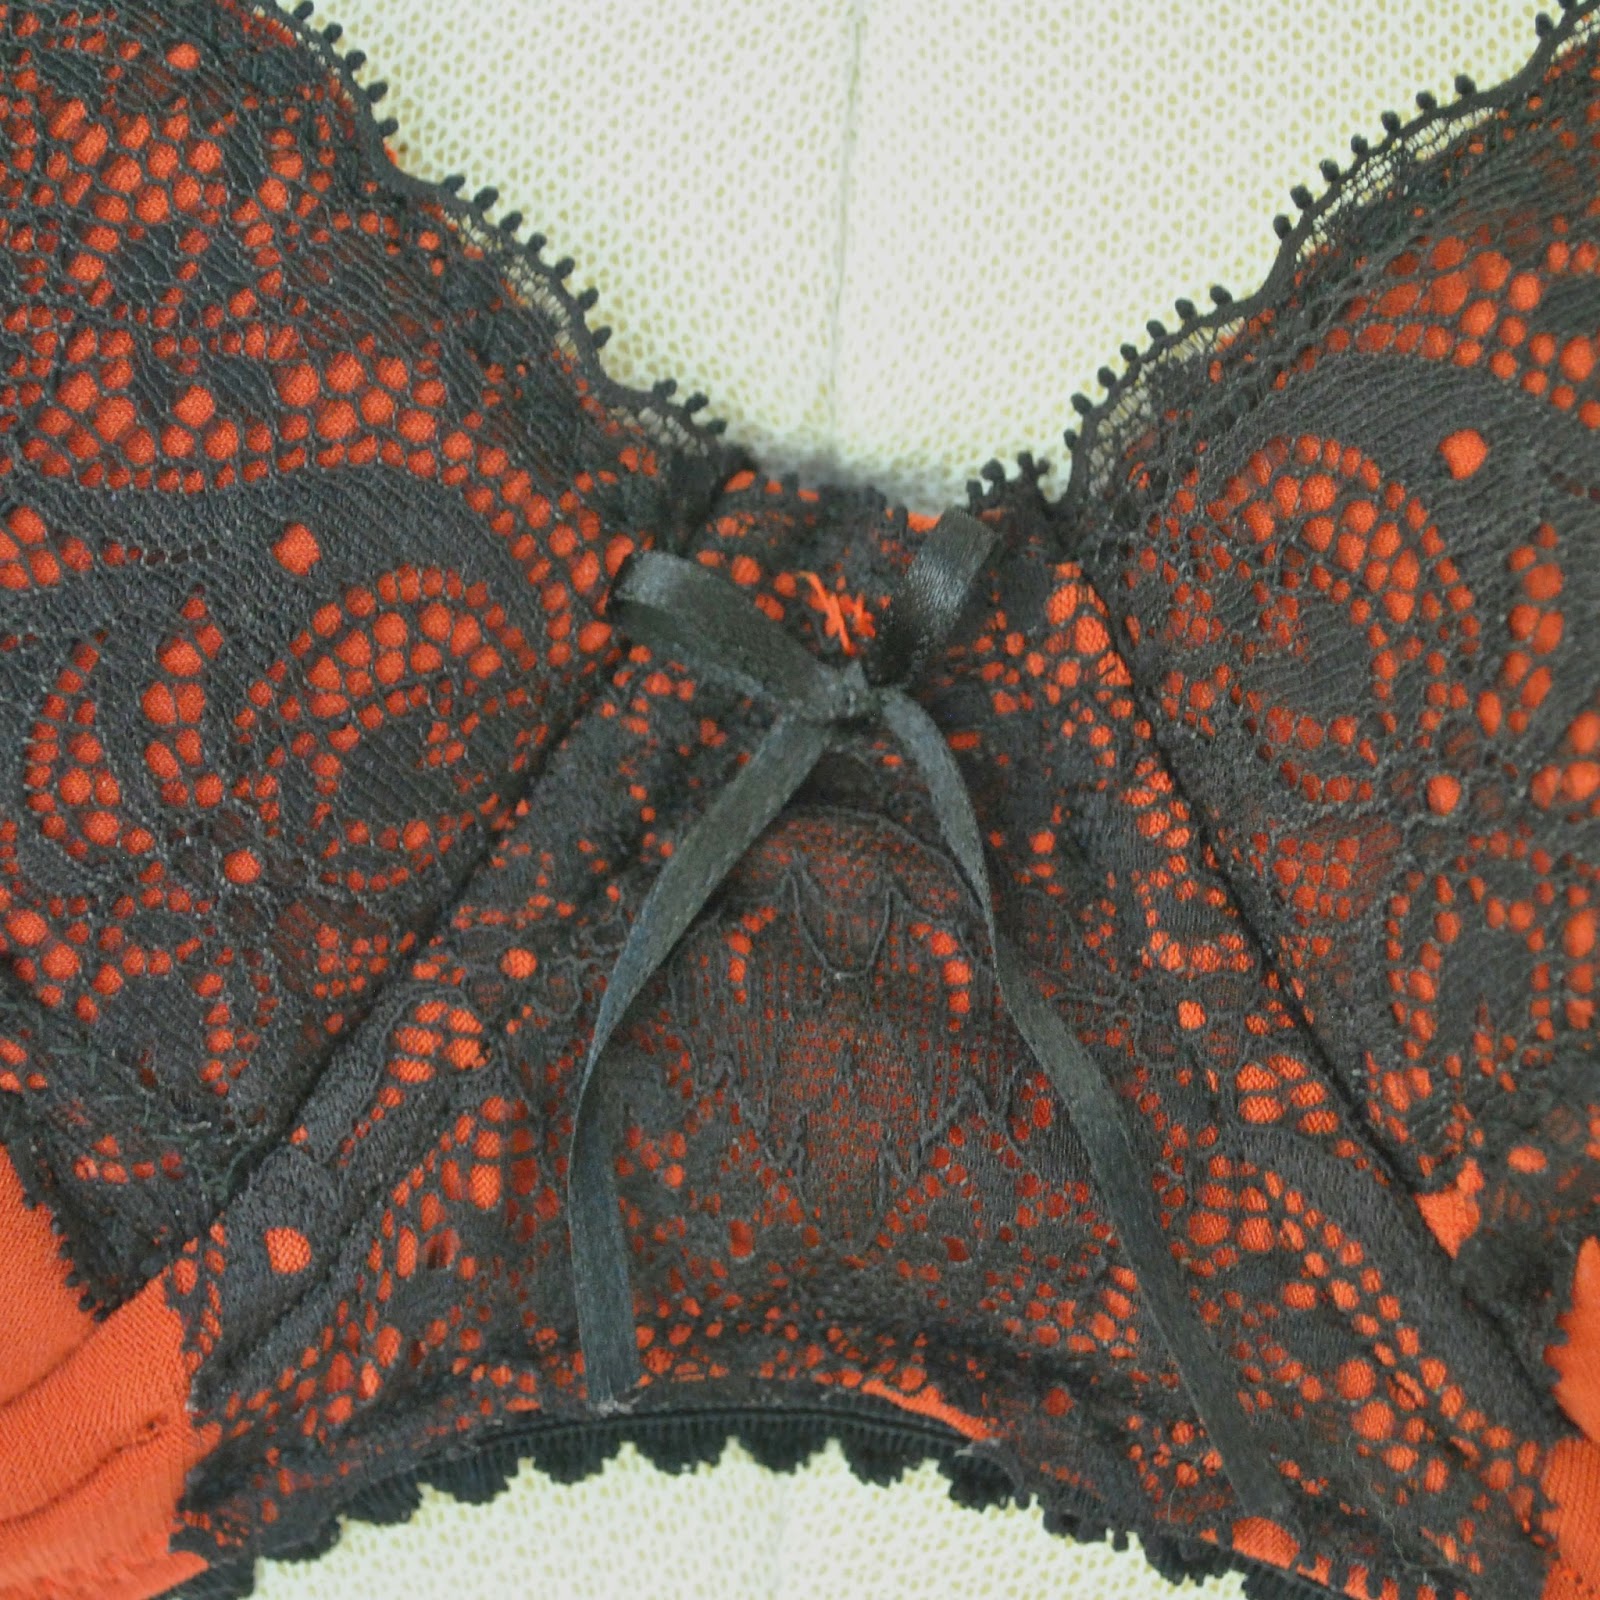
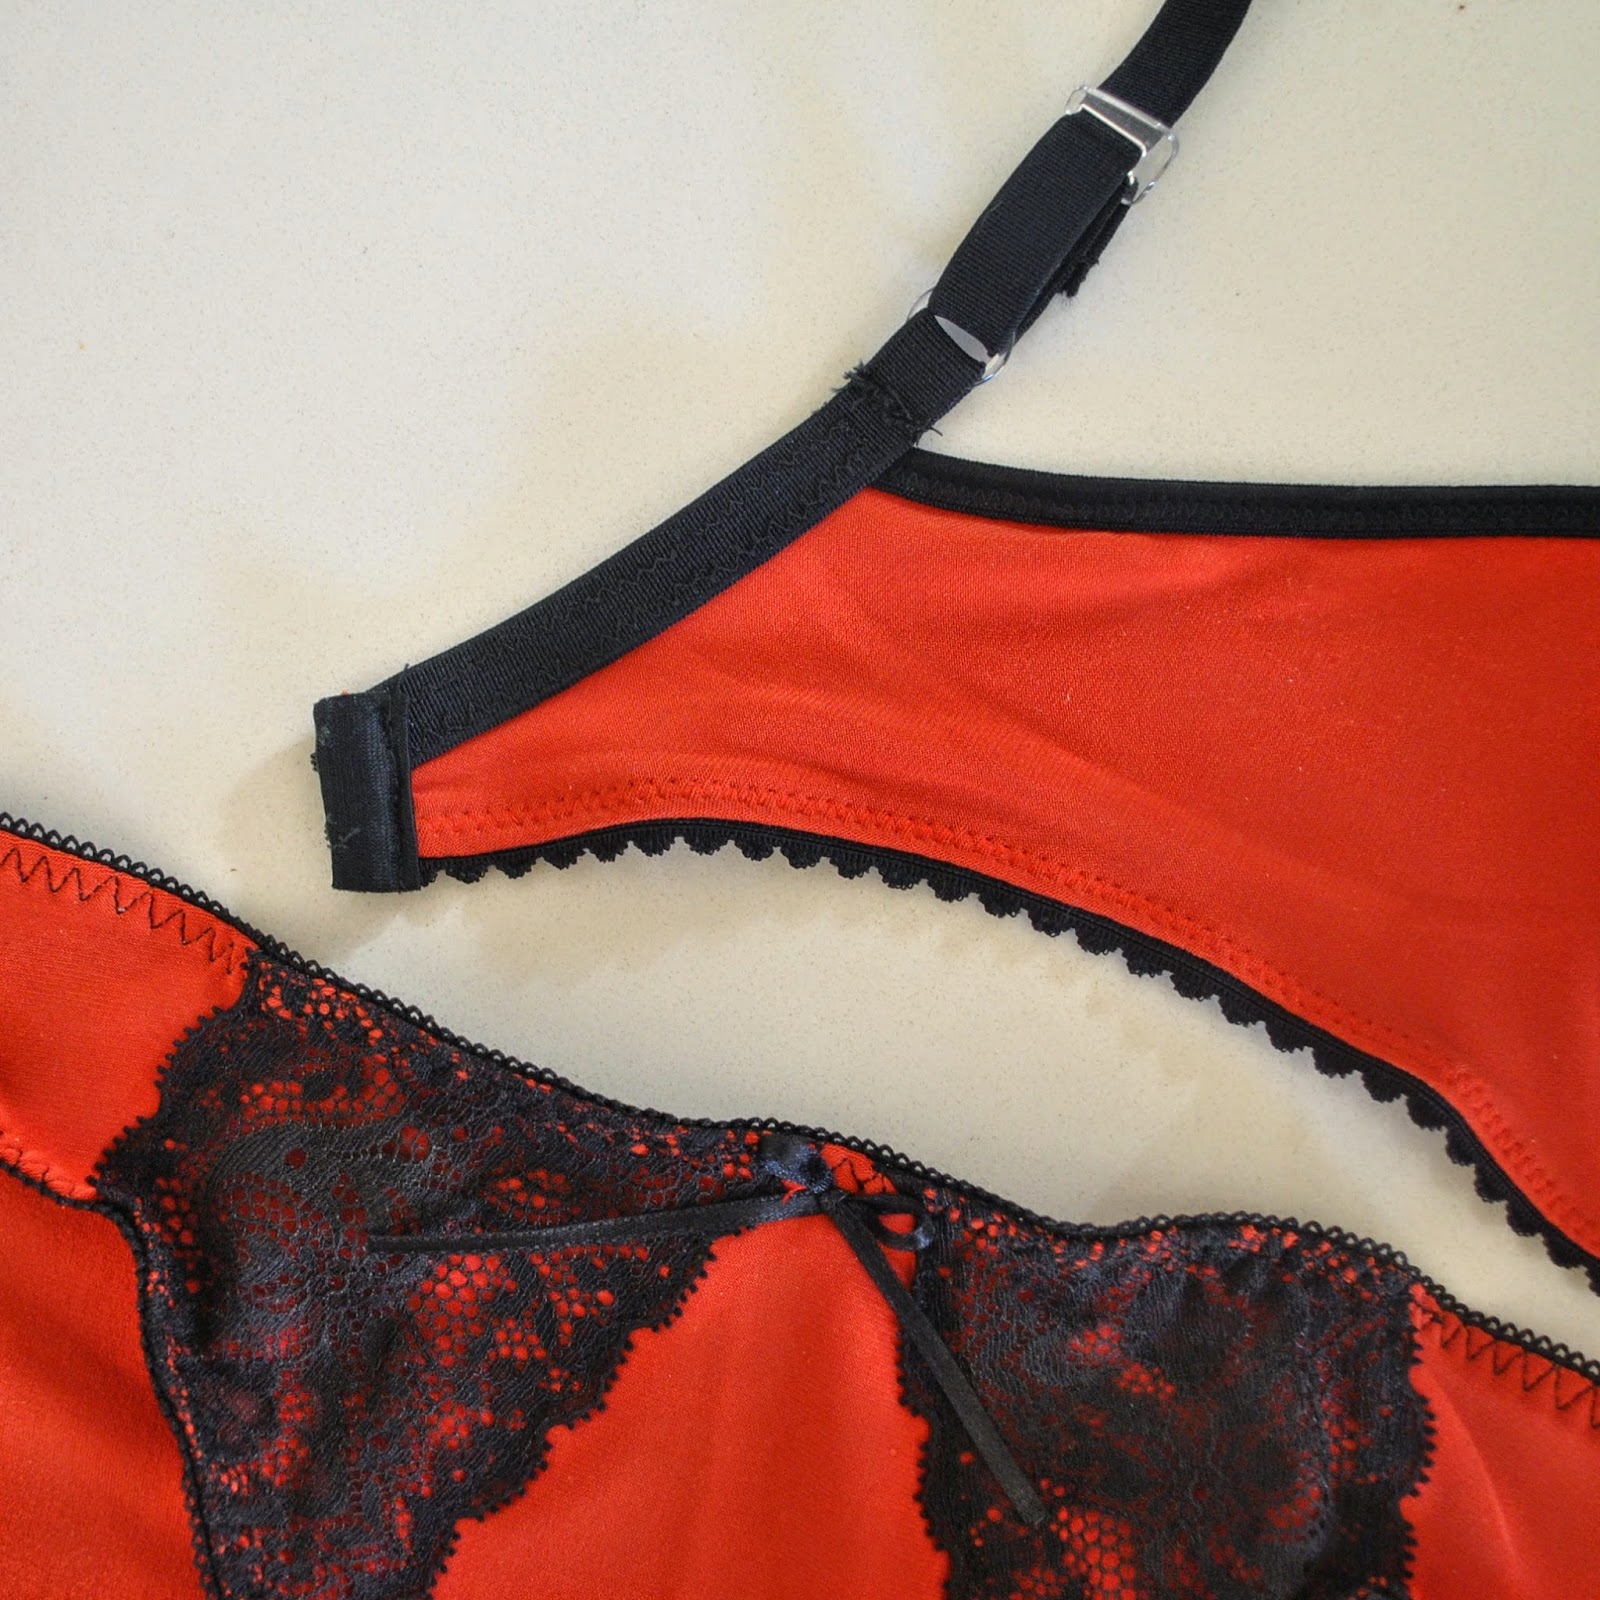
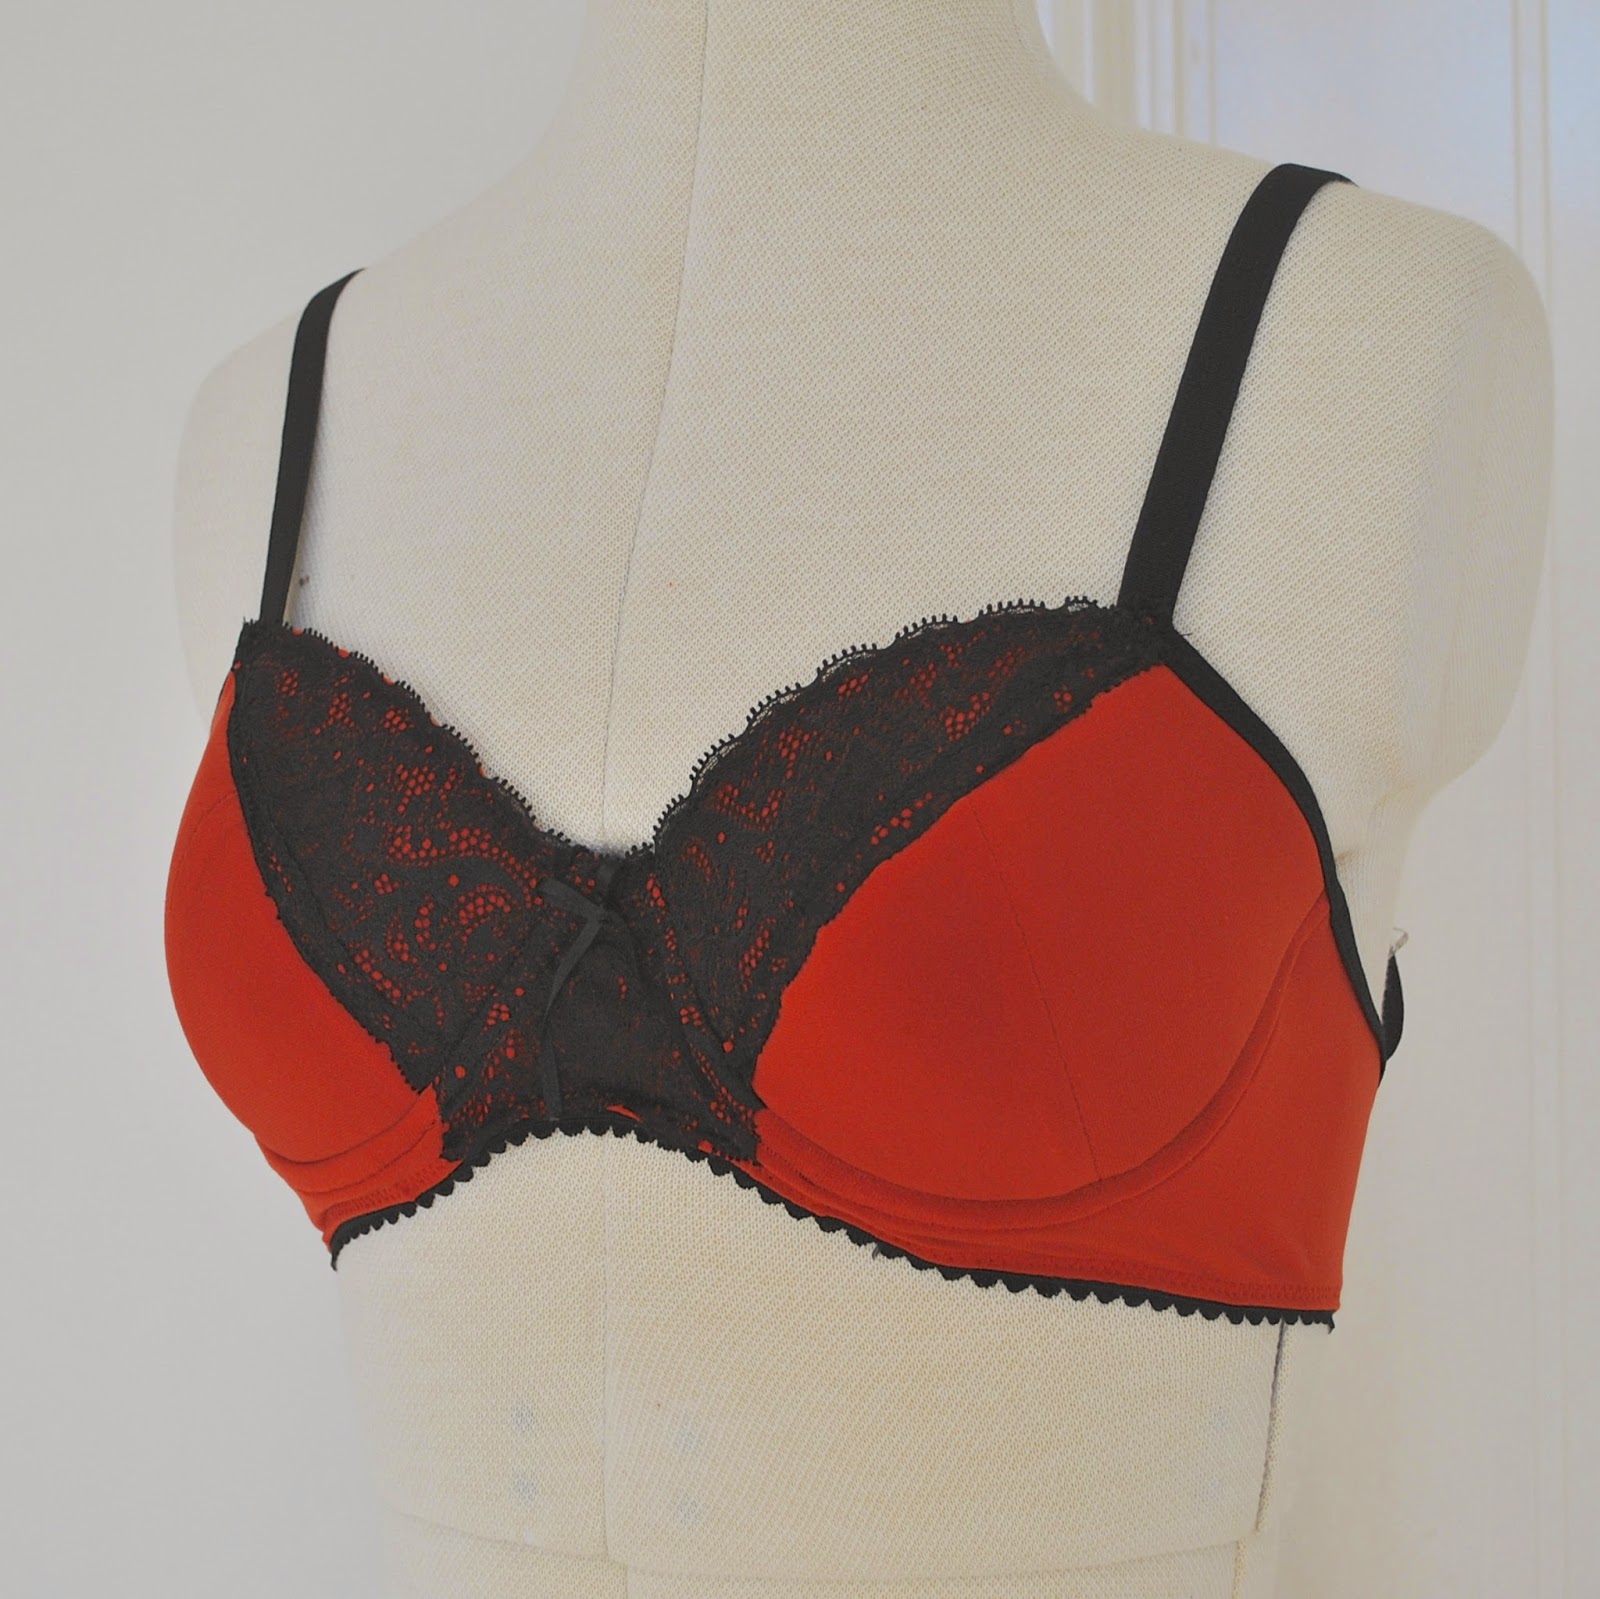
As I was making it, it occurred to me… is jungle January still a thing?  See, in the past few years I’ve been in the habit of making a set of underwear for jungle January, and one of the things about the basketball is that the Perth Arena is known as “the Jungle” during the Wildcats games.  Like, they’re always screaming  “WELCOME TO THE JUNGLE!!!!!!” and going on about “…. HERE IN THE JUNGLE…!!!!”   “Jungle” I guess because, wildcats.  Anyway, it occurred to me that I was serendipitously making a jungle-themed set of underwear again.  Without even meaning to!  Win!!!

Do you wanna hear something funny?

I’ve been in the throes of making this set for several weeks now, fitting it in as light relief in between working on my pattern, you know; and I took it along to the sewing guild meeting yesterday in the hopes of finishing it up.  And there I had the joy of seeing Emma also making a Watson bra.  Except her’s was really beautiful; super pretty, with chartreuse lace, pink and blue elastics, generally all round gorgeous and very feminine.  Just absolutely lovely in every way.  Such a contrast to my sorta … lowbrow one made from an old basketball Tshirt,  With logos, and everything.  Like something a teenager might wear.  Or more like, refuse to.  Omigawd, so embarrassing. I swear I don’t try to be like this.  It just happens.  Every now and again, I think back to an anonymous commenter who used to frequent my blog, and who couldn’t resist from pointing out my 1) immaturity and 2) unnecessary penny-pinching-ness, among other things.  Ahem, guilty as charged!

Fully lined with a lightweight stretchy stuff that I discovered during my stash clean out…  My tutorial for fully lining this pattern to enclose the seams, is here


I thought about not posting this next one… but wellll, here goes… I’ve also made another thing, squeezed out from the Wildcats Tshirt, I mentioned it was an XL yeah?! I also got a little cropped top, much nothing to write home about at all… I made it specifically for my new workout aspirations.  I hadn’t made any working out or losing weight resolutions on New Year’s Eve … but just lately I’ve been feeling a bit stodgy and decidedly… “matronly”, is the only word I can think of.  So I decided to do something about it, and purchased the Kayla Itsines Bikini BodyGuide.  One thing you’re supposed to do before even getting started is take a picture of yourself, preferably in a sports crop top and little shorts, and then take a new picture in the same ensemble every week as you work through the guide.  So obviously I had to make myself a little crop top, asap!  I used my customised version of the Closet Case Nettie bodysuit pattern and whipped up this super basic thing, just edged with a line of white overlocking thread around all the edges, which I think looks nice with my little white shorts.  I made those too.. they’re are the eponymous Carolyn pyjama shorts.  I rolled them up a bit, to show as much abdomen as I dared.  Hopefully, it’s going to become a more shapely one in a few weeks!  Don’t worry, I will not be posting a new picture here every week, but I’ll probably do an summary when I finished the course!

I started out with the beginner’s schedule, and practically killed myself just doing day 1!!

before… 

SaveSave

SaveSave

SaveSave

SaveSave

SaveSave

SaveSaveSaveSave

SaveSave

SaveSave

SaveSave

SaveSave

SaveSave

pinterestmail

suits me to a tee

So, a new year, a new Refashioners challengelast year we did jeans, this time the thing to be updated is A SUIT.

Most disappointingly, I could find no one in my family or circle of friends to donate a suit to the cause. 😉  Well of course not…  let’s see; these things are a) expensive and b) made to last a lifetime.  It takes a lot for a man to give up his suit. And let’s not forget to mention the biggie; c) suits are usually beautifully tailored things and the very thought of giving one to somebody who is just going to take the scissors to it is a pretty big ask.  I know I wouldn’t give one up either!!

before…

So I went along to the the opshop and bought one.  It was $22.  Even then, I still felt pretty bad about chopping it up, and found myself mentally apologising to the unknown tailor the whole time.  My suit is a Sax Altman: Sax Altman has been making high quality, traditionally tailored suits in Australia using fine Australian wool since 1977.

Just so you know, this is a pretty good innings by Australian standards… It’s actually pretty difficult to find suits in opshops here, men hang onto them forever.  Lots of orphaned sports jackets and some suit pants, but not many matching sets.  I initially honed in on this suit just because it wasn’t black! it is a deep charcoal-y/chocolate brown with subtle blue and grey pinstripes.

the fabric is pretty beautiful…

Once I got it home and had got a good look at it I could appreciate its quality; it’s beautifully made and let me tell you it was pretty darn hard to make that first snip… I’d decided already that I would make something that would honour the original tailoring, and keep as much of the important bits as I could, this one had it all; the interlined padded fronts with hand-padstitching, horsehair interlining, bias cut strips of organza everywhere on the inside to stabilise various areas, taped fronts, and tonnes of inner tape everywhere; sometimes bias cut organza, sometimes a sturdy cotton, sometimes strips cut from the selvedge… these were variously used as stay tape in different spots, hidden inside.  It was all pretty heavily and exquisitely engineered and one thing’s for sure; I could never produce something like this myself!!

What I did: I wanted for the jacket to be quite close-fitted to my shape, so I opened up the lining at the lower back hem and took in the suit jacket through ALL the seams here… the centre back seam, the back princess seams and the side seams, at the same time, I took in the jacket lining through the seams inside too..  I didn’t touch the front darted seams because they ran into the front pockets and altering them would have ruined the integrity of the pockets.  Oh, I’m pretty pleased that I managed to keep EVERY SINGLE POCKET of the original suit… I really didn’t want to sacrifice any, I thought if I absolutely had to I would…  but I managed to keep them all.  THE SANCTITY OF THE ALMIGHTY POCKET MUST BE UPHELD!!!  (kidding)

I removed the sleeves and trimmed several inches off the shoulders, and cut off the lower half of the legs to use for new kimono sleeves, binding the lower armhole with bias-cut wool harvested from a sleeve.

The leg hemline had a really nicely turned up cuff, which I liked, and kept for the new sleeve hem.  I love the new bracelet-length sleeves! if I did have to nit-pick, in an ideal world I think I would have preferred a wider sleeve but you know refashioning, sometimes you just gotta make it work with what you have!

I turned in and stitched a new front opening line for the jacket, making it a long, diagonal straight front coming to a point with a single button closure (above).  I cut so as to remove the lower two buttonholes, keeping the original upper button hole and repositioning the upper button over a bit to give the front more of a “wrapped” kimono-inspired look.

That’s the jacket!!

The new skirt nearly drove me mad…. men and women are not built the same (duh); we women want width for our hips and hemline, and a narrow waistline… men’s clothes are made to be the total opposite.  And also, the CUT! because of course the legs and the fly of men’s suit pants are cut differently against the grainline to how a skirt is cut, this makes it extremely difficult to transform them into a skirt!  Fortunately the trousers were big enough I had a bit of extra width to play with here….  first of all, I took off the waistband and unpicked nearly everything except for the side seams where the side hip pockets were attached.

I removed the old zip which had gotten a little rickety over the years, and installed a new black dress zip.  This entailed truing up the grain lines at centre front and creating a completely new fly and fly shield.

you can just see at the top; a strip of organza that was used to stabilise the waistline… I kept as much of these superb “hidden” structural details as I could, too

I wanted a flat-fronted look to the skirt, so made wide long darts at the front waistline to pull in the extra width there, these I topstitched down on the outside, continuing the topstitching down seamlessly to become stitched pin-tucks down the full length of the skirt front.  This is exactly where the pressed line was for the trousers.

The skirt front is straight, but those back trouser legs are cut so as to curve IN, just where you don’t want them to when cutting a skirt, so I’d cut a triangular godet from the jacket sleeves, taking in the sleeve cuff buttons/buttonholes and the original sleeve hem.  I was a little disappointed that these were fake button-cuffs and can’t be opened… but they still look pretty nice you know, you can’t win ’em all  😉

I inserted the godets in the lower skirt side seams along with a long inverted pleat so the skirt back kicks out over the godet.  I actually love this little detail.

I don’t even want to say how many pinnings and bastings it took me to get this silhouette that I wanted; a flatt-ish skirt front and a slightly flippy skirt back.   LOTS

Finishing up… shortened the waistband, reinstalled it stitched the belt tabs down again… oh and still managed to maintain that little coin pocket that sits right beneath the waistband… pretty proud of myself that I finagled that, hehe: and BAM! finally done!!  A fresh new womanly suit made from an old discarded men’s suit, albeit a rather nice one.  I’m very happy with the long-line jacket with slightly kimono-y vibes and a short, structured-yet-flirty skirt.  I feel like it’s very very me  🙂

And I still had a few leftovers from a sleeve… so I made a bandanna for Clara, and a new little zipped pouch to hold her poo-bags.  *

*it’s the law in Australia that if you are walking a dog, you MUST be carrying  little placky bags so you can pick up after your dog, there’s a hefty fine if you’re caught without them! I just used to tie them on to Sienna’s lead and then for blog pictures would try to hide them because they’re so ugly…   or take her off her lead for a bit… you can see them in an earlier picture here…  anyway I don’t know why I didn’t make a little bag like this aaaages ago!

I used an old zip and attached a jump ring and a little swivel clip so it can clip onto her lead.  The swivel clip was a leftover from when I made my winter boots… they’re not terribly robust so I plan to replace it with a mini carabina when I can get hold of one.

The only new things I used for this refashion were: thread, the zip in the skirt, and the zip, jump ring and swivel clip in Clara’s bag.  Not too bad!

Details:

Jacket and skirt; my own design, finagled from an old mens’ trouser suit
Bodysuit; the Nettie by Closet Case patterns, from paprika stretchy stuff, details here
Shoes: Misano, from Labels boutique

SaveSaveSaveSave

SaveSave

SaveSave

SaveSave

SaveSave

SaveSave

SaveSave

SaveSave

SaveSave

pinterestmail

named maisa denim jean jacket

O hey!

What am I doing? not much, just hanging around in my new jean jacket that until very recently was actually a few pairs of ancient old jeans!!!  OHYEAH!

A jeans-to-jean-jacket project has been a long-term “thing” in my little bucket list of refashions that I have in my head. and one of the reasons I’ve been collecting my children’s old jeans for only like, forever… recently I was asked to speak at the 20th anniversary celebrations of Australian Sewing Guild, a huge honour! and in the general chit-chat heard mention of their Castaway to Couture competition… where you take some cruddy cast-off clothing and transform it into something new and spectacular of course; obviously my ears pricked up … I LOVE wardrobe refashioning!!  I really the challenge and the FUN of repurposing old unwanted fabrics into something new, and I love the good self-backpatty feeling you get from being economical and not wasteful, in both the money sense as well as in the planetary resources sense as well.  I’ve done quite a lot of it in my time but not for a while… I mentioned my intention to participate in the comp on IG back on the 2nd May, and knew straight away I would finally get on with my “bucket list” jeans-to-jacket. The only things I bought for this were the buttons!

before…

after…

I used the Named patterns Maisa denim jacket pattern, and three pairs of my children’s old jeans, above.  Actually, technically I used only two and a half pairs of jeans, which I feel pretty good about!  I picked out the most similarly coloured ones, for a cohesive look, and the widest legged one in my stash; pretty sure these were all Tim’s, he used to rock the wide legged style A LOT!  I needed the wide legs so I could cut out the widest pattern pieces such as those upper sleeves.  A few pieces, like the hem bands, the collar, and the back yoke were too wide, so I had to cut these laying up and down the leg.. i.e. cutting across the grain, rather than on grain.

While I lurve a patchy aesthetic to my clothing, and of course the beauty of a thing like a jean jacket is that it’s supposed to look a bit beat up and NOT a work of beautifully tailored perfection…  I still wanted it to look at least a little bit intentional and not too bunged together.  There was plenty of colour variation even within each single pair of jeans as well as fashionable distressing effects everywhere too, so I carefully cut so as to make sure the colour variations were matched symmetrically all over the jacket, for example; the upper arms are cut from the same area of one pair, the side fronts also both from the same area of another pair, ditto the two side backs, etc etc, so as much as I possibly could the lighter blue areas are balanced out nicely and symmetrically with the darker blue areas on the jacket.

I think this resulted in a fairly cohesive look, one that hopefully doesn’t scream “MADE FROM CRUDDY OLD JEANS” anyway.

I only kept ONE thing that even vaguely hints that this is a recycled product;  for one of the cuff facings I unpicked a rear pocket from one pair of jeans and cut the facing for a cuff from this area…  it’s just facing, so it’s on the inside and can’t be seen unless I roll up the cuffs.  But I like that it’s secretly tucked away in there  🙂

For near total re-cycling, I even re-used the pocket lining of one of the pair of jeans for the new pocket lining of my jacket! well, it was a rather nice blue plaid and after unpicking the coin pocket there was just enough for my own new pockets.

Oh, yes, pockets!  The Maisa doesn’t come with pockets like this; it does have two breast pockets but funnily enough I really prefer pockets that you can actually put things in and also take them out easily… so I decided to see if I could wrangle some hip pockets in there somehow.  And I did!

I made two little welt pockets situated in the front/side front seams.  On the inside, the bottoms of the pockets are sandwiched inside the button bands, for a neat look on the inside.  They do work… however they’re not perfect by any means! because they do happen to have a button and a buttonhole respectively at the bottom edge of each one! hmmm, yes well… that was unavoidable.  Maybe, just maybe a bit of a hacking fail, however I’m really really glad still that I’ve got them.  I knew it was a risk since the cutting lines in the front of the jacket are very close to the centre front, and a pocket like this would work better if the seams were situated further out towards the side seams OR if the front closed with an open ended zip instead.  Both criteria would have given a better result…  BUT well, we live and learn…  at the very least I can put a little bit of stuff in them, so not a complete and utter fail! I’m ok with them, and they do work!  🙂

Thoughts on the pattern: description says a classic, unlined, button-down denim jacket with collar; short and loose-fitting design with flap pockets at the front; sleeve vents and wide button cuffs, wide band at the hem.  Well, hmmm, I’m not going to start ranting about my pet hate; the incorrect use of the term “button-down”.  Noooo, I’m not.  Apart from that! everything else about the pattern is pretty awesome.  A slight negative; it is a bit more loose-fitting than I anticipated.  Not 80’s loose, but still pretty loose.  I’m ok with it really… I will certainly wear it anyway! it’s so comfy and feels absolutely fantastic on! plus I’m only wearing it over a thin little Tshirt here and of course a bit of oversizedness is a good thing when I’ll want to wear it over cardigans or long-sleeved woolly tops in the winter.  I think when I get a little time I might have a go at re-jigging the pattern to be a little more form-fitting, for the future.  I still have plenty of pairs of jeans that need refashioning, so a second, differently styled jean jacket might even happen.  One which even has bigger and better functioning hip pockets!

Design decisions:  all the raw edges are finished with overlocking in dark blue thread, and I double top-stitched all seam allowances down with two different colours of thread; a coppery brown, and a creamy ivory.  These are both Gutermann upholstery thread, I actually prefer this to topstitching thread because A) it is tougher and B) it is less prone to fraying, so is easier to thread a needle with it.  I’ve used it for all my previous jeans, as well as for all my Alabama Chanin projects too, of course.  I decided to go with the two different colours, because it’s a detail I’ve noticed in some rtw jeans that I like a lot.

For the breast pockets: I originally double topstitched these in the two differently coloured threads too, however it just didn’t look very nice.  To be honest, something about the curved edge; cup-shaped pocket shapes topstitched onto the front just suggested “topstitched boobs”, to me.  Maybe that’s just me being weird… but I couldn’t stand it and unpicked the ivory and restitched the second line in the same copper brown as the first, as above.  It’s less obtrusive now and I think looks better.  Sorry, if that all sounds super weird, but just saying….

Some purely gratuitous details shots…

cuff topstitching and bar tack…

collar …

topstitching …

breast pocket…

waistband…

Details:

Jacket; Named patterns Maisa jacket, made from old pairs of jeans
Skirt; Vogue 1247, details here
Tshirt; Closet Case patterns Nettie bodysuit, white jersey, details here
Shoes; made by me and my own design, details here


location: the sundial at Cottesloe beach, Western Australia

pinterestmail

sage skirt, sage skirt, ivory top, orange hand warmers


Hello!  I’ve got a small handful of new stuff to show off present … four things to be precise!

DSC_0006Firstly, two sage green/pale coffee, checked tweed skirts.  I inherited this beautiful quality piece of wool tweed from my grandmother’s stash after she passed away.  Although I earmarked it straight away as two skirts for Cassie and myself I just hadn’t got around to it and have sat on it all this time.  It was one of those fabrics I couldn’t bring myself to cut into… you know, inherited from Granny, plus exceptionally good quality, equals inevitable thoughts of sewing tragedy followed by eternal self-damnation…. but I’m making myself get over that nonsense nowadays.  Make it!  Enjoy it!  Live dangerously!  So, finally…  it helps too that I think Cassie has now grown into fabric of this calibre  😉 not that she didn’t deserve high quality fabrics before, but you know what I mean!  it’s very much a grown-up fabric and makes a very smart little work skirt for her now that she has a serious and professional career. The fabric really is beautiful stuff… fine and evenly woven, and there are flecks of all sorts of colours in with the sage green/coffee check… blue, red and gold, caramel brown, forest green, and a hint of purple and black.  It has no identifier on it but it wouldn’t surprise me if it was a fully English tweed.  My grandmother was very much into that sort of thing  🙂
Also, this is possibly the first time that my fabulously neutral garage wall has failed me in showing up a garment nicely!!  it blends in way too much here!  Maybe the gorgeous fabric shows up better in Cassie’s picture, below.  Here, she is wearing her skirt with this caramel coloured merino tee that I made for her previously.

DSC_0009IMG_8989

Both skirts are pretty much identical, apart from the size, of course!!  Both made using Vogue 8363; the waistbands and pocket linings are cut from cotton calico, and the lining is a beige polyacetate.  Ivory/beige invisible zips in both skirts, closure by a wide hook and eye, and I cut the linings big and eased the extra fullness into the waistband with big pleats, for some wearing ease.  As always, I like to hand-stitch the waistband facings and lining down on the inside, much neater I think and the fabric deserved a really nice finish  🙂

skirt innards


IMG_5691

Next up, a little top for Cassie!  we bought this ivory/grey cotton French terry while we were in Japan recently… and can I just say… OmigawdthisfabricisthemostGORGEOUSstuff and I would sob with pitiful happiness if only I knew I could go back to Japan again… *sigh*  When Caspatternmagic3sie moved out of home she left this fabric behind and I almost started to factor it into my own plans mwahahahahaha… but of course she hadn’t forgotten it, o no!  The reason she had deviously left it behind was so that I could make something for her with it!  HA!  She chose the wings top from Pattern Magic 3, modified so as to have the wings gone; I’ve made this for myself once previously too, and I like Cassie’s new one so much I’m now wondering why I threw mine away!  I left the lower edge raw so it curls up nicely, and the sleeve edges and neckline I overlocked the raw edge, turned it under once and did a nice discreet little zig-zag to finish it.  It looks quite nice, I think.

DSC_0004
Item number four, and actually this is nothing to write home about really… I refashioned the fabric from an old woollen jumper of Craig’s into cosy new hand warmers for me.  I have my nice sheen green knitted hand warmers, that I’ve been wearing all winter, but! It’s still cold, I’m bored to tears with all my winter clothes and I just really fancied a new colour.  And the jumper was such a divinely rich tangerine-y colour and going begging because it had developed a large moth hole in the front.  Also, it had felted and shrunk a little bit when some careless person had accidentally tossed it in with too hot of a wash, tut tut *whistles innocently* and I have NO IDEA who that could have been, hum de hum!!!  Anyway!!  I cut open the whole jumper, assessed for holes, and cut out two rectangles, carefully avoiding said holes and a few stains.  I kept the ribbing intact for the bottom edge, and cut holes for my thumbs, overstitched those all nice and secure, and sewed the long side up.  I put them so the seams are on the outside because I liked the bobbly look of them, then sewed a little casing in the top edge and inserted a ring of elastic so they stay up my arm.  Bam! and bob’s your uncle.  New hand warmers, and making use of an old thing that would have otherwise been tossed out.  WIN!

Details:

Item 1)

Top; Burdastyle 04/2014-111, white bobbly stuff, details here
Skirt; Vogue 8363, sage green/coffee check wool tweed
Tights; my own pattern, black stretch stuff, details here and my tute for making your own custom-fit tights pattern is here
Boots; made by me, my own design, details here

item 2)

Top; drafted by me, caramel coloured merino wool, details here
Skirt; Vogue 8363, sage green/coffee check wool tweed

item 3)

Top; the wings top from Pattern Magic 3, ivory French terry cotton knit

item 4)

Handwarmers: made from an old jumper
Tshirt; self-drafted, dyed black cotton jersey, details here
Skirt; Vogue 1247, dyed purple denim, details and my review of this pattern here
Cardigan; Miette knitted by me, details here
Cowl; knitted by me to my own design, details and my original pattern is here
Tights; my own pattern, black stretch stuff, details here and my tute for making your own custom-fit tights pattern is here
Boots; made by me, my own design, details here

orange hand warmers

pinterestmail

jean genie

jean genieI’ve made a new dress using a bunch of my kids’ old jeans that I have vogue1316been saving for this very purpose…  and please note; yes, I am wearing denim shoes that I also made from old jeans, hehehe.  Just adding to the overall,terribly cohesive, jeans, jeans, jeans and yet more jeans look that I’ve got going on here.   Jeans from head to toe!! even though I’m not actually wearing any jeans, haha.  Long term readers may remember these shoes from when I made them a couple of years ago…  I’ve worn them a lot actually.  They seem to go with everything!
The Refashioners’ challenge this year was to make a garment using old jeans … which is fabulous timing for me! one of my imagined versions for this pattern has always been a jeans refashion and so the challenge just roused me from merely daydreaming about it and into action.  I’m a happy little refashioner from way back.. anyone remember Wardrobe Refashion? aaaah, I was a pretty active participant and was a little sad when it all wound down.  But still keeping up with that lifelong pledge!

Pattern; Vogue 1316.  this is the fourth version of the pattern I have made and actually the second I’ve made from old jeans, come to think of it!  My first version was made using four pairs of different coloured corduroy jeans.  See also my second, blue version, and my third, autumn version.  I still have several more plans for this pattern… but maybe I should wait before bringing any more to fruition; I now have three pairs currently rotating in my wardrobe, and a fourth might be just stretching credibility… just a bit!  It’s quite an eye-catching and distinctive design, over all.  This new one is pretty summer-y though, and I probably won’t be wearing it until things warm up around here a bit.

jeansMaterials;  obviously, all blue denim jeans.  I used three pairs of children’s jeans, one pair of child’s long shorts and one pair of adult jeans.  The adult jeans turned out to be necessary when I realised  that the full-length panels at the back would look pretty terrible if pieced at the waist; it’s a very much piecemeal kind of a design anyway, and to have that nice long smooth length of fabric at the back is just a nice visual anchor in amongst all that busy patchworking, in my opinion.  I decided it would be best to retain it; fortunately I had one pair of Craig’s old jeans in my refashioning bag and could cut the long back pieces from those.

jean genie 3topstitching My vision for this dress has always been to have lots of the existing jeans’ details retained in it, like the pockets with their decorative top-stitching, the coin pockets and belt loops and so forth; HOWEVER when it came down to it I retained very little of all that!  The design was just so…  busy; I ended up removing a lot of the little details I was going to put in.  There’s still plenty of the jeans bits and pieces left in, I reckon just the right amount to keep that definite “jeans flavour” to it.  There are a few original topstitched seams here and there, and the portion of a pocket left on the bodice.  I also added tonnes of new topstitching in terracotta upholstery thread, in fact every seam is topstitched down in some cases doubly so.

jean genie bodicesbaSomething I’ve managed to forget to blog about each time I’ve written about this dress… like all Vogue patterns, for a fitted design it’s a little blouse-y in the boob-al region for my figure; however the princess seamed bodice makes this a very easy fix.  I simply pin and stitch to shave a bit off the inner curve of the central bodice piece (above), and this solves the problem for me.  A very very easy small bust adjustment, and one I usually end up using for pretty much every fitted Vogue bodice with princess-seaming.  I don’t have the same issues with Burda, but always with Vogue.  I guess their “blocks” are a little different.

ventzip

The back vent (above) is topstitched in navy blue thread, rather than the terracotta.  Trust me, it just looked better this way.  I also used an navy blue invisible zip  This was the only new thing I bought for the dress!  The pockets (below) are lined with scraps of pretty floral voile… this was leftover from a dress that Cassie made for herself.  We bought the fabric together in Tokyo during our very first visit there in 2011, when we met Yoshimi and Novita for a fabric shopping day out,  Aaaah, yet more happy memories!

pocket lining
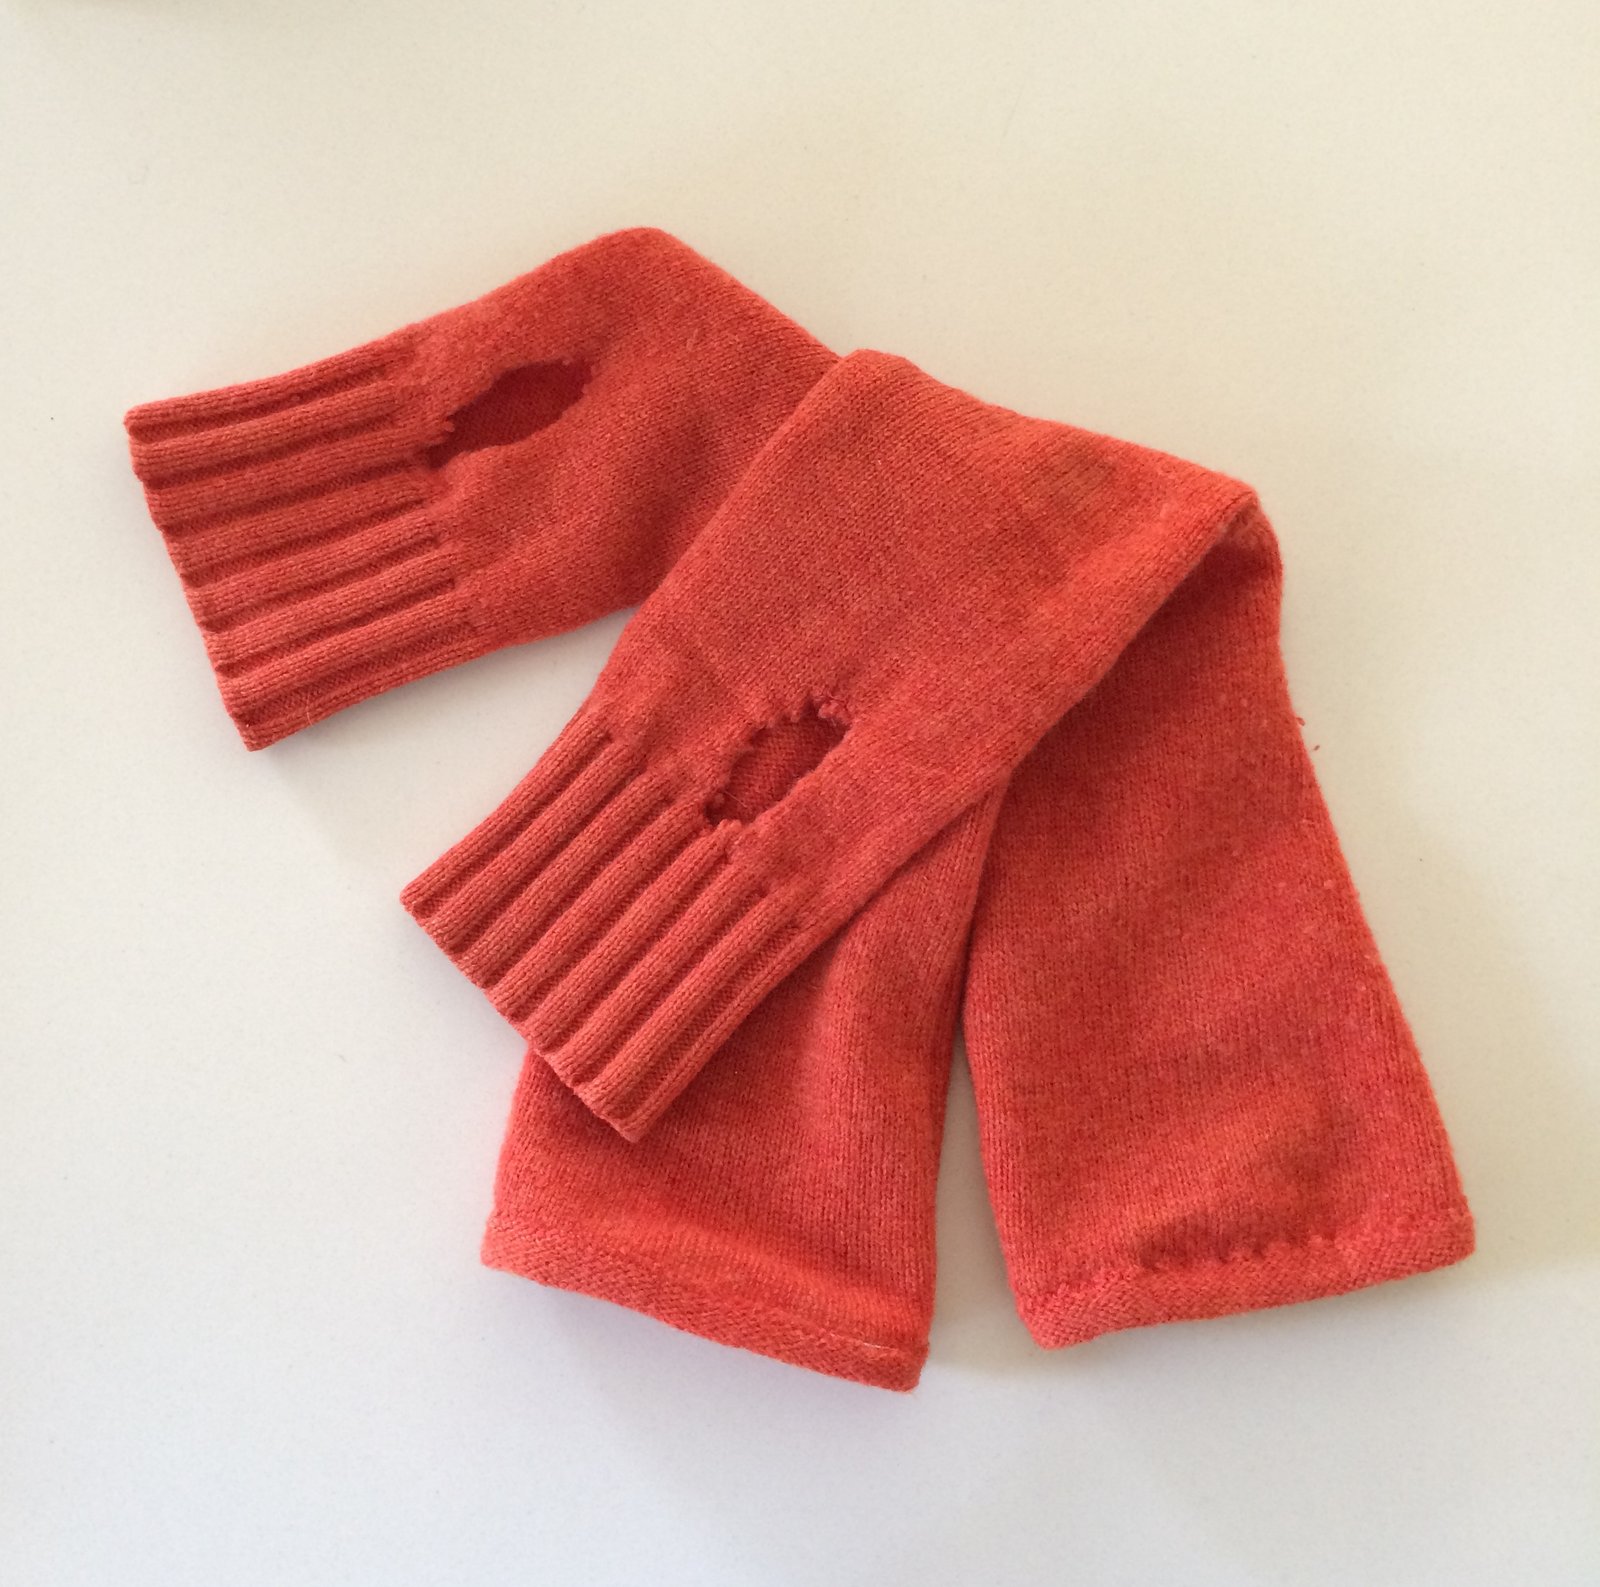
One pair of jeans, the very pale blue pair, was practically threadbare in places, but I still really wanted to have that pale blue as part of the lovely indigo-y mix…  these pieces I reinforced with lightweight iron-on interfacing to the back to stabilise and strengthen these areas (below).  Don’t want my new dress ripping in its first wear now, do I?!

skirt interfacing
For the bottom hem, I kept the original jeans’ hems in every piece (below).  This took a little bit of careful pattern placement, but I’m so happy with how it looks!  Yes, it’s a bit torn and worn in places, but that’s the honest history of the fabrics, right there.  The dress is a refashion, and proud of it.  The other little bit of history that I love about it is that you can just make out faint pink stains on one of the denims… this was a pair of jeans that Tim wore while painting once, and those paint stains never did come out despite many washes!  They are still there, and I LOVE them.  Oh, I’m a sentimental old thing, and happily so, too  🙂

hem

Details:

Dress; Vogue 1316, made from old jeans, see my original review of this pattern here
Shoes; made by me from old jeans and hand-carved wooden bases, details here

pinterestmail

Orange is the new Black

We don’t even get that show on TV here, but I’ve heard the name bandied about and thought it remarkably apt for my newest creations!
Now, is everyone else joining in the latest pretty underthingies making-fest?
Haha, sorry, of course it really goes by a far more lovely and grammatical name; “Everyone Deserves Pretty Knickers”, and is the brainchild of Susan of Measure Twice Cut Once.  It’s on its second year and I sadly missed last year.  Well, partly because I didn’t know about it then.  Which is a bit sad because I love making underthings! it’s fun! and also I’m an any-excuse kind of a seamster, as y’know.  Anyway, as soon as I read Susan’s IG post I signed up.  Couldn’t resist!  
The sweet nothings extravaganza starts 31st May running until 6th June.  So, I’m sorry to jump the gun, but I have a few things coming up on my plate at that time and if I was going to join in and make something I knew I had to get onto it right away  🙂
My new set is a re-cycling of an old thing… some tights!

I think I used the pair on the left.. no, the right.. no, the left…. no, wait, maybe the right…

A few years ago I made two pairs of deep orange tights, and wore one pair a bunch until it sprouted holes in the toes.  I even gave them a 6 different ways post, that’s how useful they proved to be in my wardrobe.  Anyhow, one pair were finally on their last legs (haha) and I considered cutting the feet off to make leggings from them, stretch a bit more wear out of them.  But the second pair was still hole-free and going strong, and instead I thought I could re-cycle the fabric from the worn-out pair into something different instead.  I managed to cut out the pieces for a new lingerie set, avoiding the areas of highest wear from the tights which were the knees and soles of the feet.
Paprika poly stretch originally from Spotlight, black stretch lace from Fabulous Fabrics.  Sliders, rings, hook/eye tape, black ribbon for bows, shoulder strap elastic and knicker lingerie elastic from Spotlight, bra foam and other remanding bra findings from MakeBra.  Some of the findings were recycled themselves from older bras that have bitten the dust too.

Patterns; I used MakeBra 2610, a balconette style bra pattern and my old McCalls 2772 bikini pattern for the two pairs of matching knickers.  I know right?, same old patterns, like a broken record, story of my life underwear drawer.  Well, when a thing works, etc etc…

black lace, and I made black ribbon bows
Sometimes I used red topstitching thread, sometimes black 
Shown here on Cassie’s dummy Clarissa.  Confession time; my bras, while they fit me, are an awfully tight squeeze on my own dummy Bessie.  Whenever I’ve used her to model bras in the past I’ve had to stretch the bejeezus out of them, or pin them open at the back.  She is a wee bit, ahem, broader in the chest than I!
pinterestmail
Switch to mobile version
↓