chilli-red paprika jade skirt

Oh hello, fellow needle-wielders!

Recently I decided I wanted, nay needed, a new colourful Jade mini-skirt; since my purple one was tragically taken too soon… *a minute’s silence, please*

Well, ta da!

I’d gone back to Knitwit in search of the same purple knit… why the same colour? perhaps because I’m a boring unoriginal creature of habit? but unfortunately they had sold out of the purple.  So I chose this chilli-red instead.  Rather nice, hmmm?

Every time I try to take any pictures in the full-on blasting sun, I regret it… however this does show off the lovely vibrant fiery-ness of this intense red rather well

For the lining, I cutup an old black Tshirt, one of Sam’s toss-outs, it’s quite a nice, sturdy, not-very stretchy and robust 100% cotton black knit, so should work really well as a lining. .  I’d given some thought into the lining this time, since the tragedy of too-much stretchiness of the purple one… that was a 100% polyester whereas my other stretch mini skirt, my self-lined charcoal one is a cotton jersey, quite stiffish with only a one-way stretch and that is holding up very nicely.  The black Tshirt fabric I used for this is very like that…

obligatory lining picture is pretty boring, sorry

With this version, I fitted and reinforced the waistband with stretch interfacing so it is quite firm and minimally flexible…

… AND put in an exposed black/brass jeans zip into this skirt.. I’m hoping these two factors will help keep that waistband firm and strong, so it suffers minimal stretching out and extend the life of the skirt…  Just for looksie’s alone, I just love the brassy glint of the zip, I think it looks really cool.

Going from my past jade skirt AND my past red skirt experiences, I KNOW I’m going to wear this a metric tonne.  Can’t wait to mix and match this  one to bits!

Details:

Skirt; Paprika patterns Jade skirt, red silk/linen knit from KnitWit
Top; the twist top from Pattern Magic, in ivory ponte also from KnitWit, details here
Tights; my own design, black polyester stretch from Spotlight, details here and my tutorial on how to make your own custom tights pattern here
Boots; made by me and my own design, all details here

location; the bush in south western Western Australia

SaveSave

SaveSave

pinterestmail

…getting a Brazilian…

Olá!

Soooo, I mentioned my brother’s BIG birthday? well to go with it he had a BIG birthday bash! with a Brazilian theme.  I stupidly procrastinated about my costume, ended up going shopping for fabric the day before the party and had to cut n’ sew like a madman to get it done on time. #sewingmachineonfullblast

I’d first googled “Brazilian women” and what came up was nothing but women in bikinis.  NO.  Even if this were the very height of summer… still no.  So then I googled Brazil women’s national costume, and oh yes, that’s more like it!

These lovely ladies are wearing the traditional dress for Bahian women, and I thought the white lace and broderie anglaise tops and headscarves and full, brightly coloured skirts so very lovely.  So I set about making something like that…

For simple yet voluminous skirt that you can whip up quickly, you can’t go past a circle skirt… I bought 4m of red polyester taffeta from the $4 table at Spotlight… it is very stiff and very silk dupion like and I knew it would stick out nicely with a good amount of volume.  I cut out my circle skirt and divided the remainder to make a waist sash and a scarf for part of my headgear.  The skirt is a full 2m in diameter, and I thought about making it rush rush rush but nah. I just can’t do that sort of thing, even in a costume.  So it’s got a proper interfaced waistband, and closes with an invisible zip and a press stud in the waistband.  Hehe, while I was making my costume, Tim sent around a snapchat re it being National Doughnut Day, and I was like HA!  I’m fitting right in!  This is MY kind of doughnut!!

Oh, I have a little tip!  I usually hand-slipstich the ends of my invisible zips to the seam allowance with a few quick stitches, but lately I’ve taken to just doing a few quick back-and-forths on the sewing machine.  It’s so much quicker since you’re not having to thread a needle, and actually more stable too.

Speaking of rush rush, I admit I did not hem that giant circle skirt… it’s just overlocked along the edge there!  I figure that if/when I ever decide to wear it “for realz” then I’ll go to the effort and hem it properly.  Probably seems funny that I did the waistband properly when it’s not even “seen” in my costume, whereas the hem, which is fully visible, I didn’t finish properly… but you know, some things are easy to re-do later and some are not.  The waistband is the kind of a thing you’ve got to do it right the first time.

The blouse is made from an old lace curtain that was originally had hanging in an upstairs window… I took it down when we re-did our floors up there and have just never hung it up again! Lazy? the view was too nice? Both really  😉   A bit off one end was sacrificed for my top, hehehe.  I had also bought a length of white cotton/linen for the lining, there’s quite a few bolts of this in Spotlight at the mo’ selling for very cheap; I’ve actually bought quite a lot of it lately, for other projects yet to appear here…

My pattern is very loosely the epaulette top from She Has a Mannish style, cut to flare out more in the body and sleeves…  the lining is cut straighter in the sides.  The shell and lining have separate side seams, but are sewn together at the shoulders and armscye.  I pinned and stitched a square neckline, cut and overlocked the edge, and then stitched a length of white cotton bobbin lace around to edge it, part of a large stash that I’ve had for many, many (many, many) years.  It’s funny, I kind of threw this together just for the costume, but you know what?? I actually love it and will definitely be wearing this again, in real life!
Waist sash:  22cm x 3.8m, I wrapped it twice around my waist and finished off with a giant pouffy bow.  Head scarf:  30cm x 2.4m of white,  21cm x 2.3m of the red;  I’d cut the white wider to be the main colour with the red to be more of an accent, like how the Bahian ladies that had popped up in my google search have their headscarves.  I’d also googled “how to tie a Brazilian head scarf” and found this video which was sooooorta helpful, I kind of based mine off her first example… but my scarf is much much longer and I obviously tied and tucked and folded extra knots in mine so as to be a much higher and more complicated affair… I’d also made two “ropes” of the white and red and twisted them to tie around my headscarf to help keep it in place.

after this photo, I redid my headscarf and I think it was a lot better the second time!  but didn’t have enough time to take another pic 🙁

For footwear, I’d noticed that the ladies tend to wear low, flat, open sandals; very comfortable things like birkenstocks but not anything specific.  I got out a few of my sandals, and Mum voted for my little white sandals, that I made last summer.  I danced the night away in these things, and they’re still holding up great!

So that’s it!  We had a blast… I wish I could show you a picture of my son Tim, who went as Gisele Bündchen in a blonde wig, bikini top, boy leg shorts and full on wings a la Victoria’s Secret.   And clonking boots on his feet.  It was hilarious.  Absolutely he was the belle of the ball!

just use your imagination…

Another funny little moment of the evening’s preparations… Craig used this picture as his costume inspiration… we’d bought red, blue, green and yellow feather boas from Spotlight to customise the black pants and black shirt that he already had in his wardrobe.. we also bought yellow satin for a sash and a yellow velour fedora from Spotlight too…

Well, he’d cut and tied together lengths of the feather boas to make the leg and arm bands… and there was like masses of feather fluff and debris all over the floor.  So he’d got out the vacuum cleaner to do a quick tidy up.  Well, he was vacuuming quite perilously close to the little pile of carefully tied together feather boa bands… and I was literally just about to say “you might want to move those feather things” when FWOOOOOOOP! this quite long string of feather boas just disappeared! right up the vacuum cleaner in a flash!!  Like, literally a split second and they were gone, like a garishly coloured, feathery snake zooming at top speed into a burrow, …  well, Kelly and I burst out laughing and just couldn’t stop, haven’t seen anything so funny in aaaages!  Panic!  Don’t worry, we opened up the vacuum cleaner and rescued the furry beast from its lair, I mean, the feather boa, fortunately none the worse for wear.

SO much fun.  EEEEE, I LOVE costume parties!!

pinterestmail

a shirt for David and a dress for Cassie

hey bro!

Woooh!  I’m so excited to finally hand this over!  My brother has had/is having a big BIG birthday… and my sister-in-law made the brilliant suggestion that he would like a shirt made by me for his birthday.  Well, oh my goodness, I don’t know why I didn’t think of it myself!!  So I dutifully and sisterly-lovingly spent LOADS of time and care into making this as perfect as I possibly could, and it pretty much is.  Ta da!

looks like a kinda cool dress when Bessie is wearing it, yes?  Gotta admit, I WAS a little tempted to steal it …

I know what you’re thinking… don’t I pour loads of love and care into making shirts for my husband and two sons too? well of course I do.  Buuuut, see…  my brother’s shirt is going to be handled, worn, laundered, ironed and generally available for up close and personal inspection by someone other than me… and I quaked with fear at the thought   * imagines to oneself, my brother and sister-in-law with a magnifying glass going over each and every stitch*   Ha!

And yeah, this really is a VIB (Very Important Birthday).  and so I just really wanted for this shirt to this to be really really lovely for my really really lovely brother.

Pattern: I used my new mens’ shirt pattern Burda 6874, graded to fit David, plus I made his extra long as per the shirt whose size I was going off.  My sister-in-law had secretly given me a well-fitting shirt of his that I could measure off to custom-fit his shirt … David is a 6’4″ champion swimmer, and built like one too… did I ever mention he has swum the Rottnest Channel swim solo?!   Yep!!  Meaning that I needed to substantially re-grade my pattern to fit his physique.  I didn’t have David himself to check the fit off of, just that one shirt; so I was pretty terrified how mine was going to go.  Luckily the fit turned out to be absolutely spot on!  *pheeeew!!!

Fabric; a really nice deep indigo cotton/linen with a permanently scrunchy texture to it, I went big guns and bought this from Calico House, because well, it IS a special birthday.  The red buttons are from Fabulous Fabrics.

But enough boring chit-chat…  how about some gratuitous detail shots  #shirtporn #oooyouknowyouwantit

buttondown collar

it took me three goes to get the second of these buttonholes looking exactly the same as the first!

sleeve placket.  contrasting red cotton for the cuff and yoke facings, topstitched in a way that a tiny sliver peeked out on the right side


fully flat-felled seams throughout

sorry for collar picture overload.. I was just so thrilled at how nice it turned out!

I was once asked what the inside of these side seam gusset/insert thingies looks like …  Folding the inner edges all around made them pretty bulky so I cut away all seam allowances of “hidden” edges ie. those of the underside of the gusset and the turned under edge of the shirt hem, tucked them inside the upper gusset edge and topstitched them all down… thus considerably reducing bulk here

As soon as he opened it, he put it on.. obviously this made me SO HAPPY to see him wearing it!

Also… recently I mentioned that I had made a dress for Cassie?  well here ’tis!

Pattern; the Sudley by Megan Nielsen patterns,  I gathered up the sleeve hems with skinny elastic, like I had done for my own Sudley blouse, at her request.  All seams are French seams, dress is fully lined with the lining cut as an extended bodice.  The fabric is a very realistic silk-like poly from Spotlight, lining also from Spotlight.


To be honest, halfway through making it I felt pretty down about it, like this was a dress that couldn’t possibly be saved… but fortunately once it was on her it suddenly looked adorable. And she loves it!  Despite that very serious facial expression!

No no no!  I’m not about to be a granny yet… this is just a pose that made us both roar with laughter!  Demonstrating the… um, capacity of this design.

SaveSave

pinterestmail

named maisa denim jean jacket

O hey!

What am I doing? not much, just hanging around in my new jean jacket that until very recently was actually a few pairs of ancient old jeans!!!  OHYEAH!

A jeans-to-jean-jacket project has been a long-term “thing” in my little bucket list of refashions that I have in my head. and one of the reasons I’ve been collecting my children’s old jeans for only like, forever… recently I was asked to speak at the 20th anniversary celebrations of Australian Sewing Guild, a huge honour! and in the general chit-chat heard mention of their Castaway to Couture competition… where you take some cruddy cast-off clothing and transform it into something new and spectacular of course; obviously my ears pricked up … I LOVE wardrobe refashioning!!  I really the challenge and the FUN of repurposing old unwanted fabrics into something new, and I love the good self-backpatty feeling you get from being economical and not wasteful, in both the money sense as well as in the planetary resources sense as well.  I’ve done quite a lot of it in my time but not for a while… I mentioned my intention to participate in the comp on IG back on the 2nd May, and knew straight away I would finally get on with my “bucket list” jeans-to-jacket. The only things I bought for this were the buttons!

before…

after…

I used the Named patterns Maisa denim jacket pattern, and three pairs of my children’s old jeans, above.  Actually, technically I used only two and a half pairs of jeans, which I feel pretty good about!  I picked out the most similarly coloured ones, for a cohesive look, and the widest legged one in my stash; pretty sure these were all Tim’s, he used to rock the wide legged style A LOT!  I needed the wide legs so I could cut out the widest pattern pieces such as those upper sleeves.  A few pieces, like the hem bands, the collar, and the back yoke were too wide, so I had to cut these laying up and down the leg.. i.e. cutting across the grain, rather than on grain.

While I lurve a patchy aesthetic to my clothing, and of course the beauty of a thing like a jean jacket is that it’s supposed to look a bit beat up and NOT a work of beautifully tailored perfection…  I still wanted it to look at least a little bit intentional and not too bunged together.  There was plenty of colour variation even within each single pair of jeans as well as fashionable distressing effects everywhere too, so I carefully cut so as to make sure the colour variations were matched symmetrically all over the jacket, for example; the upper arms are cut from the same area of one pair, the side fronts also both from the same area of another pair, ditto the two side backs, etc etc, so as much as I possibly could the lighter blue areas are balanced out nicely and symmetrically with the darker blue areas on the jacket.

I think this resulted in a fairly cohesive look, one that hopefully doesn’t scream “MADE FROM CRUDDY OLD JEANS” anyway.

I only kept ONE thing that even vaguely hints that this is a recycled product;  for one of the cuff facings I unpicked a rear pocket from one pair of jeans and cut the facing for a cuff from this area…  it’s just facing, so it’s on the inside and can’t be seen unless I roll up the cuffs.  But I like that it’s secretly tucked away in there  🙂

For near total re-cycling, I even re-used the pocket lining of one of the pair of jeans for the new pocket lining of my jacket! well, it was a rather nice blue plaid and after unpicking the coin pocket there was just enough for my own new pockets.

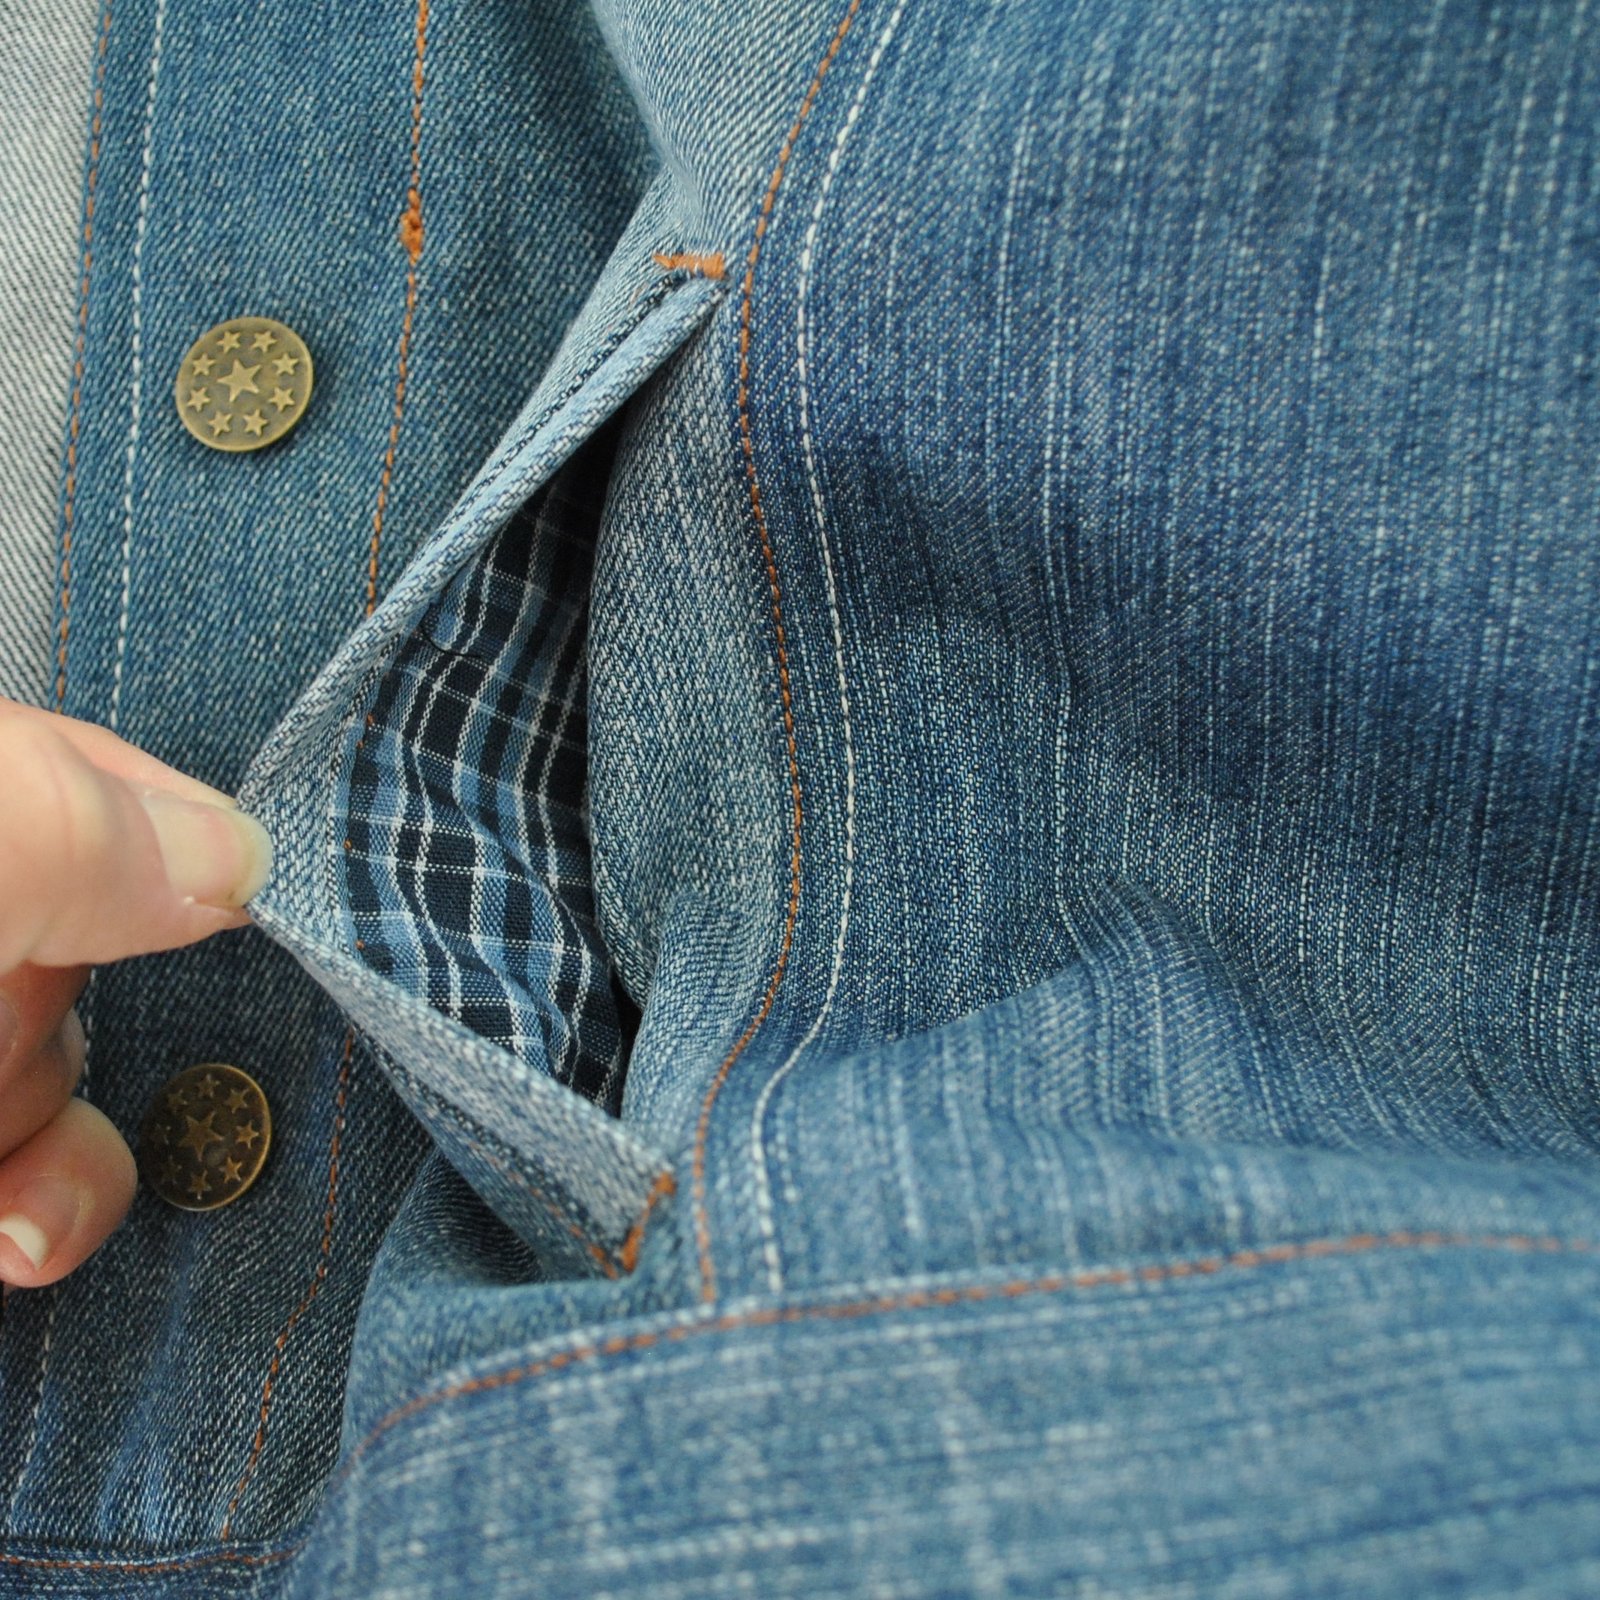
Oh, yes, pockets!  The Maisa doesn’t come with pockets like this; it does have two breast pockets but funnily enough I really prefer pockets that you can actually put things in and also take them out easily… so I decided to see if I could wrangle some hip pockets in there somehow.  And I did!

I made two little welt pockets situated in the front/side front seams.  On the inside, the bottoms of the pockets are sandwiched inside the button bands, for a neat look on the inside.  They do work… however they’re not perfect by any means! because they do happen to have a button and a buttonhole respectively at the bottom edge of each one! hmmm, yes well… that was unavoidable.  Maybe, just maybe a bit of a hacking fail, however I’m really really glad still that I’ve got them.  I knew it was a risk since the cutting lines in the front of the jacket are very close to the centre front, and a pocket like this would work better if the seams were situated further out towards the side seams OR if the front closed with an open ended zip instead.  Both criteria would have given a better result…  BUT well, we live and learn…  at the very least I can put a little bit of stuff in them, so not a complete and utter fail! I’m ok with them, and they do work!  🙂

Thoughts on the pattern: description says a classic, unlined, button-down denim jacket with collar; short and loose-fitting design with flap pockets at the front; sleeve vents and wide button cuffs, wide band at the hem.  Well, hmmm, I’m not going to start ranting about my pet hate; the incorrect use of the term “button-down”.  Noooo, I’m not.  Apart from that! everything else about the pattern is pretty awesome.  A slight negative; it is a bit more loose-fitting than I anticipated.  Not 80’s loose, but still pretty loose.  I’m ok with it really… I will certainly wear it anyway! it’s so comfy and feels absolutely fantastic on! plus I’m only wearing it over a thin little Tshirt here and of course a bit of oversizedness is a good thing when I’ll want to wear it over cardigans or long-sleeved woolly tops in the winter.  I think when I get a little time I might have a go at re-jigging the pattern to be a little more form-fitting, for the future.  I still have plenty of pairs of jeans that need refashioning, so a second, differently styled jean jacket might even happen.  One which even has bigger and better functioning hip pockets!

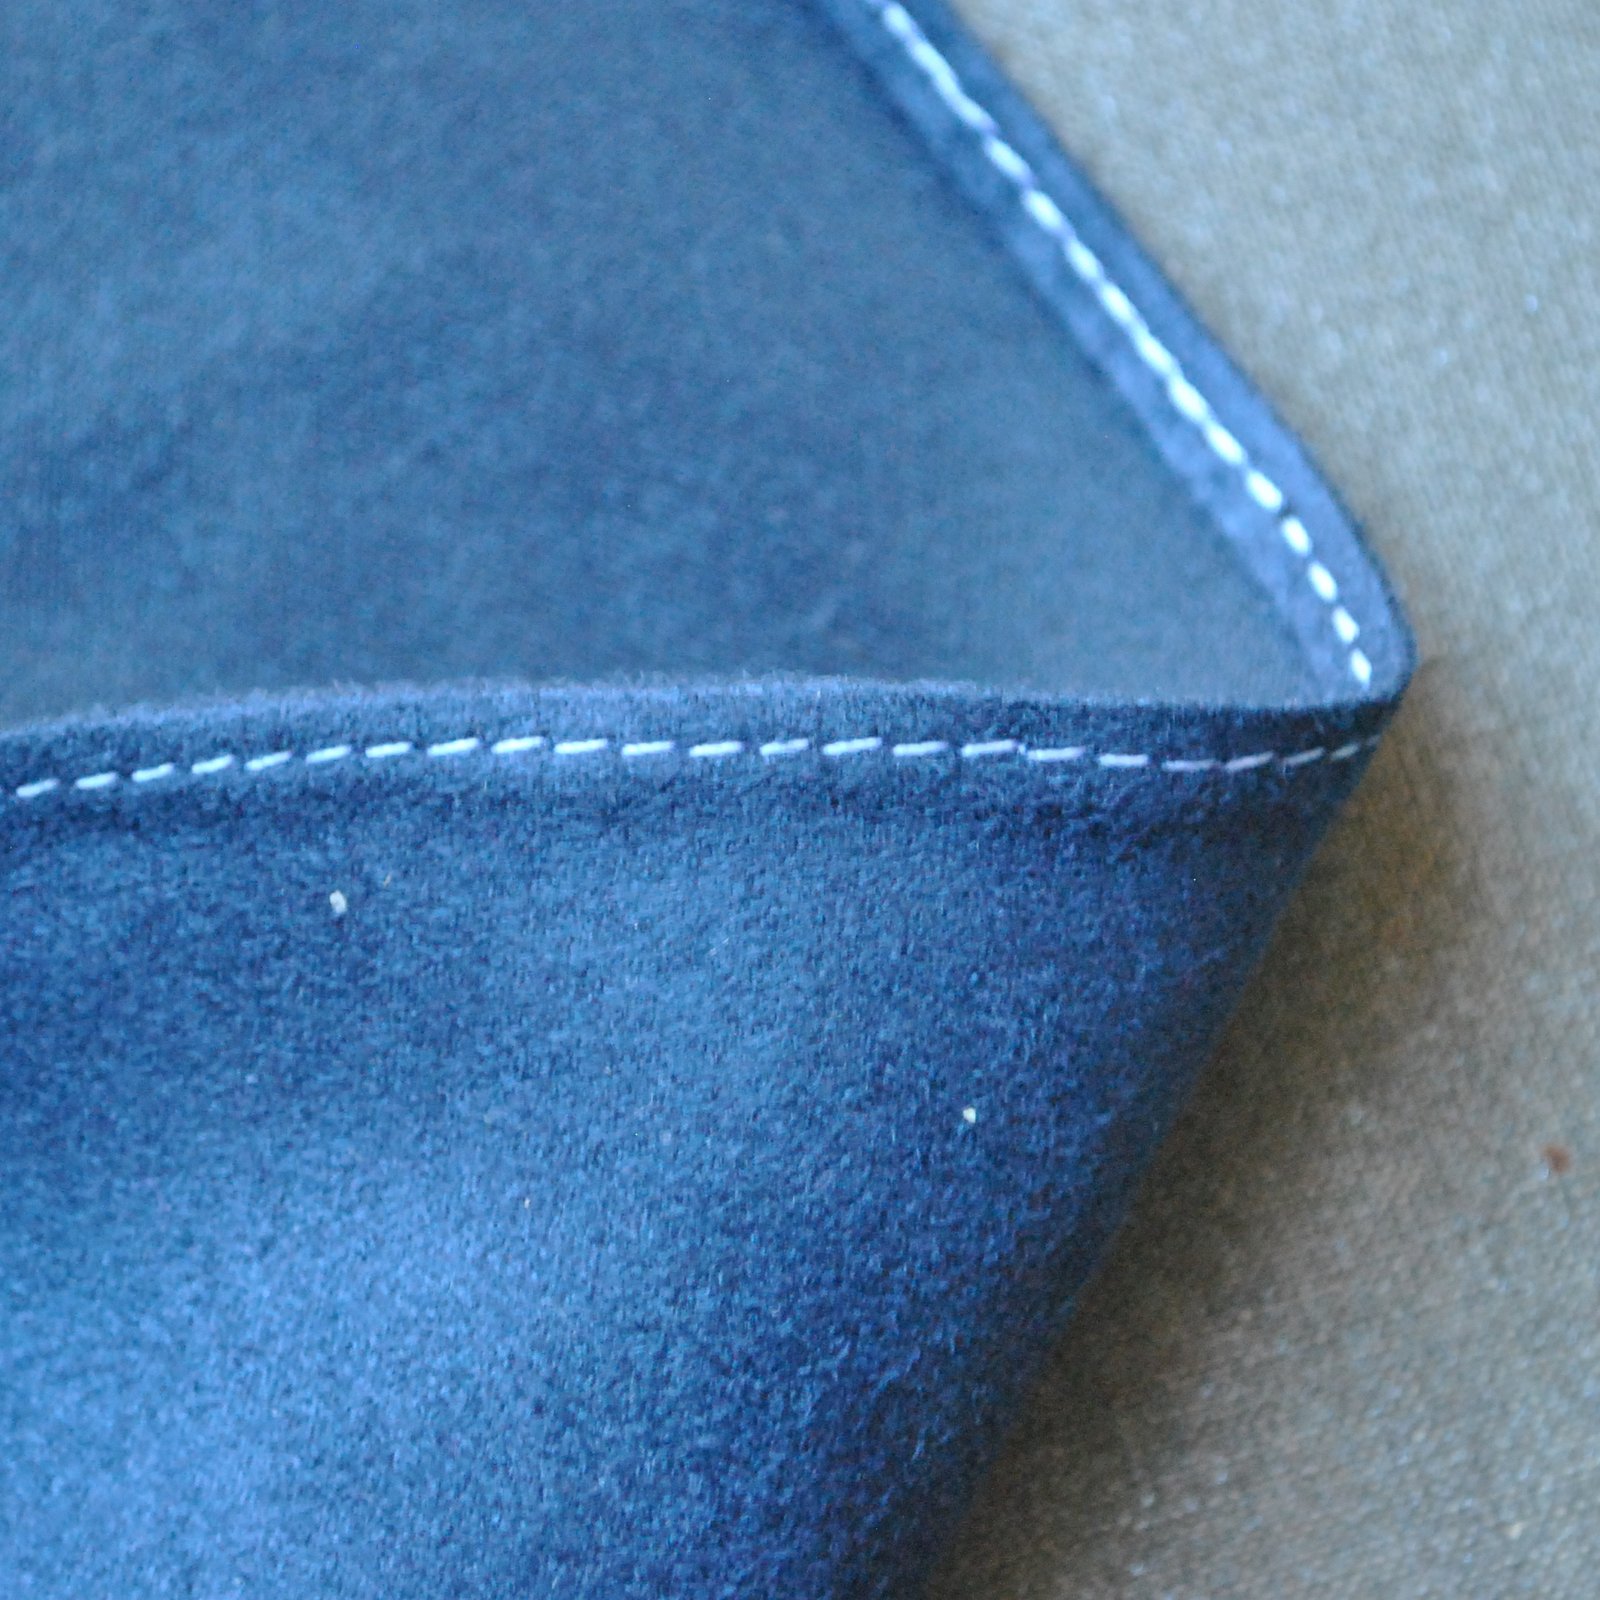
Design decisions:  all the raw edges are finished with overlocking in dark blue thread, and I double top-stitched all seam allowances down with two different colours of thread; a coppery brown, and a creamy ivory.  These are both Gutermann upholstery thread, I actually prefer this to topstitching thread because A) it is tougher and B) it is less prone to fraying, so is easier to thread a needle with it.  I’ve used it for all my previous jeans, as well as for all my Alabama Chanin projects too, of course.  I decided to go with the two different colours, because it’s a detail I’ve noticed in some rtw jeans that I like a lot.

For the breast pockets: I originally double topstitched these in the two differently coloured threads too, however it just didn’t look very nice.  To be honest, something about the curved edge; cup-shaped pocket shapes topstitched onto the front just suggested “topstitched boobs”, to me.  Maybe that’s just me being weird… but I couldn’t stand it and unpicked the ivory and restitched the second line in the same copper brown as the first, as above.  It’s less obtrusive now and I think looks better.  Sorry, if that all sounds super weird, but just saying….

Some purely gratuitous details shots…

cuff topstitching and bar tack…

collar …

topstitching …

breast pocket…

waistband…

Details:

Jacket; Named patterns Maisa jacket, made from old pairs of jeans
Skirt; Vogue 1247, details here
Tshirt; Closet Case patterns Nettie bodysuit, white jersey, details here
Shoes; made by me and my own design, details here


location: the sundial at Cottesloe beach, Western Australia

pinterestmail

purple-y Jade mini skirt, 6 different ways

During another of my sometimes brutal wardrobe clean outs, I parted ways with this little purple skirt… I have to admit it was a little gut-wrenching to get rid of this one because it had only been in existence for one sad little winter, albeit a glorious one, since I wore it at least once every week!  Aah! little purple mini skirt, the light that burns twice as bright burns but half as long… and your light has burned so very very bright…  *

I made it in a purple wool/silk knit from KnitWit, using the Paprika patterns Jade skirt… and it was such a devastatingly useful, mix-and-match-tastic item of clothing! actually as all sludgy coloured little mini skirts are.  Sadly, the knit, while a gorgeous colour, of a lovely weighty thickness and with a magnificent “quality” feel and texture to it, didn’t have a huge amount of recovery… and I’d used a VERY stretchy black poly for lining it, some leftovers from my tights! if I recall correctly!  Definitely not sturdy enough to give the purple knit the backbone it needed, so the whole thing got floppy quite quickly.  Toward the end of winter I actually worried a bit that it would at some point slide slowly and gracefully south down my smooth, black-tights clad legs to my ankles and become a rather gorgeous purple hobble…. haha wouldn’t that be glamorous/fabulous/amusing… NOT.

Anyway, because it’s been that good I thought I’d give it a little farewell party… the fact that I only wore it for one winter and still found six outfits where it is paired with almost totally different items of clothing in each one is testament to its versatility!  Also, since these were all taken during my Year of Handmade; you know, that year in which I wore ONLY clothing and shoes made by myself, ahem…I made every single blinking thing I am wearing in each of these photos, which is why the black boots appear in so many outfits, sorry…

Links to all construction posts provided  🙂

Below: at left; with its matching top, charcoal gloves, black tights, black boots
At right; with ivory top, blue cardigan, navy cardigan, purple scarf, charcoal glovesnavy tights, black boots

Below, at left: with charcoal twist top, raspberry tights, black boots;
At right; with pink jumper, green scarf, lime green hand warmers, black tights, black boots

Below at left: with ivory top, grey coat, raspberry scarf, black tightsblack boots
at right: with coffee Tshirt, striped jumper, black tights, black oxford shoes

Ok, so it’s awff to the sewing room… because clearly I need a new one …

* Blade Runner, after Lao Tzu

pinterestmail

deep teal, suedette dove blouse

Hey!

I’ve made a new blouse.  It’s the Dove blouse by Megan Nielsen patterns, in an lightweight but warm, faux suede from Spotlight.  So, the recommended fabrics for this pattern are shirt-weight stuff like voile and crepe de chine and chambray and linen… not a wintery fabric like this.  However, when have I ever taken any notice of fabric recommendations? Pretty much NEVER, haha.

And I love it.  Very very happy.  Look at those sleeves.  Oooo yeah.

this is a blouse that demands at least one dramatic arm pose

Now, remember how I mentioned pretty recently that I was looking out for this pattern??  Well, Evie, of Indie Stitches very kindly emailed me to let me know that she had one in stock… and offered to send it to me… thank you so much, Evie!  Indie Stitches is an online pattern store with a very nice range of both paper and digital patterns, obviously as the name suggests specialising in small and independent pattern makers like Closet Case Files, Grainline, Sewaholic, Jennifer Lauren Vintage, Papercut, By Hand London, Tilly and the Buttons, Waffle patterns, Megan Nielsen and would you believe this is just a selection?! There are many many more!  If you love supporting small independent pattern companies then I highly recommend heading over to the Indie Stitches pattern store and having a browse, at least.

Please note; I did receive this pattern gratis, however there are no affiliate links in this post.  I will always notify my readers if there is an affiliate link in my posts.  Also on a tangential yet related note, I read somewhere that people think bloggers are raking in the money through affiliate links, well! that may be true for some types of bloggers, like maybe fashion bloggers?  but sewing bloggers…  NO.

For the sleeves you do a triple-stitched skinny hem… it’s a hem finish I have used a few times before that gives a neat little baby hem but with no rippling or “lettuce-leaf” curling that you usually get with a single-stitched or machine-rolled hem… I think I read about it first years ago in an issue of Threads.  I wasn’t sure how it would work out with the slightly thickish suedette, but it did beautifully! and I had a request from my daughter and also from sewnewbee in IG as to how exactly is it done so I did a little sample and took a few pictures for a short tute…

I used a contrasting white thread here because I found you could barely make out a single thing in my pictures with the matching thread!  anyway:

First; stay-stitch at a distance of 6mm (1/4″) inside the raw edge, being super careful NOT to stretch out the edge while doing so.  This is the 1st row of stitching.

Turn the raw edge to the underside just outside the previous stitching, so the stitching sits just inside the pressed edge, and press.

Stitch again (the 2nd stitching) at a distance of 2-3mm  (1/8″) inside the pressed edge, and give it another quick press…

Trim away the raw edge as close to the 2nd stitching as you can.

Turn under this now extremely skinny, double stitched edge and stitch again (3rd stitching) right over the visible (2nd) row of stitching.  The first two lines of stitching help keep the hem from stretching out as you sew, so your edge will be nice and flat and with minimal “lettuce-leaf” curl along the edge.

Inside: looks almost like one row of stitching, but it is actually two; one over the top of the other

Right side has only one row of stitching… plus a very skinny, nicely non-curly edge achieved in a difficult to hem fabric  🙂

excuse me ma’am, your remote is showing

Details:

Blouse; Megan Nielsen Dove blouse MN2105, version 2, in petrol blue suedette
Skirt; Vogue 1247, yellow corduroy dyed brown, details here and my review of this pattern here
Tights; self-drafted, black polyester stretch, details here and my tutorial for making your own custom-fit tights pattern is here
Boots; made by me, and my own design, details here

location: South Perth foreshore, Western Australia

pinterestmail

a little bit of haute couture…

…haha, just kidding.  I’ve made some winter jammies for myself.

I bought this lovely, cosy, fluffy cotton flannelette from Spotlight months ago, actually during their 40% off everything sale in the height of summer, you know; when it’s so hot the thought of fluffy anything  is too awful to contemplate…  however it was rather fun to be able to choose from the full, pre-season range of prints and not just the end-of-season rejects like I normally do, ‘cos I shop at the beginning of winter when all the good stuff has all sold out … it really does pay to plan ahead!   Who knew?! I chose this cutie cute-ums woodland animal print… too adorable for words, hmmm?…  btw, cutesie little prints are not just for the kiddies.  Old hags like me are allowed to wear them too, y’know.  I almost bought a pink cupcake print, but this one does co-ordinate nicely with my fluffy slippers.  

One’s sleepwear must always co-ordinate with one’s pussycats too, a mandate not often mentioned in fashion must-does even though it’s pretty darn IMPERATIVE

gratuitous pussycat pic

Patterns: well, in the past I’ve used the old pair of pyjama bottoms for all my new ones, and I almost did this time too then I was suddenly like, hold up… I actually have a lovely new pyjama pattern, and one that was named FOR MEEEE!! still pinching myself that Heather was so kind…!  Obviously, the ol’ ego kicked in and held sway, and I made Carolyn pyjama bottoms.  🙂  I had to make them a little bit shorter due to not quite enough fabric … I didn’t take into account that my print was directional so I wouldn’t be able to flip the pattern pieces upside down! *kicking myself* I’ve previously made the shorts version of the pattern twice, here and here.

The top; well I used my standby Burdastyle 10-2009; 121 modified a bit… this time to have a higher, wider neckline with no centre front slit.  I’ve found in the past that having the low V-neckline in pyjamas, my chest actually gets quite cold in winter and I’ve resorted to wearing scarves over my pyjamas… ridiculous!!  so I cut the neckline high so my chest is covered up.  I’ve used this Burda pattern three times before… here, here, and here; twice for pyjama tops.  It’s pretty plain and boring and the easiest thing in the world to make up since you don’t even have to set in any sleeves… it’s basically like a completely shapeless flat sack with cut-on sleeves, sewn up.  I require very little by the way of fancy elegance in my pyjama tops, so boom, done!  I overlocked all the raw edges and topstitched the seam allowances down, like faux-flatfelled seams.


You may be forgiven for wondering… why hasn’t Carolyn used the Carolyn top pattern too? well, I did think about it, however I currently have other plans for that top awaiting in the wings; Rosie, @artworkerprojects on instagram has made so many beautiful versions of the pattern including this amazing dress.  This version is my favouritest of favourite Carolyns that I have ever EVER seen!  and I have the devious intention of shamelessly copying her… very soon, hehehe.

In the meantime… sweet dreams!

Details:

Top; Burda 10/2009;121, white cotton flannelette
Bottoms; Closet Case patterns Carolyn pyjamas, cotton flannelette
Slippers; made by me from floor mops, details here

Also, nothing to do with sewing, so yes, this is a little bit random … recipes make a very rare appearance here on my blog since cooking is not really my thing, but I’ve developed the perfect muesli!!  this is SO YUMMY that I just had to share.

I prefer a fruit-free muesli, and for years I’ve been a loyal fan of a commercial brand, until it suddenly and inexplicably changed the formula to have quite a noticeable and very strong vanilla flavour. This completely ruined it for me.  I been searching for another one, unsuccessfully… all the ones on the market here either have too much fat or sugar, or contain very highly process components like puffed rice; eww!  So I finally got proactive and made my own.

This recipe gives a very nutty and wholesome muesli, that is not sweet.  I LOVE IT.

Muesli

1/2 c pecans, roughly chopped
1/2 c flaked almonds
1/4 c sesame seeds
1/2 c pumpkin seeds
1/2 c sunflower seeds
1/4 c linseeds
1/4 c black chia seeds  (optional; I only included these because we happened to have some that needed using up)
3 c rolled oats

Dry toast each ingredient separately in a frying pan over low heat, using no oil.  The only exception is linseeds, which I’ve discovered will fly all over the place like popcorn so I don’t toast these!  Stir frequently while toasting to avoid burning, and tip each into the same bowl once toasted and before doing the next ingredient.  Do the rolled oats in batches.  Mix ’em all together and let the muesli cool completely before storing in an airtight container.

I like it best mixed with natural unsweetened yogurt… enjoy!

pinterestmail

golden brown


hello!  I’ve made this new blouse…  I was having trouble thinking of a way to describe the colour, since the only thing coming to my mind was those white puffball fungi that upon “puffing” send forth a little cloud of smelly spores that are just about exactly this colour.  Then Craig came to the rescue, suggesting “golden brown”  Oh, yes, that is SO much nicer!  Why is my brain sooo….? um, weird and mundane and lacking in poetic nuance?!


Fabric; a silk crepe from Tessuti fabrics in Melbourne, bought during a previous years’ trip over there with Mum and Cassie.  I’ve had it marinating in the stash all this time, awaiting the perfect blouse pattern.  I think this was happily, and accidentally, IT!

obligatory back view… 


Pattern; the Sudley by Megan Nielsen patterns. Tim and Sam gave it to me for Christmas, after I had requested the Dove blouse pattern.  Did I mention already that the Dove is perpetually sold out?? yes I believe I did.  Clearly my boys encountered the same issue that I have had …. timing, it seems, is everything!!  However, the Sudle is a nice little pattern, very simple, and I think I will use it a lot too.

This is actually the second Sudley I have made.  I also made a dress that has now been assigned to Cassie when I realised it was just going to be a little too, er, young for me.  I expect it’ll show up on ye olde blog here sometime…


Alterations:  The Sudley is a very young-at-heart style whereas I am more of a hoary-old-beast-at-heart; so I made a few minor design alterations to “old” it up a bit.   I opted for the plain neckline, and jazzed up the plain sleeves by running a loop of skinny elastic through the sleeve hems to gather them softly up, and made a separate bias rouleau loop “bow” which is purely decorative and just sewn on to the hem with a few firm stitches through all layers.

I also cut the lower hemline to have a curved “shirttail” line to it.  The hems and the neckline are all finished by hand, because I really wanted to have a smooth clean stitch-free expanse of fabric with absolutely no visible topstitching anywhere.  This is about as invisible as I could get.

Oh; one thing I did, which I would recommend for this type of neckline; you stay-stitch all around the neckline and the keyhole opening, obviously to stabilise it, however! to further help keep the neckline straight and true I kept a little bridge of fabric intact at the top front edges of the keyhole where the ties were to be attached, and maintained it throughout most of the blouse’s construction, and only cut through it at the very last minute, when turning and hand-stitching the bias binding down on the inside.  I think this simple precaution really helped to keep everything true.

All seams throughout are French seams, except for the armscye seams which I just ran through the overlocker to finish.  Picking my battles here!  This silk, while absolutely divine and a dream to wear, was actually not much fun to sew!  However!  The puffball spore, I mean, lovely golden-brown is a perfect colour for autumnal me, also I think this style of blouse suits me and I’m going to enjoy wearing it a lot.  It’s going to go with TONNES of my other clothes.


Details:

Top; MN2004 the Sudley blouse by Megan Nielsen patterns with minor modifications, silk crepe
Skirt; Vogue 1247, ivory curtaining fabric, details here and my review of this pattern here
Shoes; made by me, my own design, details here

Skirt below; Vogue 8363, canvas, details here

Location: Eagle Bay, Western Australia

Wearing it out to dinner recently, with my “bookshelf” skirt.  I think they go together quite nicely!

And my clogs have received a much-needed makeover!  The ivory pleather part of the upper has got so worn and was starting to pull badly around where it was nailed to the soles…. I’d already fixed it once but finally acknowledged that if I wanted them to last a lifetime, and I think they can! then it was time for action.  One thing I’ve learnt about making my own shoes is that if something needs a little mending or attention then it REALLY pays to get onto it very quickly.  Mum had given me an ivory leather clutch years ago “for shoes” and it was juuuuuust big enough so I could cut out new pieces.  I used my punch that I bought in Copenhagen, and upholstery thread in ivory to sew up and down all around, and hammered on the new uppers.

Now they’re as good as new!! in fact; I reckon BETTER!

pinterestmail
Switch to mobile version
↓