greenery

… and the colour of the year for 2017 is….!!

hehe, it’s kinda silly, but in early January I love looking up what the fashion Colour for the Year is going to be, even if I then forget about it and don’t add any of it to my wardrobe!  This year it is Greenery, and serendipitous news, I had bought a length of this lovely summer weight wool pashmina fabric from Spotlight, in a colour that is well, not too far off.  I love being inadvertently fashionable!

So I made a little dress.  The wool is woven in a twill pattern, and is very light, practically sheer, so I lined fully with a springy yellowy-green polyacetate lining fabric.  It was absolutely amazing to discover invisible zips in Spotlight, in exactly the right colour too.  This is so rare, especially with more out-there colours like this one!

I used Vogue 1351, which I have previously made up once before, here.  This time I followed the pattern to the letter and cut the skirts and bodice front on the bias like you’re supposed to.  I let it hang for a few weeks for the bias to drop before hemming… why so long, do I hear you ask? well not for anything in mindfulness to the outcome of this dress, NO! but because like a ravenous wild beast my Zora Queen Comic Con costume has been demanding and devouring every scrap of my creativity to the exclusion of all else.  AAAAAAAGH!!

Anyway!  It’s finished now!  This dress, I mean; not the costume.  Although that is too, hip hip hooray.  Slowly getting back to normal making.  Well, normal for me, anyway  😉

It’s funny; the vibrant colour of this dress might make it seem kinda frivolous and not like a “basic” or a very core wardrobe staple, but it is a very plain dress really, and I actually think it’s going to be an extremely useful mix and match item in my wardrobe.  The kind of thing that can either command attention in an outfit thanks to its colour, or also play nicely with other items in an outfit, thanks to its lack of detail.  A useful little stayer.  The lightweight wool is just the right warmth and breeziness for our current mild and just starting to get cooler autumn days, and I think I’m going to enjoy mixing it up in winter too, with black tights and boots too, and a dark leather jacket or coat.  The bright green is going to look great with all my bright and colourful cardigans, and will also add a nice splash of colour to more neutrally neutrals too.  I love it and am really excited about its possibilities!

Details

Dress; Vogue 1351, light green wool pashmina on a roll
Cardigan (below); my own design, based upon the Nettie by closet case.patterns, details here, paprika stretch
Shoes: sandals designed and made by me, details here

   
Location: Pt Walter beach, Attadale.  I joined friends at the cafe there this morning for morning tea; it was pure delight!!  I love these early autumn days!

pinterestmail

the Zora Queen Rutela

OK, I’ve done some pretty involved and intensive projects in my time, in fact more often than not, lately! and this one definitely ticks that box too.

Quite a few months ago, Cassie mentioned that she wanted us to go to ComicCon together this year, and furthermore, she had already chosen a good costume for me to make…

source

source

This is Queen Rutela, the queen and elder of the Zora; proud, elegant and graceful aquatic-people who reside in the Zora’s Domain in the Zelda universe.  If you’ve never heard of Zora, it’s ok, that’s perfectly normal because this stuff is the very height of geekiness and so far from the mainstream it’s a little embarrassing …  However! you have now!  She is a rather tragic character;  the story is as follows: Queen Rutela was the wife of the late King Zora and mother to Prince Ralis.  During the events of Twilight Princess, Shadow Beasts invade the Zora village, so Queen immediately sent her son to Hyrule Castle for his own safety and to inform Princess Zelda of what was going on, prompting the invaders to make an example of Queen Rutela by executing her in front of her people.

I liked the idea of going as Queen Rutela for several reasons, partly because she’s a mother so I felt she was age appropriate for me, also her story moved me because it is so sad, she’s so protective of her son and so motherly, it tugged at my heartstrings a bit.  But mostly, well, let’s be honest, because her attire and bearing is just so beautiful and I relished the challenge of giving a good go to making it!  Also, the Zora have always been my favourite species in the Zelda universe  🙂

ANYWAY!  here we go…

Firstly, the dress.  More accurately it’s a 3-piece ensemble, I made an ankle length petticoat/underdress, a skirt, and a long tunic top; all using white polyester stretch stuff (some leftovers, some new, variously from Spotlight, Fabulous Fabrics).  The plain, strapless, ankle-length petticoat is one I made many years ago, so long ago I’ve completely forgotten the pattern I used.  I never thought I’d say that, because I tend to remember patterns FOREVER, but not this time!  The skirt has the other “skirt-y” layers on an elastic waistband, and the tunic top is a drastically modified Nettie bodysuit, basically my go-to Tshirt pattern.  The sleeves are in two parts, a close-fitting “under” sleeve that is wrist length, and the “over”sleeve has a very high sleeve cap and a bell-shaped bottom edge that is gathered and “pouffed” into the under sleeve, then point-stitched in place to get artistic-y folding.  At the shoulder edge, the extra fabric in the sleeve caps is pulled in with three sharp darts; making a jutty-out sort of shoulder cap… that’s a technical term there, btw.

I stitched frilly “gills” to the side underbust area.

Oh! I’m getting ahead of myself… those frills were formed in the following way; I clean-cut the eyes using my rotary cutter, then holding the edge just slightly and evenly stretched out, passed it over a candle flame; which melted the edges just a little and set them in a naturally curly frill.  I took a little bit of practise to get this just right, with the right degree of frill and with minimal scorching!  Fortunately, those bits that looked a bit charred black just crumbled off when I rubbed them between my fingers.

Once I’d made the three parts of the dress, I shrouded Bessie in plastic and newspaper, dressed her, masked off the bits that I wanted to remain white, and sprayed the skirt, then the top utra-carefully and judiciously with poppy red enamel spray paint (Bunnings)

The colour is a little brighter than ideal, I really really wanted a warm, dusky coral pink, but with spray paint you’re unfortunately stuck with whatever is in the VERY limited pre-mixed range…  🙁 /

Spraying was pretty scary, my application isn’t perfect, and there is a blotch on the R shoulder that is a bit heavy and which was pretty devastating for a while, but I had no choice really but to accept what I’d done.   As it turned out I shouldn’t have worried too much because you couldn’t even see the blob once my headpiece was on!

Next, the fin/wings… I cut four-layers in light grey polyester organza, and simply stitched all layers together by skinny zig-zagging around all edges, and slip-stitched it in places to the top of the sleeves.


Next, the jewellery; and this bit was lots of fun!  It’s a long time since I’ve played about with jewellry-making and I really enjoyed it  🙂 I used Super Sculpey modelling clay, jewellery wire and gold metallic acrylic paint (Spotlight) and some really lovely turquoise glass jewels (Fabulous Fabrics), and baked my pendants in the oven before painting them, and stringing them together.  It’s hard to see the exact details of the Queen’s jewels in the short footage of her that there is, and what’s more, the details seem to vary from picture to picture, so I took a little creative license and designed my own, closely inspired by what I knew of the Zora style, and the arrangement that I could see from the footage.

The body-lace fastens at the small of my back; the necklace is supposed to sit out very wide on her shoulders, and I managed to get this look by stitching rings halfway along my shoulder, and the necklace clips onto these, wide on each shoulder.  I also made a “beaten gold” collar/choker from interfaced gold metallic jersey (Spotlight), hand stitched radiating lines over it, and stitched the last pendant to it, then stitched white vinyl “petals” (Clark Rubber) around the lower edge.  This closes by press studs at the back.

Headpiece: it’s simply a long tail in the same polyester stretch, stuffed with Hobby Fill (Spotlight). I inserted fins of fabric-covered cereal-box cardboard into the side seams, and I took the precaution of spray-painting the cardboard ivory first because the polyester is kinda see-through, and stitched it to the rim of a red swimming cap, also catching into the stitching a white plastic face-mask (Spotlight)

Now for the hair!  This took quite a bit of nutting out…. I’d stretched the bathing cap/head-tail/face mask contraption to Mr ‘Ed, my foam head, above.

For the hair I used skinny foam noodle (Clark Rubber) and stitched the top bit of the hair through all layers.  This stuff is pretty bouncy with a mind of its own, but I damn well forced that sucker to be what I wanted it to be with firm and masterful stitching to get the folded part/hair at the centre top. Take that, foam noodle!!  BOW TO MY WILL…

The blonde “coral” hair was easier and actually lots of fun, like being in kindergarten again… I snipped it into lengths, and painted the bits with various mixed shades of pale yellow, shaded with addition of lilac and metallic gold.  I wanted the hair to be in shades because we all know a flat colour just looks fake and, well, flat, any painted thing always looks so much more vibrant and real and rich when it has several different shades in it.  Going to this much effort sounds complicated and maybe even unnecessarily involved, but I whizzed through making the hair, loving every paint stroke.  I strung them on yellow thread and stitched them to the cap through all layers, and painted part of the top layer of hair in the same way.  There is 35m of noodle in this thing… I can hardly believe that myself but yes, really!

One “strand” came off while I was pulling the thing onto my head, aaaaagh NOOOOOO! which was a bit of a worry, obviously! but I had plenty of “hair” and luckily every other bit stayed put.

The final step was to spray-paint the top side of the head-tail with the same poppy-red spray paint.  Scary!! but I was super SUPER careful… On another note, this picture below gave me a laugh! the head looks hideous, the stuff of nightmares!!!  Zoe “looks” terrified but of course she wasn’t… she’s knows what’s real and what’s not.  Even on Saturday morning when I emerged from the bedroom in full costume plus makeup, all the cats just looked at me, maybe a bit quizzically! but they still knew it was me.

Oh, wait… doing the make-up was the final step, of course!  I painted white dots around her brow line, just like in my inspiration pic, and then trimmed away the mask.  Cassie suggested a strip of Hollywood tape on my nose, which helped keep the nose piece firmly in place throughout the day.  Also, with amazing luck, Priceline had a 40% off all makeup sale in the days beforehand so I got some white translucent face-powder and rather horrible bright red rouge-y stuff for the matching poppy-red circles under my eyes and lips.


The photo at the top is my first attempt to photoshop myself into a fake background!  pretty good, huh?!  this actually took me aaaaaaages… hehe, #photoshopnoob Well, I felt like Queen Rutela just HAD to appear in Zora’s Domain or it would be, well, you know, just like an unfinished and half-done effort, so I decided I just had to do it!

I didn’t get any photos of me actually at ComicCon in Perth unfortunately; we were just having way too much fun! plus my gloves made it impossible for me to operate my phone!  However about a million people asked to take my picture, which is not as weird as it sounds, it’s just the done thing at ComicCon when you dress up; everyone does it!  Also it was highly gratifying when people recognised my character, totally made my day!!!  Every now and then I would hear a call; “Queen Rutela!!!!!” which was really nice!

pinterestmail

burnt brown jeans; 6 different ways

I’ve been planning my upcoming autumnal/winter wardrobe, doing a seasonal clean out, or in today-speak; konmari-ing the heck outta it… and decided to bid adieu to these jeans.  The last few times I’ve tried to wear them I’veburda7863-1-728x1024 just felt vaguely frumpy in them and peeled them off straight away.   I’m just not feeling this style any more, feel like it’s becoming a little bit dated.  Is it just me, or are skinny jeans appearing decidedly passé right now?  Anyway; OUT THEY GO!!! Well… maybe just to the time-out box for a while.  I have this box you see, that I chuck doubtful clothes into, and in a few months or a year or so I’ll check them out to see if it’s easier to make a decision then.  Honestly, sometimes I wonder why I even have that box since it’s a kind of hoarder-ish thing to have and really nine times out of ten the items within get the flick! but for the one item that gets a reprieve I’ve always been glad I kept it after all.  Sometimes, you and your clothing just need a bit of a break from each other.  A trial separation.  A conscious uncoupling, with the door open to re-coupling.  Yeah.  *madly justifying hoarding tendencies to oneself*

Anyway, here are six of my favourite outfits with these hardworking jeans…

I first made them about two years ago, one of my many Burda 7863’s and they have been absolutely fantastic in their day, I have to admit it.   Very stretchy, therefore super comfortable, and a terrific colour that seems to go with everything I’ve got.  Having said that; a heckuvva lot of the time, I wore them either with this big loose ivory shirt as in the first picture… OR like at right, with one of my Pattern Magic twist tops.  Here, with the forest green one.  In fact, it would be pretty accurate to say these two outfits were both very reliable fallback “uniforms” for me for quite a long time…

brown-jeans-2

At left; another frequently-worn ensemble, worn with my white drape drape t shirt, and my leather jacket.  At right; I do still like them rolled up to three quarter length like this.  Hmmm, actually I really like this outfit too, maybe I should keep them after all…. (worn with self-drafted Tshirt, cardigan, self-made shoes)

At left; they’ve frequently done service in casual, dog-washing, beach walking, gardening, house packing-and-moving mode too… worn with my over-dyed blouse, black thongs…  At right; another winter-y ensemble… worn with my Pattern Magic twist tops, my shearling jacket, hand knitted gloves and my self-made desert boots.

brown-jeans-3

Okaaay! I’ve just done an excellent job of talking myself out of getting rid of them! 😀 So maybe I’ll see how they go this autumn/winter before giving them the big heave-ho…

Anyway, on a slightly related note: I’ve read a few good strategies about helping to clean out unwanted stuff from your house, the one I like the most and have adopted a few times in the past coupla years is to just walk into your closet/open a cupboard and immediately throw out five things without spending more than ten seconds thinking about each thing.  If you give yourself permission to do this once in a while; and I use that phrase because I have terrible hoarding tendencies and really DO need to give myself a stern talking to, mentally giving myself permission to throw things out seems to work for me…  anyway, it can be an excellent and stress-free way to de-hoard.  The trick is to first say sternly to yourself “OK, I’m doing this NOW” and then to march in and NOT think too much about it.  Five things, just like that. *snaps fingers*   It can be surprising how quick and easily you then immediately identify those things that are just not working anymore.

pinterestmail

bobblehead

Note; apologies for the latent loopiness of this post.  Sombre, serious, meaningful and purposeful sewing and discourse thereof shall recommence in the near future…. or maybe not…

So, recently I was queued up in Spotlight and spotted some mini snowball-like bobble trim.  … bobbles! so playful! sooo cuute!

I just absentmindlessly picked it up, and then I didn’t want to put it down again.  Realised that I really really wanted, nay, needed, bobble trim in my life, like now.

See, I’m in the middle of making a monstrously involved, head-explodingly complicated costume for Comic Con…  well never mind that right now.   I’ve been working on it for what feels like forever but has only been a couple of weeks actually.   #imgonnalookridiculous

It just felt so nice to indulge in making something super quick and easy as a wink, like this.

Anyhoo.  2m of very lightweight gauzy cotton muslin (Spotlight), always handy to have lots of this around, btw!  cut in half down the middle along the grain line.  I folded a skinny 3mm (1/8″) hem under twice around all edges and top-stitched catching the bobble trim underneath at the same time…

Done!!

Details:

Dress; Named patterns Inari tee dress, in red/white sweatshirt fleece, details here
Scarf; lightweight cotton gauze/muslin, edged in bobble trim
Red sandals/thongs; made by me, details here
location; playground at the Scented Gardens; South Perth foreshore

I have a new scarf, weeee!

pinterestmail

making your outfits “pop”

Like most bloggers, when taking my pictures I usually try to pick some nice location as a backdrop to my creations, something that has the colours and the “feel” and/or just some general overall appropriateness in subject matter or whatever, that I think enhances whatever it is I’m showcasing.

my West Aussie outfit in its place of absolute origin, the West Aussie bush

However, even if you LOVE your background, it can sometimes swallow up your colours into its gorgeousness and your outfit kinda disappears and doesn’t show up very well… And also, sometimes I just like the idea of being able to eliminate the background.  I really like that look where you have a black and white background, and the thing you’re showing is in full and glorious colour… and after a bit of fiddling about I’ve worked out an easy way to do it and am sharing it here just in case it helps anyone else who likes this look too!  🙂

SO.  You need Adobe Photoshop;

Firstly open your picture in photoshop.  Go to Image, Adjustments, and select Desaturate.  This makes your picture black and white

Now go to the icons on the left and select the History Brush Tool

On the right in Brush selects, have the brush as the big, round-edged solid one at the top.  You can change the width/size of the brush using that size scale just above.  For the edges, make it a very small size and zoom right in on your picture so you can get it into the edges and corners as close as possible, getting it all nice and neat and no going over the edges.

For the “colouring-in”, size up the brush width a lot wider, for speed.

Once it’s all done, save it as a new jpeg.

Oh yeah!!  Doesn’t it all really POP now?!!!

“POP”:  hehe, I never use actually that phrase; I’ve always been like, pop? I heard no pop, am I going deaf? well ahem, ummm ok yes, I am actually… the perils of ageing, you know,  but um, oh alrighty then!  Guess that explains everything!

pinterestmail

the year of handmade, 12

above are just a small selection of some of my favourite outfits for this month, the entire collection for the year in total can be viewed in my Year of Handmade flickr album, here

It’s over!  I’ve worn ONLY my own handmade shoes and clothing for an entire year, and not allowed a single, ready-to-wear item to adorn my body in that whole time.  If that sounds a bit melodramatic, well to be honest it feels pretty darn dramatic to me right now!  Whoooooo!  Chucking a party in my head, right about now!!!!  This challenge has been HUGE to me.  I think it’s been the biggest wardrobe-ing challenge I have ever set for myself.  And, I almost can’t believe it, but I managed to do it.  A long term life-goal; achieved.  #tick

I’m SOOO pleased, and SOOO very relieved, although, at the same time I feel a bit anti-climactically exhausted too.  I can’t even imagine what shoes I am going to wear tomorrow!!

SO.  I’ve already discussed the difficulties I encountered along the way previously here on my blog, but just to recap…

Basically all my challenges involved my self-made SHOES!!  My clothing? well, I’ve been wearing exclusively self-made clothing for years already so that was pretty easy.

Specifically, shoes to wear in heavy rain and for “dirty” activities like bushwalking  were by far the most challenging hurdles to overcome in my year, and the kind of footwear I missed the most.  I made shoes for these scenarios and got through it fine; but I always felt quite nervous and insecure about them, like my efforts were a bit precious and not 100% up to the really heavy-duty stuff.  Though, maybe I was the one being a bit precious, since most of them did.

I also really missed being able to wear “glamorous” shoes like stiletto heels and dainty little high-heeled sandals for formal events.  Again, the shoes I had were actually fine…  but you know; a girl likes to feel shiny and glamorous every now and again! and I dunno, there’s something about clickety-clacking along in ridiculously impractical shoes that fills that need PERFECTLY.   I never did crack the the glamour glass-ceiling in my shoe-making…. I still think I could do it, but it would be a new shoe-making challenge, for sure.

How has this challenge changed me:  well, you know they say if you do something for a year, you will have successfully adopted a new lifestyle.  I think that’s true, although I am looking forward to embracing the above mentioned kinds of shoes back into my life again…. Hiking boots!!  Exquisite little heels!!   Time will tell if I truly revert to rtw shoes… I will continue to make shoes for myself, simply because I have so many plans still!!    Also, I’ve really really enjoyed wearing my own shoes so much!  I can’t even begin to describe how utterly rewarding and satisfying it is to sashay out feeling nicely put together, and to KNOW that you made every, single component of your outfit.  Like, it’s ALL YOURS.  Nothing can take the euphoria of that feeling away.  However, I’m not going to paint a false picture that making shoes is easy; some types of shoes are but most are not, and it takes time and maybe even a few failures to come to grips, get your shoe-making groove on.

I’ll definitely keep up with the clothing side of things; I’ve been making my own clothes for many many years now and have always found it to be both easy and fun.  Now after a year in my own shoes, I do feel like that mental block has been cracked too… however, I will from now on ALLOW myself to wear ready-to-wear shoes, if I want to.  As an example: we have a heavy-duty camping/hiking holiday coming up later this year, and I will be taking my big tough ol’ RTW hiking boots with me.   Common sense prevails?  *shocked gasp*

Likewise, if I want to don a pair of silly vertiginous heels to go out to dinner or parties, I will do so.  And will thoroughly enjoy it too…  😉

Just for funsies; here is a collage of my whole year of outfits in two pictures because they wouldn’t fit in one!  To better  see my outfits properly, they are all in my Year of Handmade Flickr album… along with the links to every component of my outfits for each day.  Phew!  This feels like a bit of a magnum opus!!


SaveSave

pinterestmail

totally local, totally natural, from head to toe

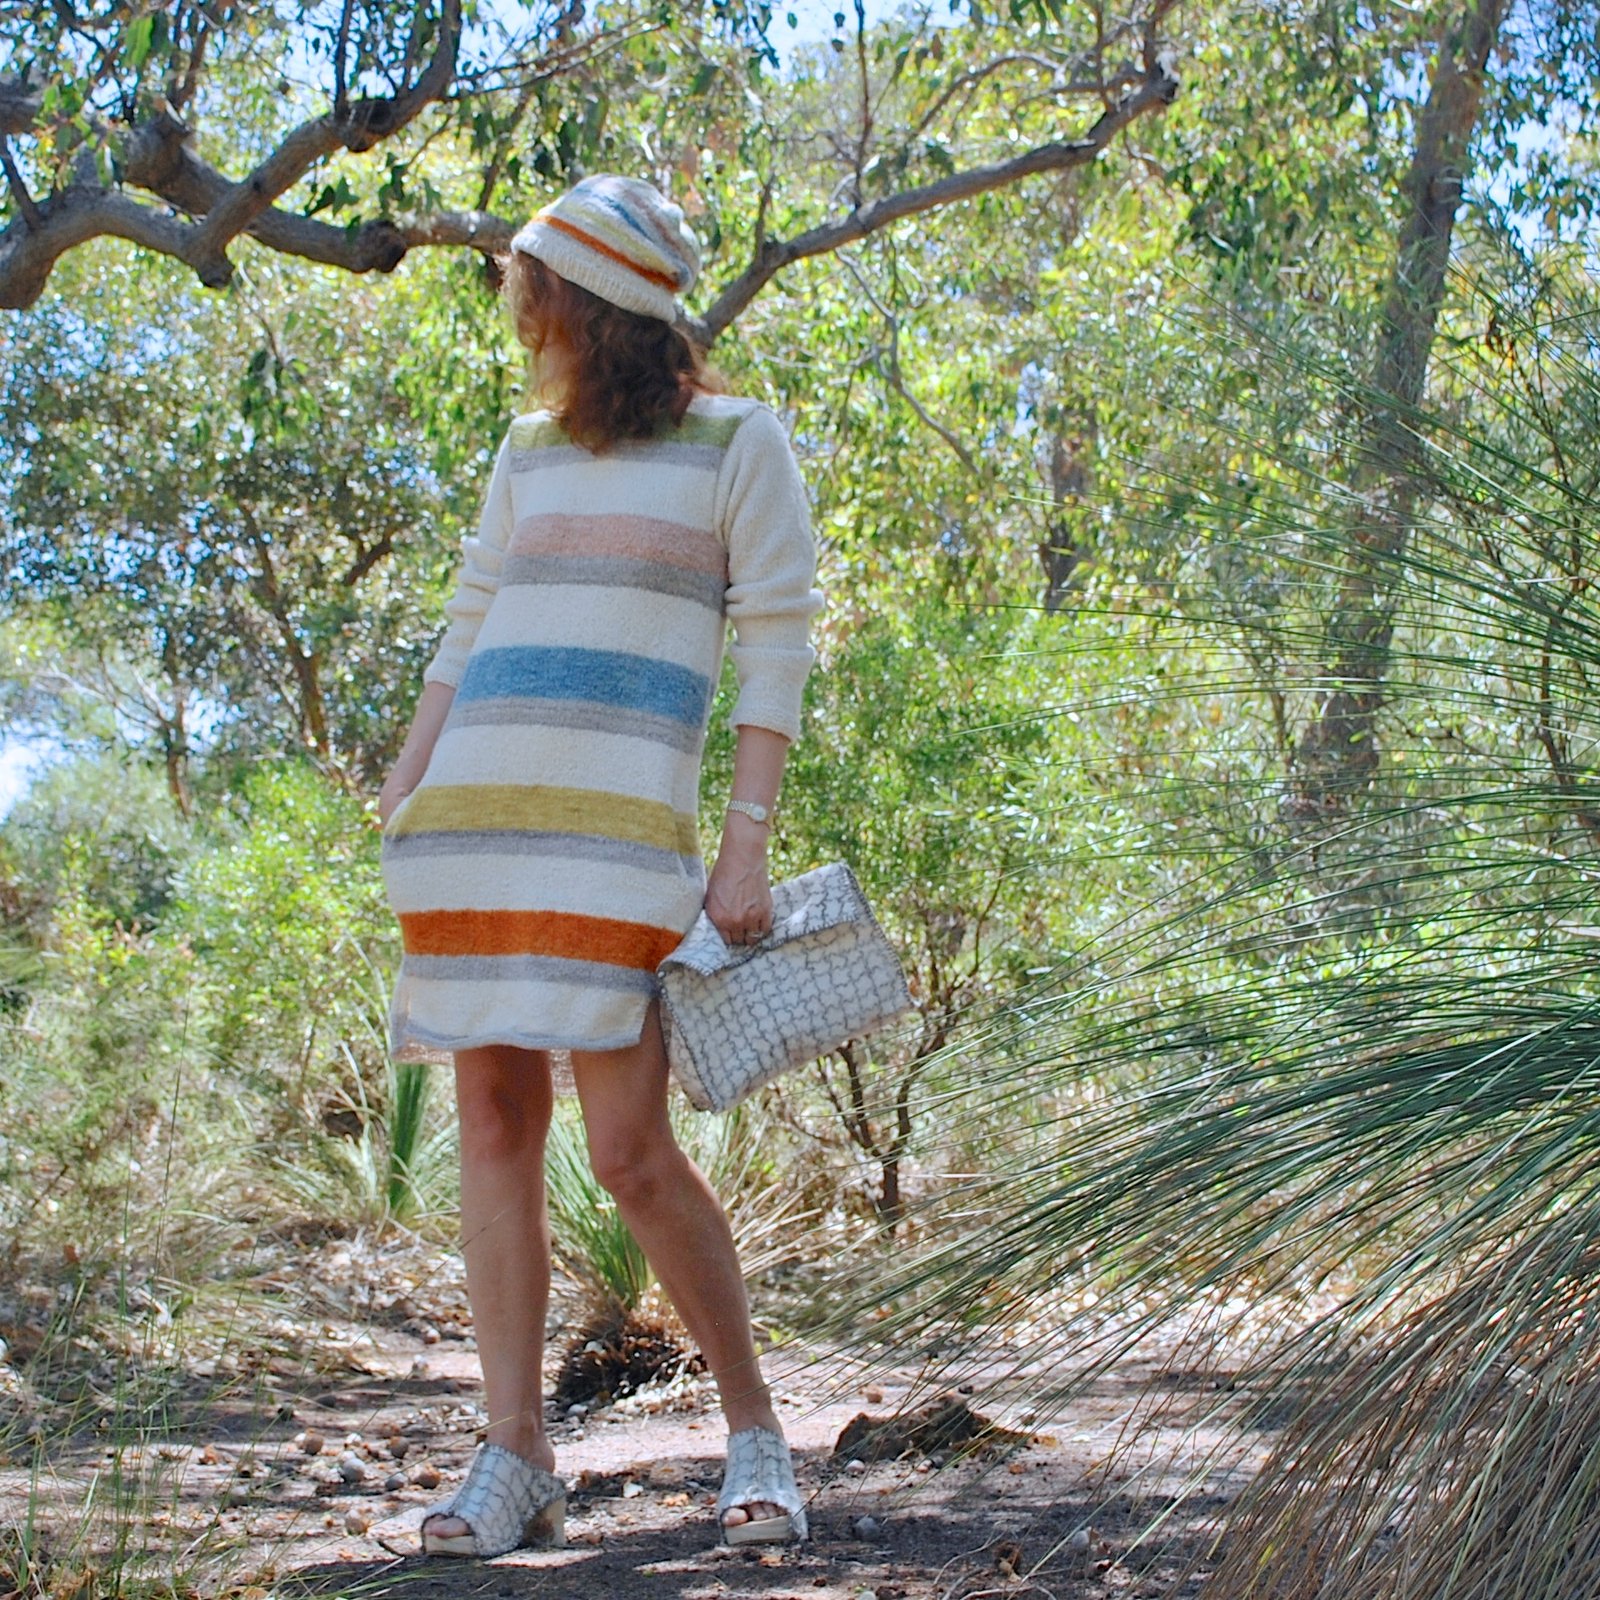
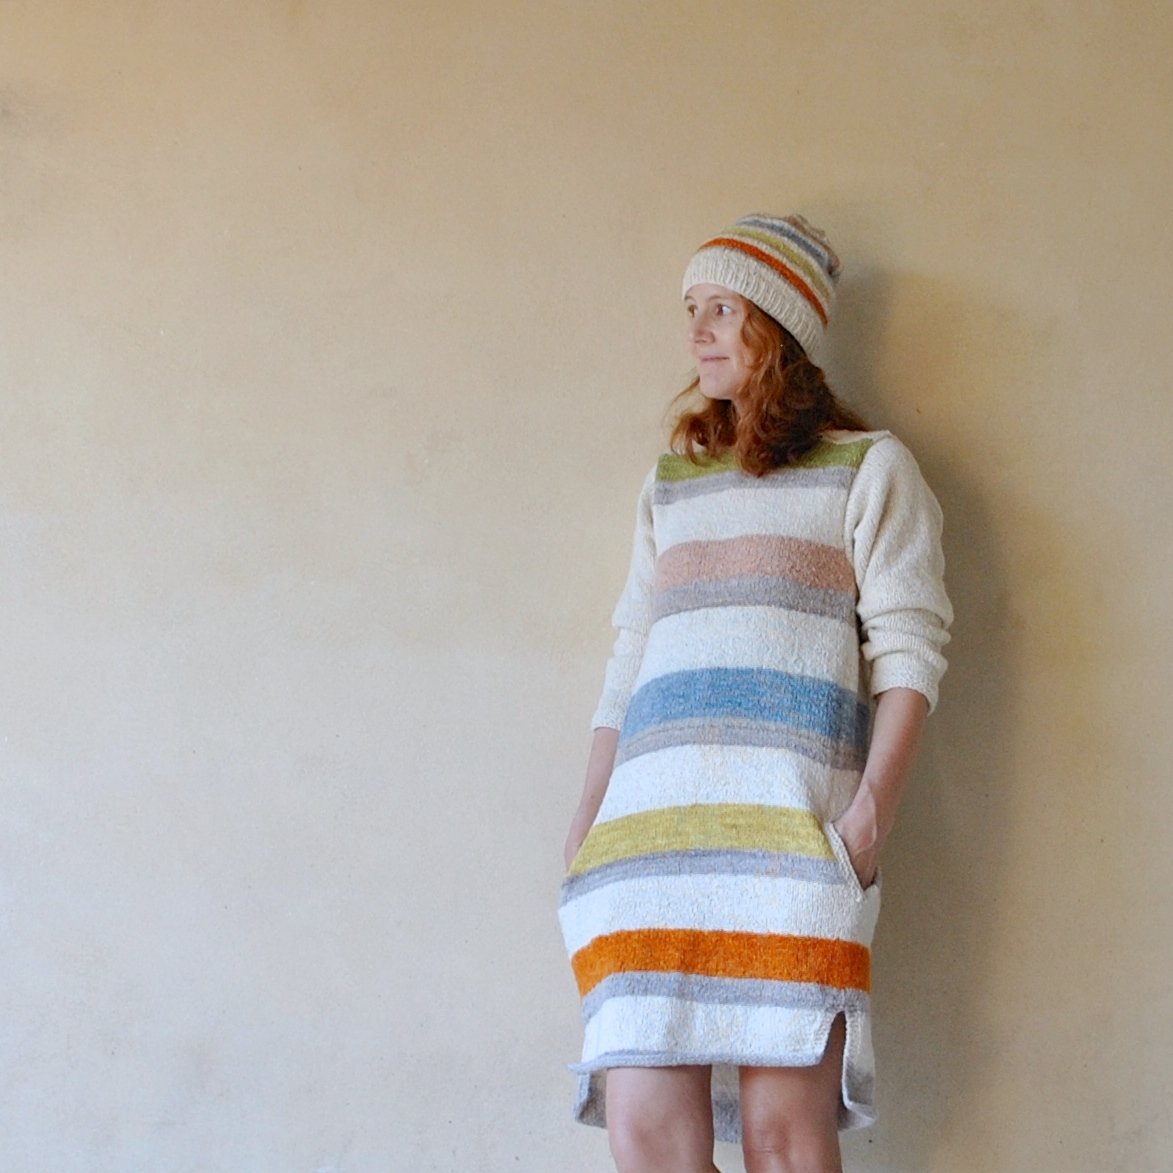
A person could be forgiven for thinking that I had abandoned my totally local, 1 year 1 outfit project, since there has been no mention of it here for months!… *blush* however, it has been plodding along, slowly but surely, and is now FINISHED!!!!  Hurrah!  At last!

The concept: last year Nicki from this is moonlight conceived the very interesting 1 year 1 outfit project and invited me to take part with her… the idea was that you make an outfit using ONLY local materials and primary supplies grown and/or sourced in your own area.  Well you know how weak at the knees I go for a dressmaking challenge! and the more difficult the better!  Several of us here in Perth took part last year; Nicki, Sue, Megan and me.  Sue, Megan and I met up for a hilarious photoshoot in our outfits one day last February; it was so much fun! and we all had plans for this year too.

from left: Megan, Sue, and me… the links in this post go to everyone’s individual posts about their outfits

So yes, I was all enthusiastic… however!  It really is a difficult challenge, far more difficult than you might think! and though I made a good start with dyeing some yarn early, my other challenge, my Year of Handmade, has consequently swept me away with its even higher degree of difficulty … I’m not whinging, ’cause I really do like challenges honestly! however I’ve struggled with everything this year a bit and it’s taken a while for me to get my groove on.  Fortunately Nicki announced a March deadline recently, which lit a fire under me.  I got cracking, and got finished!!!!

Thoughts going in: I loved my first 1 year 1 outfit project from last year; although I confess I’ve barely worn it at all!  Reason being that while I think my embroidered felt is ethereally beautiful, at the same time it is fairly fragile and can only stand up to light wearing on special occasions.  So my major priority for this year’s outfit was casual wearability; something that I could toss on and wear on a daily basis without fear of ruining it.  I also wanted it to try out some natural dyeing techniques.

What did I make: a simple knitted dress and a matching beanie, showcasing my dyeing experiments in stripes.  I just wanted my hard-won colours to shine on their own merits equally without competing with each other, and individual stripes separated by the blankness of the natural undyed ivory just seemed a good way to accomplish this.

My shoes, bag and underwear were all made for last year, and also comply with the rules of the challenge.

Sources; I obtained all my handspun merino yarn from Bilby Yarns, which is an absolute treasure trove for West Australians interested in local wool products and supplies.  My yarn is from Western Australian Merino sheep; born, grown and shorn right here in the south-west of WA.  The raw fleece is transported to Bilby Yarns in Willagee, where local spinning enthusiasts can purchase it, spin it in their own homes, and sell it to people like me back through Bilby Yarns.  It’s such a great scheme!!  All my yarn was spun by the talented Beverley L. whose yarn I also used last year!  Some of my yarn this year was leftover from last year, and I managed to buy some more of her’s this year…. I’m so pleased I was able to purchase so much of her gloriously lovely handspun!  I bought mostly undyed natural white, and some natural grey.  The grey is quite rare, and I was lucky to get hold of this!  I used the grey to highlight each colour; I like how the grey stripe adds a bit of trompe l’oeil 3D-ness to the coloured stripes, like a shadow underneath each one.

So! I had my natural ivory and grey yarn, now for the colours!  All my dyeing experiments are outlined in this post here.  I didn’t end up using all the colours I produced… leaving something for the next 1year1outfit maybe??  The colours I chose from my experiments are, from the hemline going up, are:

Orange, from Coreopsis flowers;

Acid yellow; from sour grass stems and flowers,

Blue, from Japanese indigo, and I’m so grateful to Nicki for the use of her dye vat,

Pink, from avocado pits,

and that lime-y green colour at the neckline, and seen in closeup a few pictures down, was the result of over-dyeing, soaking some of my spare indigo yarn in a sour grass (oxalis) dye bath and then with just a single coreopsis flower (orange) tossed in to give it a bit more oomph when I realised the yellow was a bit weak.

The design: is my own!!  I did about a million calculations first but even then there was plenty of unravelling and re-doing bits until I was satisfied with it!   I wrote down my final pattern below, just in case I ever want to revisit this pattern, or if anyone is interested in knitting an entire dress for themselves!  It’s ok, I wouldn’t blame anyone who didn’t but still…  The only thing is that it’s only got the one size.  That lower hemline with slightly forward slits?  yes, it’s pretty obvious that my hemline is totally inspired by the Named patterns Inari tee dress, a pattern I have made five times now and unequivocally LOVE.   I just really like the way the Inari dress slits do the job of a walking vent, but is visually more interesting and obvious than your regular, garden variety, centre-back walking vent … and I really like the terraced high-low look of that longer back and shorter front.

The dress is mostly stocking stitch, with the lower edges, the sleeve edges, and pocket opening welts highlighted with various width rows of garter stitch.  Those sleeves!  OK, I’ll confess these almost did me in  … initially I had other ideas, resulting four false starts on the sleeves before the final design decision.  Four!! It was a bit gut-wrenching, each time I would be chooffing merrily along with a sleeve, before the dawning realisation that my previously thought-to-be cool idea was actually going to look really really stupid.  Gut-wrenching!  SO MUCH UNRAVELLING!!  But I refused to give up, I kept reminding myself that this HAD to work, I’d put so much into it already and I just could not abandon it in its hour of need.  Finally I hit upon this sleeve, a very simple, and plain, , unadorned long-sleeved style , which worked out just right, I think.

Pockets; of course it has pockets!!  the dress is knitted in the round, so there are no side seams, but I left openings at the front hip to knit in the pockets later.  There are little extension “flaps” at the pocket openings, for a continuous look when you’ve got your hands in the pockets and may catch glimpses of the pocket insides; and the pockets are just little “bags” made by picking up stitches along this edge, knitting a simple rectangular strip and folding it in on itself.  The garter stitch “welt” was knitted on before stitching the pocket piece closed.

The neckline; just wanted something really simple and streamlined, so I did one single row of chain stitch embroidery around the neckline edge.

The beanie: is a slightly loose and slouchy beanie, as I love this look and have decided this style of beanie suits me quite well, I think… hope!  The arrangement of the stripes is the same as the dress, just on a smaller scale.  This got unravelled and re-knitted only once before I worked out just exactly how I wanted it to look.

Le Whole Shebang, with accessories and all:


Shoes and bag; I’m wearing the same shoes and bag I made for last year’s project.  At first I worried that they wouldn’t “go” but well; I reckon they go just fine.  I carved my shoe bases from Manjimup pine and made the felted tops in natural white and black merino fleece and handspun, as described here.  The matching bag is of the same felt.

Underwear: yep, same as last year.  Well, I’m not going to make a new pair when I never wear this set at all!  However, it is totally 100% local so I’m counting it as part of my totally local outfit again for this year, hehe.

So that’s it!!  Am I going to take part in the “1 year 1 outfit” project again next year? well I do have ideas, but confess I’m a little exhausted, by, well…  everything, at this point.  Maybe, maybe not.  The truth is that I actually do have enough totally local materials still, to produce something… so maybe…  yes?! We’ll see!

fun fact; the small tree with bright green leaves behind and to the right of me in the picture, is called a Snottygobble.  Yes, really!! #weirdAussienames

Following is my free pattern for this knitted, slightly A-line dress with inset, welted pockets, split hem, long sleeves.  Includes pattern for optional beanie also.  Please link back to me and credit me if you use this pattern, thank you so much  🙂

Knitted dress + beanie

Location;  Leeuwin National Park, in the south-west of Western Australia… although the picture immediately below is actually taken in our own garden, since I forgot to take my bag with me when I went to the park, doh!!

Now, you may be wondering… Carolyn, isn’t it the height of summer?  Aren’t you absolutely roasting alive like a broiled lobster in that warm and ultra-cosy-looking woollen ensemble??  The short answer to those questions is; yes, and again, yes.  Ahem.   The maestro of Seasonally Inappropriate Sewing strikes yet again.

pinterestmail

red thongs (shoes)


Hello!  I’ve made a new pair of um, “shoes”…??  although I’m embarrassed to even consider giving them that lofty title; they’re so basic.  Also; yes I know my year of handmade is all but over and I don’t have to make any more footwear, but I just can’t help myself!  I’ve even got some OTHER new shoes in the works too!  😀

I’d bought a sheet of this foam from Clark Rubber; it’s matting designed to slot together to make a kiddies’ playmat or shock absorbent flooring for gyms.  My straps are red corduroy, the same fabric I used for a previous pair of long-gone sneakers.  I made the hole in the foam with a sharp pencil, which I also used to push the straps through said hold.  The straps ends are sewn securely to a piece of linen that will be glued between the top and bottom layers.  Liquid nails was deployed.

The bottom layer is thin cork-covered, contact paper, cut to size, stuck on – more liquid nails, yo!!  and then three layers of clear, enamel varnish to seal and strengthen.

aaaaand, done!

Details

Dress; Vogue 2900, indigo dyed linen, details here
Hat; Vogue 8844, ivory corduroy, details here
Red thongs; made by me

random outfit shot intended to feature the thongs and they’re barely visible, ha!

location; Eagle Bay, Western Australia

pinterestmail
Switch to mobile version
↓