fractal

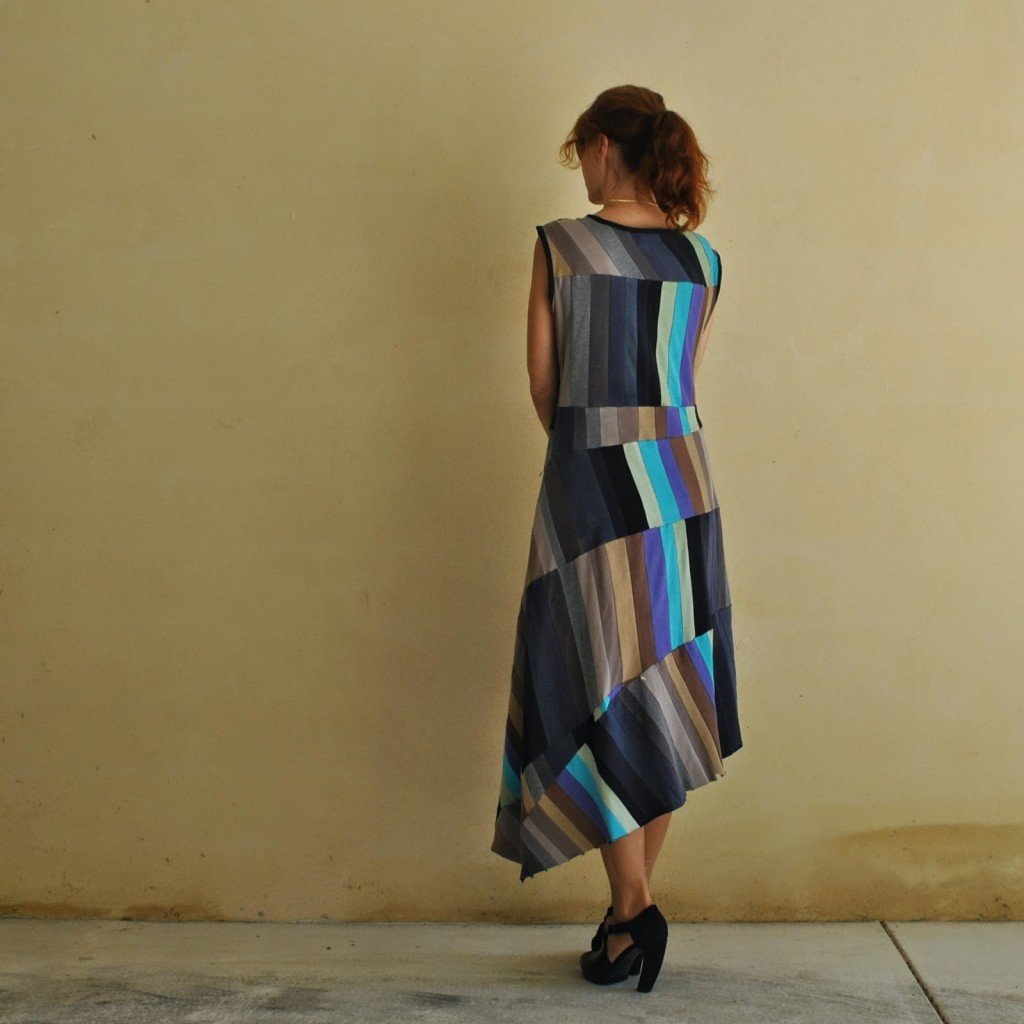
I’ve made a weird patched dress using twelve old Tshirts of my boys’.  I know it’s bizarre and crazy and probably a little bit ugly but I totally love it!
I’m constantly pinning patchwork-y and randomly asymmetric things.  I’m actually very inspired by and crave to wear stuff like this A LOT in reality, even though I also make and wear a lot of plain things.  I think I have a very non-cohesive brain, wardrobe-wise.  It plods along all plain and quiet and unobtrusive for a while, “fitting in” with the norm *yawn* and then will suddenly have the urge to zoom off into arty, thrown-together-land.  Making something kinda weird and wild like this makes me feel quite exhilarated; sorta free and unconstrained and satisfied and happy.  I don’t think I act upon this often enough.  Clearly, I need a little more such craziness in my life!
Anyway, the new dress.  I was inspired by this dress credited to Jurgen Lehl.    
I used one of my oldies, Vogue 7795 with some adjustments; namely with the front bodice tucks and back bodice darts removed and the waterfall skirt drape transformed into an asymmetric box pleat.  Also I made the back bodice and back skirt as one piece each, with the CB seam removed from both.  In my memory this is a very drop waisted design, so I also shortened the bodice pieces by about 4cm.

I’ve made this pattern up a couple of times before; both many years ago, my first version in white swiss dotted voile is pictured here looking tres touristy with a gelato and at the Fontana di Trevi in Rome, and my second version was pink, although I can’t find any pictures of that one.

When you’re making a large scale, randomly patchworked design like this one, I’ve found it’s a good idea to draw out the adjusted pieces full scale and lay them out as a guide for the patchworking.  That way, you can see how the design is looking on the scale of the dress as the piecing progresses.

I selected twelve Tshirts, all old, some very old, cast-offs from my boys.  This is one of the things I love the most about it actually, in that I am so familiar with each and every one of these shirts, having watched my boys run around playing in them a zillion times, also of course I’ve washed them all, hung them on the line, folded them and tucked them away into their dressers about a zillion times each also.  
A sentimental dress then, in a way  ðŸ™‚

There’s also one “new” fabric, harvested from a recent Absolute Fail… *sad face* IG’ed here.  
I cut all the fabric into varied width strips and then just got creative.  

In a super random design like this one it’s good to install some order to the thing somewhere, and in this case I stuck to the same order in the colour arrangement.   I finished the neckline and armscyes as simply as possible with strips of black Tshirt, stitched on right sides together, then folded to the inside and topstitched.

So, my dress is fulfilling several intentions; firstly to satisfy that creative urge, and my desire for a bit more crazy in my life as outlined above.  Tick!
Secondly, I made it as a kind of a muslin for another project that I’m planning right now.  Then I had the patching idea, was distracted and got  a bit carried away.  I may or may not go ahead with that original plan, but I’m very happy with this particular result! I’m pleased to say  ðŸ™‚

And lastly, I recently received an email from Charlotte regarding the sew solidarity challenge run by the charity TRAID.  Essentially it’s this: to commemorate the Rana Plaza garment factory collapse you select an old, not new! mass-produced garment, possibly from Bangladesh although I didn’t restrict my options country-of-origin-wise, re-fashion it fit for a new life and then you’re supposed to wear it on 24th April.  Last year I joined in the same-aimed Fashion Revolution movement by wearing my self-made clothes inside out.  Theoretically this year I could do either of these commemorative activities… option 1, wear this dress as per the Sew Solidarity challenge; option 2, like last year wear something else I’ve made inside out as per the Fashion revolution challenge; OR option 3, combine the two challenges and wear this dress inside out.  The only problem with option 3 is that I’m pretty sure my insides might be kinda too ugly for me to get away with this in my very conservative suburb!  The insides are a gridlock of overlocked seams, and because I used some fabric pieces wrong side out, the prints are then on the inside of the dress; so it’s a bit of an unholy mess in there.  But I guess the option is there, should I choose to look irredeemably ridiculous.

Details:
Dress; modified Vogue 7795, made from old Tshirts
Shoes; Zomp, from Zomp shoe boutique
pinterestmail

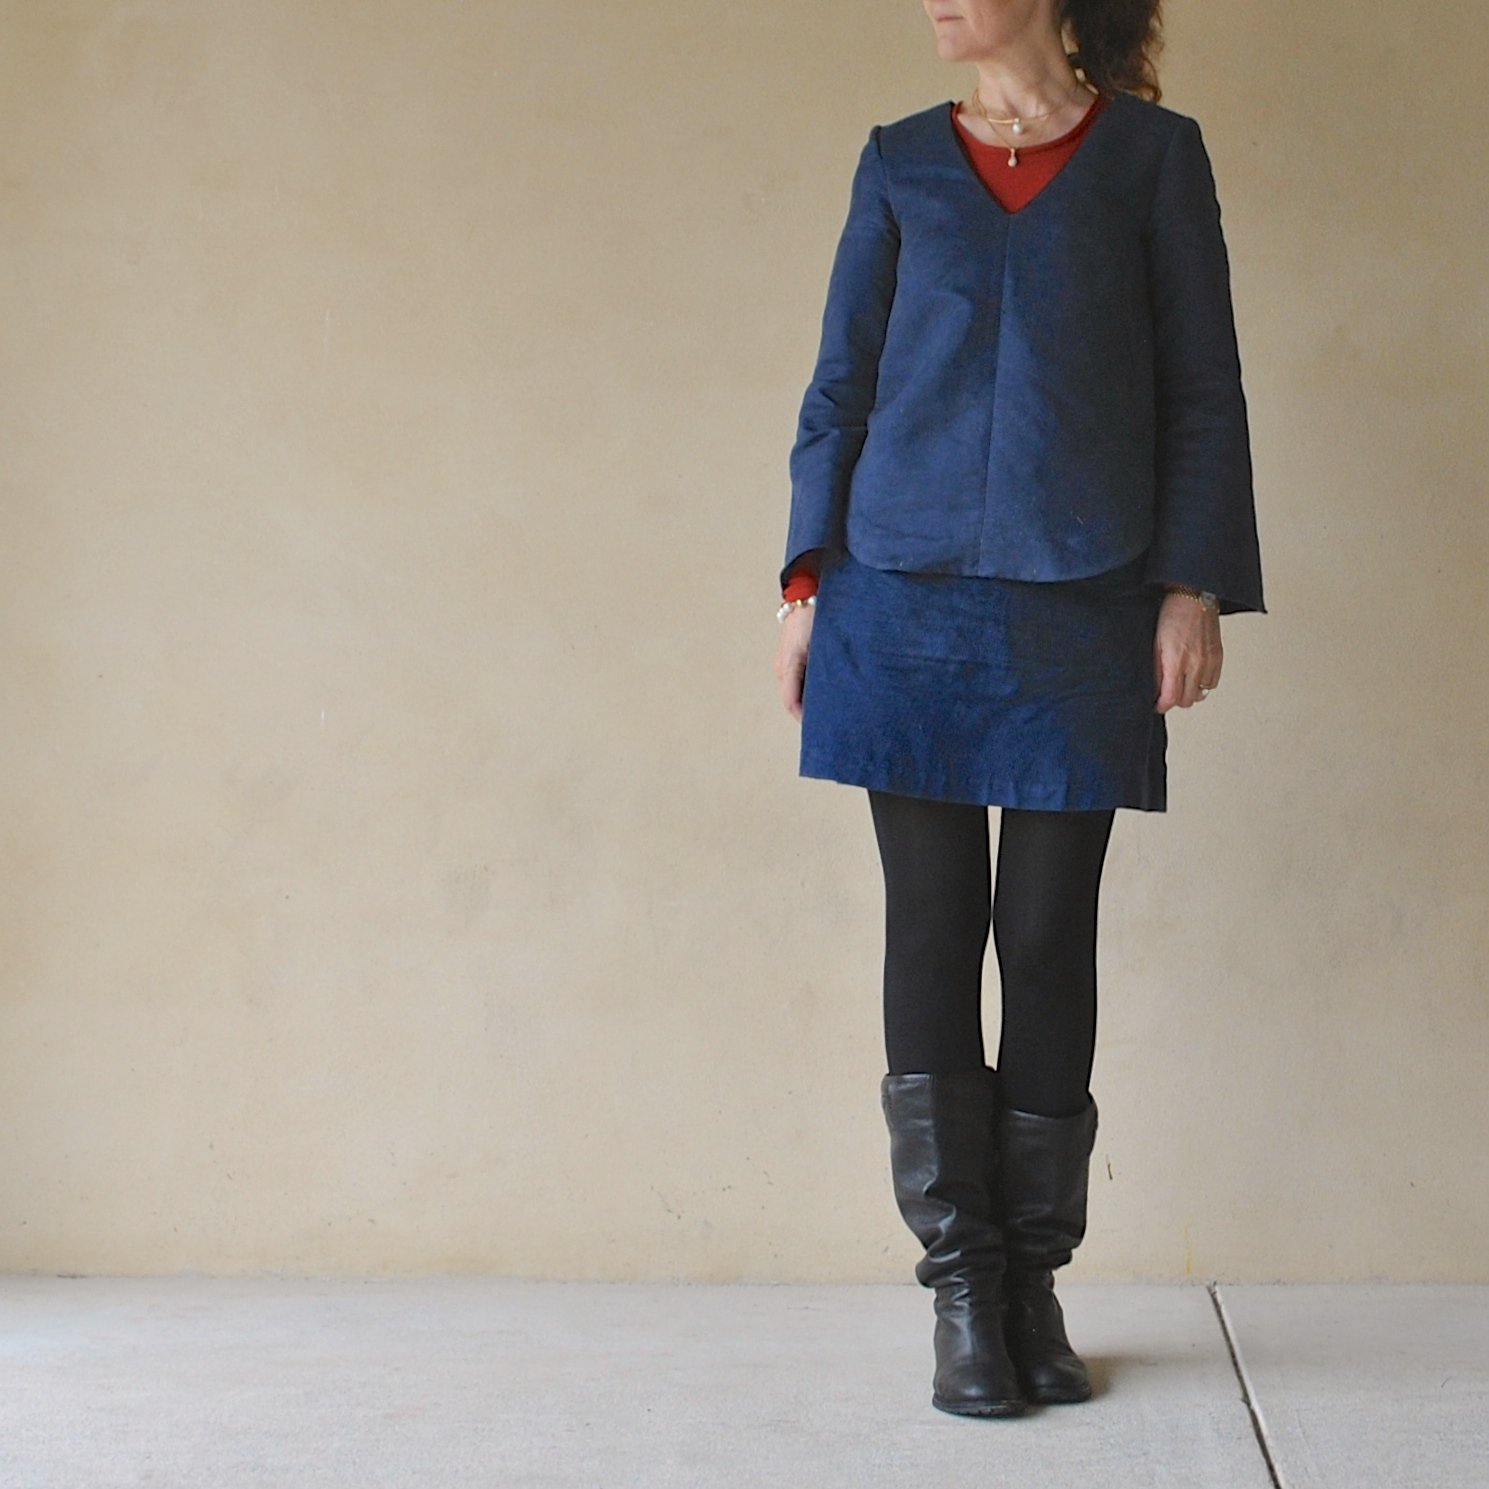
two sea change tops and a little blue skirt

I absolutely adored the new Lily Sage & Co Sea Change top when Debbie debuted it on instagram and rushed with unseemly haste to sign up when she called for testers.  My love has not diminished upon making up a few either.

The top can be made in either a stretch or a woven, and I elected to make up one in each.
Exhibit A is in a deep blue stretch panne velvet, from the leftovers from Sam’s Magicka robe here.  Basically, it’s a big, roomy, cropped, oversized velvet Tshirt.  Ha! I know that sounds weird and like the kind of thing that has potential to be hideous, but I think it turned out absolutely not.  I love it, unequivocally.

The Sea Change is a gorgeous design; modern and stylish, comfortably roomy, chicly oversized and tres elegant.  It is also a super easy, quick and simple project; a “can be started the night before to wear the next day”, kind of a project.  My measurements fell on the upper side of Small, lower side of Medium, so I elected to go Medium.  This feels fine, but the top is quite unfitted and intentionally roomy so I would have been equally comfortable in the Small too, I think.

So, that’s top numero uno.
And theeeeeeeen…
Having done a little cleanout recently I realised that I had very few skirts that matched my lovely new top… the horror!  I raced to rectify this terrible situation.
I unearthed from le stash a few smallish pieces of bright blue cotton corduroy, the leftovers from my dyed blue ray dress here.  I had just exactly enough to eke out the pieces of Vogue 1247… o joy!  It’s bordering on embarrassing how many of these skirts I have made by now.  It’s such a fantabulous little pattern; a. on its own merits, nothing else considered; and also b. for using up a pile of awkwardly too-big-to-throw-away leftover scraps, and also c. it’s hard to have too many of these classic little A-line skirts in winter.

The brightness of the blue is borderline OK/not-OK for me.  I’m humming and haa-ing about it a bit.  I’ve been entertaining very tempting thoughts of dyeing it a deeper darker dirtier blue; a colour which I think will blend in a lot better with my current colours hanging in the wardrobe.  But for now I’m just going to live with it for a while and see how it goes…
I bound the inner seam allowances of the skirt with some pretty pink and white polycotton gingham, itself the leftovers from a lemon-butter bottling project, and also used for this nightie.  I have now used up every.  Single.  Last.  Weeny.  Scrap, of this stuff.  Hurrah!
The only thing I had to buy new for this entire outfit was the invisible zip for the skirt… and then this is a whole new outfit ALL from leftovers! So it feels kinda free, in a way.  Double hurrah!

But wait, there’s more…
Exhibit B.

My second Sea Change top is made from a very lightweight and drapey crepe from Fabulous Fabrics.  All new fabric for this baby!  It is a rather divine and heavenly pale pink in colour, and sheer enough that I decided to underline totally in a slightly deeper pink, poly chiffon.  By “underline” I actually sewed all shoulder and side seams, the sewed the two different tops together around the neckline, right sides together, turned the chiffon top to the inside and under stitched and top stitched around the neckline… then, from then on, treated the two layers as one.  So, that’s not really the same as underlining, but I have no other, more accurate word for that process.  All seams are concealed away within the layers of the top and bands.

I embroidered a tiny “x” to mark the back…

The armbands are the same stuff, in a garish lime-y greeny yellow that I was drawn to immediately.  While I was petting it another lady in the store remarked, “that is your colour!”
*cue immediate purchase*
I bought enough for a matching skirt too.  I’m rather excited about the skirt; which I have to confess is already made, finished and hanging in the wardrobe but not yet worn or documented, whoops!! anyway I’m excited about wearing it because I think it will go very nicely with both of these tops, and a whole lot of my current existing tops too.  In fact, I’m quite looking forward to mixing and matching all these things in with my new and existing winter wardrobe.


Details:
Tops; the Sea Change top by Lily Sage & Co, (1) dark blue stretch velvet, and  (2) pink and green poly crepe lined with pink chiffon
Skirts; Vogue 1247 lengthened, (1) blue cotton corduroy, and (2) yellow cotton corduroy, details here and my review of this pattern here

Update: it’s been great, but nearly two years of use later and I got a bit bored with the vivid bright blue-ness of that little blue skirt, so I’ve over dyed it with some brown dye.  Now it’s a lovely deep navy/teal colour.  Like having a new skirt!
Wearing it with my paprika Nettie bodysuit and my suedette MN Dove blouse that’s a pretty good colour match, yay!

SaveSave

pinterestmail

jumper of triangles

I’ve knitted a jumper  ðŸ™‚
I’ve knitted jumpers before but this one felt different because I didn’t feel like I was knitting an actual real entire jumper, a process that can sometimes feel a bit never-ending while you’re so engaged… this rather unusual and innovative design is essentially a patchwork comprised entirely of plain and identical triangles.   So all you’re doing is knitting is a whole bunch of very quick and simple triangles, separately, one by one… you knit a triangle, toss it on the pile, knit another, whenever.  The triangle itself is a super quick n’ easy pattern that you’ve memorised after the first couple.  Making it a fairly mindless and terrifically painless project.  Once you have enough you stitch them together into a jumper shape.  So really it’s like, the jumper to knit when you don’t want to knit a jumper!
I bought the pattern pamphlet from Spotlight, thinking about the awkward quantity of fiddly diddly leftovers in my collection that were not enough to do anything with on their own but that were too much to throw away.  Mission: Use Up Leftovers; and I think I’ve accomplished that quite successfully, ahem *smug self back pat*  I used several different shades of grey, chocolate, beige, black, navy blue, mustard, natural and white; various Patons 8 ply and Rowan tweeds and several others too, basically a small collection of disparate leftovers I’ve held on to for forever.  I also had to buy some new, don’t you always?! I bought some of the recommended Cleckheaton Country Naturals 8 ply from Spotlight.   Which is where I bought the pattern pamphlet too 🙂
The pattern can quite easily look like a, er, regular jumper too if you aren’t keen on the multi-coloured harlequin look; you can always just use one colour for all your triangles.  In the pamphlet there’s also pictured another, rather chic and stylish version made up in deep flecked charcoal which looks quite classic and mainstream and normal, and not patchwork-y at all! 
But, as an interesting way to make good use of little bits and bobs I reckon this is a pretty good design idea, and is a nice and easy project for beginners too  ðŸ™‚
Details:
Jumper; knitted by me from various 8ply yarns, a Nikki Gabriel design for Cleckheaton
Shorts; Burda 7723, made from an old charcoal gabardine skirt, details here
pinterestmail

Maldives; a travel wardrobe

We have just returned from the most wonderful holiday on Velassaru in the Maldives *sigh* and it’s time for me to have the usual retrospective think about my travel wardrobe.  Such as; how did my selection work, was it appropriate, and could I do better for next time… if we should ever be so incredibly fortunate as to have a next time!
Time away:
7 days
Where to:
the Maldives
Season:
the tail end of the northeast monsoon, or dry season.  Beautifully warm 24 hours a day, with a daily temperature range of roughly 28-31C.
Expected activities:
well, very little! haha! specifically; wandering along the beach, laying about on the sun lounge, reading, um…. a bit of knitting? *blush* gawd I’m such an old biddy…  Occasional spurts of swimming, snorkelling, canoeing, and of course cocktails and dinner!
Colour scheme:
a very summery, and hopefully pretty, selection of white, pink and blue!
What I packed:

from left to right, top to bottom, each garment is linked to its original construction post
powder blue dress
ivory broderie anglaise petticoat
pale blue tunic dress
red gingham dress
white linen dress
pink leather bag
watercolour silk dress (for dinners)
hot pink cardigan (Metalicus)
(left) white broderie/lace top
beige top with white print
pink patchwork top
white cotton LS shirt
white shorts
charcoal shorts
ivory corduroy hat
green floral bathers
white thongs
black sandals
not pictured, selection of underwear, nightie, toiletries

My daily outfits:

Thoughts:
Well, going to the Maldives has been my dream holiday, numero uno on my bucket list for only like, forever! so for a few brief mad moments I had happy daydreams about making for myself an entire new wardrobe in the honour… tonnes of white and turquoise!  floor-sweeping maxis! a fantabulously elegant super-widebrimmed hat! anyway, clearly I got sensible and just took a selection of the regular clothes I’ve already been wearing all summer.  
And that was just fine! if not so exciting as a whole new wardrobe.  That would’ve been very nice!  ðŸ˜‰  but well.  Clothes are not supposed to define your holiday.  Our island, Velassaru, which let me just say is the most beautiful place imaginable, everything I could have dreamed of,  like heaven-on-earth, and more!  well, it is super quiet, easy-going and very relaxed and I pretty much spent most of the time in my bathers and hat with a loose dress or top n’ shorts tossed on over, and only really “dressed” for brekkie and dinner.
I enjoyed my colour scheme; it felt easy, unobtrusive and quietly pretty.  For my bag, I took my really old pink leather Country Road bag; it fitted in nicely colour-wise, was just the right size for my essentials, as well as perfectly beachy-casual and old enough that I didn’t mind tossing it down on the sand.
Shoe wise, I took my nice black leather thong-sandals for nice shoes, just in case, and they never even left the suitcase!  I only ever wore my white rubber beach thongs, since the island was basically a white sandy beach all over.  I wore them on the plane too! comfort ruled over glamour this time 😉
It was too warm for my white LS cotton Carolyn shirt, so that didn’t get worn at all either, but the other clothes eked out nicely for the week.  Even though your clothes have no opportunity to get actually dirty,  you do get a bit saltwatery-y and sweaty in the sun, so you do need to change every day.  My hat got worn continuously, and I was glad I had my one nice silk dress (at far right) to look swish for dinner.
My old, hot pink Metalicus cardigan went with everything but then wasn’t needed on the island at all! however it was essential for the plane which was, as expected, freezing!  For the same reason, I wore my cream broderie anglaise petticoat/dress underneath other dresses on the plane for warmth, my plane outfits are the first and last pictures above.  And also I thought that dress could be a spare if needed.  It wasn’t, but again I was so glad I had that extra layer on the plane!

pinterestmail

top; wonky apricot stripes

So, I bought this piece of very nice, thin, cotton jersey from the Fabric Store in Melbourne, during Mum, Cassie’s and my trip there late last year.  It is elegantly drapey, feels deliciously soft, and the ivory, pale yellow and apricot stripes went perfectly with my apricot skirt fabric.  I bought them together, planning a nice little skirt/top set.  Which of course explains why I am not wearing them together right now! ha! the logic, I lack it; clearly.
Anywayz, I chose and bought the fabric, washed it, pegged it up and only then! noticed a horrific thing, the stripes were printed on the fabric terrifically off-grain, which in itself would not be too much of a disaster except that it had been cut in the store for me as though the stripes were on-grain.  I had only planned a little top, so had only asked for a little piece.  So I had this rather smallish and off rhombus with which to somehow wrangle a top.  Great.
So although my plan was for something very simple, it didn’t seem like it was going to be simple at all.  I agonised and pondered for a bit.  Finally I was just like, oh to heck with it! I’ve got to just make something.  Anything!  

I decided to embrace the wonkiness, and make a wonky, off, little top from out of my wonky, off, little piece of fabric.   This is Burda 04-2014 111, and is the second version of this pattern that I have made; my first version is here.  
Because I am rather obsessive about corralling at least some sense of order to my wonkiness, I cut my top on-grain and very carefully measured, cut and sewed my body piece so that the stripes matched up as perfectly as I could get them at the one side seam.  So the stripes have become one stripe, rotating around and gently down my body like that on a barber shop pole, and because of the twist of the top are slightly more horizontal on the back.  

the side seam

The inner seams are finished with the overlocker, but I didn’t want any overlocking “on show”.  So I flat-felled the seam in the cowl part of the neckline, so it looks nice and neat if you happen to catch sight of the inside.  In this design, a very probable occurrence.  The shoulder seams are also flat-felled for strength.

I left the raw edges of cowl and sleeves raw, because the jersey is very stable and does’t really need finishing. The edge naturally curls up quite nicely and I like how this looks  ðŸ™‚

To get as much length to the top as I could I added a wedge of fabric onto part of the bottom edge.  The lower edge is simply overlocked, turned under once and stitched using a twin needle.  One thread is white, the other ivory, but I’m just fine with that.  Didn’t want to wind another bobbin for just one little hemline.  For what should have been a nothing-much top, I reckoned I’d expended enough thought on this thing already!

 Details:
Top; Burdastyle magazine 04/2014, 111, jersey stripe
Skirt; Vogue 1247 lined, ivory curtaining fabric, details here and my review of this pattern here
Sandals; 2 baia vista, from Zomp shoe boutique

stripe ever-so-slightly more horizontal on the back
pinterestmail

Carolyn shirt and shortie shorts, take one

Hello!  So what’s new? hmmm not much.  
Well OK, of course I am wearing something that has not yet appeared here on the ol’ bloggeroonie.
My shirt and my shorts are another pair of Carolyn pyjamas by Closet Case patterns, made a few months ago.  These are the first ones that I made actually, months ago! using an earlier version of the pattern, before Heather changed the shape of the collar for her final pattern release.
So technically they are not really new, nor are they “pyjamas” for me either since I have every intention of wearing each of the pieces as daywear, actually out and about and in public.  Why? well, I used such really nice fabric, a particularly lovely slubby soft cotton from Fabulous Fabrics and I feel like it’s just too good for bed!  Also, maybe I’m biased, since well, you know, they have my name on them and all! but I do really like both the pieces in this pattern such a lot.  The shirt has such a crisply classic, yet easily swingy shape to it, with a very nice curve to the lower hemline.  I left off all piping, and I like to wear the shirt with their long cuffs casually and cooly rolled up.

I made the set really as nicely as I could, flat-felling all the seams in the shirt.   Well I’ve been flat felling all the seams in the shirts I make for my boys for ages so felt like maybe I too deserved a little of that same attention to detail  ðŸ™‚ 

My own tip for flat-felling a shirts curved armscye seams is here, and another for just regular flat-felled seams is here

I think the shortie shorts are very cute too, and I actually have worn these out and about! in public! *gasp* several times during our holiday, with the elastic waistband hidden away underneath a longer overhanging top, so it doesn’t show.  I am slightly allergic to visibly elasticated waistbands in daywear.  But yes, of course they are super comfy, that cannot be denied.  I think the shorts with a turned-up cuff, peeping out underneath a long top, make a really fun and playful look for summer.

Just exactly the same as I did for my previously blogged black Carolyn shorties, I like for shortie shorts to have the turned-up cuff look, so I constructed the cuff slightly differently to the pattern to have this feature.  I left off the piping, and sewed the cuffs on with a narrow seams allowance and then turned up and pressed a 1cm fold-up.  Then turned under the cuff and pressed under the other SA so the SA fold sits directly underneath that stitching line.  Then underneath the first fold, I sewed all the layers underneath together by stitching-in-the-ditch of the shorts/cuff seam; so that folded-up cuff is sewn securely and permanently in place and you can see no visible stitching on the outside, since it is all hidden inside the cuff.

Details:
Shirt and shorts; Closet Case patterns Carolyn pyjamas, in white cotton

pinterestmail

raspberry/navy Alabama Chanin tank top

I’ve finally finished my latest Alabama Chanin project…  
Below is how it appeared on this blog previously…? (shudder) well, that dress has undergone extensive renovation over the past five months and now at last, I am quite satisfied.

I received loads of fantastic suggestions, thank you so very much to everyone who gave me so much helpful and wonderfully thoughtful advice  ðŸ™‚  I am very grateful  ðŸ™‚ *mwah*
The pattern is the fitted top from Alabama Studio Sewing + Style, by Natalie Chanin, and I had modified it slightly by giving it a higher rise at the neckline at CB, which will help keep the straps firmly on my shoulders and not slip off, like they occasionally do in my previous, first version of this pattern.  The print is Abbie’s Flower design from the same book, enlarged by hand and printed as described here, and I employed the reverse appliqué method from the book, stitching running stitch around all motifs using crimson Gutermann upholstery thread, and then cutting the printed motifs away to reveal the base layer of fabric underneath.

I really liked Ann’s suggestion to bring some navy into the equation.  I bought some royal blue cotton jersey from KnitWit.  This was but a starting point; the original blue was a nice colour, but flat and not quite as edgy as I would have liked against the warmth and liveliness of the raspberry.  Some dyeing fun was called for.  I made haste for the lair and dragged out ye olde dye-pot, mwahahahaha


A short stint in a half-strength bath of iDye in Brown later and it was darkened and deepened up very nicely; transformed it into a very satisfactory shade of mottled dirty-navy.

Hehe, I just re-read that description and had to laugh at how the exact opposite of attractive that colour sounds!  well, I do love me some ugly colours, hehe.
The seams are all hand stitched in running stitch, with the occasional backstitch to “stop” the seam, something I learnt to do in hand- stitching quilts; and the seams then felled using running stitch, as per the Alabama Chanin way.  

I cut the binding strips for the armholes and neckline from the same dyed navy jersey and hand stitched them down in herringbone stitch using navy blue Gutermann upholstery thread.

A new tip; in my previous Alabama Chanin embroidery forays, I pinned the fabric layers together for the embroidery stage, this time I thought of a better solution.  I pinned and basted around all raw edges, then simply ran rough basting lines of long stitches, about 4-5cm apart, right across the pieces using my sewing machine.  Quick and dirty, nicely stable, and the long stitches are very easy to pull out as the embroidery progressed.  And far better than having to worry if my pins were going to fall out, only to get discovered on the sofa and produced as hard evidence in the Case against Sewing Taking Over the House.  Please, take a moment to consider the danger to one’s beloved husband whose bottom came to rest right beside that tiny little pearl-headed pin! not to mention one’s innocent offspring and cute fluffy pets!  
Hehe, no need to add further fuel to that particular flame  ðŸ™‚

 My next Alabama Chanin project? already in the works!  Fortunately I made my original dress double layered and so I still have quite a good quantity of the raspberry fabric left after cutting this out; and I also dyed enough of the navy so that now a matching, though not identically patterned, skirt is awaiting in the wings to be made, as we speak.  Type?  Read?  One day, someone is going to come with a satisfactory verb for this kind of interaction  ðŸ˜‰
Anyway, I am super pleased with my new Alabama Chanin top, and the good thing about that satisfaction is the renewed enthusiasm it brings for me to get on with that skirt quick sticks, to have something else to wear it with.  Ever onwards!

Details:
Top; the fitted top from the Alabama Studio Sewing + Style book, hand-dyed, -printed, -embroidered and -stitched in two different colour fabrics
Jeans; the Closet Case patterns Ginger jeans, navy stretch cotton denim, details here

pinterestmail

watercolour silk dress

I’ve made a new dress  ðŸ™‚
Every year, my friends give me a Fabulous Fabrics voucher for my birthday; aaaah! they know me so well…!  ðŸ™‚
and last year I spent it on this gorgeous, water-colour-y silk charmeuse.  And have made it into dress 35 from Patrones 7; this magazine was itself a gift to me from Merche Martinez from a few years ago.  This is the second time I have used this same dress pattern, my first version is here.
So, I have worn it a scant handful of times so far; for dinners during our recent holiday, and I’m wearing it today as well to show it off to my gorgeous gal-pals who gave the voucher to me… and I have to say I’m quite besotted with my dress already.  Honestly, bias cut silk, there’s just nothing quite so lovely to wear.  It’s a beautiful gift from you to your skin.  Seriously, my skin is thanking me every single second I spend in this dress.  It’s pure and utter heaven.  *dreamy sigh*    
To go the whole nine yards silk-wise, I fully lined the dress with creamy-coloured silk habutai.  Pinky-purple lining seemed at first to be a better colour match; but upon checking how the fabrics looked when layered together I found any colour just very subtly dulled those large white-ish feathery-floral areas, whereas a lighter creamier-coloured backing really enhanced the colours of the charmeuse and gave them a beautiful inner glow that I preferred.   Something to bear in mind when choosing a lining for lightweight, patterned fabrics; hold lining underneath the fashion fabric to check how it affects the colours before making a final decision.  Sometimes an unexpected colour choice will look better.

The dress lines are quite simple and feminine, with a slight a-line curve, small cap sleeves and I lengthened the neck-tie to extend right around the length of and beyond the v-neckline, so it is both a tie and also a sort of “collar” that finishes the neckline.  The skirt is cut flatteringly on the bias and I gave careful thought to the colour placement over the body.  I wanted the darker, moodier colours to feature mostly and aimed for the splashes of those big abstract feathery flowers to appear over one shoulder and to bloom down the side and hem of the dress, front to back.  ie. not on my tummy or right boom on the derriere.  The dress closes with a burgundy invisible zip in the left bodice side seam, and I hand-rolled a narrow hem on the sleeves and lower hemline.  All seams in both dress and lining are French seamed.

I altered the bodice pattern piece substantially from my first version because ultimately I decided that that dress incorporated an excessive degree of blousiness for my particular shape, or lack thereof, ahem.  I pinned out about 3cm width from the lower edge and curved the lower edge up as marked in red, cutting out up to 5cm in height at CF, this removed a tonne of blousiness and so is only about a thousand times more flattering on me, rough estimate there.  In lieu of lightly gathering the bodice evenly along most of its width into the skirt, instead I folded the width into four little folds, evenly distributed just out from either side of CF, treating the lining as underlining and folding them together.  These folds can be seen more clearly from the inside of the dress.

I also added about 4cm in length to the skirt at the lower edge.  I’m slightly doubtful about this added length, I don’t hate it but also am not bowled over with love for the length right now either.  I may just live with it for a while but that extra 4cm may or may not just get lopped off at some point.  I’ll just have to see how I go; weighing up the pros, such as would it look more chic if it was a bit shorter? against the cons; the main one being that I would have to re-do that hand-rolled hem.  Hmmm…

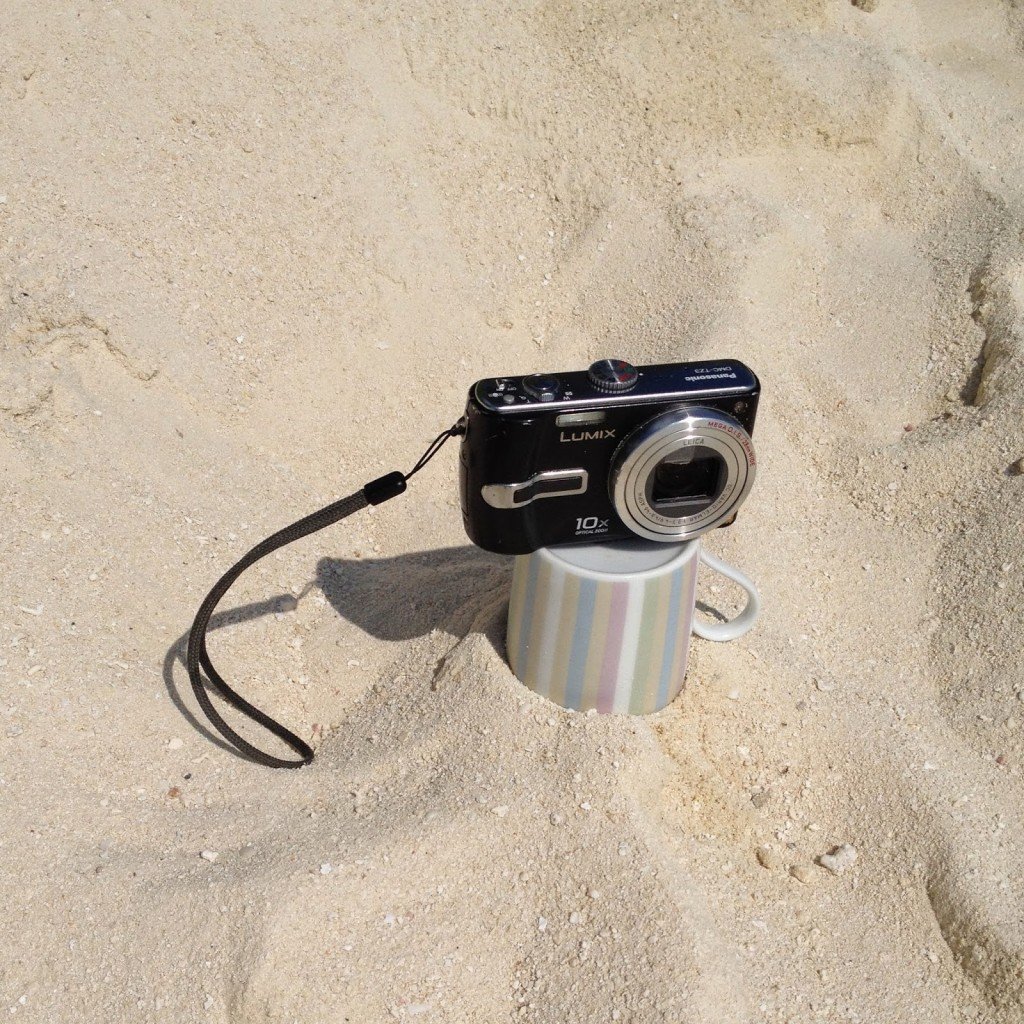
Now, on another note: anyone who follows me on IG would know already about our recent, most utterly paradisiacal holiday ever!  yep, I took my pictures on the beach during our holiday in the Maldives.  And I thought I would show one example of my set-up for taking my own pictures when away, an activity at which I now consider myself an expert!  I’m a big fan of packing as light as possible and saving myself any packing and carrying around bulky camera equipment.  Just cannot be bothered with all that.  Yeah, lazy, I know 🙂 
When travelling, I just take my small travel camera and nothing else.  And I look out for and take full advantage of any flat surface that I may come across, although if nothing presents itself I can at a pinch just sit the camera on its own little soft case.  This is not completely ideal, but it’s doable if no other handy flat surface is around.   Good flat surfaces include, but are not limited to: park benches, curbs, low walls, a level spot on a rise in a path.  Rocks sometimes too, though rocks can be tricky and it’s imperative to check carefully that the camera is sitting perfectly stable and isn’t going to topple over and smash.  
In the case of our last holiday, our cabin was on the beach and I used a flat-bottomed cup from our room.  My camera sat up, safe and clean, up off the sand as pictured.

Anyway, whatever flat surface is at hand; I just set the timer function on my camera, pop the camera up on said flat surface, push the button and then race out in front.  Voila.  Does the job, and requires no big bulky camera equipment.  Win!

Details:
Dress; Patrones 35-7 modified slightly, silk charmeuse
Location: Valessaru, the Maldives

pinterestmail
Switch to mobile version
↓