#hoodie

I love hoodies.  And I love dark browns, crinkly linen and loose relaxed-fit comfy loungewear.  Despite all those loves, it’s taken me a ridiculously long time to finish this hoodie.  I started it before I left for Melbourne last year! woops!
I used Burda 09/2014-115, a tunic/hoodie pattern; and this lovely deep, deep, burnt chocolate linen, that I bought from Tessuti’s in Melbourne on our previous, 2013 trip there… extra woops!  Sometimes I hoard lovely fabrics for forever and feel guilty about it, but really it’s only because I can’t think of the Perfect Project which it would like to become.  Some fabrics tell you straight away, whilst others sit there and taunt you with their loveliness while never giving any hint of what they want to be.

Anyway, finally I made something.
To be honest, this is version two.  
The pattern is actually for a tunic a good 6″ longer than this, and that is how I made it.  I had visions of those lovely chic European lagenlook-y ladies wearing long and loose flowing clothes in earthy neutral shades.  I started out with high hopes, made the hoodie/tunic.  Felt really good about it, all went together smoothly, happy with my decision, almost finished it; perfectly hand narrow-hemmed shirt-hem and all.  It was easily long enough to be a dress.
Tried it on, and was immediately struck by the fact that I had made myself a Friar Tuck robe.  Yes, in its long version I looked exactly like Friar Tuck. Do I want to look like Friar Tuck?  Emphatically, no.  Disastrous.  Dejectedly shoved it aside for, um; a few months.  Hmmm, how time flies!  
Anyway, I really did want it to work, and so just recently I drastically shortened that hem and rolled the sleeves up.  Massive improvement.  I left off the waist tie channel and tie.  I reckon that as a boxy, shorter tunic, with rolled up sleeves, it still had that relaxed, fairly oversized, comfy vibe that I was after… stylishly chic, I hope!
The dress has pockets and so I kept those, cutting and re-hemming it to just below that level.  The button placket is invisibly sewn closed, because all buttons just seemed either the wrong size or colour, or just plain wrong against the fabric.

For some reason that now escapes me, I felt allergic to the idea of self-fabric bands to hold up the rolled sleeves.  At the time I felt they would look unutterably boring and/or too match-y.  So I made some sleeve holder-up thingies from skinny metallic belts.  It felt like a good idea at the time, and luckily I’m still quite pleased with them, feel like they bring something interesting to the table, on what is otherwise a quite plain and featureless hoodie.  I’ve tried wearing the hoodie with a few other of my clothes and it’s interesting that that little bit of silver-y, pewter-y metallic on the sleeves really helps the hoodie to “go” with a lot of my other clothes far better than it would without.

The neckline/hood seam is hidden underneath a band, cut from the leftovers from this dress.  It felt quite fortuitous that the brown stripes were wide enough that I could do this, with barely a hint of cream pin-stripe to be seen!

Later edit: Inside the sleeve tabs, and thank you Jenna-Lynn for asking  ðŸ™‚
I made the belt sleeve tabs by buckling the belts and cutting down to size keeping the buckle area intact.  Using a nail, I hand-drilled four little holes for stitching, two at each end. The outside holes are hidden underneath the belt overhang.  I put a little wad of folded fabric inside the sleeve between the belts to stabilise and strengthen the stitching area, and stitched through my drilled holes firmly and securely using thick upholstery cotton.

Details:
Hoodie; Burdastyle 09/2014, 115 shortened, of burnt chocolate-brown crinkly linen
Shorts; Burda 7723, grey/cream pinstripe linen, details here and my review of this pattern here

Disclaimer; this pattern was given to me by Burdastyle; however I chose it myself from the large range of patterns on offer because I liked it.  All opinions are most definitely my own.  There are no affiliate links on my blog and never will be…  I’m in it because I love sewing  ðŸ™‚ 

pinterestmail

“poison dart frog” lingerie set

Sounds like a weird inspiration  for a lingerie set?  Well this is my thing for prttynpnk’s Jungle January  🙂
I really wanted to do something a bit different, something other than big-catty.  I googled jungle animals and was immediately drawn to the splendiferous group of amphibians that are the poison dart frogs; there is a huge variety of incredibly hued, jungle- and rainforest-dwelling frogs, in the most amazing array of beautiful, vibrant colours!  The one that really leapt, or hopped? out to me was this little guy.  Meet Oophaga silvatica, a native of Colombia.  This colour morph is called “Koi”.  

I loved its pale blue/red colouring and immediately envisioned some sort of lace overlay to mimic the markings.
I did a certain amount of agonising over “what” to make, I was a little tempted to make a dressy cocktail number, but practicality won.  Keeping my new resolution to sew thoughtfully firmly in mind!
The pale aqua blue bamboo knit and red stretch lace are from Fabulous Fabrics, the baby blue shoulder strap elastic from Homecraft Textiles.  The bra pattern is my current favourite; MakeBra 2610, an underwired bra with a pieced foam cup lining.  I’m very comfortable with this style so I am super happy to have another one in my collection.  

I made two pairs of matching knickers using two different patterns; the boy leg hipsters above are a copy taken off a rtw pair and the bikini brief below are from my tried and true McCalls 2772.  This is the second time I’ve made the MakeBra pattern, the second time I’ve used the rtw pattern and about the millionth time I’ve used the McCalls… well, it feels like it sometimes anyway!  The McCalls bikini brief pattern is hands-down my comfiest and easiest to wear, but I do still like making a different one occasionally, just for some variety.

I sewed the lace on the undies by machine but thought it ended up looking a little too… machine-y? so for the bra I sewed the lace on to the cups by hand, using invisible fell-stitching with the stitches hidden within the foam lining.  This does look much nicer, no surprises there.
I couldn’t find any blue or red lingerie elastic to match in nicely, so instead used regular 6mm braided elastic and enclosed it inside a once turned-under hem, topstitched on the outside in zig-zag stitch.  It doesn’t look quite as well finished on the inside as lingerie elastic would, but doesn’t look terrible.  And it works just fine  ðŸ™‚

Those very long-tailed, decorative bows on all 3 pieces: I’ve seen several rtw lingerie sets decorated with much longer tailed bows than usual and liked how it looks, so I decided to cut my tails quite long too.  Hmmm, not quite sure now!  They do look quite romantic and pretty, but I’m starting to wonder how practical they’ll be in situ.  So these are currently on trial and may or may not get cut shorter.
Thoughts; ok I love this colour combination in theory, in practice it does feel a tiny bit on the flashy side for lingerie.  For me, I mean.  My usual style tends to run to the colourless and slightly boring, and this set is anything but! so I’m stepping outside of my comfort zone here.  But I kind of still love it anyway.  It’s not the obvious thing anyone would think when imagining “frog-inspired” but I’m totally going to think of frogs every time I look at it.  
*ribbit* 

Details:
Bra; MakeBra 2610, in aqua bamboo knit and red stretch lace, my review of this pattern here
Undies;  (L) McCalls 2772, and (R) pattern taken from a rtw pair

pinterestmail

2015 plans

Hello!
I’ve been thinking about my 2015 wardrobe requirements and sewing plans for this year.  To be honest I was kinda shocked at the sheer number of things I sewed last year, and not in a good way!  It wasn’t lost on me that my favourite projects for last year were also the ones upon which I lavished the most time and thought.  So I’m thinking that to slow down, take my time, be more mindful; would be both a rewarding and sensible thing to do.   I mean, I have clothes.  Quite enough really.  But I still want to sew.  So it makes sense to concentrate on making fewer, but more individually labour intensive things, with an eye to provenance, longevity and quality of finish.
You know that word of the year thing?  I haven’t had one before but it’s a fun concept, yes?  Anyway I’m giving it a burl.  This year I wish to be more thoughtful in my sewing.
My on-going pledge to abstain from RTW will continue, so there may be a certain amount of maintaining-my-basic-wardrobe kind of sewing happening too, but I still would like to stretch myself with a few new patterns and skills.  It would be cool to make a few more Pattern Magic things.  And shoes!  And some Alabama Chanin sewing, which is definitely an exercise in slow thoughtful sewing!


Also, and in the same vein, last year Nicki of this is moonlight contacted me about participating in her one Year one Outfit project.  You can read all about it on her blog; essentially the project involves making for yourself an outfit using all materials sourced and produced locally.  Obviously this does not mean simply visiting the local Spotlight store! but at a much more grass roots level.  So for me, finding Western Australian farmers and sustainable producers of their own yarns and/or fabrics, and making a high quality outfit using only these.  This also pertains to all dyes and finishing touches!  The only thing I think maybe we can give ourselves a pass on is thread, since I think the only threads we can get here are Gutermann’s.  I’m pretty excited about this project and my brain is already buzzing with opportunities.  This one should be quite a challenge!
I’ll just give one clue as to just one of my ideas, contained in an instagram I posted late last year from my friend J’s farm in Cunderdin… 😉

Also;
I was quite inspired by Lauriana and Sue‘s vintage pattern journeys of last year.  The vintage sewing pattern pledge is conceived and hosted by Marie of A Stitching Odyssey, and I only wish I’d thought of joining in last year!  Whatevs, this year I’m IN.

During 2015, I hope to sew up at least five of my vintage sewing patterns.  

So, I shall see how I go!  Some of these things might overlap.
Oh, and also this year, I will join in with Anne of Pretty Grievances‘ Jungle January for the first time; it’s in its third year so what took me so long?! and hopefully Zoe‘s Me-Made May, as per usual.
wrt the former; my Jungle January fabric is flapping on the line, drying, as we speak! um, should that be type? read?  anyway all I shall reveal for now is that it is totally different from the expected, mwahaha. 😉
To be appearing here, very soon…

pinterestmail

Setting an invisible zip in a French seam

… as promised, and thank you to everyone who showed an interest  ðŸ™‚
And, just saying; I am a believer that there is no necessarily right or wrong way to do anything in sewing, but whatever works and is neat and tidy is pretty much going to be a “right” way, no matter how you got there!  This is merely just showing a way that I chose to do it 🙂
Step 1; sew the zip into the open seam.  Also, when inserting a zip into a very lightweight sheer fabric like this I always stabilise the seam with strips of the selvedge as described here, the ends of these can be seen at right protruding out either side from underneath the seam.  I used the selvedge of the thicker lining fabric here.
On the inside, pinch the seam allowances together, aligning the raw edges, right sides together. Snip 6mm (2/8″) into the seam allowances, underneath the zip tape, about 1cm away from the stitching.

Turn raw edges to the outside, wrong sides together, align and pin.  Stitch a narrow 6mm (2/8″) seam starting from the “snip” and continuing down to the bottom edge of the seam.  Note, this seam is on the outside of the garment.

Press the stitching.  Open the seam and press open.  

Close it again and press closed.
Trim the seam allowance to half its width.

Open the newly skinny seam and press open.
Turn to the inside, folding as accurately as possible along the line of stitching with wrong sides together.  Press the fold firmly in place.

Underneath the zip, pin the stabilising selvedge strips in place over the seam. 
Baste a 6mm (2/8″) seam, commencing a few inches below the lower end of the zip and going up to as close to the zip stitching as possible.   Turn it out and check for straightness and neatness. 
Note; this is the most difficult part of the whole thing! below at right is pictured my first, not particularly straight, line of basting stitches 😛
If it isn’t neat, unpick and re-baste.  When you’re satisfied with it, stitch over the basting stitches.

Stitch the remainder of the French seam, from the previous stitching down to the bottom edge of the seam in a 6mm (2/8″) seam allowance.

Press the French seam to one side, and catch the lower ends of the zip tape by hand to secure it.

And that’s it!  I also lined this skirt, and in a sheer fabric like this it’s best to French seam the lining too.  I trimmed the zip opening seam allowances of the lining skirt before turing under and hand-stitching them invisibly to the zip tape.

pinterestmail

2014; a retrospective

So, on the last day of the year I like to look back upon some of my favourite sewing creations/outfits/pictures for the year, one for each month…
January

February

Some stats:
Number of garments made; 73 items, counting each set of 1 bra + 2 undies as one item.  This includes 15 items that I made for family.
Knitted garments; 5
Garments re-fashioned from old clothes; 8
The same number of items that entered my wardrobe also exited my wardrobe, so I’m holding steady on numbers there.  I ruthlessly got rid of a few things that didn’t get worn at all this year, and I’m getting better at letting go of really old things that are past their best, yay! There’s still room for improvement there, though  ðŸ™‚

Also, this year I took a picture of my ootd every day and totted up the totals.  Why? because stats are very dear to my analytical little heart  ðŸ™‚  This year 95.6% of the clothing I wore was made by me. This includes all my underwear, socks and hosiery.  Woot!
The remainder comprises scarves given to me by family, and my old MetalicusTshirts and Country Road cardigans that I still love and cannot bear to part with.  
I have eschewed buying RTW for 5 years now.  Yay!

Favourites: top place just has to go to my Alabama Chanin ensemble.  I’m HUGELY proud of this outfit, and feel very sort of high-end and couture-y when I’m wearing it.  Funny I know, since the fabrics are quite humble and ordinary in themselves and it is not extraordinarily eye-catching upon a casual glance.  I don’t think I’ll ever tire of it  ðŸ™‚  I also really adore both my Swedish dress and my blue ray dress.
Probably the biggest thing for me this year has been that I made for myself shoes! two pairs of rudimentary shoes, or maybe three counting my slippers?  OK then, just two  ðŸ˜‰  They’re certainly not the most wonderful shoes in the world but I feel pretty proud of them and want to make a few more pairs sometime.

Just for the record though, I’m definitely not giving up buying RTW shoes.  Gotta leave myself something!

Fails…  haha, well there were a few less than fantabulous moments in there, ahem. Some honourable mentions:
My pale coffee jeans, which sadly turned out to be beige slacks after all.  The fabric felt weirdly stiff and crackly and plasticky against my skin, and there was a slight camel toe issue that I worked on a couple of times but which remained stubbornly unfixable.  Binned.
My leatherette baseball skirt; it’s the second leatherette skirt I’ve made that never felt right.  I think maybe leatherette skirts are not very me.  Fortunately, Cassie took a shine to it and it now lives in her wardrobe.  She’s worn it several times too, so yay!  Handballed.
My raspberry Alabama Chanin tank dress.  I already covered the problems in the blog post.  It’s in the process of being hopefully improved upon and fabulous-ifed as we speak.  Working on it.

I enjoyed keeping my daily outfit blog and I think I may still continue doing it again next year.  The photos are not super high quality, definitely of the no frills variety; but I’m OK with that since it’s just like a quick visual thing for me to see how my outfit actually looks from an outside eye.  That’s a very helpful thing sometimes.  Some days I find an ensemble especially pleasing to me, which is good.  Other times I’ve realised that the outfit I’ve been wearing all day is actually pretty meh, if not downright awful. *sigh*

So that’s it for another year!  I’d like to send out a huge mushy thank you to everyone who reads my blog and who takes the time to comment, thank you!  It’s not so long ago when sewing my own clothes felt like a very lonely hobby.  So I’m hugely grateful to have “met’ so many lovely and inspiring like-minded creatives… and yay! for the internets for enabling us to connect and support and cheer each other on.
See you all in 2015!

pinterestmail

Cassie’s Christmas ensemble

So, this year I asked Cassie what she would like for Christmas and she replied without hesitation, a long, white skirt.
Alrighty then!
I bought both fabrics at my local Spotlight; I considered buying Melbourne fabric like I did for the boys but reasoned that I could probably find nice enough white fabric at home.  So fortunate then that I did!  I was particularly thrilled with these finds.  The overlayer is a sheer cotton muslin and the lining/underlayer is a cotton voile; both light and airy and quite beautifully soft.  I really like how the layers of sheers and seams give a kind of “striped” effect to the outfit.
Honestly, Spotlight really can be such a hit or miss affair, so thank goodness for a hit.  A very palpable hit!  Random pop quiz; Can you name that quote…?
I used Butterick 3134; a very useful basic multi-gored skirt pattern and selected the six-gore option.  I cut it longer and flared out the lower edge a little more, for a nice swish.  I cut the lining/underlayer skirt using the spliced together pieces of Vogue 1247, lengthened, and put an invisible zip in the left side seam.  All French seams throughout, including that zip seam.  
Incidentally, I took a few pictures of doing the zip French seam in a sheer fabric, and can write a tut for anyone who is interested?  
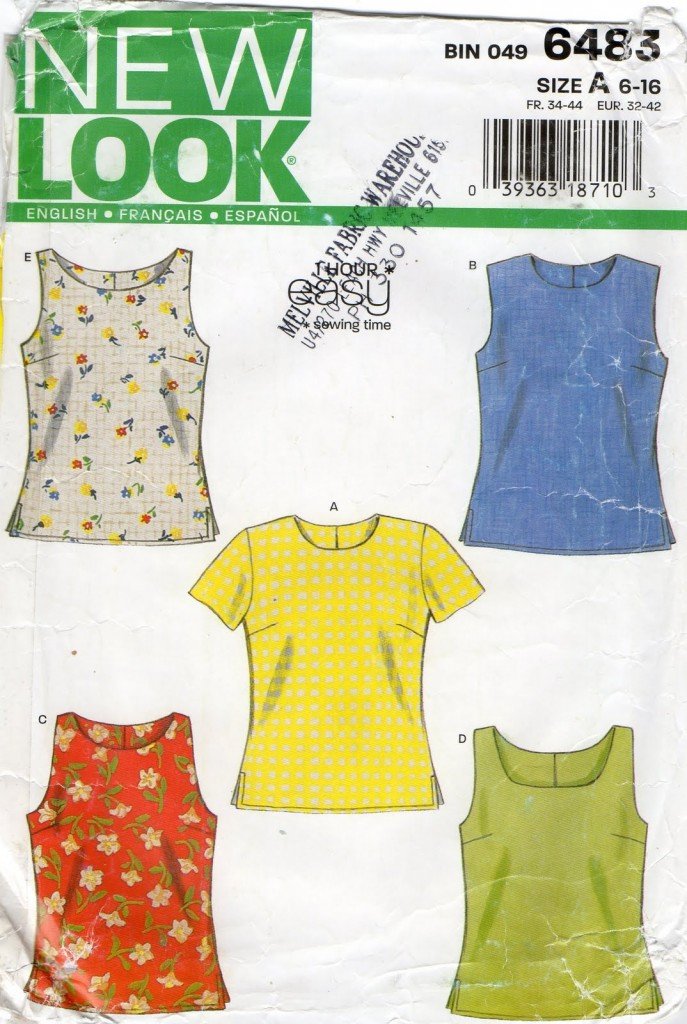
I had enough fabric leftover to cut out a little blouse/top for her also, so she has a complete ensemble.  The little cropped blouse is a cut down version of NewLook 6483 with the sleeves lengthened.
Only the bodice of the top is lined and also French seams everywhere with only the armscye seams of the little top finished on the overlocker.  I’ve found that I’m really enjoying finishing my seams using more traditional methods lately and resorting to using the overlocker less and less.
Phew!  I have to confess I started making this outfit at the crack of dawn on Christmas Eve and finished it at about 6.30pm that evening.  It was a frantic race to the finish!  But it was worth it to see Cassie looking so lovely and summery and fresh and pretty in her outfit on Christmas Day.

Details:
Top; NewLook 6483 modified by cropping bodice and lengthening sleeves, white muslin and voile
Skirt; Butterick 3134, lengthened and lined with spliced-together Vogue 1247 lining, white muslin and voile
Sandals; 2 baia vista, from Zomp shoes

pinterestmail

a bevy of beauties

I can now share the fruits of my Christmas shirt-making bendah!!  Old news? oh well…
I made four shirts recently.  Yes, four! *phew* all since I returned home from Melbourne.  I know.  Sheer insanity.  I has it.
Actually I did have different Christmas pressie plans, firm intentions to do something else for them all this year.   And then couldn’t find the specific fabric I needed.  And then the Fabric Store in Melbourne had such a gorgeous quality linens in stock…
resistance was futile.  Shirts it was.  My other plans will keep for next year  ðŸ˜‰
All are made using Burda 7767, all with short sleeves, all felled seams, with those tricky curved armscye seams felled using this tip.  The linen had no right or wrong side, enabling me to fold the buttonhole bands out, rather than under.  This makes a rather nice distinct buttonhole band, which can be further emphasised with piping like I did here, or a coupla double rows of top-stitching, or both.  This is my favourite way of doing the buttonhole band.
Burda 7767 has three collar variations; the button-down, the Kent and the shark.  I’ve used all of them at one time or another in my 30-odd versions of this pattern, but haven’t ever pointed out the differences specifically when blogging about them.  So this time, I shall do so  ðŸ™‚

Shirts 1 and 2, above and below: Tim’s and Sam’s pale blue shirts both feature the “shark” collar, more traditionally known as the cutaway collar.  It was a collar designed to accommodate a large or widely knotted tie, but I think it makes a nice collar for a casual shirt, worn open with the top few buttons undone.  Which, lets face it, is how my boys wear their shirts, like 99.99% of the time.

Tim’s shirt

They are both of sky blue linen, with piping inserted in under the buttonhole band, the pocket and sleeve hems.  Tim’s piping is pale blue and Sam’s is creamy pale yellow; these fabrics harvested from two of Craig’s old business shirts.  I cut both the boys’ shirts a little slimmer in the body and a little shorter of sleeve than I’ve done in the past, because I’ve noticed the fashion in young mens’ shirts is for a slightly shrunken look at the moment.
btw, Cassie made Sam’s shorts in the top picture; I think she did a brilliant job and they look gorgeous!  The fabric is Batman cotton from Spotlight, and she drew up the pattern herself using some of Sam’s shorts to guide her.  They have two welt pockets on the back as well as two inseam side pockets, and an elastic waistband.

Shirt 3; Craig’s blue linen shirt has a Kent collar, considered the classic collar.  I originally made the sleeves on this shirt a little shorter like the boys…  However! upon first try-on my conservative husband immediately requested a lengthening, ahem.  *sigh*  I complied and added a long cuff, with a decorative metal button sewn on the top edge.

This shirt has a longer back than front, and split side seams felled with a long bar tack at the top.  The other three shirts all have a regular, shaped hemline. 

Shirt number 4; Craig’s emerald green shirt has the rather difficult to execute button-down collar.  

To my mind the button-down collar has the most formal appearance of the bunch, but actually this is considered the “sporty”option in collars.
So there you go! a short compilation of collars. 
Haha, bevy of beauties, compilation of collars, I’m so alliterative this morning.  Sheer poetry, wot.

All buttons were harvested from off of some of Craig’s old business shirts.  RTW mens’ shirts nearly always have great buttons, good colours, good quality and in a difficult to find small size.  Only the Craig’s blue linen shirt has new metal buttons, from Spotlight.

pinterestmail

fun with gingerbread

*sings* Have yourself a very gingerbread-y Christmas…

Gingerbread!  Gingerbread madness  ðŸ™‚
I love the stuff but I pretty much never make it.  Until I do and then it seems like I become temporarily obsessed and will make a lot, maybe to compensate for not having made it in, like, ten years or so.  Madness.  
See, I decided I would make gingerbread men to give for Christmas gifts this year, and so made a big batch.  See above.
Then I thought it would also be nice to make a gingerbread house for Christmas Day too.  So drew plans and made a few more batches of gingerbread.  Can I just say; designing gingerbread houses is a lot of fun!  A lot more fun than actually putting them together, haha.
Mine is a pretty wonky little house but hey! shrug.  My family politely admired it!  And I’ve learnt a few tricks, from my mistakes.

For example; if, like me,  you’re a gingerbread house newbie, don’t try to make it symmetrical and perfect.  There lies inevitable failure and grief at your own ineptitude.  Just aim for charming wonkiness and asymmetry right from the get-go! and then you may happily bask in the success of your ploy, mwahaha.
Also, roll and cut out the house pieces straight on the baking sheet.  Picking up and tranferring the pieces can skew them a tiny bit.  Ergo, wonkiness.
Make the walls thicker than the roof pieces, to stably hold that thing up.
Also, pipe any fiddly decorative curlicues on the flat, before construction.  Seriously, that bizz is freaking difficult enough already, no need to make it more so.
 Then at some point I looked my first set of gingerbread men and judged them to be a bit big and not very cute at all; really a totally unacceptable gift!  I decided that only cute, mini gingerbread men would do.  Went out and bought a new, mini gingerbread man cutter, and made stacks of baby ones.  Was satisfied with these.

 I’ve kept the rejected big ones with green buttons for my family, and the silver- and pink-buttoned ones are the good ones, that I gave away.  Yes, my poor family have no choice but to eat big, non-cute gingerbread men, awwww!  I’m such a bad mum  ðŸ™‚

I used a recipe from my mother’s Scandinavian cookbook, that she has had since the 70’s.  I doubt it is in print anymore so I’ve reproduced the ingredients here:
Gingerbread

100g butter
225g dark brown soft sugar
1tblsp each of ground ginger and cinnamon
265g treacle
900g flour
1tblsp bicarb of soda
approx 235mL milk
Melt and mix the butter, sugar and treacle, then add the dry ingredients all at once and mix in thoroughly.  Stir in the milk, then knead to a consistent dough-y texture.
Roll out to desired shapes.  These quantities make quite a lot of dough, enough for a small house.
Bake at 175C, for approx 12-15 minutes, depending upon the size and thickness of the pieces.
Join the house pieces with toffee, made by dissolving and gently boiling plain white sugar until it reaches the hard crack stage.
Icing: beat 1 egg white until stiff, mix in 500g icing sugar.  Note; not “icing mix” which will not set properly.  Add in a coupla squeezes of lemon juice to get a good piping consistency.
Merry Christmas everyone!
pinterestmail
Switch to mobile version
↓