Category Archives: Uncategorized

some noice new basics…

I’ve had this post sitting just as a draft for weeks now and just keep adding new tees to it but I’m rapidly coming annoyed with myself that when I wear one of them I have to write “not blogged yet” in my ootd blog.  So I’m hitting “post on this thing right now.  I know I know, so ridiculous!

A long-term goal of mine is to have a full complement of colour range in my winter tees; so every time The Fabric Store has an online sale on their merino I tend to hop on and pick up a coupla new colours.  Then that luscious new fabric just sits there in my stash for a few years.  Occasionally I admire the pretty colours and dream about how wonderful it’s going to be when it’s done.  Of course winter is nearly over, so it seems like the perfect time for me to finally get going!  Actually, it’s not such a silly plan of attack really, because it’s right about now that I become so heartily sick of my winter wardrobe that I don’t want to wear any of it, so it’s been rather nice to have a few new things to inspire me!

First up, above: a gorgeous strawberry-milkshake pink – technically Rose pink –  new Pattern Magic twist top, from the first Pattern Magic book by Tomoko Nakamichi.. I’ve made this design up several times before and have loved each and every one.  I love this one too, though I kinda wish I’d made the straight-grain sleeve just a leetle bit wider because while it’s fine while I’m wearing it it’s hard to squeeze my hand through the sleeve and pop it out the other end!  I had actually anticipated this and made it a few cm wider, but it’s still a wee bit snug.  Wearing it here with a skirt made using Vogue 1247, and a scrap of denim given to me by a friend cleaning out her stash… details here

Secondly, a  new heavily modified Nettie tee, with a collar variation that I’ve used before, and love.  Yes, it might look boring but I absolutely know this is going to get worn to death!  This is in the Vanilla colour way. which I think is my perfect white.  I made this one with the sleeve and lower hems finished with a self-band, as per this method..  worn here with my newest skirt, my sunshine-yellow Paprika Patterns Jade skirt, details here

Thirdly, another heavily modified Nettie using this stunning burnt orange merino, actually colour Paprika from the Fabric Store…Worn here with my Sabrina mini-skirt, made with a beautiful herringbone wool tweed, inherited from my grandmother’s stash, details here

Fourthly; yet another modified Nettie, made with this Avocado merino from the Fabric Store; with a slightly wider and higher collar… to be honestly I’m not totally sold on the collar, it’s maybe a scant 1cm too high and I haven’t ruled out cutting it off and shaving off that little bit!  mostly just for appearance sake, I may even be glad of the height when the weather is cold again.  We shall see, we shall see…  worn above with my blue Sasha trousers, also a Closet Core pattern, and blogged here.

Anyway, I really like how fresh my little collection of new basics is looking right now!

pinterestmail

a little packet of masks

… we are so very very fortunate here in WA so far, there have been no outbreaks of covid-19 but we’re not taking that for granted! everyone including me is continuing to practise social distancing and hygiene because for sure the current virus-free state of our state cannot last forever.  Masks are not mandatory yet, but one person in our lives who is very health-vulnerable is Craig’s Mum, she is being super careful and wears disposable masks everywhere.  However, they probably cost her a bit so I offered to make some for her.  And she accepted, so I got to work!

Voila!

I made seven differently coloured masks, all are simple, two-layered and pleated so as to expand to fit over your nose and chin too, using this pattern and tutorial on the Makers Habitat youtube channel here.  I made seven so she can wear different colours to match different outfits, and included one pretty floral one too.  I also cut seven cotton denim inserts, which I shall explain later.  Because masks and inserts are small fiddly, nothingy things liable to getting lost, I also made a little custom-sized pouch for her to keep them all safe and together in one spot.

All the solid colours are tightly woven poplin (Spotlight), the floral is a linen, leftover from this top I made for Cassie (Fabulous Fabrics), and the linings are made from tightly woven cotton voile (Spotlight).  The denim inserts are all cut from a piece of coated cotton denim, and I finished the edges simply on my overlocker.  I cut the mask straps from a small leftover piece of white cotton jersey.

Some sewing notes; I’ve found it a really good idea to understitch the top and bottom edges of the mask/lining seam after the first sewing step.  The masks look so much nicer if you do so!

And I cut my straps to be 30cm x 1cm using my rotary cutter and ruler, no finishing because it’s not going to unravel, and just allow the cotton jersey to roll up naturally, if it wants.  I just tied them in very loose knots so they don’t pull out, and Craig’s Mum can re-tie them to fit herself properly.

So, why separate inserts?  Well, homemade masks are considered ok here; as long as they are made of at least three layers of fabric, preferably tightly woven and with the inner layer being of something like denim.  Basically all the patterns and tutorial out there are for two layered masks.  I trialled a few different mask patterns in three layers of fabric, with an inner layer of denim, but actually found this to be a really bad idea; the masks; and the seams! were terribly thick and bulky.  Oh, long story short; I popped it in as an insert and I think it’s going to work really well.  You do have to put the inserts in; which I hope is not too fiddly a thing for her! and push the corners up into the corners of the mask, but once they’re in it’s very comfortable to wear, and you can breathe through the layers quite ok.

The little pouch was fun and easy to make! and it fits all the mask components perfectly… I cut it from an old tablecloth that Sam bought at the Salvos to make part of a costume; the fabric is quite thick and stiff and it stands up by itself.  I pin tucked all the side and bottom edge seams, which helps to stiffen it too, and used a brown dress zip from my stash for closure.   I also put a piece of cardboard in the bottom of the pouch to stabilise it.

pinterestmail

golden yellow Jade skirt

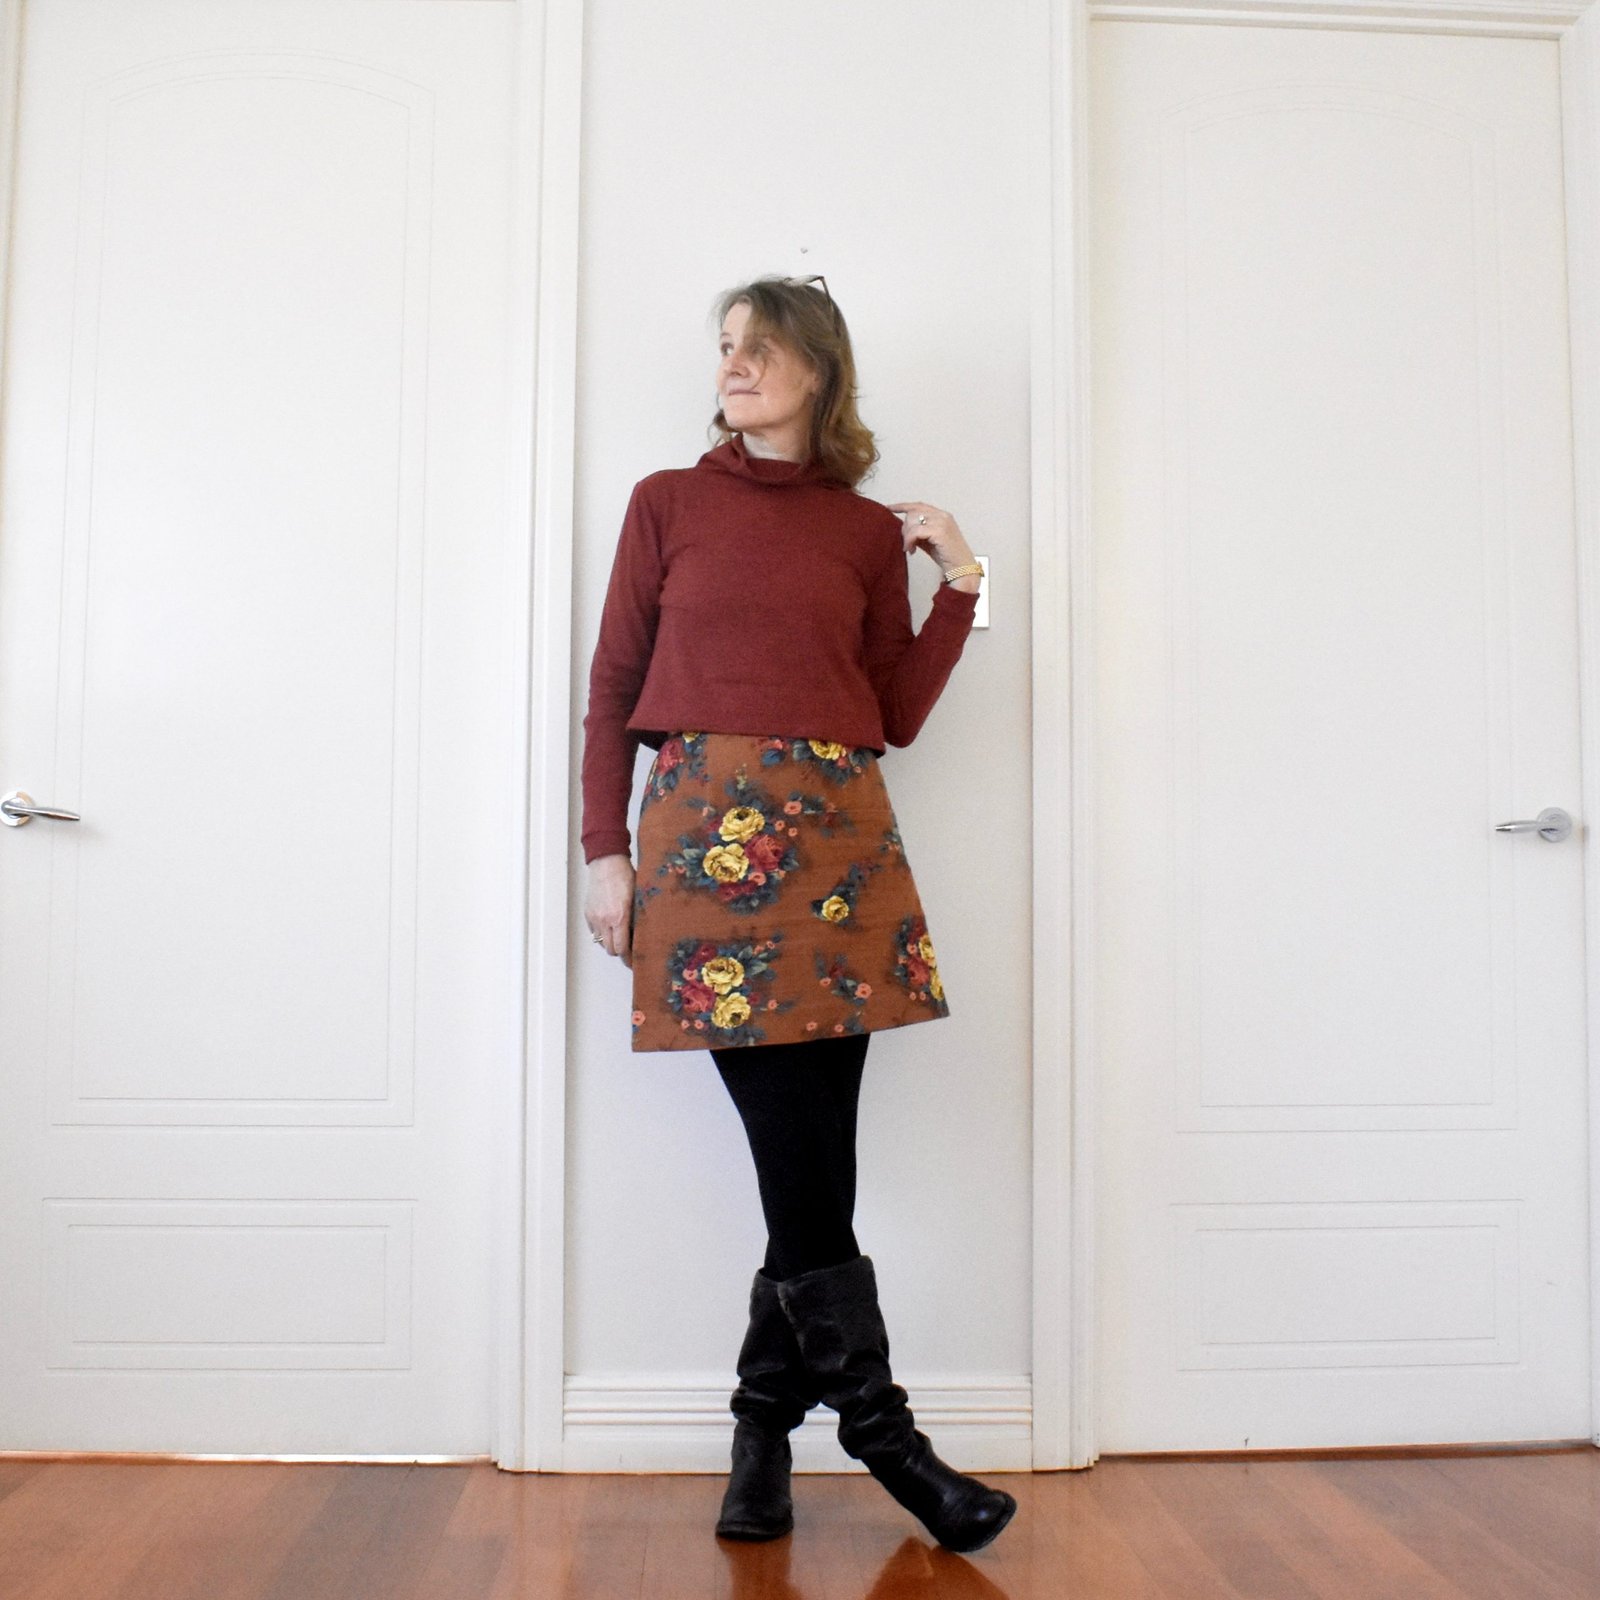
… sooo, while I was knitting up my new blue-flecked jumper I was all the time envisioning it worn with a brightly little coloured little skirt.  Only problem was that I currently did not have such a thing in my wardrobe.

Ta da!!  Problem solved.

I got out one of my favourite little winter skirt patterns, the Paprika patterns Jade skirt, and bought a length of cotton jersey from Spotlight in the most perfect shade of bright golden yellow.  I’m having a bit of a thing for this colour at the moment actually, since I also bought a few new cushions for our couch in this exact same colour too, and turfed out a few of the old, drab, neutral ones.  I’m in the mood for BRIGHT! and FUN! and CHEERFUL!  I think my new skirt hits the spot beautifully!

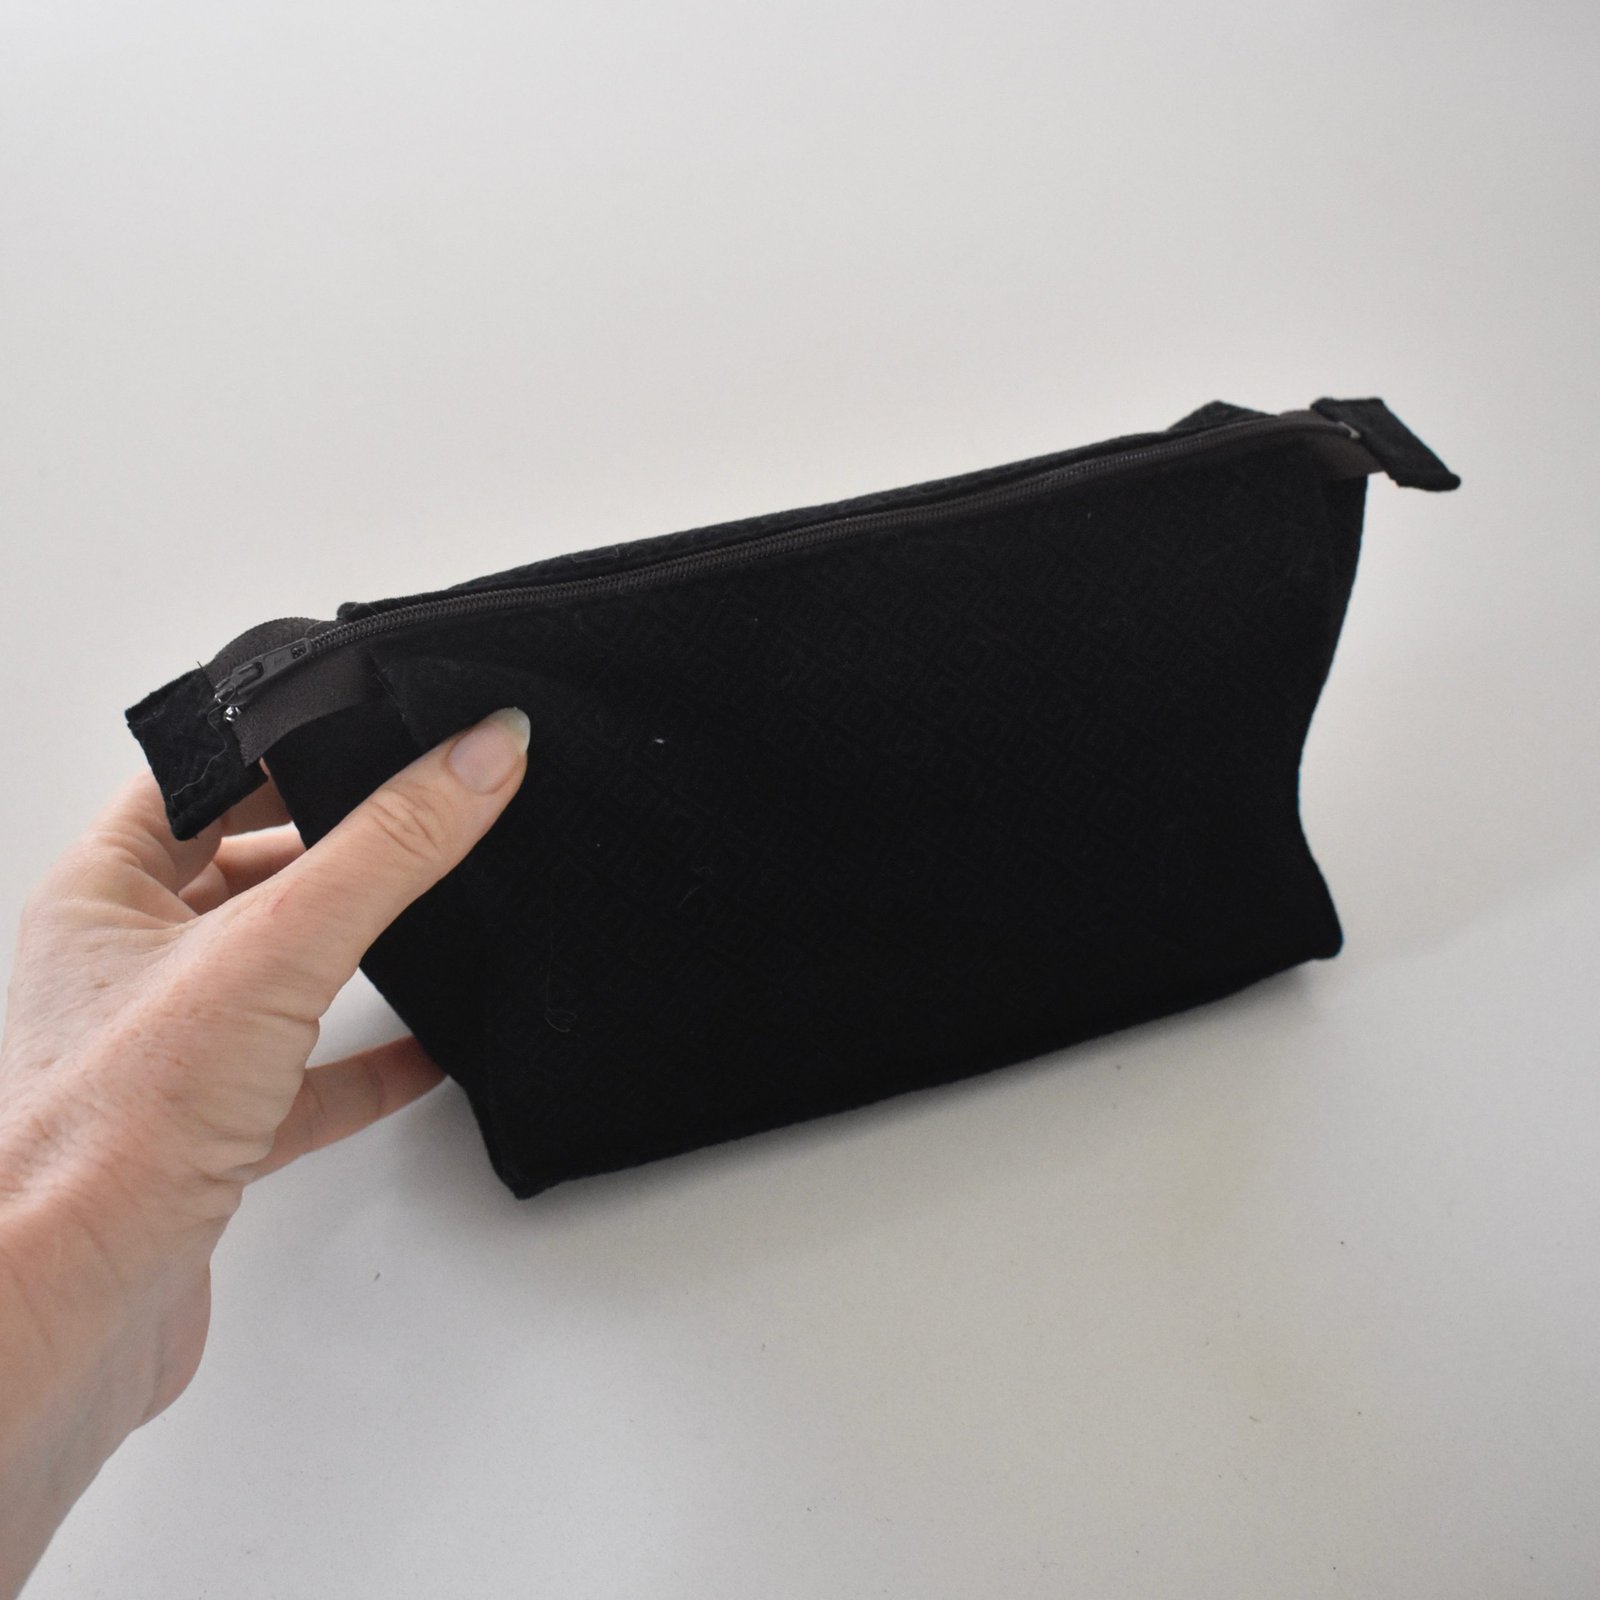
This is my fourth time making up this little pattern, I love it so much.  This time, I added a gold coloured jeans zip to the centre back seam… it was a pity I couldn’t find one with a gold coloured tape too but you know, options are severely limited here in Perth.  NYC we are not!

I’ve always thought the only downside to this otherwise perfect pattern was the lack of pockets, and to be fair it’s damn near impossible to add them “nicely”.  I took a punt with this skirt and stitched some patch pockets onto the back.  I’m pretty sure they’re going to bag out and look terrible very quickly, especially if I actually use them?! lol, but I figure that when that happens I’ll just take them off.  Maybe I’ll substitute pockets made of more sturdy fabric, we’ll see.  Actually, to be honest, this cotton jersey, while it is indeed the most perfect colour! is none too stable full stop, and so I’m not sure how long the skirt’s going to last.  In retrospect I should have used a different lining fabric, so it’s my fault.  I’m hoping it will be good for at least this winter and spring, and I’ll be on the lookout for better fabric to make up another!

Details:

Jumper; the raglan sparkle sweater pattern by Krysten Ritter via We Are Knitters, in 100% merino superwash, details here
Skirt; the Paprika patterns Jade skirt pattern, cotton jersey from Spotlight
Tights; my own design, made in black stretch poly, details here
Boots; Roberto del Carlo, from Zomp boutique
Striped sweater below; my own design, made using a yarn advent calendar by Dingo Dyeworks, details here

this is how I wore it yesterday… I’m pretty happy it looks really nice with my striped jumper too!


pinterestmail

fluffy blue speckles

Oh hey!  I’ve just finished knitting a new jumper.  Perfectly fluffy and perfectly relaxed and slouchy, the most wonderfully comfortable lounge-able thing you can imagine.  This is the We Are Knitters sparkle raglan sweater, a design by Krysten Ritter, in the “sprinkle blue” colour way.  It comes as a kit with everything you need to make it all packaged up neatly  in a lovely brown paper bag.  It’s was the absolute hugest treat to come home and find this on my doorstep! a really delightful present to cheer myself up during a sorta low spell.

And it was truly such a joy to knit!  unply-ed, unspun “fleece type yarn and giant fat needles meant giant fat stitches too, so it knitted up super fast.  Quick gratification, for sure.

And how beautiful are these wooden needles?  They look so cool… so much prettier than my old metal ones.  I wondered if they’d be a tinier bit “stickier” than metals; and yes they were, but not so much as to be annoying or a problem.

The yarn is We Are Knitters “the meriwool”; absolutely gorgeously squishy stuff!!  100% merino, and supposedly treated with a superwash treatment to make it machine-washable.  This is awesome news because I already dropped a bit of chocolate on it… whoops!  I didn’t risk the machine was yet though, I’m too frightened!  I just gave it a spot hand-wash just very gently rubbing wool-wash into the chocolate-y smudge and the spot came out alright.  When I do get brave enough to toss my sweater in the machine I’ll come back and update on whether this worked out just fine or whether it was disastrous… but I’ll be allowing myself a few more wears first, just in case!

So; there was a slightly negative thing with my kit… when I checked out the requisite five balls for my size I noticed that one ball was from a different dyelot than the other four.  This one ball had noticeably less blue sparkles in it that the other four balls.  Not too much of a problem, I thought; I’ll just use that one divided evenly over the sleeves; as in, two rows of the majority dyelot, two rows of the odd-one-out, and repeat; for each sleeve.  This worked out ok, I think but as I was doing the front and back of the sweater I couldn’t help but notice that as well, one ball of the majority dyelot seemed to have considerably more blue in it that even its fellow three balls from the same dyelot.  You can see this at the top of the sweater in the lower picture, below.  It wasn’t obvious when you were looking at the balls together, but once I’d knitted practically the whole ball it did start to stand out a little bit.

above, I’m wearing it back to front compared to the below picture…  the pattern front and back are exactly the same as each other so you can wear it either way, which I really like btw!  I’ll probably wear it like the below picture because I prefer the way the sparkles appear on this side…

Oh, the other thing I’m posting about here is this skirt… this is the Sabrina skirt by Forget-me-not patterns that I made last year in a lovely orange-brown herringbone wool that Mum gave me once.  I recently added pockets to this, as posted here, and now I’m posting it again to point out that I’ve shortened it too.  This involved a fair amount of unpicking an intricately stitched walking vent, just so I could stitch up again closed. Lol, the things we do!  However, I’m much happier with it this length.  I really like my winter skirts to be on the shorter side, and realistically I’m never going to wear this thick woollen skirt in the warm weather!  The other, hidden bonus is that initially I stitched the burgundy-coloured lining hem in orange thread, a. because it’s the thread I used to sew the skirt in and I couldn’t be bothered changing it, and b. I didn’t have any matching burgundy thread at the time anyway.  Now I DO have some burgundy thread, so once I trimmed the lining I stitched the new hem in matching thread.  Yay! for tiny good things!

Look, with regards to the uneven-sparkle issue with my sweater; it’s fine really: I’m not actually bothered because I’m really very happy with it, and I even like that the body is a touch more blue than the sleeves and therefore has a slight visual point of difference.  Sometimes I’m a bit more obsessive about how an apparently random distribution of decorative elements can then appear not so random in the end result; a foible of the design process that a regular person probably wouldn’t even notice but which can at times send my weird brain into a frenzy of debate about whether I should unravel the whole thing and start again.  However, I shall NOT do this, because I knit for joy, not self-flagellation… and I am content to just enjoy my sweater for what it is.  Which is fluffy and warm and pretty and wonderful.


Details:

Sweater, the sparkle raglan sweater design by Krysten Ritter, in a kit from We Are Knitters
Rust skirt; the Sabrina pattern by Forget-me-not patterns in an old herringbone wool passed down by Mum? I think? shorted and with pockets added.  initially posted here
Turquoise skirt; adapted Burda 2/2015;109 denim from my NYC holiday, details here
Black tights, my own design, black stretch polyester, details here

yeah, unless it was pointed out, which I JUST DID of course! you can’t even really tell in real life.  I’ve really got to learn to not point these things out…

pinterestmail

I made a little red top

… hot on the heels of my turquoise skirt, I whipped (k-chshhhh!) up a little top!

This is made from the leftovers from this little skirt, that I wore to near-death last year.  I still have that little skirt actually, but don’t wear it as much nowadays.  It needs replacing, to be honest  #plotting …  Early on I was like, sure I have plenty of leftovers for a little top! story of my sewing life, actually.  You know, it always looks like a lot of fabric, and then once you lay down your sleeve piece, which is far bigger than you thought, always, then it’s not quite so do-able.  Anyway, I did manage to get a little top out of it in the end, but it’s a little on the cropped side and the neck is more turtle than my originally planned cowl.

But I still love it!  I think it’s cute and it’s one of my favourite colours.

The most exciting thing to me about the top is actually these other photos of it… I’d taken it down to Bridgetown when I went down for a few days, for Mum’s citizenship ceremony…  and one day I took some pictures of it for my daily outfit blog.  And unknown to me, while I was taking pictures, a kangaroo crept up there into my background.  How cool is that?!  A wild animal!  This is an absolutely first for me, even though roos are pretty common around Mum and Dad’s house they’re usually so shy! Though, this particular one is not extremely shy actually; she has a new joey and just seems to be taking it easy for a while, she’s been hanging around the house area, not venturing very far and sleeping for much of the day.  But I still consider it pretty lucky that she moved into my pictures!  Thanks, darling!

Oh, whoops, forgot to mention some of the all-important sewing deets; fabric originally bought from KnitWit, and the pattern is mostly self-drafted rectangles, except for the armscyes and sleeve caps for which I used Burda 4/2014;111 … only chosen because I just so happened to have it out to cut out a new one.

This is Thing 7, from my “new year’s resolution” collection of 12 that I set for myself:

Details:

Top, mostly self-drafted, sleeve caps and armscyes from Burda 04/2014;111
Skirt at top; Vogue 1247, outback wife cotton, details here
Jeans; Closet Core patterns Sasha trousers pattern, cut with wide legs, cotton corduroy, details here

pinterestmail

I made a turquoise skirt

Enough said!

Well actually, I guess I can say a little more… so I bought this turquoise denim in New York City during my holiday in the United States with Yoshimi last year…. and who could have guessed how much the world would change during this short short time??  Crazy… I’m still reeling to be honest! Anyway, I did have such a wonderful time and am very happy to have made up my first thing from some of the fabric that I bought.  Don’t worry, there’s lots more!  I got this in a little shop whose name now escapes me, sadly; though I’m forgiving myself for forgetting since it was kind of an overwhelming day.  Honestly I’ve never seen as much fabric in my entire life as I did on that day of fabric-shopping in NYC!

have a squizz at those pockets!!!

The fabric was cut wildly off-grain, which meant I had a bit less than I thought, but fortunately I had enough to make this skirt using mostly Burda 2/2015; 109.  This is a pattern I’ve attempted once before; I made it up using yellow linen which was quickly deemed a giant fail and converted into a top, and I must say it’s been a great little top!  Anyway, I still had faith the pattern had great skirt bones.  And I’m glad I gave it another chance since this little skirt is fantastic and I love it!

I did make a few mods though… namely, the wrap nature of the skirt is gone, because I felt the denim would be too stiff to make a nice wrap and tie belt; also I didn’t have enough of the denim for something like that anyway.  Instead I made the skirt to have a fixed waistband and a centre back zip closure; a pretty straightforward mod.  I also stitched down some of the pleats to make it a little more fitted.  I wondered if I’d have a matching zip in my stash, and you know what? I did!  Miraculous!!  It was from a large bag of colourful zips that Mum had tossed my way, once upon a time.  I’ve used up quite a lot of them over the years!  This one is really very “vintage”, so much so that I zip it up and down quite carefully.

I used white thread for all the topstitching; I really love how subtle this looks.  And I cut the contrasting inside waistband and bias to finish the hemline from an old shirt of Craig’s.  I’ve harvested from this very same shirt previously, to bind the quilt that his Mum made for Arthur, here.

That shirt still has quite a bit of fabric leftover still to use for other things, which is fabulous; because it’s beautiful quality stuff!

This is thing 6, from the collection of 12 I tasked for myself at the beginning of the year.  Yay, I’m halfway through!!


Details:

Skirt; Burda 02/2015; 109, turquoise denim
Top; Burda 04/2014; 111, in a slightly stretchy bobbly stuff, details here
Tights, made by me to my own design
Boots; Roberto del Carlo, from Zomp boutique

(below)
Jumper; hand knit by me, my own design
Raincoat; made by me, new and not yet blogged!  eeep!  I’m so behind!

… nothing to do with sewing, but lately I feel like I have so few good hair days I reckon it’s worth documenting when I do have one, even if it’s courtesy of the salon and not my own doing at all!  I’ve been trying to grow my hair out all natural, a whole year later and I think I almost like my hair again.  Finally, a light at the end of the tunnel!

pinterestmail

blue Blair jacket

Hello!  I made a new thing.  It’s sort of a jacket, sort of a coat.  What’s the difference between those two things anyway, I wonder?  I always thought a jacket was short, like maybe no longer than hip length max, and a coat is longer, like anything past the hip.  This pattern is marketed as a jacket, but also as potentially a shirt-dress, and the two variations are called duster and blazer respectively; so I guess you can take your pick!  A multi-faceted design, to be sure!Whichever, it’s unlined so a very simple and quick thing to make as far as jackets go, and the boxy unfitted shape makes for an undemanding fitting process too.  Oh, maybe I should mention the name of the pattern; this is the new Blair jacket pattern by Homer and Howell, and I made the duster length.

I really enjoyed making this! you normally think of jackets/coats/dusters as being quite involved but this was really easy.  Even considering that I chose to bind all the raw edges inside with HongKong binding, which is a process that when you’re about to embark on it you think; oh this is going to take FOREVER… But since I figured the seam allowances were going to show every single time the coat blew open I wanted everything to look neat and tidy inside.  And whenever I do get going with HongKong seaming I invariably love it, end up thinking, oh this is FAB!! and why don’t I do this for ALL the things I make, hmmm??

My fabric is a wool-blend suiting that I’ve had in my stash for years and years; so long I cannot even remember who gave it to me.  Because, yes; it was donated to me from someone else’s stash once upon a time.  I think maybe my grandmother’s?  It’s beautiful quality, but I’d always shied away from using it because I thought the colour was absolutely terrible for me.

However right now I’m trying to be more resourceful and use le stash, stay in my house and avoid shopping as much as possible.  You know, isolation and all that … so decided what the heck.  That’s why dyes were invented, right?  I knew the fabric wasn’t 100%wool, but it was worth a try.  Sploonch! it went, straight into a navy blue dye-bath.

This actually worked out pretty well… it’s now a lovely shade of …  bruise?? ok maybe I’d describe it as smokey blue, or even light teal.. anyway it’s a richly smudge-y sort of a colour that I really like and a big improvement on the original light sky-blue.  For the HongKong seaming I used an olive green poplin from my stash too.

Buttons! well obviously I had nothing that matched in size or colour AT ALL and normally I’d pop off to the shops to search for something.  But see I’d made up my mind to work from my stash, and giving in on the buttons would be such a fail… so fresh on the heels of making my tea-cup for the bridal shower hat, I thought I’d try to make some from modelling clay.  I think they worked out really well!

I don’t think I’ll be tossing the coat in the washing machine any time soon, just in case, although I’m sure they would probably survive fine.  Maybe just a gentle hand-wash.  But look at them!  I LOVE them!  I especially love how slightly wonky they are.  Of course any and all wonkiness was completely intentional  😉

I’m just going to briefly mention the changes I made to the pattern:

I switched the orientation of the box pleat in the back to be an “innie” rather than an “outie”

I added a hanging loop inside the collar/yoke seam

I put in BIG inseam pockets into the side seams.  Yes, there are now pockets in the Blair pattern, but I was a tester for this pattern and they weren’t in the original design.  I NEED pockets in a coat! so I actually went in with the seam ripper and added some in after I’d finished the coat completely.

Here’s a little video on the making of this coat, now up on my YouTube channel… I’d like to say that the quality of my videos is improving, but I still haven’t worked out how to even add music.  I feel like such a youtube failure!  but it’s such a lot to even get this out.  I’m trying to improve!

Anyway, blogging/vlogging fails aside; the final verdict is that I’m going to love wearing this… coats are not an awfully common sight here in Perth, we’re so ridiculously casual here, to a fault! But I really love coats, both the making and the wearing of them; and I really love looking at pictures of Northern hemisphere bloggers wearing coats regularly that I’m going to just do it anyway.  This is one of those things that is kinda un-Perth, even though I’m deeply Perth in just about every way.  This is weird, but it’s just the way it is  🙂


Details:

Coat; the blair jacket pattern byHomer and Howells, in a wool mix suiting
Dress; the Cissy dress pattern by Homer and Howells in a rust coloured lace, underlined with pink/rust dyed cotton, details here
Tights; my own design, black stretch stuff, details here
Black shoes; my own design and made by me, details here
Floral dress; based upon Simplicity 8658, floral cotton gauze, details here
White shoes; designed and made by me, details here

pinterestmail

I sewed selflessly

So, I sewed some stuff!

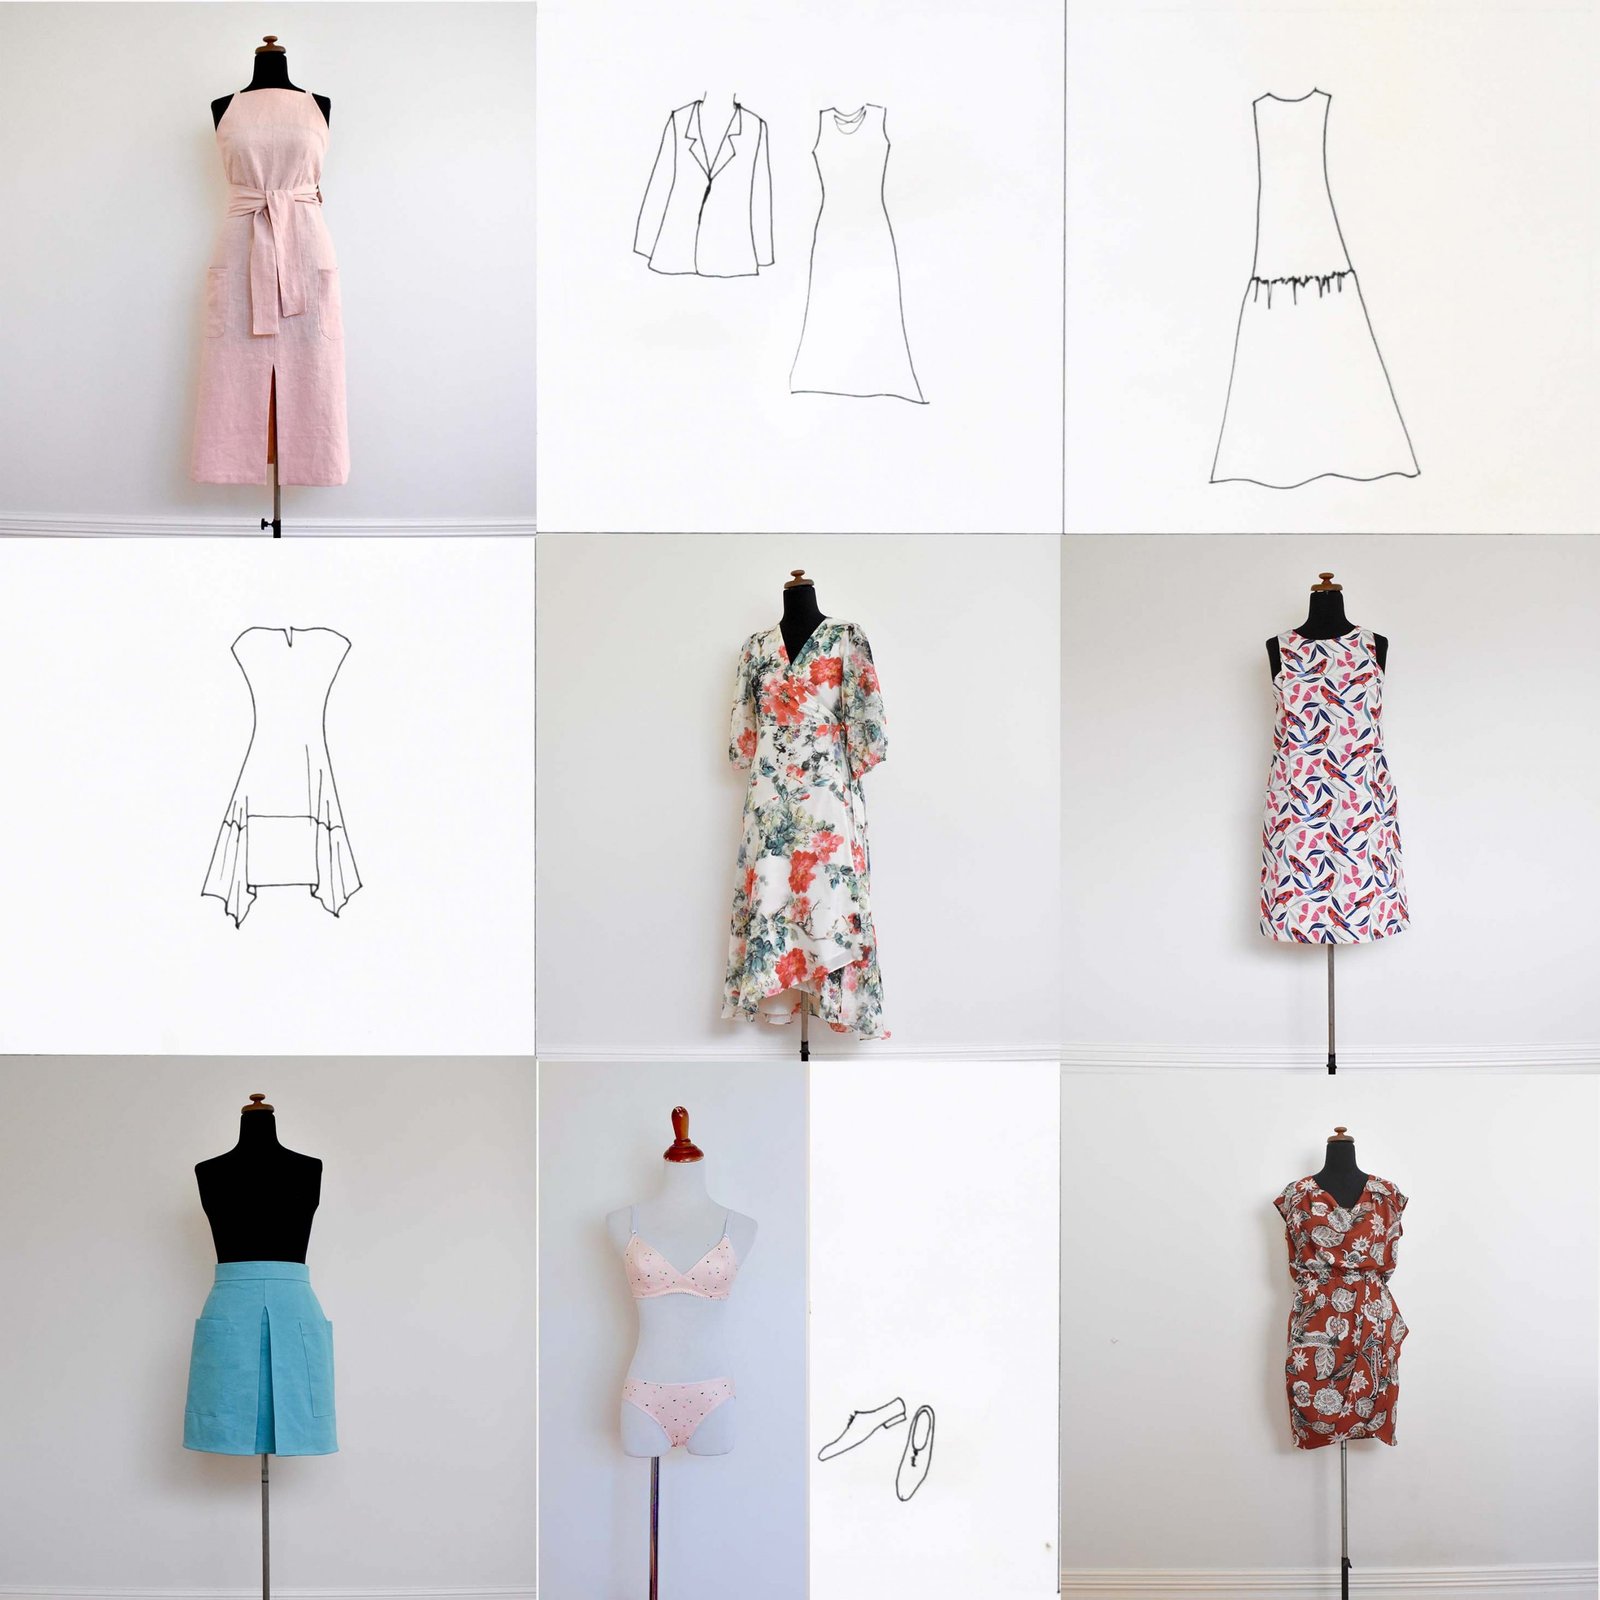
Item A; a dress for Mum to wear to Cassie’s wedding…

I started out with Burda style 09/2019; 109 because I thought the sleeve cuff really lovely; however I ran up a muslin – actually 2 –  and we decided the cut-on sleeve just wasn’t that nice and that a set-in sleeve would be much better.  So I ended up re-tracing and -fitting the Esme pattern from Lotta Jansdotter’s Everyday Style book again since Mum had really like the one I made for her previously.  I just adapted the sleeve to have the Burda cuff on the sleeve end.

The fabric is a really beautiful, green polka-dotted ivory crepe from Fabulous Fabrics; Mum and I went in together and chose it one morning.  Fun!  I didn’t use the neckline facing pieces, opting in stead to fully line the dress with an ivory lining that I already had in my stash, the lining negated any need for a facing…  Mum kindly hemmed the dress herself since I was seriously running out of time by the end of it!  The dress shell has french seams throughout, though I used the overlocker for the lining.

At the same time that we bought the fabric, Mum bought a length of emerald green chiffon and finished it with a hand-rolled hem to make herself a lovely matching scarf.

I thought she looked absolutely lovely!

Item B; a shirt for part of Cassie’s birthday pressie…

For her birthday, we went out together and bought a few lengths of fabric which I was to make into some simple work outfits for her.  Of course now she’s working from home but that’s ok; at least she’s still working!

This is pattern 02/2015; 113, adapted to be much slimmer in the body due to the fact that I didn’t buy enough fabric, ahem… that’s fine since the style is so super wide I think Cassie would have requested it be slimmed down anyway!  This thing is BOXY!!  I also had to leave off the sleeve cuffs, but Cassie absolutely loves it just as it is  :)..

The gorgeous polka-dot fabric is a linen from Fabulous Fabrics.  The buttons are leftovers from Kelly’s wedding dress!

I did manage to snap one photo of her wearing the top! kinda a miracle given how crazy busy we were before the wedding, and then I’ve barely been able to see her after the wedding during these virus social-isolation times… this is her on the eve of her wedding, when she was preparing to practice her father/daughter dance with Craig… yes, she’s wearing her wedding shoes of course  🙂

I actually made a little video on the making of this blouse, which was fun.  I’m hoping to make more of these for my YouTube channel  🙂

Item C; some shorts for Cassie’s birthday.  For these I started with the Closet Case patterns Pietra shorts and did the same elastic-waist elimination that I did for my own shorts… shown here.

The fabric is a cotton twill from Spotlight, in Cassie’s favourite duck-egg/mint green colour.

Item D; another little top for Cassie… this is the Closet Case patterns Cielo top, lengthened slightly. This is a lovely little pattern and I will definitely be using this one again!  No other adjustments.

The pretty rose-print is a linen from Fabulous Fabrics.  I should say, that while these pieces are all a gift from me to Cassie, she did choose the fabrics herself.  We had a lovely fun morning checking out fabrics and chatting about work-wardrobe possibilities!

Items E & F; I made two different masks for myself.  I haven’t used them very much but am really trying to get more used to the idea!  When we’ve visited Japan I’ve seen lots of people wearing masks all the time of course, and while I think they’re a great idea, especially in our current virus-centric lives, we’re just completely unaccustomed to wearing them here in Australia and it’s really hard to get used to it.  I find them very claustrophobic and a little difficult to breath in them!

The first one, above; I used this pattern/tutorial on the Makers Habitat YouTube channel, it has a lining with an opening so you can insert a filter inside.  It’s a nice straightforward pattern, very quick and easy to make.  I added a skinny channel to the top, and cut a short length of wrapped florist’s wire to insert in there for a nose support; this can be removed for washing.

This second one I used the Trend patterns free mask pattern, here.  This is also a nice pattern, very “designed” and I really like it, but I did find I had to fold a quite wide dart in the under-chin piece to get a good fit.  Also it is a more complex and involved thing to make than the previous pattern,  For both masks I used a leftover piece of cotton from my stash, the most tightly woven and with the densest thread count I could find!   They are both lined with cotton voile.  The ties are just thin strips of cotton jersey, cut with my rotary cutter, left unhemmed, threaded through the side channels and simply knotted.

pinterestmail
Switch to mobile version
↓