finishing an edge with bias binding

Now, I promised to write this tutorial to show my Mum how I applied this finish to her top… and others expressed an interest too; thank you so much to everyone else who did… I finally did it, yay  😉

Mostly I would use this finish for a neckline that is wide enough to need no zip or button opening, as pictured above. Another example of its use is for a hemline such as the skirt demonstrated here.  I’m making this in a totally inflexible fabric with about zero give, PLUS the design has such a sharp curvature around the bottom edge a regular turned-up-twice hem is quite difficult to execute neatly.  The bias binding finish is a good solution for this 🙂   It results in a clean, banded finish on the inside of the garment, with one row of 1cm (3/8″) topstitching visible on the outside of the garment.

This method is just one of several ways of doing this kind of finish, I prefer this way because I find it the quickest and easiest, results in minimal fabric bulk, and minimal mucking around.

Firstly, make a strip of 2.5cm (1″) wide bias cut fabric long enough to fit the opening to be finished, plus at least 20cm (8″) extra.  Best fabrics to use are something woven that is very thin, fine and lightweight, like cotton voile, silk or handkerchief linen; in an unobtrusive colour toning in with the fabric.  For Mum’s cotton top above I used the self-fabric because it is quite light; for the blue suedette skirt I used a scrap of leftover silk-like microfibre.

Right sides together, pin around the edge to be finished, and stitch in a 6mm (1/4″) seam, leaving a gap between start and finish of around 15cm (6″) and ideally tails of at least 20cm (8″) 

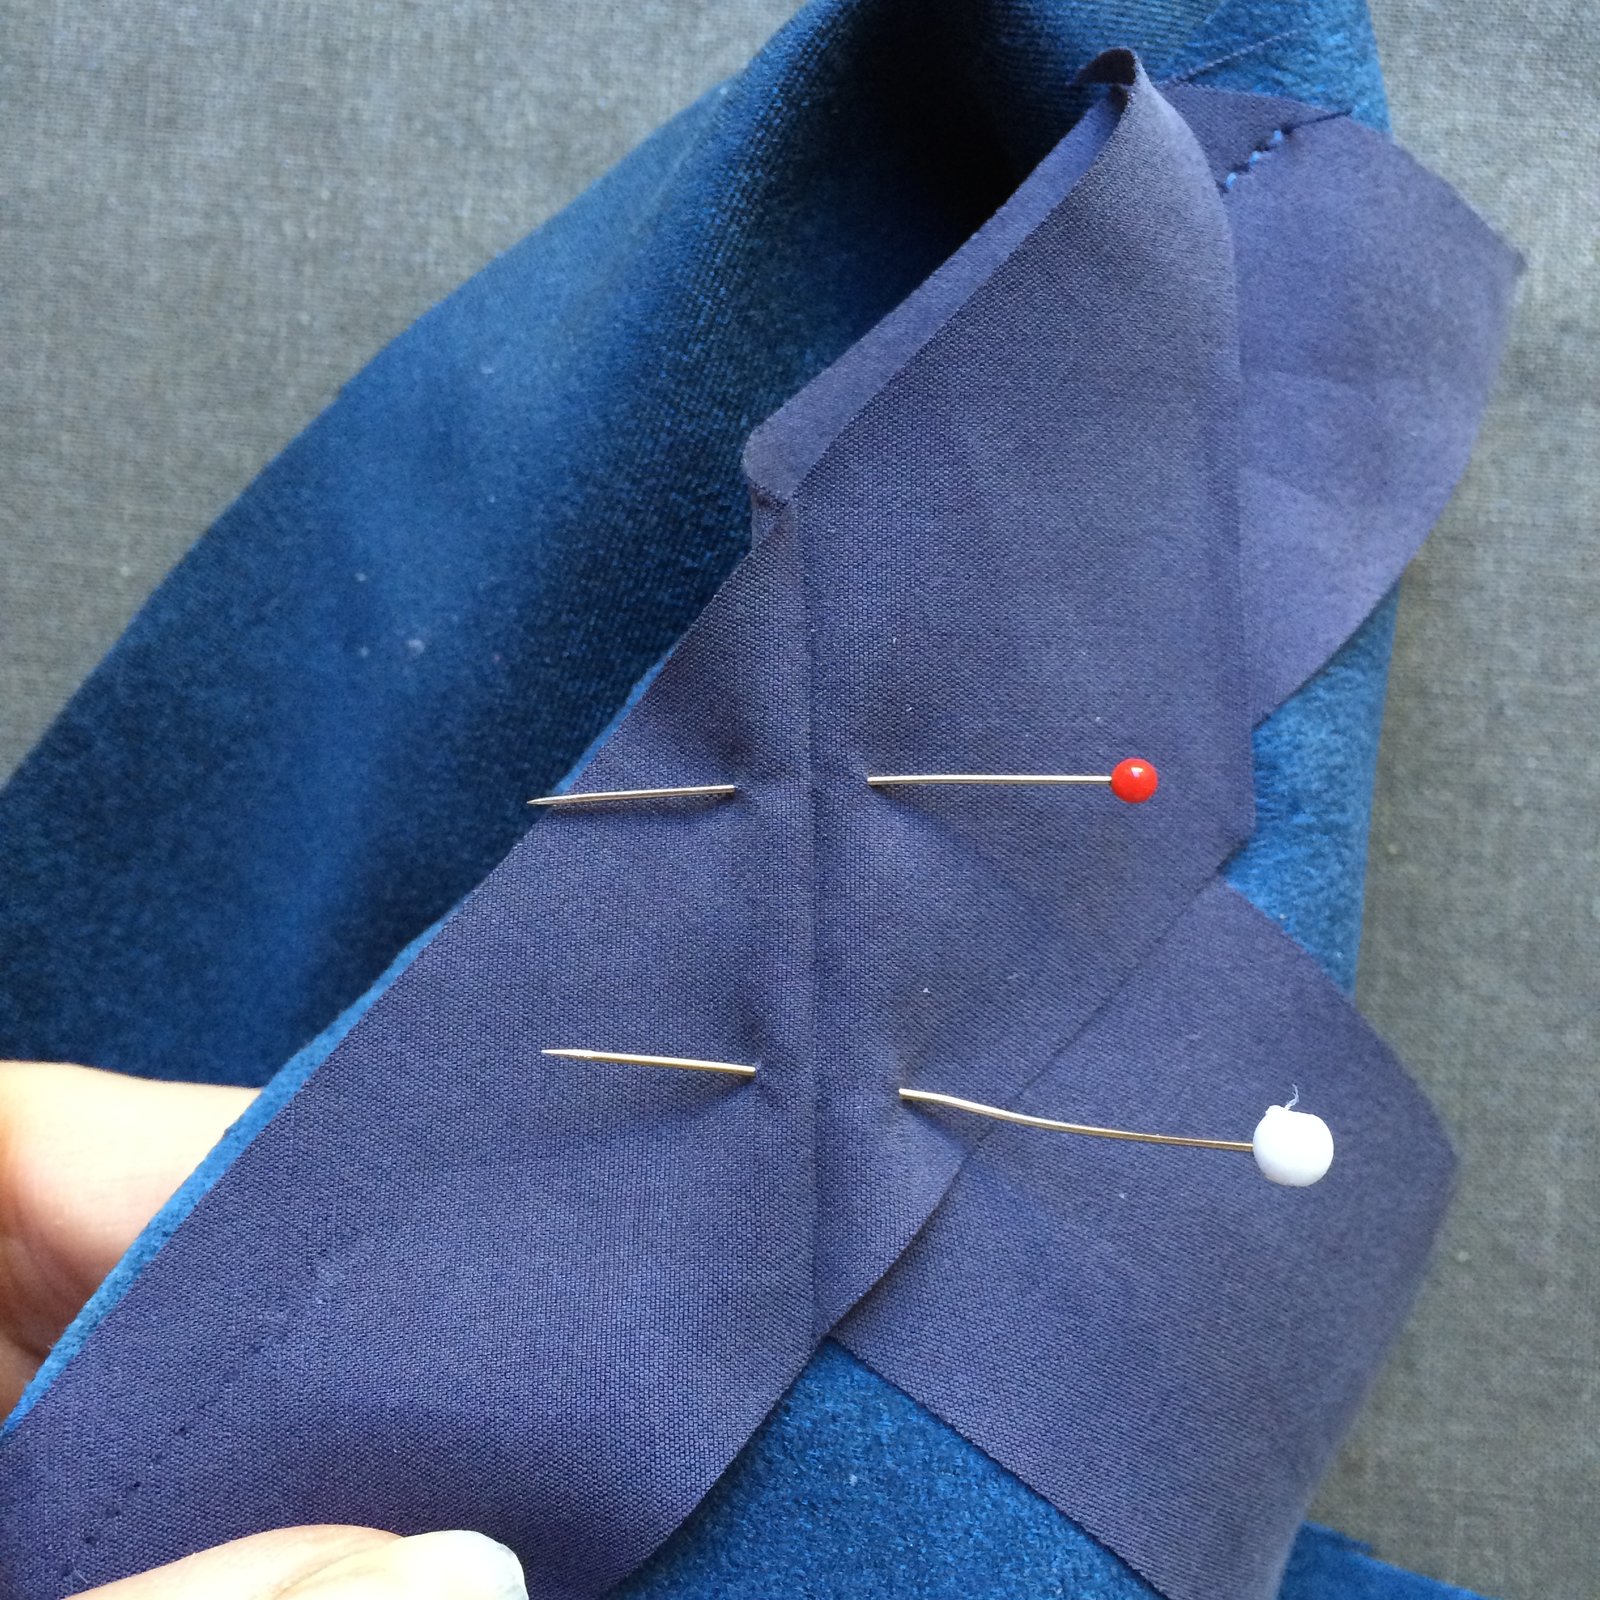
Fold and press the strips to meet together on the bias.  I find it best to leave a very tiny gap, like 1-2mm or so, between the pressed edges.  Don’t have any explanation for this, just that it works better when it can stretch into it just a touch.  Keeping everything straight and right sides together, pin along the folds, stitch, and trim.  Press seam open.

Stitch up the gap to complete the bias strip attachment to the edge.  Press the bias strip, bias strip seam allowance, and garment seam allowance away from the garment.  Understitch these three layers together close to the seam line, keeping just the garment layer free.

Turn the garment wrong side up and press the bias strip back onto the garment, keeping the seam line just inside the pressed edge.

Turn under a 6mm (1/4″) seam allowance on the bias strip, press and pin in place.  Topstitch 1cm (3/8″) in from the garment edge.  Done! and the nice thing is that you won’t ever be able to see where the strip starts and ends  🙂

pinterestmail

pink/navy DKNY dress

Terrible post title, I know.  Every now and then, inspiration strikes and a fabulously perfect Word that describes my new “thing” to a T springs to mind instantly.  Other times I just plump for the obvious.    Today, inspiration was like a wispy breathe of smoke in a dark shadow of the night.  Barely present, fleeting and rapidly lost amongst the dusty cobwebs in ye olde brain.
But, enough of that… wot abart the dress eh??

Pattern; Vogue 1351; bought aaaaaaaages ago. With the intention of making it up immediately, funnily enough! but more on that later…

Fabric; a slightly stretchy crepe from Fabulous Fabrics.  Also bought aaaaaaaages ago with the intention of making it up immediately, sigh.  The aqua and indigo, sorta-floral/sorta-galaxy border print runs along one selvedge of the fabric, so to retain that I cut out the pieces across the grain, rather than on the bias as recommended in the pattern.  I just really love the colours in this fabric… but! I know pink doesn’t suit me, in fact I’m already anticipating that my Mum will have A Few Words to Say just as soon as she sets eyes on me in this sick-making, blemish-enhancing shade of pink.  What can I say? I agree, but sometimes I just can’t help myself, I just LOOOOOOVVVEEE pink and navy together, and like a lemming I occasionally toss myself over that cliff.  It’s one of my favourite colour combinations, with a lovely and natural yin/yang balance.    Frivolous and girly; pitched against sombre and slightly masculine.  Like a perfect summer sunrise over the ocean.  It speaks to me.

Anyway, no doubt drawn to that; at some point about mumblemumble years ago I spotted it, oohed and aahed, and naughtily bought some.  And cut out the pieces for Vogue 1351 that I’d recently bought in a club bmv sale.  Honestly, I barely remember doing any of these things, but obviously I did and it’s been folded up and tucked neatly away in my fabric cupboard ever since.  Then about a week ago I “found” it, and just set to, whipped it up.  Whipped it, I say!  Kt-chaaaaaaaaa!  … that’s a whip-cracking sound effect there by the way, just in case it’s not immediately obvious, hehe.

Alterations; downsized the bodice.  Hey, it’s Vogue,  and something of this kind is an always-requirement for me in Vogue.  Their patterns are designed for a more busty lady than I; but you know, I still want to use their patterns!  Often I handle this by shaving something off princess seam curves, or doing some other variation of small bust adjustment.  In this case, the bodice is one-piece with that draped neckline being the only feature, actually it’s the only feature of the whole dress…! So to avoid having to diddle around with that and possibly lose something essential to the neckline, the easiest thing to do is simply downsize.

I lined my dress fully with pale pink, polyacetate lining fabric, also from Fabulous Fabrics.  The design of the lining is quite clever, the way it’s a little fitted around the décolletage and with a nice smooth joining seams still allows the drape to spill out over the top.  It’s impossible for the lining to flip up or peek out in any way.  Very clever.  I love Donna Karan’s aesthetic, and am quite sad that we will no longer see her designs for Vogue patterns.  She really knows how to flatter a woman.

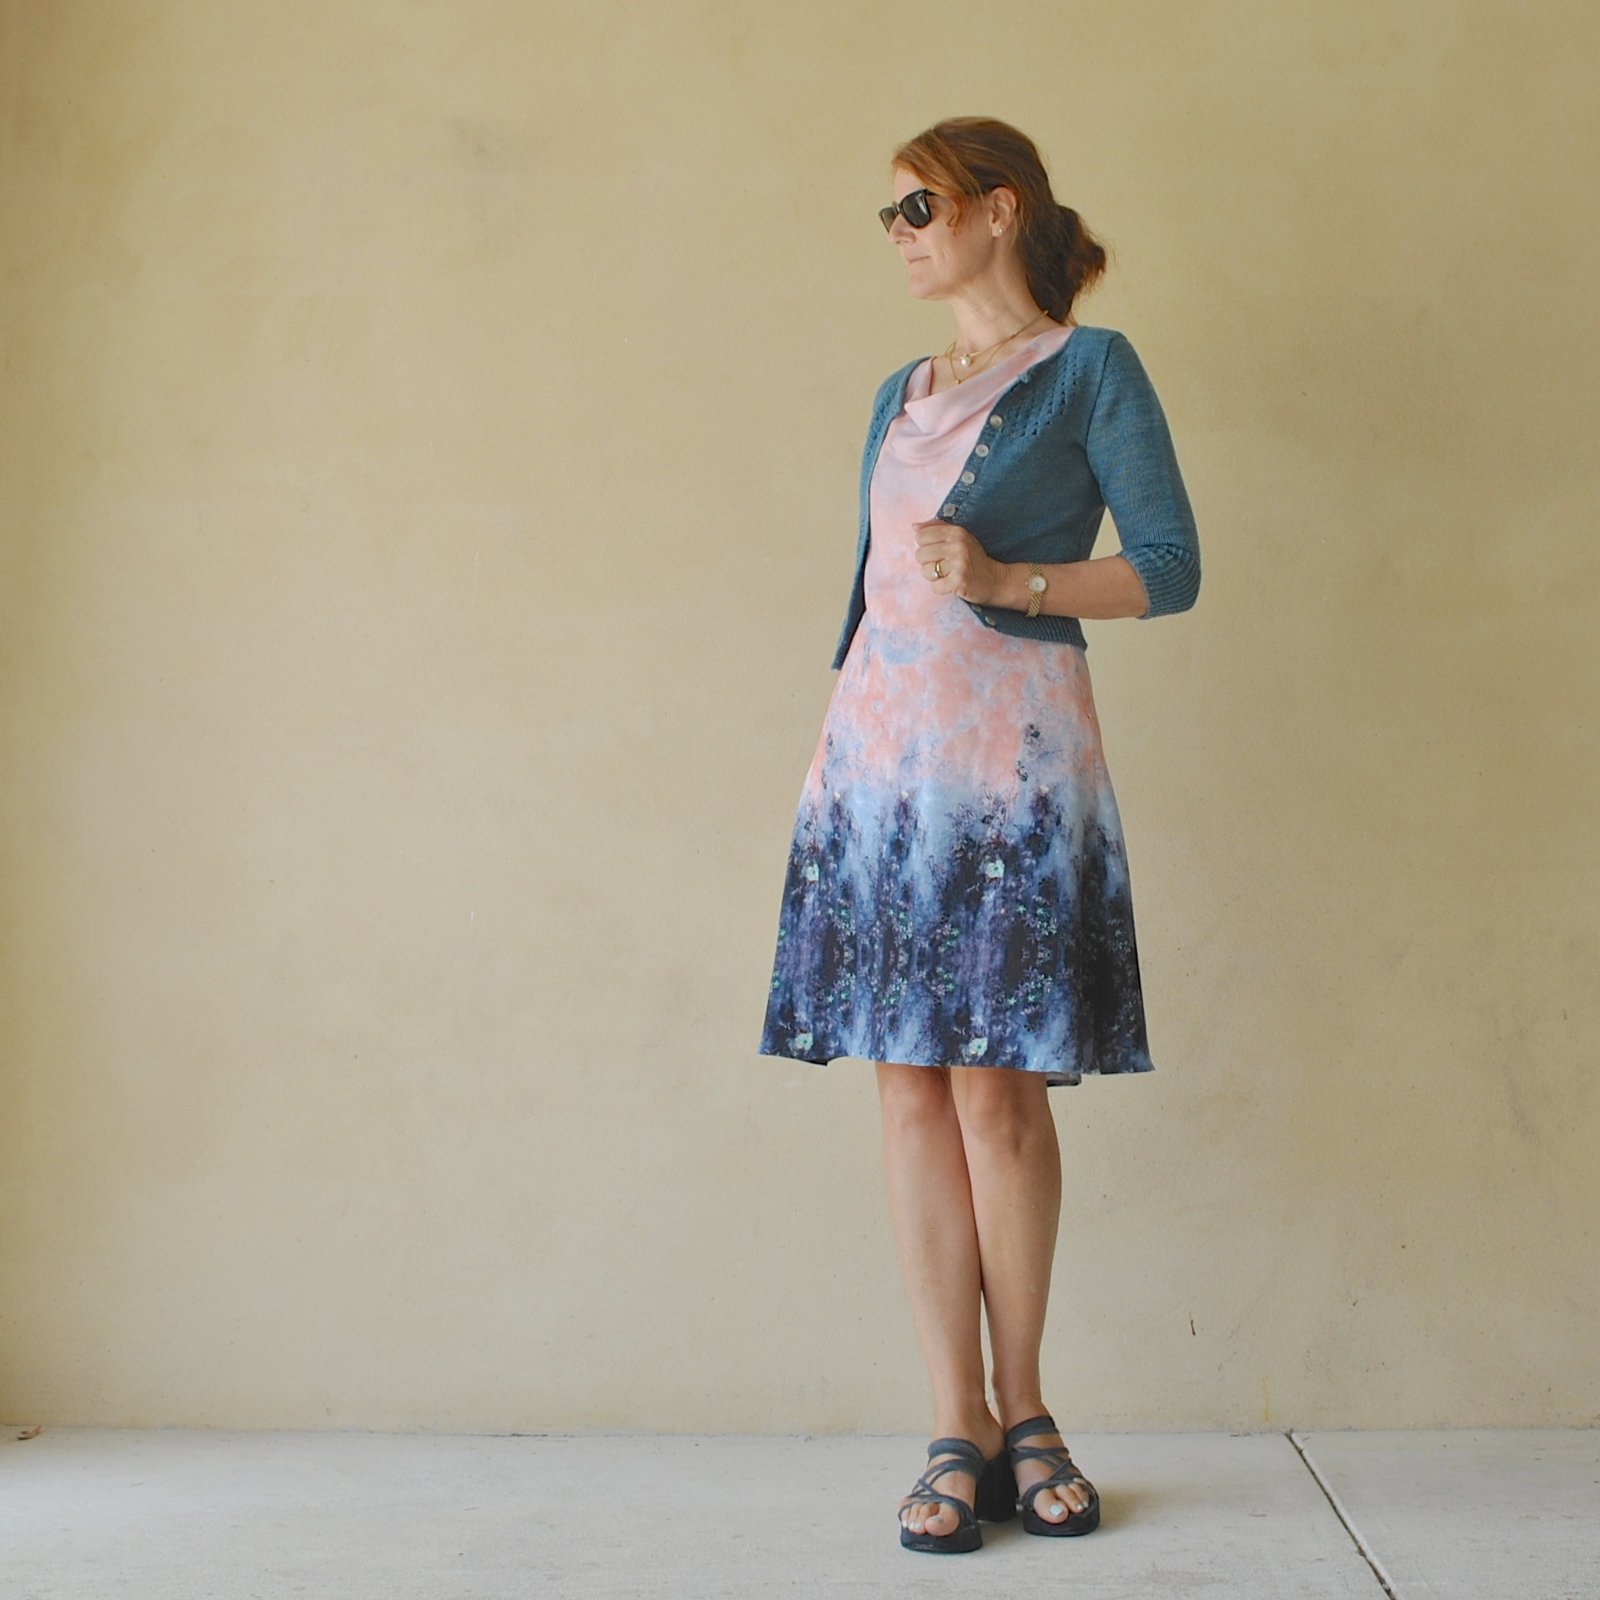
Also! can I just say with regards to the issue of those of us with Autumnal colouring wearing Pink = A Really Bad Idea thing…  see below how I’ve deviously dealt with it, by wearing it with my little teal cardigan.  Whammo! instantly counteracting and negating the death-warmed-up effect.  I think the pink actually looks quite OK on me like this!

Details:

Dress; Vogue 1351, printed crepe
Cardigan; Audrey in Unst, knitted by me, all details here
Wedge sandals, made by me, all details here


out in the wild…  I wore it out to lunch with my friend J today  🙂
location; South Perth foreshore, Western Australia

pinterestmail

french navy, french navy orla

Partly because of the colour.  And partly because the designer is also French Navy.  Truly!

So, recently I discovered Sarah of french navy .. she has a chic, pared back style; easy, casual, uncluttered, slightly sporty, one that I love and very much can relate to; and it was exciting to see that she has lately decided to dabble in a little pattern designing.  Her first pattern, the Orla dress, is a free pattern,  I decided to give it a whirl; stat!  hied myself over to her site, printed it out… and boom! Made it!
Fabric; a piece of thin, lightweight cotton drill given to me by my friend L when she was doing a big clean out out of her garage and “discovered” a large stash of fabric…  I was so thrilled that she offered it to me! #insanefabricaddict  Don’t you just LOVE friends like that?!  She’s like, what IS this pile of junk? hey maybe my friend Carolyn would like it…  😉  So my fabric was free too.  Basically, apart from the invisible zip, my dress was fabulously FREEEEEE!!!!!  #miser

The Orla is a super quick and fun little pattern which is exactly what I wanted to cleanse my palate, so to speak, after my mad Christmas making-fest… Featuring a gently fitted bodice, rather pert short sleeves, which I think I would be rather nice in elbow length too; a highish waistline, and with a gathered rectangle skirt.  I think the low scooped neckline is really lovely, it’s my favourite thing about the pattern.  I added 3cm in length to my skirt… just because I thought the gathered skirt gave it a rather young look and I’m.. well, you know. not.  Hehe, to be honest I agonised over the length of this skirt, you don’t want to know for how long.. at least as long as it took to make the whole dress.  I pinned and tried on, contemplated; re-pinned, re-tried on, re-contemplated…  I finally settled upon keeping some extra length that I’d added while cutting out, but I’m still partially tossing up the idea of re-hemming it shorter again.  Man, I am SOOOOOO indecisive sometimes, I drive myself batty… I think I’m going to be ok with this length… FOR NOW, she intones, dramatically.   I may or may not change it up on a whim, whenever.  But maybe not.  Might do, though.

Oh, I added inseam side pockets.  Goes almost without saying, yeah?  Everything’s better with pockets!

The neckline is finished with a bias cut strip, topstitched on the outside, and I added a hook and eye closure at the top.  Normally I’m sloppy about that sort of thing but every once in a while I rouse myself to add these proper little extra touches.

oh HELLO you gorgeous thing..  yes you are a BUNCH more interesting than some old sewing details yes you are you big boo-fful fluffy ol’ booffy booff you…  (cuddles ensue)

Ahem…  So yes; now I have a new, sorta minimalist little frock, to be dressed up or down as the occasion demands.  Knowing my lifestyle, most likely down. hehe.  Seriously, at this time of year I LIVE in easy, just throw-it-on little dresses, and this is a great new colour for my current wardrobe too.   It’s nice to have a few different silhouettes to choose from too and this one is a little different from my current crop of sack-like summer dresses; more fitted, loosely-waisted, with that low scooping neckline, feels a bit more “classic”.  Hey, no judgement, I love my shapeless sacks too! but just that it’s good to have some variety.

And I’m looking forward to seeing what Sarah designs next!


Details:

Dress; the Orla dress by French Navy, in french navy cotton chambray, a free pattern available here
Hat; Vogue 8844, in ivory corduroy, details and my review of this pattern here

location; Eagle Bay, Western Australia

pinterestmail

2016; a retrospective

Soooo.  It’s the last day of 2016.  Cheers! and here’s to the year that was… *chinks champers flutes*   Mwah, mwah, darlings!

Kicking off with my favourite ootd/blog pictures, just one for each month…  Apart from January, well obviously I did not make January’s outfit.. I am wearing a full traditional kimono in Tokyo! but it was definitely a highlight for my year! spending the day with my dear friend Yoshimi and with Cassie and Kelly, getting dressed in kimonos and having a Japanese lunch together.  So very interesting and so much fun!

Apart from this one picture, I made 100% of what I am wearing in every other picture…

January;

February;

March;

April;

May

June;

July;

August

September

October;

November;

December

Oh dear, oh dear; looking through all my old pictures to compile this post has been a little sad, Sienna features in so many of them.  yes I miss her so much, in fact everyday.  We’ve still been quite down here.  But I will not get all maudlin now…

Ever onwards.  So, my year in making:

I made a total of 101 things this year.  I don’t think this is too bad, considering it included a fully embroidered Alabama Chanin skirt, and 19 pairs of shoes.  Yep! NINETEEN pairs of shoes…  ahem, some of them are just a tad better than others, and several of the earlier, shonkier pairs have already winged their way to that big eternal shoe box in the sky…

Da breakdown…  13 dresses, 1 doll with a full wardrobe, 12 skirts, 5 lingerie sets, 5 prs of bathers (1 binned without blogging because it was an abject fail), 1 knitted cardigan, 5 jackets/anoraks, 2 prs thongs (flip-flops), 10 prs oxford/lace-up shoes, 1 pr winter boots, 2 prs desert boots, 2 prs slippers, 20 tops/shirts/blouses, 2 prs sandals, 5 prs tights, 1 pr jeans, 1 pr hand warmers, 13 bags/pieces of luggage.  Phew!

Selfishness vs. virtuous brownie-point earning:  63 plays 38.  Maybe a little tipped towards selfishness, but since that figure includes all the shoes, and practise shoes! that I needed just so I could lead a self-shod, but functional life, well I don’t think it’s too terrible.  I think I make just enough things for others that I’m not a pest about it, you know?

Costs… dunno.  Haven’t been keeping track.  Probably a small fortune?!  😉  No really, I did 3 refashions, and also 24 items were made from free “old” fabric being tossed out by others, or using leftovers, or scraps.  Really could improve upon this though…

Most worn items:  ah, this is my favourite bit…  For four years now I’ve kept track of what I’m wearing, three of those years via my ootd blog..  I keep a spread sheet that I update every month, so I know just how often each and every thing has been worn.   I know I know, super nerdy stuff.  But, real talk; it’s been an eye-opener I tell you… someone who tells you they’ve worn something hundreds of times…? well, if you actually add it up, for real; you may not have worn it as often as you think!  Truth!  Anyway, my most worn clothing items for this year can be summed up in the following outfits:


The obvious basics were my black winter boots (70 wears), black tights (109 wears over 4 prs), white LS woollen winter tees (30 wears over 2 tops), other white beige/ivory Tshirts(41 wears over 5 tops); my staples are all 4 of my coloured Miette cardigans, my little mini skirts for winter, and all my loose linen, cotton and silk dresses for summer.  For the most part I stick reasonably well to my autumnal palette but I’m not strict about it

Favourite creations:

I would have to say, topping of the list are my winter boots!!  so unbelievably proud of these things!!! and which as mentioned have been worn a TONNE.  I can still hardly believe I managed those things!

Followed closely by my Magdalena Dusk Alabama Chanin 3-piece ensemble.  I’ve worn it twice this year, not very much! I think I suffer from might-ruin-it-itis.  Gottta snap outta that.  This thing deserves to be paraded about more, not just for the several months worth of hand-embroidery it represents, but of course for its connection to my lovely friend Lisa of Lisa’s Carolina 🙂

I’m also pretty pleased and proud of my Tosti jacket...  🙂

Goals for 2017; Mainly, I want to see out the end of my 100% handmade challenge of course! I have just 53 days to goooooo!  But in making goals, well I don’t need anything, so my creating is going to be aimed at maintaining a useful wardrobe, and concentrating on higher quality, and more interesting things.  I would like to occasionally make some more fun and frivolous things too.   And to continue making shoes, and improving my cobbling skills.

Finally and most importantly of all, I just want to say THANK YOU to everyone who reads my blog and who takes the time to leave a comment, I am grateful for each and every kind thought.  Thank you so very much, and I’d like to wish all the best to everyone for a safe, happy, peaceful and creative 2017!  xxx

pinterestmail

buttonhole loop; a tutorial

Aaaages ago, Susan asked me for more information about the buttonhole loop used in this top, and I totally forgot!  I’m so sorry! right up until yesterday when Pencil Girl asked the same thing about Cassie’s top.  Ladies, thank you so much for asking!  I hopped to and wrote up my method… and if you dislike sewing tutorials then please skip over this… we’ll just pretend that this isn’t even here and we can still be friends, yeah?  winkwink ;D

The buttonhole loop is a quick, easy and very unobtrusive button closure, made using thread alone.  It is most often used for a short slit opening at the top centre back of a dress, blouse or a top, where two finished edges abut each other with no overlap; it is practically invisible as well as a quicker alternative to a rouleau loop.  My grandmother used it aaallll the time, and taught me how to make one…

also, please let’s just pretend that this is the back of a divine little blouse made of Liberty lawn or something, and not what it is.  Which is two measly scraps of  leftover upholstery fabric from my recently made duffle bags… #notliberty #notsilk #ohtheshame

Stitch the button in place.  Which side is up to your personal preference… although to have the button on the right hand side is conventional

Cut about 30cm (12″) of the thread you’re going to use.  Buttonhole twist is traditional and the best if you are lucky enough to get hold of it, I am using upholstery thread here which is an excellent substitute.  You can also just use regular, all-purpose thread or even embroidery thread if you like, it will probably be just fine if a little more difficult to work with.  Reason being, regular thread is thinner and twists and tangles more easily, so is more likely to develop knots, and also results in a flimsier loop, naturally; and embroidery thread, being stranded, is more difficult to pull firmly into the knots you are forming with each stitch.  But either would work out ok, in a pinch.  There are no rules in sewing!

Secure the thread at the top of the left hand side of the opening.  This should be at a level with the top of the button.

Lay it over the button so the thread lies around the button shank/stitching, and pull firmly until thread and two garment sides are sitting in the desired position.  It’s more neat to have the sides abutting each other closely, although if you want a bit of a gap between the sides make the loop longer.

Stitch the thread once in the left hand side, level with the bottom of the button.

Lay the thread back around the button again, and stitch back in the top edge.

Being careful not to pull the loop out any looser or tighter, undo the button… now you’re going to work buttonhole stitch to totally cover up that two-stranded loop…

Bring the needle over the loop, insert it back under the loop and over the working thread on the other side… this is the buttonhole stitch.  It’s basically the same as blanket stitch, but instead of doing it into the edge of fabric, you’re doing it over a thread in mid air, so to speak.

please excuse my dodgy drawing skills…

Pull it down firmly, and repeat; just keep going, going, going; pulling each stitch firm and trying to keep it all flat and even and straight; and not to rotate around the loop as you’re going along.

When you get to the end, secure the thread into the bottom of the loop by sewing three tiny stitches  into the same spot three times.

aaand; done!

pinterestmail

… some clothes for Cassie

… and finally, I made some clothes for Cassie for her Christmas pressies too.  At first I had wanted to make some luggage or a travel set for her too; but we were hanging out in Spotlight together, you know as you do… and I discreetly sounded her out about the particular fabric that I had in mind for her.  And she basically nixed it.  Aaargh!  So I had to change tack.  Realistically, she probably needs clothes more than she needs a travel set, anyway!

Particularly she needed little separates and dresses for work.

Et voila…

1. a little spotty top.  The pattern is the cap-sleeved crop top;  Burda 02/2015; 127 and is one I’ve previously made for myself, here.  This one is sized to fit her and lengthened by about 5cm too.  The fabric was a surprise goodie from Spotlight.  I prefer polka dots to be irregular in some way, either in size or arrangement.  When I spotted (hehe) this one, well I just couldn’t resist!  A lovely soft grey crepe, with ivory spots in a satisfyingly random, non-grid pattern, and feels very luxe, just like silk.  I don’t think it is actually silk but it does feel exactly like it; lovely, slippery and whisper-soft.

Funny story; I made this nearly two months ago… and risked posting it on IG for bpsewvember “spots and stripes”… I don’t know what I was thinking … that she might be too busy at work to notice it or something? but she did! and commented “thanks, Mum!” eek!  I proceeded to just keep quiet about it and hope she wouldn’t actually come around asking for it, and luckily she didn’t think to do that!

that IG pic… with my own striped skirt

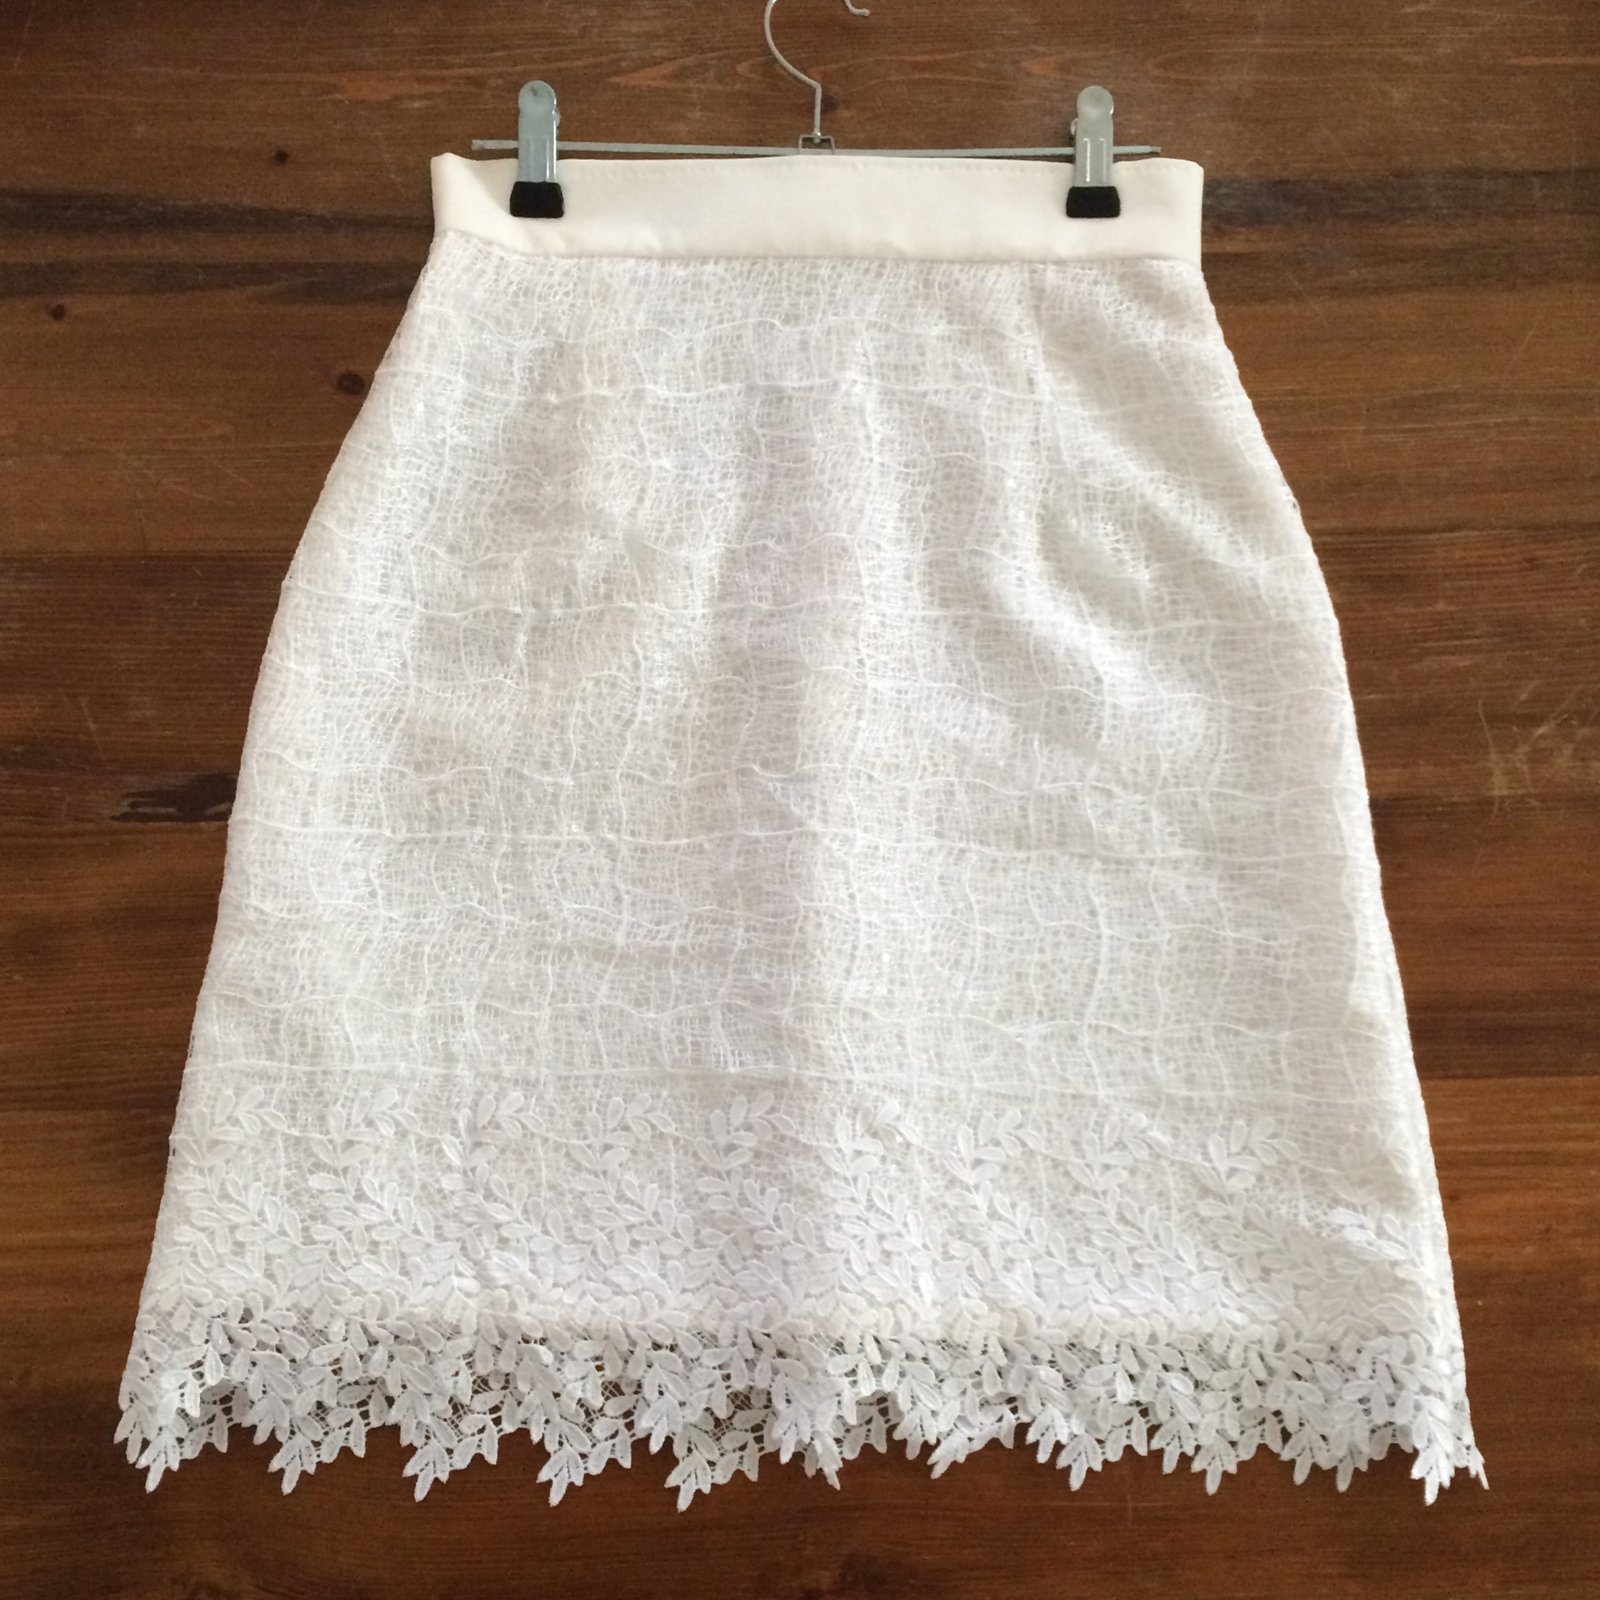
2.  a white cobwebby, lace-y skirt, with a very pretty border.  I used Vogue 1247… again! and spliced the pattern pieces together so there’s just one seamless front, and the two back pieces with one centre seam for the zip.  The white lace shell and cream suiting gabardine lining/underlining fabric are from Fabulous Fabrics.  The waistband is cut from the same cream fabric.  I like the cream peeping through from underneath the pure white lace, I think it makes a really nice, tonally subtle contrast.  The waistband looked a little bland by itself but I didn’t want machine topstitching, I thought it would look a little… I don’t know, like it would lower the tone of the skirt or something.  But it needed something.  So I did some hand-picksitching along the top edge… and really like how this looks; it adds a little bit of something, a certain handmade je ne sais quoi, and practically speaking achieves the stabilising effect of topstitching without the regimental look of machine topstitching.

note: shoes are Melissa

3.  finally a plain pink Tshirt. Looks boring, but she was over the moon with this!  This is my attempt to clone her favourite and beloved Cotton On Tshirt style and make a pattern from it for her… she has several of these and they’ve all been loved almost to rags!  I borrowed one that hadn’t been stretched out toooooo badly, and made a pattern from it; this was also a Christmas gift for her  🙂  I think it turned out pretty good , the fit and style is just about identical to the Cotton On one, so yay!  There’s nothing quite as valuable as an excellently fitting Tshirt pattern! and, bonus; they take barely an hour to whip up.

I finished the hems and sleeve edges with my twin needle, and since I was too lazy to wind up a new bobbin of pink, the double topstitching has one strand of pink, one of white.  You can only really tell if you look right up close! and I kind of like it.

And that’s it for my Christmas pressie making this year!

Oh! I almost forgot! not a Christmas present, but a few months ago I also made a Named pattern Inari tee dress for her.  This isn’t for work obviously, it’s just a casual, slop-around-at-home thing… the fabric was leftover from a hoodie that she made for herself previously, and she bought it in Tokyo during one of our holidays there.  I added a kangaroo pocket at the front because, well you know; pockets! and finished the neckline and opening edges of the pocket with a bias binding; left off the slits and finished the bottom gently curving longer at the back than at the front, mimicking the high-low hem of the original pattern.

It’s not a very exciting dress, but she likes to wear it on the weekend, or in the evening when relaxing, or to watch tv and stuff. An after-work, but pre-pyjamas thing.

Ok, now that’s really it.

Now, to make something for meeeeeeeeee!  she skips with a clear conscience to the sewing room, self-indulgent frippery in her heart… 

(btw; I apologise for the terrible quality pictures.  I just snapped most of these very quickly with my phone, on Christmas Day, as she tried everything on.  I’m hoping she will give me a little time for me to take some nicer pictures sometime… but she’s currently away and I reeeeeally wanted to get these blogged before the end of the year, to round all my “made” things off!  This post to be updated, in time!)  Update; DONE IT!!

pinterestmail

the year of handmade, 10

above are just a small selection of some of my favourite outfits for the last month, the entire collection for the year so far can be viewed in my Year of Handmade flickr album, here

Oh, running behind my blogging schedule… oh well, it’s a self-imposed folly anyway, right?! 57 days to go!

This last month has been pretty intense, not so much in the wearing handmade clothes and shoes side of things, which to be honest has been just about the easiest thing going on my life!  but just in the ordinary life side of things.

Obviously losing our dear Sienna has been a huge blow to the family.

In other “things”, we finally sold our old beach house, which is a good thing because it has been on the market for a LONG time… not such a good thing was the three day window in the week before Christmas; in which we had to go down, pack the house, move it, clean and clear out.  Man.  It was pretty crazy, but did come at just the right time when we needed some hard physical work to distract us from our sadness.  We just worked our butts off for three days straight and flopped into bed late each night, exhausted, sleeping like babies.

All plonk in the middle of the pre-Christmas work/social scene, my “real” work, and of course my own Christmas present making period too… and I’l be the first to admit that I sometimes set making-goals for myself that can sometimes be quite ambitious.  Basically, every spare minute has been very full and a bit stressful.

I’m not writing any of this to whinge or whine, but just stating the facts for the month.  I think it’s good sometimes to acknowledge stuff, you know, not make like everything is easy-peasy, no sweat.  You know how sometimes Christmas Day can be more of a relief than anything else?  it was actually rather nice just to merely have practically nothing left to do, just chill with our lovely family.

Anyway, the last few days since Christmas has brought some peace and quiet and the feeling of more optimism.  The last few months of my handmade challenge are going to be pretty breezy, I’m sure.

I’m actually even a little enthusiastic about making something for myself, soon…  Can’t even believe I’m saying that! but … yeah!

pinterestmail

some shirts…

… in addition to luggage pressies, I made some shirts for those incredibly difficult to buy/make-for men in my life.  Honestly, it would be so much more fun and frivolous if I only had girls to make stuff for, but you know.  I love these big blokey-bloke creatures anyway.

My husband and sons all do like shirts fortunately, and I recently bought this new pattern, Burda 6874, and made a short-sleeved version for Craig, here.  For these new ones though, I went with the full-on, long-sleeved version.
Prior to Christmas Craig and I went to several Christmas parties, and on on a fair few we encountered our good friend S, a man who is the most super-stylish, fashion-forward, hip dresser you could imagine in sleepy old Perth.  Needless to say, he is not actually a born-and-bred Perth man.

I always look forward to seeing what he is wearing.  Anyway, a couple of weeks ago he was sporting a floral shirt.  And not a traditionally manly type of a floral, like a Hawaiian print or abstractly/discreetly masculine-y subdued-colour floral either, but a distinctly “pretty” floral with rambling roses in shades of pink and pale yellow.  Well!  With the way he’d styled it, with rolled up sleeves and faded blue jeans, it just looked so awesomely cool, it blew my tiny little mind.  SO ON POINT!!!  With brain a-buzzing, I forthwith made haste to the fabric store like immediately; to add some cool-dude florally goodness to Craig’s wardrobe.  I should just slip in here, Craig is not much of a fashion-forward guy actually.  To his credit, he wore this shirt on Christmas Day, and looked super cool.  He garnered many compliments too, hehe (rubs nails on chest pridefully)

I also made a shirt for Sam.  His is a fun and beautifully coloured feather print, that I just fell in love with, randomly.  Oh, in each case, I’ve customised the fit of the pattern to suit each guy… Sam is my easy one, in that he just about perfectly fits a size 38.  YAY!!  Craig is not so perfect, ahem  😉 he still requires that 2cm extension out and down from each underarm point, plus the same modification to the sleeve/underarm point.  Otherwise I run him up a straight size 40 with a little added length in the body too.

All fabrics and buttons are from Spotlight, both a crisp cotton print. Funny thing, while I was making each shirt, I kept each guy’s shirt super secret from that particular guy, but was less careful when that guy wasn’t around.  So every now and again they would catch sight of the other one’s shirt.  And even though I was careful to say to them, “btw, this is NOT for you!” they each privately thought the other’s shirts WERE for them, and were looking forward to wearing them!  I’m sorry! but yes, I was telling the truth  😉

I altered things very slightly on each shirt… the pockets are different on each one.  They both have two breast pockets; but Craig’s has arrow-pointed bottoms, and I did a little bar tack on the top edge of the topstitching, in lieu of the usual triangle.  I don’t know why, just a whim.  For Sam’s, the pockets have a rounded bottom, and the regular triangle at the top edges.  I chose shiny black button for his shirt, to pick out the black feather borders, and unobtrusive, white, matte buttons for Craig’s shirt, to allow the floral to truly shine, hehe.

The other alteration I made for both was to make the sleeve plackets with an arrowhead top…  the previous pattern I used Burda 7767, had this feature and I’ve just grown to like it.  The Burda 6874 sleeve placket has a flat, rectangular head; I did use this pattern piece still, just cut it a little bit longer at the top and stitched it with the arrow head.  I had to giggle at myself though, because there’s pretty good chance these shirts will ALWAYS be worn with the sleeves rolled up, they’re just that kind of shirt! and those immaculately stitched sleeve plackets won’t ever be seen.  Ha!

When I wrote about this pattern previously, I mentioned how I always hand-slipstitch the inner collar in place before topstitching, and quite a few people commented how you could dispense with the hand-stitching; just press the SA in and topstitch and voila!  However, maybe it’s just me, but I just do not get a very neat finish that way.  I’ve tried it, but nearly have always ended up unpicking and re-doing little bits here and there, where it ends up a bit uneven.  So, now I save myself the unpicking and just do the invisible hand-stitching, then topstitch from the outside; and get this satisfactory (to me) evenness in the collar finish.  I suppose I am pretty pedantic, but I just cannot dispense with that step and I admire anyone who can.

topstitched on the outside

still looks kinda neat inside

In both shirts; all seams are flat-felled, including the armscye seam (tutorial for flat-felling a curved seam here)  It’s a bit crazy, particularly given my very tight schedule for making Christmas gifts this year, but since I discovered that I could do this level of finish for my mens’ shirts, now I just can’t let it go and always have to do it.  Really, it doesn’t add that much time overall.  Sometimes I wish a little that I could go back to those days of carefree-ly zipping the seam allowances through the overlocker, but no.  #sigh

This side seam, um… gusset/insert-thingy?  don’t know what you should call it really, but this is a feature of the pattern.  I love this!  It’s just a little thing, but I think it looks really nice.

I’m planning to write a pattern review for this pattern too… but in a nutshell; LOVE almost everything about it! with the one exception of the instructions for doing the front buttonhole bands.  Those are a little light-on and it’s not intuitive, really.  You kind of have to work it out from scratch each time… I’m thinking of doing a little tute for myself to refer to in the future.  Next time I make a shirt  🙂

pinterestmail
Switch to mobile version
↓