Category Archives: Sewing

mustard pietra shorts

Hack attack!

Despite initial appearances, my new shorts are actually based upon the Pietra shorts/pants pattern by Closet Case patterns… I loved this pattern immediately, loved the high waisted flat front with no waistband, and those cool side panels with pockets.  However, I was not quite so much in love with the elasticated back … or perhaps I should specify I was not quite so much in love with my own rear view in the aforementioned elastic waist version of the pattern?!

Yes, I did make up a test version with the elastic waist first … for version number one, I cut up an old linen dress given to me by Mum.  Unfortunately I decided I’m tragically allergic to elastic waistbands, with the one and only exception of pyjama bottoms.  Although looking at these pictures now my rear view is not as offensive to me as it was when I first looked at them!  at the same time, I am still much happier with the rear view of my second, non-elasticated and more streamlined version.

side view…

I was pretty sure I would be able to alter, modify, wrangle a de-elasticised waist with a bit of finagling… putting an invisible zip in the centre back seam and removing a whole lot of real estate from the back waist area, retaining that lovely flat front and pockets completely.

the front view looks exactly the same as the original, unsurprisingly since this is basically unaltered…

I shall now proceed to explain my butchery… and please note that these measurements laid out here are tailored to my own personal waist measurements and will obviously be different for other people.  Specific measurements for each of these modifications can best be determined from your own waist and hip measurements.

I removed 6cm from the waist of the back piece; and actually swung the side edge out towards the hem edge at the same time, adding a bit of flare to the back view of the shorts…

I also removed 2cm from the top/back edge of the side pieces, tapering off to nothing at the top edge of the pocket.  This wedge was also removed “mirror-image” from the front facing, shown already stitched on at the left…

I put a dart in the back piece… while my picture illustrates it to be 10.5cm, I actually stitched it a bit longer, closer to 11.5cm at its end point

… the dart is situated 10cm in from the centre back raw edge and is 3cm in width at its top edge

… I used the existing back waistband piece to cut my two new back waistbands to fit the new size…

… inserted an invisible zip into the centre back seam.  Note, the centre back seam is essentially unaltered, except that the back waistband now has a vertical centre back seam too.

Because I whimsically fancied something a bit different for the back of my waistband, specifically a V-shaped cut-out effect at the centre back … I put in the zip a bit lower and stitched the top edge in an angle like so…  Yes, I’m very much oversimplifying here, because making my two sides exactly identical actually took aaaaages and some super precise measuring.  I even unpicked one side completely and re-did it because it’s amazing how even 1 or 2mm difference will show up as a glaring inconsistency.  Hint; making a little paper template made it a lot easier to get everything perfectly mirror image; which yes, seems super obvious in retrospect!

corners trimmed and turned out…

I hand stitched the waistband self-facing down with tiny fell-stitches…

To finish; the side seams were pinned, and the already-understitched front facing was wrapped around over the top and over the back waistband piece.

Side seams were then stitched, corners trimmed and seam allowances finished etc. before pulling the whole thing right sides out.  And that’s it!


Oh! of course, the ever important fabric notes… this is actually just a super cheap cotton drill from Spotlight… I LOVE the orange-y mustard colour of course, SO MEEEEE! and the random vertical dashes.  The pattern sorta reminds me a lot of this felted wall hanging I made, many moons ago; my vision was of a sort of poem carved by an artistic cave man, in a language or alphabet wrought in colours and strokes of differing lengths and groupings.  This is still hanging up in our front room! and you can read more about it here

Details:

Shorts; both the Pietra shorts/pants pattern by Closet Case patterns
Drapey white top; based on the loose drape top no.1 in the Japanese pattern book “drape drape”, by Hisako Sato
Hat; Vogue 8844, in khaki drill
Plain white tee; Nettie tee by Closet Case patterns, white jersey

pinterestmail

a pink pinny

So, I loved my red velveteen pinafore so much… it’s such a lot of fun to wear.  I can’t believe I worried a little that I was too, er mature, for such a garment and I thought I might become the butt of mutton-dressed-as-lamb commentary but you know what? I wasn’t, and I’ve throughly enjoyed having a “pinny”.  So I made another! though I believe this is an improvement even upon its predecessor’s near-perfection because the pockets are a tonne better, in my opinion.

Again, I used the pauline alice Turia dungarees pattern for the bodice section, and modified so the bottom part is a skirt.  I put the pinafore on and pinned carefully so as to achieve the ideal proportion to suit my figure, but it actually turned out identical to the shape of my red one!  I’m really really happy with the shape and length of this, it’s absolutely perfect for me,I think…

I really love the front bib pocket of the Turia pattern, I think it’s super cute.

For the pockets, I got out the pattern pieces for Vogue 1115; the shape construction and placement of these pockets is also close to perfection, in my opinion!  I like my pockets to be a bit bigger, but instead of cutting the pockets bigger, I simply stitch the with a 6mm (1/4″) seam allowance instead of the regular 15mm, and boom! I have bigger pockets!

Fabric; cotton corduroy in the most totally divine shade of dusky pink!!  I saw it on Potters’ Textiles instagram and raced in immediately to snap some up!  Then, for some bizarre reason that I have absolutely no explanation for, I bought only 1.5m.  Sure; it’s quite wide; but still I was struggling to cut my pinafore out of such a small piece, especially since you do have to be strict about following the corduroy’s nap when laying out your pieces.  To be honest; I totally would have cut my pockets bigger, but was dealing with mere scraps after getting out my big, important pieces first.  Anyway, I did get everything I wanted successfully, thank goodness…  Normally you’d think, oh I can always get more fabric! but while I was buying it the lady in the store specifically mentioned that they were nearly out!

Like with my red pinny; I chose to line this one fully.  I cut the lining using three of Craig’s discarded old business shirts.  I’m kind of a stash-busting mission lately; really making an effort to reduce pieces in there that have been kept “just in case”; and particularly; fabrics/garments from my refashioning bag.  I carefully harvested all the buttons off the shirts first, of course…

these matching sets of buttons are quite valuable if you make shirts for the menfolk in your life; particularly the shirts that have those mini-buttons often found on the sleeve plackets and button-down collars.  It’s almost impossible to find the two sizes in complete matching sets like this in haberdashery stores.


So you’d think there’s loooooooads of fabric in 3 shirts; and surely more than enough to line a little pinafore??  but of course unless I want my lining to be a heavily patched/seamed, and therefore rather bulky thing, I could really only use the largest swathes of fabric from the backs of the shirts, and still had to join!  But that’s ok; I still feel good about using up at least a little bit more of the refashioning bag!  The lining for my straps was harvested from one sleeve.

THIS! is a cautionary tale…. so, when you’re making welt pockets, and you come to the all-important, ever-so-precise task of cutting the welt opening in your dress fabric?  It’s a good idea to check that your lining fabric has been flipped up out of the way first.  Yeah.  *kicking myself BAD over this disaster…. I used my rotary cutter, and cut the most beautiful clean neat welt pocket opening through the front of my pinny…. AND THE LINING UNDERNEATH AT THE SAME TIME TOO.  Fortunately this only happened once, on just one pocket I mean, and I realised straight away.  If I’d done it for both pockets, I would have seriously considered replacing the lining, for real.  Anyway; I bandaid-ed the problem by ironing on a strip of iron-on interfacing and indulging in some furious and thorough zig-zagging.  Not the most beautiful of repairs, but experience has taught me that this is both a durable and efficient method of fixing a cut like this.

Miraculously, I unearthed a very small length of pink, bias cotton cotton voile from my stash, that I made so long ago I barely remember it.  But it was just enough to finish the hem!!  STOKED!!!

So happy with my pinny!!!!!  I’ve worn it a couple of times already, and am over the moon with it!

I am wearing it here with one of my wool-mix Nettie tees, probably one of my most worn winter tees! my self-designed and -made black tights, and my favourite motorcycle boots.

Now… for something completely different!

Recently I had a conversation with my good friend E.  Now, E is one of my closest friends, we’ve been so for decades and I hold her opinion in high regard.  At the same time! she doesn’t even know I have a sewing blog really, and though she knows I have an instagram account I’m totally sure she has never looked at it… why? because the topic of our conversation on this day was about her recent holiday with her husband, and as an extension of that; how she feels super strongly that “instagrammers” are ruining the world and are just beyond despicable, in her eyes.  In her own words; she despises instagram, because people are obsessed with taking their pictures in the most beautiful places and are thus destroying these places for everyone else, in both the taking of the photos, and the damage they do while doing so.  And not to mention they look ridiculous in their ballgowns and long tresses blowing in the wind, out on the moors, or in front of a particularly picturesque cottage, that’s not even their cottage, or whatever…..  Now… on the one hand I can certainly see her point, especially when it comes to people monopolising key beautiful tourist spots, setting up tripods and preventing other people from enjoying the view because they are prancing around right in the middle of it.  Our conversation didn’t even touch on people leaving rubbish behind, or treading on and damaging delicate flora or anything physically destructive like that! though of course that is a problem too.  My friend blames instagram completely for all this.

Now of course, I have thoughts!  I personally love instagram! though I can see too that all of her points have validity.  I know exactly the type of instagrammer to which she is referring… I have seen them myself too.  And secretly thought how silly it all looks.  And I know I might well be accused of being one of “those prancers” sometimes…!!   HOWEVER; I would argue not! since I take great care to take my own photos in complete private.  I think this is something not many readers of my blog or viewers of my instagram understand about me; I am actually a very shy and quiet person; and would be terrified to take photos of myself in front of other people.  I need complete isolation!  If there were other people there enjoying the view and taking their own pictures or whatever, you can bet your bottom dollar I am NOT going to be getting in their way, or taking my own pictures.  So while the evidence is there on my blog that I do indeed take pictures of myself in beautiful locations, I’m not really making a spectacle of myself in the action of doing it; if that makes sense.

It’s always felt logical to take photos of my new creations in my favourite spots.  It just gives me lots of pleasure to make this happen.  Should I stop? because I’m being ridiculous? or continue because it gives me joy?  rhetorical question btw, no need to answer… I don’t even know why I’m going got all this effort to explain myself really, except maybe to lay out my own thoughts coherently.  Did she strike a nerve?  maybe.  I have a sense of the ridiculousness of it all, even while I’m doing it.  But at the same time, I want to take pictures of my clothes, and I like the idea of nice photos, though my commitment to this waxes and wanes. I did actually go for a fairly long period of time where I only took pictures in my own garage, or in our own house and garden.  I don’t know if it even went noticed on my blog here because I am fortunate to have some quite picturesque corners in my garden, but yes; I went off the idea of ” real” photos “out and about” for nearly a year…

And obviously; I am super opposed to damaging the environment in any way.  If I love a beautiful spot, I definitely want it to stay beautiful for the future!  Leave only footprints and take only pictures.  Am a big proponent of that.

I’m not sure what the right answer is, but I guess I should just continue to be super vigilant and careful about taking my photos only when alone.  It’s easy to “say”, like many people do in this time of (over?)-sharing; that I don’t care what other people think of me, but obviously that would not be true!

What a weird, double life I’m living!  Maybe I should just delete all this?!

pinterestmail

a raincoat for Cassie

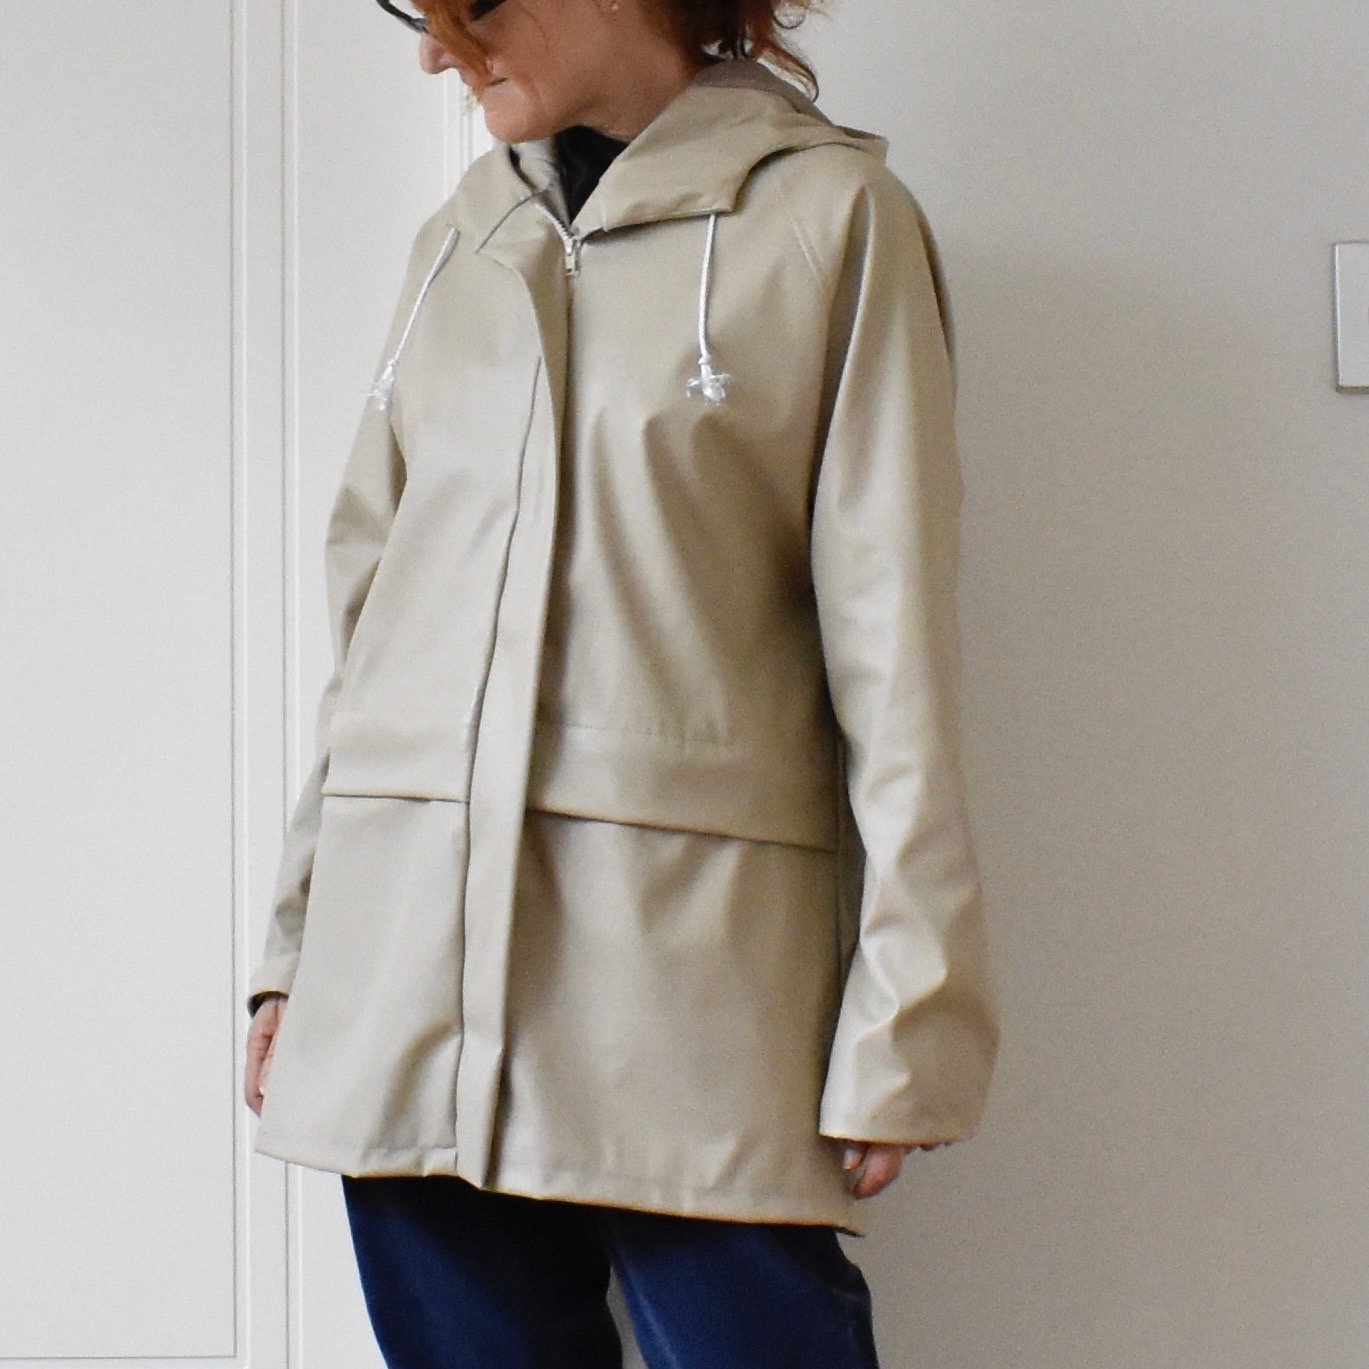
Yes, I may be modelling it here, since maybe I stole it for a few days after finishing it, hehe, but this raincoat was always for Cassie and is now safely residing in her wardrobe, where it should be!  I ended up finally giving it to her a coupla weeks ago.  Luckily I had taken photos of me wearing it because it’s just not so easy anymore to take photos of her, now she’s moved out of home… *sob*  She popped over today for some Mum/daughter time and I asked her how it’s been.  She says it’s waterproof, it’s a good size to wear over regular winter clothes which is just what you want from a raincoat, and she loves it, all three of which are always very gratifying to hear!

Materials; So, I’ve had this beige pleather in my stash for aaaaaaaaages, so long that I barely even remember buying it! although I do remember it was from Spotlight.  I’m in a real stash-busting frame of mind lately, so TIME TO GET THIS STUFF MADE UP AND OOOOOUUTTA THERE!  It’s pretty hideous stuff to sew; slightly stretchy and with that “sticky-ness” of pleather so it doesn’t move nicely under the sewing machine foot at all.  I used strips of tissue paper for each and every top-stitching seam…  see here for my tips on sewing leather or pleather

Lining fabric from the deep stash; have no idea now whether I bought it originally or whether it was one of Mum’s throw-outs.  I used a slightly different beige lining fabric, also deep stash; for the sleeves.  All three zips, hood cord, cord stops and eyelets are all from Spotlight.

I couldn’t find the same seam sealer I’ve used for all my other raincoats; BCF is now stocking the above sticks of wax for the job.  I couldn’t help thinking they were basically candles without the wicks and maybe I could use one of the many candles I have already! but bought one anyway.  It proved not very easy to use, since it was quite “firm”, not really soft enough for the job; and  you have to rub it quite vigorously over the seam to get it insinuated into the stitch holes which seemed to stretch the fabric out a little.  Then, I tried melting it a little in a (real) candle flame, before dripping it over the seams, then eventually moved to softening the wax stick in the flame just a little before commencing to rub it in.  The last wasn’t particularly easy either, because the wax only stayed softened for about five seconds away from the flame before it hardened up again, and needed another “soften” in the flame; but in the end I decided this was the best way to get the wax well-worked thoroughly into the seam holes.

But it works! the raincoat is waterproof and that’s the main thing.  Though if I had a choice, I would probably choose the chemical seam sealer over the wax stick… actually I only just had a thought; I have some real beeswax somewhere, and wonder if this would actually work better?  It’s quite soft naturally and so might prove easier to massage into the seams….  something to think about trying next time!

Pattern; is my own.  I’ve made this up three times previously, my first go is here, my second, also for Cassie! is here, my third is here.  I’ve added little improvements and modifications each time I’ve made it up; this one is, dare I say, the nicest yet… although it’s always had the most awesomely practical and deep pockets, if I do say so myself!  I gave this one a big upgrade when I lined it fully with golden beige polyactate lining fabric.  This makes it quite delicious to wear, and makes me wish I’d properly lined my own raincoats with something more traditionally “dressmaker-y” like this.  I lined my first and second raincoats with a soft mesh, which is very nice, but the lining fabric is definitely silkier and far more luxurious against the skin.  Again… next time!

o hey you gorgeous thing!  fluffy photo bombers are always welcome!!


I also gave it an internal pocket, just a simple patch pocket on the left breast; simple but extremely useful.  Yes, ahem; I am realising this raincoat IS most definitely far nicer than my own!  I should have kept it!  jk

.. cheekily wearing it “out” another day!  I wore it to the sewing guild meeting with my dp studio “Eve” dress, my handmade black tights, and the booties Craig bought for my last birthday present…

pinterestmail

some naice new clothes

I’ve been whipping up (k-chaaaaa!) some maternity clothes for Kelly… I’ve been making a lot “for others” lately, all this year in fact, or at least it feels like it! but I’m ok with that; for one thing; it gives me a chance to get that aspirational 30 wears out of my own wardrobe, and for another… well that’s reason enough, I think?  I have lots of nice clothes and I’m enjoying getting the most out of what I have lately  🙂  But I still want to sew! so it’s both fun and enjoyable for me to make clothing for my loved ones instead.  Kelly needs new clothes to fit her fast-changing body and is keen for me to make them, and I am more than happy to make them for her, so it’s a win-win situation for both of us. She recently had a birthday, and we headed out to Homecraft Textiles and Spotlight together and did a bit of shopping; my birthday present to her.

A lovely reader of my blog, Graca sent to me this maternity skirt pattern, Burda 7023, thank you so much Graca!.  First of all, I ran up a little test number, using a soft, grey and white cotton jersey sweat shirting, leftover from this hoodie I made for Sam a few years ago.  The leftover scrap I had was the perfect size for the skirt!  The sizing chart of the Burda pattern was a little weird; Kelly’s hip size put her between a size 20 and 22, the very top of Burda’s size range which seemed quite quite bizarre!  I eyeballed the pattern pieces and decided to size down to 18-20 for Kelly, and of course it fits pretty well so sizing down was a pretty good decision.  Also, of course the skirt is currently huge on her, not surprising given that she is in the very early stages of her pregnancy.  But we both feel it will be a good thing for her to have in the later stages of the pregnancy.

On our shopping trip for the real version we picked up a few very nice fabrics; including a truly gorgeous, creamy/ivory/grey cotton jersey – I bought enough for me to have something too! – and this absolutely drool-worthy rose printed stretch velvet.  I used the Burda 7023 skirt pattern to make the skirt, and “early-maternitised” it a little bit, so it’s more suitable for her to wear during this wintery, early stage of her pregnancy.  I did this by reducing the amount of gathered rise in that front portion of the skirt.  I also installed a drawstring in the front band, so she can pull in some of the extra width now, and let it out gradually as she expands over the coming months.

How?  Firstly; I ironed a square of iron-on interfacing in the centre of the skirt front facing section, and stitched a sort of double buttonhole/figure 8 stitching using a narrow width, short-stitch zig-zag stitching.  I used small shape scissors to cut X-shapes int he square centres of this stitching.  Next, I cut long strips from the ivory jersey I used for the little T-shirt top; these left unheeded naturally roll up in to nice little rolls of fabric.  These I stitched into the side seam stitching of the front/back waistband/facing/casing so the strips are hidden inside, and threaded the ends through my makeshift eyelets.

So, they emerge inside the front waistband of the skirt, and Kelly can pull the waistband in to fit now, and let it out as she grows.  I think this is quite an improvement on the original, which is left to stay big and loose and floppy no matter which stage of the pregnancy you are!

I also made the little top, using the Ebony top pattern I’d bought recently, totally for maternity purposes only of course.  Though I did get an extra one printed out for myself too! ahem…  Kelly has been wearing the striped, raglan-sleeved test version I’d made up, and requested it be streamlined just a little bit, so I brought in the “swing” of the side seams by about 2 inches at each side seam, keeping the side seams straight.  And it still has plenty of swing!  The next request was to bring it in even more next time! though I’m pretty sure the bit of extra room will come in very handy come breastfeeding time.

When making a T-shirt; I like to stitch the shoulder seams down towards the back, and also to stitch the neckline seam allowances down onto the shirt at the back only, like so…. I believe it stabilises this part of a T-shirt which is often subject to the most strain.

This is the regular, set-in sleeve version of the pattern …

btw, when it comes to stitching a hem or an elastic casing in velvet; its pile causes it to become the most annoyingly migratory stuff that slides over itself under the sewing needle, even even when you’re being super vigilant and slow, it just happens!  I found the best way to keep it firmly in place was to pin regularly, like at least every inch! and perpendicular to the seam, with the needle passing through exactly where you’re going to be stitching, and not removing the needle until you’re right upon it.  This seemed to keep everything in place nicely enough…

I already have some other versions in the pipeline, as well as a few as yet unblogged things awaiting in the wings; I need to get cracking and catch up!

pinterestmail

black Clementine

Oh my gosh, I am so behind!  I’ve made this new dress … and have worn it and why have I not blogged it?  I used to have quite a strict rule about not wearing something until I have written a blog post for it, but things have been so hectic and complicated lately.

So I received a length of beautifully soft, perforated black suedette fabric from Minerva, and also the Clementine dress pattern, the inaugural pattern from a new pattern company, Forget-Me-not patterns and the marriage of these two items bore the most satisfactory fruit; this delightfully witchy-chic and I think rather elegant little number…  I only had 2m of the suedette fabric which was technically not enough to make the dress I wanted to, but somehow I made it work! with some sneaky patching together here and there.  Specifically, the side front and side back panels have a waist seam, and the back panel has a centre back seam.  Not that you’d ever know that wasn’t completely intentional if I hadn’t pointed it out, right?!

The Clementine is a terrifically versatile pattern, a fit and flare style with princess seams, designed for a stretch knit, and includes a top and dress variations, with either a scoop neck or a cowl neck option.  Also three different sleeve lengths marked too.

I went, very predictably I’m afraid, for the dress option, with the cowl neck, and the three quarter sleeve length…

My suedette, being perforated, is actually a little bit “peekaboo” close-up, so I chose to underline my dress completely with some very thin, beige/greyish-ivory knits I had in my stash already.  Two slightly different fabrics, of an annoying length each of which wasn’t really enough on their own to be useful enough for anything much so I was mighty pleased with myself when it occurred to me I had “just enough” of each combined to cut out my underlining!  I clean cut the suedette and the beige knits using my rotary cutter and left them unhemmed, since the fabrics are all non-frayable and quite stable; however I did opt to hem the sleeve hems since these areas are subject to a bit more stretch and strain.  Each of the underlining pieces was cut to be 5cm shorter than its corresponding outer shell piece.  I stitched each seam, before overlocking the raw edges in a second pass.  The pattern is reeeeally economically designed for minimum fabric wastage, with a 6mm seam allowance.  Highly approve of such thriftiness! although it doesn’t leave any wriggle room, should one wish to indulge in a bit of post-cutting size-fudging/alteration, ahem!  fortunately I went with my recommended size and feel like the sizing is just right.

I am completely in love with that s0ftly draping cowl neckline!  It’s my favourite feature of the dress!

At the back neckline I overlocked the raw edge of the suedette shell self-facing, turned it down over the underlining, and simply topstitched it in place…

I was quite pleased with myself when the front facing/underlining turned out quite clean and neatly done; I cut the front underlining the right length so as to stitch to the lower edge of the front self-facing, right sides together, and then when I stitched the shoulder seam I sandwiched the back shoulder edges in-between the front and its self-facing, so all raw edges are neatly hidden inside.

I liked the idea of the dress being middy length, so lengthened all pieces by 15cm at the lower edges… this is the very maximum I could get out of my metre-age!  I was actually kicking myself I had not ordered more fabric, but was rather chuffed I managed to make it work, yay!

And that swish factor!  I love a dress with a bit of swish!

I have to say; Clara was being so sweet the day I took these pictures!  I was down south alone with her on this particular week, and setting up to take photos of my new dress and she just snuck over and plopped herself down loyally at my feet, without even being asked… I was so touched!  although the little nose touching my hand in the first picture make me suspect she thought a treat might be in the offing; poor girl, it was not!

I am wearing the dress here with my self-made tights – think I might need to make a new batch of these before winter ends!; and the boots Craig gave me for my last birthday.  It’s funny, I didn’t actually think these would get a tonne of wear since I have several pairs of black booties/boots; but I’ve enjoyed wearing them so much this winter.  Maybe even my most worn pair of boots for the year?… maybe?!

pinterestmail

a new baby in the family!!! plus something for Mummy too :)

So, I have some extremely exciting news… !!  I am going to be a granny!!!!

Last week, Tim and Kelly announced they had a “souvenir” from their honeymoon to give to all of us and gave each of us a package… I unwrapped mine and what should I find, but a length of this adorable fabric and a pattern for a weeny little onesie and beanie…! everyone else had suitably themed pressies too; Sam had a T-shirt with “world’s best uncle”, Craig had a book “Grandad jokes”, and Cassie had a “World’s best auntie” Tshirt… oooh, such an incredibly lovely surprise! We were all stunned and then excited; and of course completely over the moon!  We all cannot WAIT to welcome the newest and littlest member of the family next year…!! the first one in our next generation!!  In the meantime of course I’ve made up the baby fabric immediately! Such fun to be making baby clothes again!   #itsbeenawhile

So this is the pattern they chose; Burda 9434, and the cotton jersey is from Spotlight.  I’m like, haha, first time parents; they bought a full 1.5m of fabric!  Enough for two babies, lol!   Wait, what?!!  but no no, before we all get too excited Kelly has had a scan and there is just a singleton in there  🙂

I immediately traced off the one month size and ran up a onesie.  And a beanie.  Eeeee so cute! and it was such an absolute joy to be making these!!  By the way; I had to trace the pattern in full, and will need to do so again and again, and probably even again! because obviously all sizes must stay intact since we’ll be needing those down the track too, that’s life…   babies GROW 🙂  The pieces are all so tiny though it’s not exactly an unduly cumbersome chore.

I forgot to mention, the beanie is made from navy blue merino from the Fabric Store; I bought in in Melbourne during one of our girly jaunts over there and previously made this T-shirt/sweater using it too.

Kelly also mentioned that she needed to buy maternity clothes, and daa da da daaaa!  (bugle call to arms) mum-in-law to the rescue and all that.  Well, I do love sewing and have SO MUCH time on my hands now I no longer have a wedding dress to make, haha.  I thought this a perfectly good excuse to buy the Closet Case Ebony tee pattern.  This is one of the few Closet Case patterns I hadn’t got my hands on already … I had eyed it up a number of times but not pulled the trigger.  Anyway, I finally did!  And immediately printed out two copies; one for Kelly and one for me.

I know this isn’t a maternity pattern but I also knew it could easily work as one!  I sized up from Kelly’s normal size, just in case; and you know what? it fits her perfectly!  Pregnancy boobs, you know.

now this is a nice touch!  personal.  I like.  I wonder if I can do this for our patterns?!

This is me here, modelling it for ye olde blog, before I hand it over to Kelly.  Maybe I’ll get a shot of her wearing it, one of these days, maybe not.    I’m not feeling very strict about blog photos for this one, because it’s essentially just a wearable muslin to check for size.  It’s all leftovers; the body was from the leftovers from this top (Fabulous Fabrics) and the sleeves leftover from this, old favourite dress (Spotlight).  To be honest, even though they’re both stretch fabrics, I don’t think they had enough stretch actually, but it still worked out, um; reasonable? I think?!  And it’s just a muslin, but I still had to obsessively pin each and every stripe, grrr.    This is a pretty silly thing to do, but it does result in great stripe-matching so *shrug* it’s worth it? I guess?

One thing I can guarantee; I am going to make lots more of both these patterns, and SOON!!!

Details:

Baby clothes; Burda 9434, cotton jersey and merino for the beanie
Tunic; the Ebony tee by Closet Case patterns, striped stuff, probably not enough stretch
Skirt; Vogue 1247, striped drill, details here
Tights; my own custom fit pattern, details on how to make your own here
Booties;  Officine Creative, birthday  present from Craig last year  🙂

pinterestmail

black and cream Eve dress, dp studio

Not very long ago, I was contacted by dp studio, a pattern company whose offerings I’ve always found super interesting and intriguing… I bought a few of their patterns last year but am still yet to find time to make them up… eek!!  Anyway, they wanted to know if I would like to review one of their latest.  Would I?!  Omigosh, yes!!  They have recently brought out a new thing… something called a “kit couture” that is a collaboration between dp studio and Hamon, a fabric and haberdashery store in Paris.  The kit comes in a rather beautifully packed box, and includes the sewing pattern, fabric, and all notions and bits and bobs you needed to finish making it.  Very luxe.  I was so excited to try it out!!  They didn’t have my first choice, but I did like the look of the kit they offered me quite a lot and I anxiously awaited its arrival.

Did not disappoint!!  The kit I received was for Le 912, the Eve dress, described on the box as “Robe effect portefeuille a manches longues”  Oh, how I wish I could speak French! everything sounds so much lovelier and more poetic than in English…  the translation is “dress with wallet effect and long sleeves”

The fabric from Hamon is absolutely lovely; a 100% viscose with a beautifully soft and floaty hand to it, and a loose flowy, silk-like drape.  Divine!!  Even better, the print is super pretty; black flowers and leafy tendrils on a creamy background.  I think this creamy ground suits me quite well, my “white”, so to speak; so I was very happy with this.  The kit also contained a lightweight, fusible interfacing, a stable, fusible stay-tape for the bias cut opening edges and the shoulder seams; and length of perfectly colour-matched satin ribbon for the belt/tie.  Oh! and a reel of perfectly colour-matched, cream coloured thread.  This was actually overlocking thread rather than all-purpose thread, but I found it quite nice, not woolly; and to be absolutely fine for the purposes of sewing this very delicate fabric.

I really enjoyed making up my dress.  Lately – well I mean, once I’d got my mad, rough knitting bag project out of my system; I’ve been more in the mood for careful, quietly lengthy and dedicated sewing projects; something that takes time and effort, and maybe even requires unpicking and re-doing things over and over until I get them right.  I think it’s the process of making Kelly’s wedding dress that has brought this new mood for meticulous perfection upon me.  Will this be the case from now on?  possibly not! but it is right now so I’m contentedly riding that wave in serene and unhurried happiness.

I initially made long; bias cut ties, seen above; using the black/cream print for the waist tie, which is actually what the pattern instructions tell you to make.  Ultimately though, I didn’t like these so substituted the included cream coloured ribbon tie instead, which is really much nicer in the end; prettier, softer, and easier and more comfortable to wear too.

Craig heartily approves of the dress which I found slightly surprising.  After all, the dress is quite “covered up” and not figure hugging or the least bit “sexy”; and Craig usually prefers this sort of thing…  #husbands  However, he really likes this one; called it “classy” and “really nice”.  Well OK then!!

One thing the kit did not include was a required button; but I’m perfectly ok with that since I have about a billion buttons and absolutely zero need to ever buy buttons again in my lifetime.  I used a tiny, “pearl-with-a-shank” button for the closure.

Yesterday, we went to the city and my reluctant-photographer husband Craig kindly took a few pictures of me, for my blog.  Well, that was an unusually nice surprise!  Hurray!!  Afterwards, I regretted a little that we hadn’d taken Clara, since she goes so nicely with the dress.  #dressingtomatchyourdog  #itsathing  #promise

So I couldn’t resist another picture at home, this time including my very worthy little accessory, hehe

Details:

Dress: le 912, the “eve” dress by dp studio, cream/black viscose
Shoes; Vitullimoda, from Zomp shoes
I also wore my hand-knitted cardigan all day, because it was a COLD day!  Jo Sharp Tweed Coat, shortened, in Jo Sharp Silkroad DK  tweed yarn in colour Peppercorn (col 425), blogged here

pinterestmail

sasha-jenny trousers, and a honey-coloured turtleneck

I made a new outfit for myself! well actually I thought I was, although as it turns out I had only made half a new outfit for myself.  But as halves go, I’m pretty happy!  Also,  I know it seems like I’ve only just finished wedding sewing, but how does one choose to wind down after a bout of incredibly, stressfully intense, VIS???    btw, that’s Very Important Sewing in case it wasn’t obvious.   Well, one dives head-first into a fresh new sewing project, of course!!  Ha!  and it felt awesome too… because by comparison this is VUS, or Very Unimportant Sewing, and man it sure felt good! I loved every minute of making these new things  #youknowyoureobsessedwhen

First things first; I made some new trousers…  I’ve been wanting to make this particular love-child of these two different Closet-Case patterns for aaaages now!  I’ve always really liked the mid-riding style of the Sashas; how it sits feels very comfortable, and how it fits is quite flattering for me.  I also love the magnificently flared wide-legs of the Jennys, and thought how cool it would be if they could be jammed together into one, gloriously slouchy, flare-y package.  Well, ta da!!!

please excuse horrible but apparently obligatory butt-picture…

I just needed some nice fabric, which popped up suddenly in Spotlight of all places… Spotlight has fabric highs, where they’re stuffed with a tonne of really very nice and affordable options and you’re completely spoilt for choice; and also sad and lengthy lows, where there’s nothing but absolute crap…   You just have get in there and stock up during the good times and then endure the bad times until the good times roll around again.  Anyway, currently they’re having a rather awesome high, which is pretty nice for us sewing-obsessed peeps.  I mean, I’m not supposed to be buying any fabric right now… but you know.  When you see something good, it’s not going to be there forever!  I pounced upon this stretchy, narrow-whale cotton corduroy in this gorgeously yummy shade of caramel pretty much instantly… not only is the colour so very me, but the stretchiness is just exactly right for that required for the Sasha’s too.  Right nearby was some really lovely, very soft honey-coloured knit; very cashmere-like in its feel though it’s actually just acrylic, but that’s fine.  Fabric snob, I am not, well, most of the time anyway.  I planned a honey/caramelly sort of an outfit for myself.  A Mars Bar, sort of an outfit.  #nowiwantamarsbar  #damn

What is the other half of the wannabe outfit?? well, I’d downloaded the free, tessuti patterns Monroe turtleneck pattern ages ago, printed it out and had it lying around; and I decided it would be a good one for the honey-coloured knit.  In my head my snuggly new sweater was going to look absolute perfect with my new, wide-legged slouchy trousers.    I could hardly wait to wear them together!  So did things work out just exactly as planned?  don’t be silly!

I absolute adore my caramel trousers, they turned out to be everything I could have hoped for; however… the turtleneck…    Well right from the word go it did not want to be my turtleneck.  It really really just wanted to be Cassie’s.   I was barely halfway through when I realised it had her name written all over it.  The sleeves and collar of the Monroe turtleneck are tight-fitting, with a dropped shoulder and a very boxy, oversized body; a combination which looks pretty terrible on me,  I’m coming to terms with that sad fact (sob) but I know is quite gorgeous on Cassie.  It’s a style she has worn before, and worn well too.  When she came over in the evening I gave it to her, and her reception was most satisfyingly enthusiastic!  I might even whip some more for her… it’s a very quick and easy pattern to make and you only need about 1.2m or so.  And I do have several other tops already that I can wear with my trousers.  I’m ok with passing things on that don’t want to look good on me, especially when they look so good on another, and are so warmly received!  🙂

Some technical sewing deets:

The turtleneck; nothing much to say, just made straight up; sleeve hems done using a twin needle, hemline done by hand because the fabric was stretching out some.  Super easy.

R2D2 says hi….

The trousers; I cut out the tops as Sashas, and from the hip down they are almost Jenny’s.  Not exactly Jenny’s because the patterns are actually completely different from each other and can’t really be “melded” that easily.  For one thing, the Sasha’s are drafted for a stretch while the Jenny’s are not.  Another thing I pondered quite a bit, was the alignment of the back leg piece; because the grainlines of the back legs in the two patterns are very different to each other.  I’ve made up two pairs of Sasha trousers previously, exactly to the pattern, and for this new pair I decided to alter the alignment of the back leg piece, pivoting the ankle a little outward, so it’s got a similar grain line to the Jenny’s.

The waistband lining and pockets are cut from some ikat cotton, that Mum gave to me a few years ago, from when she cleaned out her stash.  You can see I attempted to finish the pocket edges with French seams as indicated in the pattern, but it was just too bulky around the heavily-interfaced pocket opening area, so I overlocked the edges for that little bit.  Probably would have looked better to overlock the whole thing, but the pockets were all basically finished, done and dusted by this point so I was just, ehhh  *shrug*  I used the little Closet Case label Heather sent out along with the pattern.  Cute, huh?


I’ve found that around the waistband hook and eye closure at the front, no matter how heavily you interface the waistband and facing, the hook and eye will pull the facing out a little, just because the two layers aren’t joined together at this point…. for these ones I kind of stab-stitched the two layers together all around the hook, keeping the stitches tiny and almost invisible on the right side of the waistband.  You can see the stitches if you know they’re there, but I think you can barely tell, and it does help to keep the waistband nice and flat-looking, and no hint of pulling out of shape while you’re wearing them.

I am SO PROUD of my welt pockets!!  You know how sometimes one welt pocket might look a little better than the other and so you just take picture of that one for your sewing blog and quietly leave out the other??  oh wait, what? no I never!!  oooo I would never something so devious, oh no….  Well anyway, both my pockets turned out to be things of perfectly-matching beauty, if I say so myself…

.


Details:

Trousers; Sasha trousers by Closet Case patterns, with wide legs from the Jenny trouser pattern
Honey coloured turtleneck; the free Monroe turtleneck by Tessuti Patterns
my pink top; the twist top from the Japanese pattern book “Pattern Magic” by Tomoko Nakamachi 

 this picture adds nothing to the story apart from Zoe looking kinda funny … oo I’m so mean.  Would I ever post a picture of myself looking kinda funny??  NO

me and my big fluffy girl on our  holiday down south together, just the two of us… was so nice  🙂

…wearing them here with my mustard Nettie tee and my self-designed mustard cowl also self-knitted socks

pinterestmail
Switch to mobile version
↓