Tag Archives: Top

I made a little red top

… hot on the heels of my turquoise skirt, I whipped (k-chshhhh!) up a little top!

This is made from the leftovers from this little skirt, that I wore to near-death last year.  I still have that little skirt actually, but don’t wear it as much nowadays.  It needs replacing, to be honest  #plotting …  Early on I was like, sure I have plenty of leftovers for a little top! story of my sewing life, actually.  You know, it always looks like a lot of fabric, and then once you lay down your sleeve piece, which is far bigger than you thought, always, then it’s not quite so do-able.  Anyway, I did manage to get a little top out of it in the end, but it’s a little on the cropped side and the neck is more turtle than my originally planned cowl.

But I still love it!  I think it’s cute and it’s one of my favourite colours.

The most exciting thing to me about the top is actually these other photos of it… I’d taken it down to Bridgetown when I went down for a few days, for Mum’s citizenship ceremony…  and one day I took some pictures of it for my daily outfit blog.  And unknown to me, while I was taking pictures, a kangaroo crept up there into my background.  How cool is that?!  A wild animal!  This is an absolutely first for me, even though roos are pretty common around Mum and Dad’s house they’re usually so shy! Though, this particular one is not extremely shy actually; she has a new joey and just seems to be taking it easy for a while, she’s been hanging around the house area, not venturing very far and sleeping for much of the day.  But I still consider it pretty lucky that she moved into my pictures!  Thanks, darling!

Oh, whoops, forgot to mention some of the all-important sewing deets; fabric originally bought from KnitWit, and the pattern is mostly self-drafted rectangles, except for the armscyes and sleeve caps for which I used Burda 4/2014;111 … only chosen because I just so happened to have it out to cut out a new one.

This is Thing 7, from my “new year’s resolution” collection of 12 that I set for myself:

Details:

Top, mostly self-drafted, sleeve caps and armscyes from Burda 04/2014;111
Skirt at top; Vogue 1247, outback wife cotton, details here
Jeans; Closet Core patterns Sasha trousers pattern, cut with wide legs, cotton corduroy, details here

pinterestmail

a pretty outfit (cielo and sixtine)

So I made an oh-so pretty, fluttery, flower-strewn outfit of the most perfectly spring-worthy persuasion! but wait…  am I not currently still on the downwards slope to the dark dank pit of winter?  well yes, so we are just barely into July, and I am OVER winter already.  *sigh*

Really I expect I’ll be making winter-y things soon but I just don’t feel like it right now, and I just want to think about fun summery things still.  Terrible, isn’t it?  Anyway, I bought this lovely rose-y rayon-linen in Spotlight, back when Perth was sort of half in isolation.  I’d been feeling very down, gone shopping for some essentials and just spontaneously decided buy something pretty and non-essential at the same time, to cheer myself up.  As it turned out, we had hardly any cases of the covid-19 virus in Perth, which is of course wonderful; but we were all as terribly worried at the time as if there were and buying something lovely lifted my spirits quite a lot at the time.

I cut out the ruffle-tastic new Sixtine skirt by Coralie Bijasson patterns and then had just enough left for a plain little top, which is the best counterpoint for all that ruffle anyway.  I’d recently had success making the Closet Case patterns Cielo top for Cassie so traced out the  next size up for me.  And I really love how they go together!  The Sixtine pattern is a simple, completely symmetric, true wrap skirt, with the most amazing ruffle and a half action going on.  Actually when I say ruffle and a half, that is quite literally what it is; there’s a ruffle, and then another half of that same ruffle on top.  Ruffle and a half! And my fabric worked out so nice! it is quite fluid and soft, which was just right for the ruffles; they have just exactly the right amount of body and zero limpness.The Cielo top is a great little basic, I can already tell I’m going to make stacks more.  Simple, but perfectly so.

I don’t really have much else to add, both these patterns are unambiguously straightforward designs with no tricks to speak of.  With the Sixtine skirt, I think you were supposed to place the buttonholes and buttons so the buttons popped out on the outside of the waistband when buttoned up, but I used very plain sheer flat ones from my stash, both ancient and inherited and not very pretty, so I positioned them so they button up on the inside of the skirt.

Oh, I also finished the lower hemline of both ruffles using the triple-stitched narrow hemline, explained in this post here.

I have one more sort of interesting thing I can say about sewing this; normally when you’re cutting things out from a print you carefully make sure all your pattern pieces are aligned with the “up” side in the same direction, yes?  Well I would definitely do that for fabric with a nap, but for a fabric with a print I’ve often preferred the look when I do not adhere strictly to this rule, but lay pieces so as to alternate up and down placement.  That way you avoid that “double-ing up” up of an identical motif that can look absolutely terrible and obvious when it occurs in a pieced garment.  Obviously this really only works if the print doesn’t have an obvious “right way up” design, but while it’s only a little thing it can make a noticeable difference.  As soon as I looked at my pictures here I could see a couple of instances where an upside-down motif is not too far away from a right-way-up motif, and if they’d been both oriented the same it would have looked strange.  So I’m glad!  I hope I explained that OK!

Anyway, I love this new ensemble and honestly can’t wait til the weather is hot again so I can actually wear it.  In the meantime perhaps I should start finally turning some attention towards more wintery projects  (sigh)


Details:

Top; the Cielo top by Closet Case patterns
Skirt; the Sixtine skirt by Coralie Bijasson patterns
Shoes; both super old now but still much loved

Later edit; so I added some pockets to this skirt! They’re patch pockets, with a slightly gathered top, drawn in by a little olive ribbon, which I happened to have in my stash.  They’re simple but of course useful.  Who doesn’t like a little bit pf practicality along with their floomph?!

Here’s a brief overview…

the pockets are cut to fit my mobile phone in, and are about 3cm wider at the top…

I snipped a little hole in the outer layer of the upper hem/casing..

the gathering ribbon emerges from this hole

align the raw ends of the ribbon inside with the raw edges of the upper pocket hem/casing

ensure the ribbon ends are stitched down firmly along with the pocket… gently pull up the excess pocket width at the top and tie off the ribbon…

camouflaged but not totally, and I think it looks kind of pretty when you do notice it   🙂

pinterestmail

knots and crosses

I made this crazy outfit!  I know; it doesn’t “look” too crazy.. but it is, because it was a super-fiddly process and took aaaaaages.  Not content with just using what was actually very nice fabric as is; I, of course, made life more difficult for myself by instead cutting it up to make new fabric.  Crazy..  Yep.

But I’m getting ahead of myself…. this is actually my entrant into the Tessuti Sewing competition… the idea is that you get some of the nominated competition fabric and make something with it… pretty simple huh? but the kicker is that nothing else other than the competition fabric can be visible and you cannot dye it either.  Tessuti nominated a family of six fabrics, which was pretty awesome! three colour ways of two related eyelet fabrics; one is Knots, the other is, naturellement, Crosses.  I bought the Natural colour way of both fabrics and got to work!

My thought was to cut the fabrics up “creatively” to make a multi-layered, multi-textured sort of a thing, like a layered lace kind of a look…

For the top; I cut the fabric into 3 types of fabric strips; the knots fabric on the bias, snipping out the backing fabric to make the pretty embroidery design into an edging.   The crosses fabric I cut strips on both the bias and the straight; in each case snipping out the backing fabric carefully to leave the embroidery forming a pretty border.  I arranged these strips over a pale pink lining bodice and stitched them in place with double rows of stitching…

the sleeves are in the knots fabric, and I cut the edging “lace” like so; just the very edge of the crosses fabric cut on the straight made the outer, lace-like edging.  The neckline edge is made from two different cuts of the same Knots fabric, one on both the bias and one on the straight.  The eyelet with the “ribbon” thread through is one diagonal arm of the knots fabric, and the lace edging was the same fabric cut on the straight; the two were stitched together to make the neckline edging.  The blue “ribbon” threaded through the neckline edge; well you might be thinking, ah, but that’s not the competition fabric?  Fail!  But it IS the competition fabric!  The selvedge had these pretty blue striped borders printed along the edge… I carefully stitched very very close to the blue with tiny, 1mm stitches to stabilise and help prevent it from fraying, and cut off the excess to make a ribbon to thread through my created eyelet.

The skirt is relatively simple, sort of… I dug out a favourite old skirt pattern Vogue 7880, which has multiple, asymmetric layers.  It’s such a lovely pattern, I haven’t made it for ages but I think about it every now and then.  Now, as before; I lengthened the skirt stay pieces to make a full lining for the skirt, otherwise just made it up as normal.  The lining is the same pale pink lining fabric I used for the top.  I used a “natural”-coloured invisible zip in the left side seam.


It’s looking very pressed and neat in these pictures, but what I’m really looking forward to is washing it and letting it crease and rumple naturally, which I think will look really charming.  And better, I think…   I really should have done this before taking my pictures here but I literally forgot about the competition until the last minute and had to take my pictures here on the very last day.  Which is today.  Gah!  I hate being incompetent!!

So.  I actually do really like this outfit…

however!!  I purposely did not look at the tessuti pinterest board with everyone else’s entries in the lead-up to the competition, because I did not want to be influenced by anyone else’s design decisions.  I just wanted to come up with my own ideas purely unaided and unabetted – is that even a word? Never mind… stream of consciousness blogging!!  Well, as I was saying, I finished my outfit, quite oblivious; took a bunch of pictures and sent in my entry, THEN I went over and had a look at the pinterest board of entries.  And immediately saw that I had not the proverbial snowflake’s chance in hell.  There were SO MANY beautiful and fantastic entries!  It was wonderful to see so much creativity! even though mine is kinda ordinary, but I can live with that.  I think the top’s kinda pretty and as a whole it’s ok!

Details:

Top; kinda based upon New Look 6483, except completely different and with nothing of the original remaining.
Skirt; Vogue 7880
Tights, made by me, details here
Shoes; made by me, details here


pinterestmail

I sewed selflessly

So, I sewed some stuff!

Item A; a dress for Mum to wear to Cassie’s wedding…

I started out with Burda style 09/2019; 109 because I thought the sleeve cuff really lovely; however I ran up a muslin – actually 2 –  and we decided the cut-on sleeve just wasn’t that nice and that a set-in sleeve would be much better.  So I ended up re-tracing and -fitting the Esme pattern from Lotta Jansdotter’s Everyday Style book again since Mum had really like the one I made for her previously.  I just adapted the sleeve to have the Burda cuff on the sleeve end.

The fabric is a really beautiful, green polka-dotted ivory crepe from Fabulous Fabrics; Mum and I went in together and chose it one morning.  Fun!  I didn’t use the neckline facing pieces, opting in stead to fully line the dress with an ivory lining that I already had in my stash, the lining negated any need for a facing…  Mum kindly hemmed the dress herself since I was seriously running out of time by the end of it!  The dress shell has french seams throughout, though I used the overlocker for the lining.

At the same time that we bought the fabric, Mum bought a length of emerald green chiffon and finished it with a hand-rolled hem to make herself a lovely matching scarf.

I thought she looked absolutely lovely!

Item B; a shirt for part of Cassie’s birthday pressie…

For her birthday, we went out together and bought a few lengths of fabric which I was to make into some simple work outfits for her.  Of course now she’s working from home but that’s ok; at least she’s still working!

This is pattern 02/2015; 113, adapted to be much slimmer in the body due to the fact that I didn’t buy enough fabric, ahem… that’s fine since the style is so super wide I think Cassie would have requested it be slimmed down anyway!  This thing is BOXY!!  I also had to leave off the sleeve cuffs, but Cassie absolutely loves it just as it is  :)..

The gorgeous polka-dot fabric is a linen from Fabulous Fabrics.  The buttons are leftovers from Kelly’s wedding dress!

I did manage to snap one photo of her wearing the top! kinda a miracle given how crazy busy we were before the wedding, and then I’ve barely been able to see her after the wedding during these virus social-isolation times… this is her on the eve of her wedding, when she was preparing to practice her father/daughter dance with Craig… yes, she’s wearing her wedding shoes of course  🙂

I actually made a little video on the making of this blouse, which was fun.  I’m hoping to make more of these for my YouTube channel  🙂

Item C; some shorts for Cassie’s birthday.  For these I started with the Closet Case patterns Pietra shorts and did the same elastic-waist elimination that I did for my own shorts… shown here.

The fabric is a cotton twill from Spotlight, in Cassie’s favourite duck-egg/mint green colour.

Item D; another little top for Cassie… this is the Closet Case patterns Cielo top, lengthened slightly. This is a lovely little pattern and I will definitely be using this one again!  No other adjustments.

The pretty rose-print is a linen from Fabulous Fabrics.  I should say, that while these pieces are all a gift from me to Cassie, she did choose the fabrics herself.  We had a lovely fun morning checking out fabrics and chatting about work-wardrobe possibilities!

Items E & F; I made two different masks for myself.  I haven’t used them very much but am really trying to get more used to the idea!  When we’ve visited Japan I’ve seen lots of people wearing masks all the time of course, and while I think they’re a great idea, especially in our current virus-centric lives, we’re just completely unaccustomed to wearing them here in Australia and it’s really hard to get used to it.  I find them very claustrophobic and a little difficult to breath in them!

The first one, above; I used this pattern/tutorial on the Makers Habitat YouTube channel, it has a lining with an opening so you can insert a filter inside.  It’s a nice straightforward pattern, very quick and easy to make.  I added a skinny channel to the top, and cut a short length of wrapped florist’s wire to insert in there for a nose support; this can be removed for washing.

This second one I used the Trend patterns free mask pattern, here.  This is also a nice pattern, very “designed” and I really like it, but I did find I had to fold a quite wide dart in the under-chin piece to get a good fit.  Also it is a more complex and involved thing to make than the previous pattern,  For both masks I used a leftover piece of cotton from my stash, the most tightly woven and with the densest thread count I could find!   They are both lined with cotton voile.  The ties are just thin strips of cotton jersey, cut with my rotary cutter, left unhemmed, threaded through the side channels and simply knotted.

pinterestmail

jungle baby mobile

Yesterday we attended a very special event, and I made a very special gift for the occasion! … Kelly’s bridesmaid and Tim’s groomsman, now a newly-wed couple themselves, hosted a baby shower for who else but our newest little not-quite-here-yet bub…  The new nursery is to be jungle-themed, so I thought I’d make an animal mobile.

I bought acrylic felt sheets, wooden beads and a bamboo hoop from the craft section at Spotlight, and everything else from my stash… embroidery thread for the embroidery, upholstery thread for stringing everything all together, and all-purpose glue… the blue/green wool that I used to wrap the hoop was from a large bag full of wool that a neighbour put out on their verge as rubbish.  When I spotted it I was like… whaaa??? well yes please and thank you! #wastenotwantnot

The designs are all my own:

toucan;

sort of a generic monkey… I kinda wish now I’d made him a specific type but oh well…

gorilla.  btw, most of them have a definite front and back so I’ve pictured both of his here…  He was one of my early favourites so I can’t believe I forgot to take his special close-up photo!  we’ll have to make do with a couple of zoom-ins …

tiger.   I’m pretty pleased with my tiger, it was easily the most labour intensive and fiddly of them all!  This is actually version three; I was dissatisfied with two earlier versions but kept going until I had one I was happy with.  He also has a definite back and front.

panther

blue and red macaw

blue and gold macaw.  Until I was making this mobile and made a point of looking it up, I wouldn’t have noticed that these macaws have black beaks while the red and blue ones have white beaks!

python.  this was a last minute inclusion and I really love him!  My python has a lovely diamond pattern along his length, and it should be noted btw that this is not a very common marking for this particular colouring but I’m claiming artistic license!

There are three different leaf sizes, and I went to a careful effort to balance everything out; the ground dwellers are at the bottom, then there’s the mid-range dwellers, with the birds flying up in the canopy.  Except for the toucan, he’s not flying but I imagined him perched on a branch.

I like the way the blue/green yarn I used to wrap the hoop is sort of “planet earth” colouring, as well as sky/leaf canopy colouring.  Seems sort of fitting.  And the dark wooden beans that are really there to weigh down the motifs, also sorta represent nuts in the trees and on the ground,  and the wooden trunks of the trees.

Lastly, here it is in motion.. thanks Cassie! for holding it up for me to film it!

Kelly sent me a picture this morning showing it hanging up already, which is so cool! and I sure hope baby enjoys watching it from his cot!

Before anyone points it out; yes I know these animals do not necessarily live in the same jungles as each other, but hey; at least they’re all actual bonafide jungle animals and I didn’t pop a cheetah or a zebra in there!

Now before I forget… I said I only had two more things to blog about before the end of the year, but I was forgetting the following!  for Kelly’s birthday she mentioned how she needed maternity clothes, so I offered to take her shopping for fabric and I’d run up a few things…  I’ve shown some of them here but not all of them for some reason, anyway, here are the rest…


a Closet Case patterns Ebony dress with set-in sleeves; in cotton jersey bought from Spotlight for this project

A raglan-sleeved Ebony tee, and a skirt made using Burda 7023.  Apart from the navy blue merino for the sleeves which is leftover from my Nettie tee, these fabrics are all long term residents from my stash, some give to me by Mum.  It’s not a glamorous outfit, but one I thought she could wearing hanging around the house or on the weekend for housework or something… hey, we all need those clothes too!

another raglan-sleeved Ebony tee, and Burda 7023 skirt combo… striped jersey a long term resident from my stash, originally leftovers from this dress; and black jersey from Spotlight, not a leftover but bought specifically for this project.  For my previous notes on adaptions to this skirt pattern, see here.


So; NOW I’m pretty sure I have only one thing left in this year to blog and it’s a lovely one if I say so myself …. stay tuned!

pinterestmail

“Moroccan tile” skirt and a little white top

Something I really wanted to do before my trip to the United States was to make a new outfit for meeting with other seamsters… with two days to go; I did!  I made a skirt and a little white top ensemble… each piece was actually pretty simple and the whole process from go to whoa took about half a day each.  Bam! I really  love sewing projects that just whizz together super quick like that.

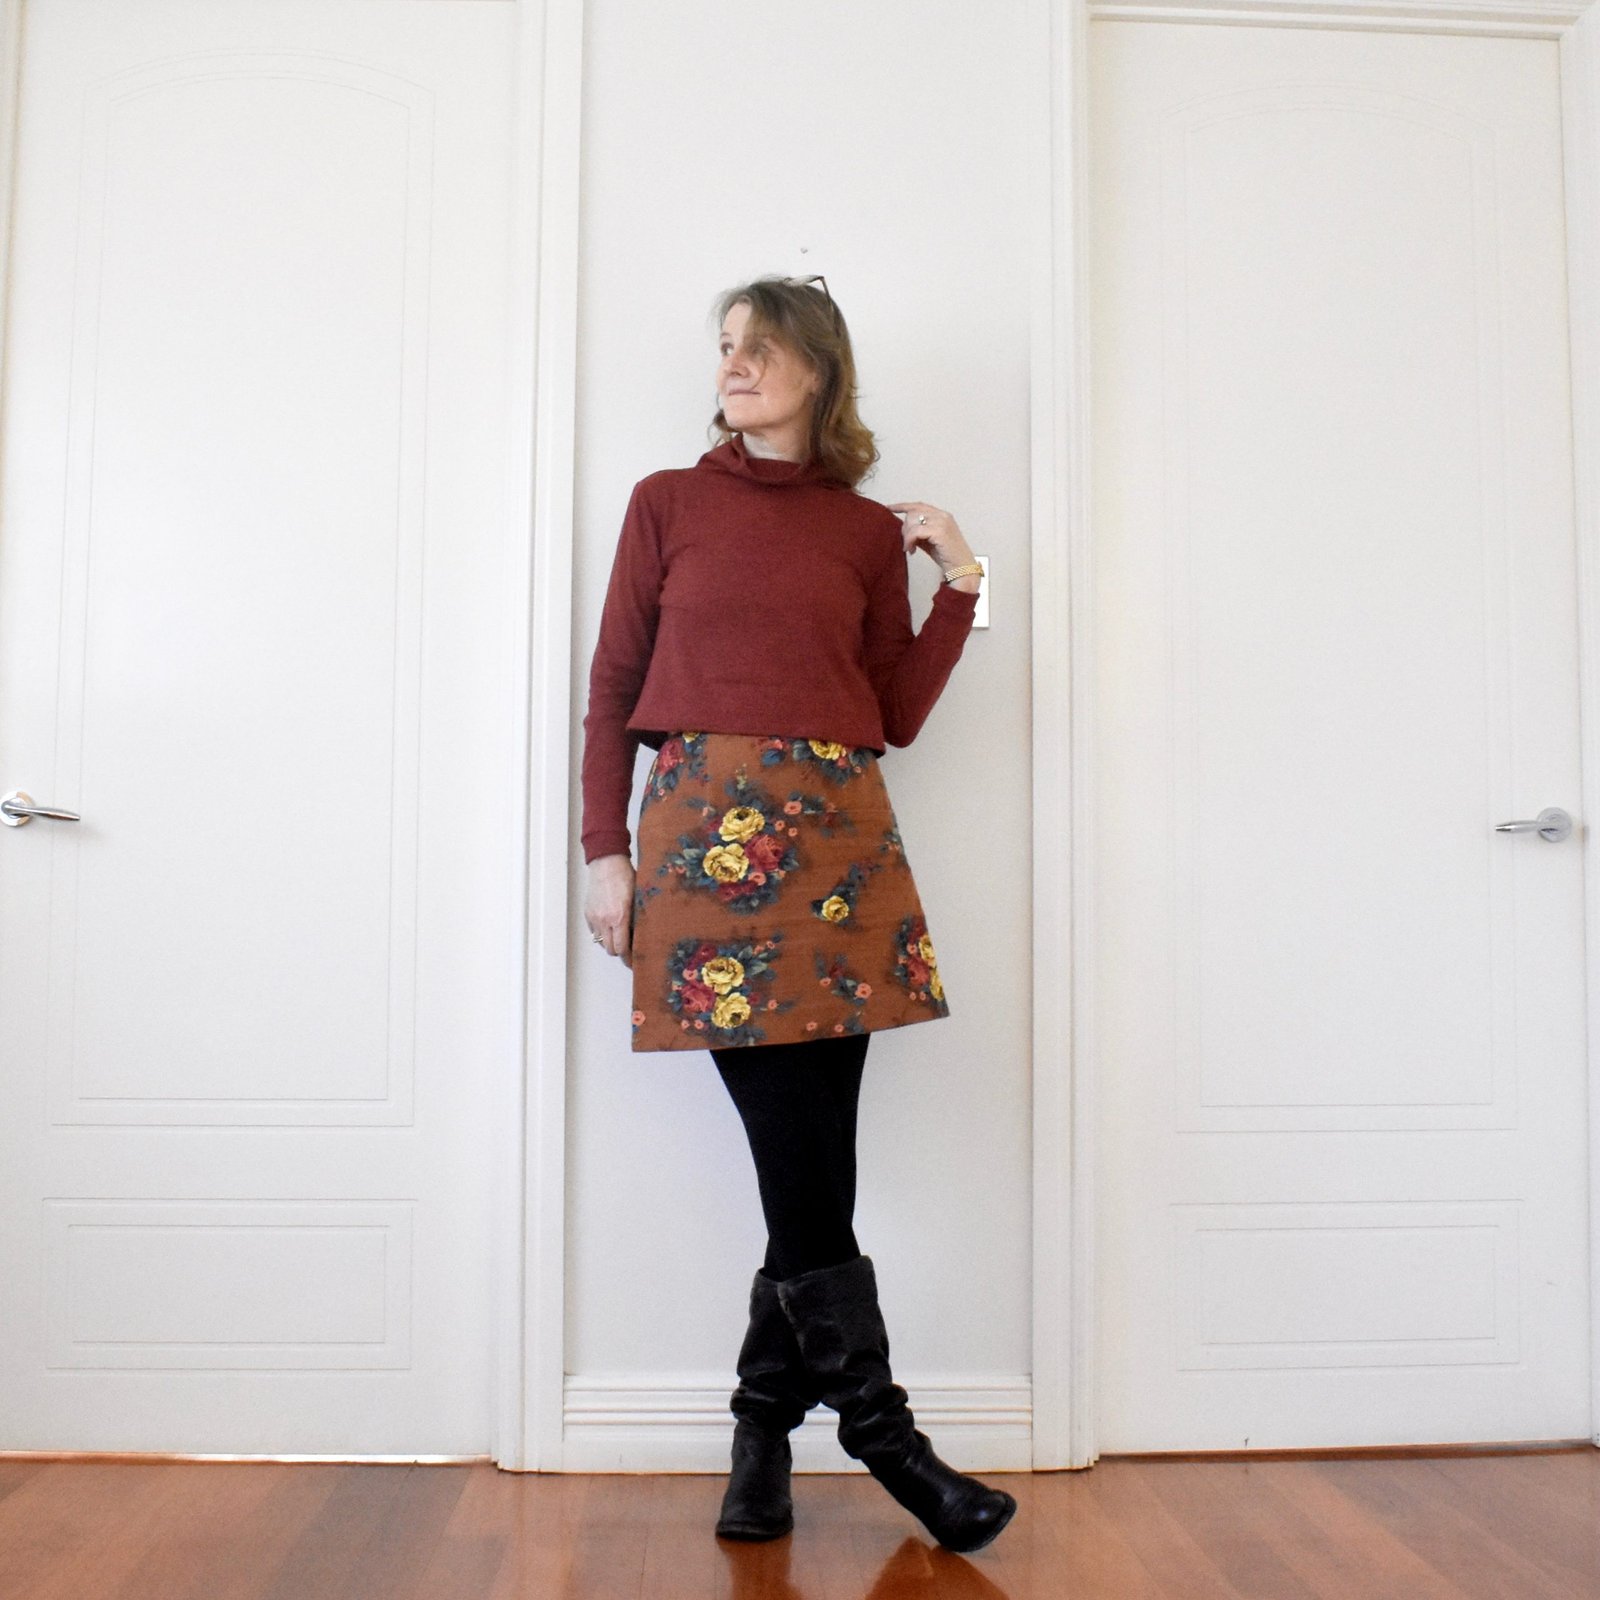
I used Vogue 1486; a Nicola Finetti design.  Nicola Finetti is an Australian designer, and when have I ever seen an Australian designer collaborate with Vogue??  I’m pretty sure, never.  I decided this was a collab I absolute needed to support by buying the pattern…

For the skirt; I’d ordered 3m of cotton from Minerva.  I thought the print looked quite divine on the website, when it turned up it was actually a bit of a surprise, to be honest!  The print was divine; however it was also far far smaller, I mean, on a smaller scale, than I had imagined.  I’d sort of pictured the squares being each about 10cm, sorta like real Moroccan tiles, actually they’re more like 1cm.  Hey ho though; I still had hopes it would work out ok…  The colours are quite luscious, and very very me!  Mustard, terracotta, burnt orange, turquoise, green, a tiny dash of coral pink… honestly could this possibly get any more my sort of palette!

The fabric is beautiful quality, as good as I could have hoped for; soft, and still crisp enough, densely woven and yet still with a very nice drape.  It was also very generous width, however I still didn’t manage to cut the skirt pattern pieces out from my 3m length!! I know, right?!  You’d hardly believe it to look at it, but it’s a HUGE fabric hog!!  I had to piece a smaller section onto the end in order to cutout the back lower skirt piece.  The join is not perfect, but pretty good; plus it’s positioned so it’s hidden inside a side pleat, so it’s really quite invisible.

For the little crop top I used some slubby white cotton I bought years ago, from Fabulous Fabrics, and a navy blue chunky metal zip from Spotlight.  The top was super easy and fun to make.  You had to shorten the zip; and the instructions showed how to do this with a pair of pliers.. however I just could not pry the metal teeth off of the zip tape.  I struggled and struggled with this, but eventually gave up, and in the end simply cut the zip off at the right point and stitched a good solid bar tack in the gap between teeth to keep the zip pull firmly trapped where it needed to stay.  And I lOVE how the zip looks at the back of the little top!

innards…for some reason this sight is enormously pleasing to me….

You were supposed to put an exposed zip into the skirt too; however I decided this might all be a bit too much; overpowering the delicate print.  I just used a dark green invisible zip here instead.

And just saying; the skirt has fabulous pockets.  Fab -U -Lous…!

So I’d mentioned I whacked this outfit together in a matter of days… of course I haven’t made this pattern previously and didn’t really bother to do a careful fitting on myself either.  I’d picked a size 12; my correct size according to the size chart.  Usually I pick a 10 for Vogue patterns.  And I don’t know why I decided upon a 12 because, of course, turns out I should have picked a 10 for this one too… I knew I usually go a 10 for a reason!  the waistband is a little bit baggy on me, and – is it my imagination? – but I feel the top looks quite big on me too.  Not that this is going to stop me from wearing it, but just; you know.  For next time.

The day we’d planned to meet with sewing girls in San Francisco was a lovely warm day of 28C… so I felt so lucky I could wear my new outfit!!  however we only had the one warm day during out entire visit and that was it!  I was happy that I could wear it for one sewing meet-up, but just a wee bit disappointed it didn’t get another outing.  Like, the days we met other sewing peeps in New York city it was just too cold for it (sob)  so I had to make do with other things I’d packed…

from left: Yoshimi is wearing Vogue 2900, Beth is wearing one of her favourite dresses, a Butterick pattern, and Shams is wearing her Style Arc Stevie jean jacket

Later on we headed over to a cafe where Shams had organised an afternoon tea..

from left: and I apologise I did not catch what everyone was wearing this time … I think Rose is wearing a Cashmerette top and Jilly is wearing a tessuti patterns Lily dress?? 🙁

Wendy, Shams, Yoshimi, me, Rose, Jilly, and Catherine is taking the picture… I knew I should have taken over the camera so she could be in the photo!

And that brown paper bag, clutched in my  pawsies??  Yup, you guessed it… it has a nice little stash of fabric tucked away…;)

Yoshimi took this picture on the train platform, after fabric shopping in the Bay Area with Shams and Beth.  I thought it was such a nice picture!  In fact the whole day was such a fun day!!  I wish I could hang out and gossip and chat and go fabric shopping with all these ladies more often!

pinterestmail

khaki suede top; 6 different ways

Last week, on a whim; I randomly decided to mini-wardrobe-challenge myself to wear this khaki/olive suede tee  for one whole week, styling it differently each day … I’d made it five years ago! back in 2014 and it’s been such a great versatile piece!  It’s mostly a winter-y sort of a thing to wear, though it’s quite nice to pop on for a half-warm but not hot day.  A transitional piece, is what the cool kids of fashion would say, yeah.  Although, what am I talking about??  I’m the cool kid, well I can dub myself so here in the realm of my own funny little blog at least, anyway!   #imtheONLYkid

So yeah, I made this 5 yrs ago, using Burda 10/2009;121 and a very realistic dark olive green suedette that I bought in Tokyo during a holiday there; original post is here.  I remember Yoshimi bought the same stuff in pale pink at the same time, and made herself a top too.  I’ve worn my own top lots over the past five years, ‘cos it pretty much went with everything I own, though I still did develop favourite ensembles with it.  One of those I included in my previous 6-different ways post, with my terracotta skirt! but I decided it would be sorta cheating to include that outfit in with this six too.  Although it totally should be here too really, because it still ranks amongst my favourites for this year.

Anyway! without further chitchat!  I made every item of clothing I’m wearing in the following pictures, with the exception of my shoes.  All items are linked to their original construction post.

Below left: worn with my over-dyed Nettie tee, sage green wool tweed skirt, and my self-designed chenille scarf and black tights; and my old black booties.  I love love LOVE the olive green and raspberry colour combination together…  Need to establish more opportunities for such in Ye Olde Wardrobe….

Below right; worn with an ivory wool Nettie tee, my purple Jade miniskirt, ivory hand knit möbius scarf, black tights, and my beloved motorcycle boots.  I guess purple is basically a variation on raspberry, because the olive/purple colour combo similarly speaks to my soul too!  Sadly this little skirt bit the dust last year too…

Below left; proving that chambray goes with everything.  I wore this outfit on a warmish day during my recent Week of the Olive Suede Top.  My blue chambray shirt is an oldie but a goodie, and the little blue denim skirt is another staple.  Also wearing unseen sockettes made by moi.

Below right; with my over-dyed Nettie tee, my once yellow, over-dyed corduroy skirt, a scarf knitted by Mum – oh, ok, there is one item of clothing not made by me! –  my over-dyed khaki leggings, and hand knit socks.  And my favourite desert boots.

Below left; This is my outfit from just yesterday, an unexpectedly very wintery day.  Worn with my mustard merino Nettie, my outback wife barkcloth skirt, hand knit mustard cowl, black tights, and my mustard raincoat. Did I mention that olive green and mustard is another favourite colour combination?!  Maybe I should amend that to say, olive green and anything?

Below right; I paired the olive green top pretty frequently with white, black to black-and-white combinations; all of which it looked pretty good with, I thought, lending warmth and life to the general colourless-ness, however chic said colourless-ness may be!  I picked this outfit for this post though, because it was one of the few times I tried belting the tunic.  I actually like it a lot belted; slightly 80s-inspired in a look that makes me nostalgic, in a good way.  I think I should have done this more often I think!

Worn with my Eve dress, black tights. and the lovely suede booties Craig bought for my last birthday…

So!  Sadly, the tunic has pretty much done its dash now… while the fabric seemed reasonably sturdy it actually was not; and over years of use it eventually developed a few holes from rubbing and little tears, particular around the side splits and the underarm area.  I haven’t actually tossed it out, but I may think about repurposing the fabric for something else sometime.  Because I still really really love the fabric!

pinterestmail

some naice new clothes

I’ve been whipping up (k-chaaaaa!) some maternity clothes for Kelly… I’ve been making a lot “for others” lately, all this year in fact, or at least it feels like it! but I’m ok with that; for one thing; it gives me a chance to get that aspirational 30 wears out of my own wardrobe, and for another… well that’s reason enough, I think?  I have lots of nice clothes and I’m enjoying getting the most out of what I have lately  🙂  But I still want to sew! so it’s both fun and enjoyable for me to make clothing for my loved ones instead.  Kelly needs new clothes to fit her fast-changing body and is keen for me to make them, and I am more than happy to make them for her, so it’s a win-win situation for both of us. She recently had a birthday, and we headed out to Homecraft Textiles and Spotlight together and did a bit of shopping; my birthday present to her.

A lovely reader of my blog, Graca sent to me this maternity skirt pattern, Burda 7023, thank you so much Graca!.  First of all, I ran up a little test number, using a soft, grey and white cotton jersey sweat shirting, leftover from this hoodie I made for Sam a few years ago.  The leftover scrap I had was the perfect size for the skirt!  The sizing chart of the Burda pattern was a little weird; Kelly’s hip size put her between a size 20 and 22, the very top of Burda’s size range which seemed quite quite bizarre!  I eyeballed the pattern pieces and decided to size down to 18-20 for Kelly, and of course it fits pretty well so sizing down was a pretty good decision.  Also, of course the skirt is currently huge on her, not surprising given that she is in the very early stages of her pregnancy.  But we both feel it will be a good thing for her to have in the later stages of the pregnancy.

On our shopping trip for the real version we picked up a few very nice fabrics; including a truly gorgeous, creamy/ivory/grey cotton jersey – I bought enough for me to have something too! – and this absolutely drool-worthy rose printed stretch velvet.  I used the Burda 7023 skirt pattern to make the skirt, and “early-maternitised” it a little bit, so it’s more suitable for her to wear during this wintery, early stage of her pregnancy.  I did this by reducing the amount of gathered rise in that front portion of the skirt.  I also installed a drawstring in the front band, so she can pull in some of the extra width now, and let it out gradually as she expands over the coming months.

How?  Firstly; I ironed a square of iron-on interfacing in the centre of the skirt front facing section, and stitched a sort of double buttonhole/figure 8 stitching using a narrow width, short-stitch zig-zag stitching.  I used small shape scissors to cut X-shapes int he square centres of this stitching.  Next, I cut long strips from the ivory jersey I used for the little T-shirt top; these left unheeded naturally roll up in to nice little rolls of fabric.  These I stitched into the side seam stitching of the front/back waistband/facing/casing so the strips are hidden inside, and threaded the ends through my makeshift eyelets.

So, they emerge inside the front waistband of the skirt, and Kelly can pull the waistband in to fit now, and let it out as she grows.  I think this is quite an improvement on the original, which is left to stay big and loose and floppy no matter which stage of the pregnancy you are!

I also made the little top, using the Ebony top pattern I’d bought recently, totally for maternity purposes only of course.  Though I did get an extra one printed out for myself too! ahem…  Kelly has been wearing the striped, raglan-sleeved test version I’d made up, and requested it be streamlined just a little bit, so I brought in the “swing” of the side seams by about 2 inches at each side seam, keeping the side seams straight.  And it still has plenty of swing!  The next request was to bring it in even more next time! though I’m pretty sure the bit of extra room will come in very handy come breastfeeding time.

When making a T-shirt; I like to stitch the shoulder seams down towards the back, and also to stitch the neckline seam allowances down onto the shirt at the back only, like so…. I believe it stabilises this part of a T-shirt which is often subject to the most strain.

This is the regular, set-in sleeve version of the pattern …

btw, when it comes to stitching a hem or an elastic casing in velvet; its pile causes it to become the most annoyingly migratory stuff that slides over itself under the sewing needle, even even when you’re being super vigilant and slow, it just happens!  I found the best way to keep it firmly in place was to pin regularly, like at least every inch! and perpendicular to the seam, with the needle passing through exactly where you’re going to be stitching, and not removing the needle until you’re right upon it.  This seemed to keep everything in place nicely enough…

I already have some other versions in the pipeline, as well as a few as yet unblogged things awaiting in the wings; I need to get cracking and catch up!

pinterestmail
Switch to mobile version
↓