Tag Archives: Skirt

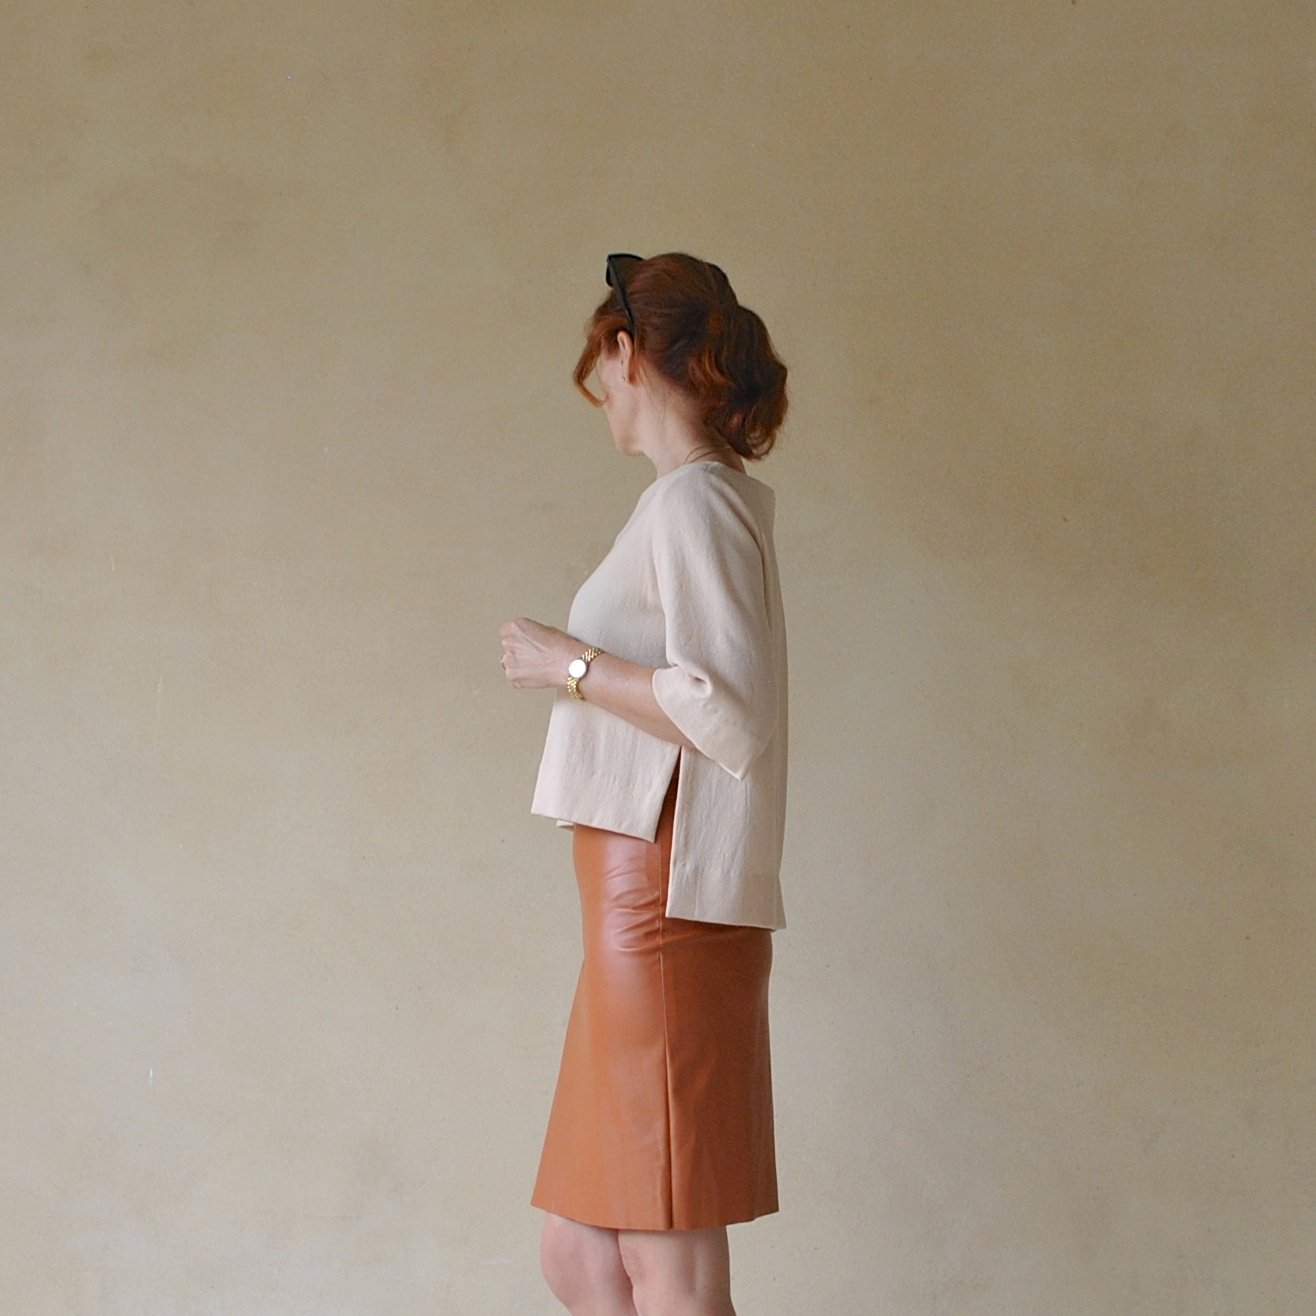
terracotta axel skirt

Hey!  I’ve made this new skirt.  Actually I’ve made lots of new things lately and just haven’t yet blogged them… oops!  Getting onto that, asap!  Hehe, actually a good thing about me-made May is that it kinda forces me to blog as yet unblogged things that I want to wear that day.  Well it means I have to, otherwise… what would I link to??  *horrified gasp*  O, the shame of having nothing to link to!


Pattern: the Megan Nielsen Axel skirt.  I bought this pattern a few months ago, on one of the several occasions I’ve wandered into Potters Textiles in fruitless search of the Dove blouse pattern.  The Dove seems to be a pattern that is perpetually sold out… yes, I could have bought a pdf but I kinda had my heart set on a paper pattern.  Mostly because I adore Megan’s illustrations that she does for the envelope.  Aren’t these adorable?   I also have another, different Megan Nielsen pattern that I have recently finished too… but that shall wait until another day and its own separate blog post…. 😉

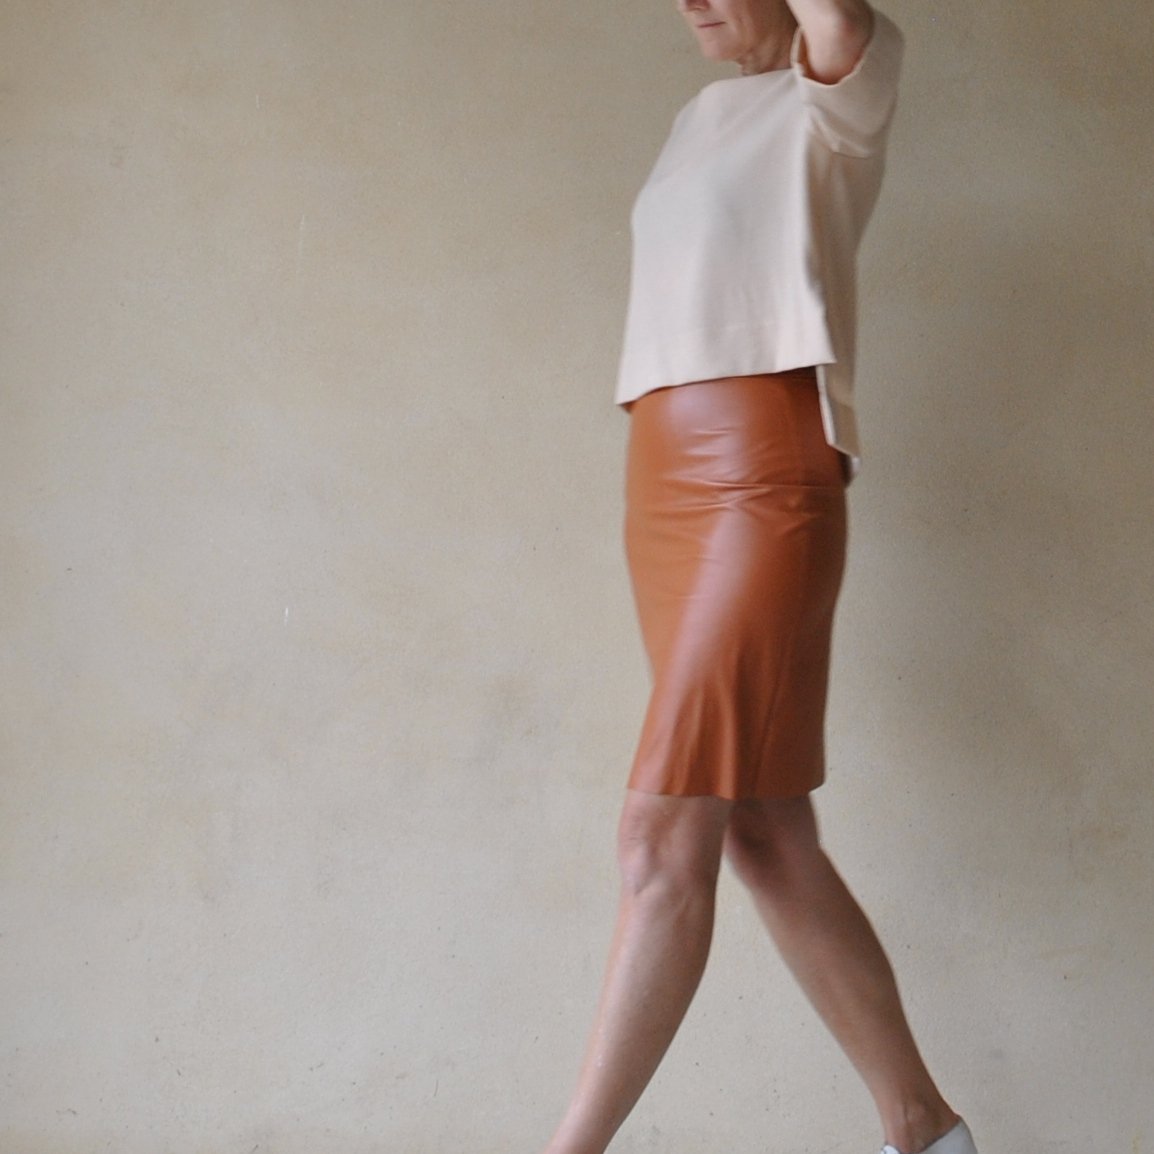
I made the short, straight version 2 only without the waist ties because this one is actually just my trial version of the pattern…  I was toying with the idea of using it for one of my Melbourne fabrics and just wanted to test it out for fit first.  This is a pattern designed for firm fabrics with some stretch, because it is a tight, form-fitting pattern, but in quite a nice way I think.  The style actually reminds me a LOT of the figure-hugging little pencil skirts we used to wear to high school in the 80’s.  Btw, and going off on a random tangent… if you want to see a daggy homemade mockup of my old school uniform; I put this one together for a school reunion a few years ago…

Fabric: a stretch polyurethane laminate “pleather” from Spotlight.  I’d originally bought several metres of this stuff on superDUPER special; I had the thought of making either shoes or a raincoat… then I went off it and shoved it away and out of sight.  As you do!  I’ve made quite a lot of things out of this stuff in the past, here, here, here, here and here!  Some have been more successful than others and so I have a bit of a love-hate relationship with the stuff  😉  When I was searching for something to run up a muslin/trial thing I thought “oh what the heck this’ll do”, made it up, and you know what?!  I’m actually liking how it turned out, like, A LOT!  It’s like an old-fashioned love story; fabric and pattern met, eyes locked across the room, hearts went a-pitter-pat, the stars aligned, fireworks exploded, champagne corks opped, they rode off into the sunset together and are bound to live happily ever after.


Some details: I cut the front on the fold so as to eliminate that unnecessary centre front seam; also, to accommodate my ahem, pear shape; I pro-actively graded out from an S waist out to an M at the hips.  And I’m pretty happy with the fit. See, this is why we sew!  Style-wise; it’s an extremely simple, no-fuss, zero-drama design, with absolutely no closures; just the simplest of bands for a waistband that you pull up over your hips.  Not even kidding, this took me like a few minutes to whip up, tops.

simple stretch waistband


I’ve learnt in the past that this pleather doesn’t hem well… so I just cut a sharp clean edge using my rotary cutter, and angled the seam allowances inside the skirt so there’s no danger of them peeping out under the lower edge.
Also, it’s tricky to press, but does look about a thousand times better if you do… it’s best to press on the underside and use scrap fabric when you’re going over the seams, the plastic right side of the fabric will soften and melt ever so slightly and I found I had to peeeeel off the pressing scrap after pressing.  So it’s best to be quick and not let the iron linger on for too long!  Some more of my tips for sewing with leatherette or pleather are here and here


Details:

Skirt; MN 2207 (Megan Nielsen Axel), terracotta polyurethane laminate “pleather”
Top; own design variations on the Epaulette cut & sewn from the Japanese pattern book “she has a mannish style”, also called “she wears the pants” by Yuko Takada, apricot crepe, details here
Shoes; designed and made by me, details here

Location: along the South Perth foreshore

pinterestmail

“bookshelf” skirt

Hello!  I’ve finished the second part of my little autumn wardrobe-lette… a new skirt! using a printed, upholstery-weight cotton canvas from the Fabric Store in Melbourne, the fifth fabric from the top in this pic of my Melbourne acquisitions…

I absolutely fell in love with this print at first sight, in fact the very minute I spotted it I GRABBED IT!  Not even counting the rather yummy autumnal colours… it reminds me of bookshelves, stacked not quite full, with the colourful spines of the books tipping over a bit into the gaps between them.  I love libraries, in fact it’s been a lifelong daydream of mine to have a room that is completely lined with shelves of books, from floor to ceiling, and a big squishy armchair right in the middle of the room, either faded rusty-red or bottle-green velvet, can’t decide but either would be nice, big enough for me plus at least one cat, and with one little curly-legged side table just big enough for a stained glass lamp and a cup of tea perched on top.  *sigh*

Wait, where was I? oh yes ahem…SKIRT.


Pattern; Vogue 8363, one I’ve used many times before, actually I’ve just counted and have made it TWELVE times previously!  You can look at ALL of them by clicking here….

Some of the many reasons I love this pattern so are; a) gorgeously deep slanted side pockets, in fact I can’t help noticing I have my hands shoved deep deep down into those pockets in, only like, every single picture.  They’re just that wonderful, I simply can’t resist!  Also b) straight side seams, making it a nice one for pattern matching, c) double darts in the back which lend themselves very nicely to the wide hips/narrow waist/slight sway back adjustment that I usually make.  I tend to use view D for the pockets, which has a button front placket at the centre front; I obviously eliminate this though and instead have an invisible zip closure at the centre back.  I also like to cut the skirt part roughly two sizes up from the waist part, because I like that boxy with nipped in waist silhouette on me.

Also, this time I added belt loops because I decided all that psychedelic tipping-stripe-y action could probably benefit by being visually reined in with a solid, sombre, no-nonsense belt.  Now it’s finished and I’ve worn it thus, I think yep, this was a good idea

Partly because I stingily didn’t buy much of the print, and also partly for the same visual grounding reason as having a belt: I cut the pocket bags in a thick chocolate brushed twill, a small bit of leftover fabric harvested from Craig’s old pair of chocolate moleskins and which I used to make this skirt, also  Vogue 8363.

Inner workings; I had to piece the chocolate moleskin to get pieces big enough for the pocket bags, but the seams are tucked down deep in the pockets… I used plain black cotton for the waistband facing and pocket facings.  Because I’m a bit of a stickler for matching threads, I switched threads on BOTH my sewing machine and overlocker several times during the making of this skirt!

Above, I spaced it to turn up the hem exactly between two horizontal stripes in the print.  The lower edge of the skirt is finished in bias cut black cotton, the same as for the inner waistband and pocket facings.  See that little tiny row of mustard stitches along the top? I initially started hemming with black thread to match the bias; but quickly realised that even though I made my stitches as tiny as tiny could be, that row of minuscule black dots did show up on the right side of the skirt if you looked closely enough, and I didn’t like it!!  So I switched to the same mustard thread that I’d used in other seams, which disappears nicely into the print.. so they’re pretty much invisible on the right side, which is the main thing!

Above; I chose a mustard invisible zip.  When it came to placing the belt loops, I put two on the front, spaced just outside the waist-shaping dart; and three on the back, the outer two just outside the outer waist shaping dart, and one in the centre back.  It abuts the waist closure, which I wondered would make it difficult to put in the belt; but it doesn’t, it slips through just fine and isn’t a bother at all.  Oh, and waistband closure? there’s a wide hook/eye stitched in under there.

Also, darts?!  One of the most serendipitous things I discovered about this print is that you can barely make out any darts at all! can you even see them in the above picture?? they’re just buried there in amongst those higgledy-piggledy books.  WIN!

I’m wearing today paired with my basic black Tshirt because I wanted the skirt to take centre stage in this, its own dedicated post… but I also think it looks quite nice worn with the, as yet one other piece in my autumn mini-wardrobe, the apricot top.  Actually, I only picked up the apricot crepe because of this fabric!

sorry for the blurriness.  Clearly I’m busily dashing off on a very important mission… like, to get the leaf blower


Details:

Skirt; Vogue 8363, printed cotton canvas, my review of this pattern here
Black Tshirt; self drafted, details here
Belt; had this for about 30 years
Black shoes; designed and made by me! details here

Above picture:
Apricot top; the epaulette cut and sewn, pattern no.4 from “she has a mannish style” by Tuko Takada, details here
Brown and ivory clogs; also designed and made by me, details here


Also; on Eagle Bay beach, Western Australia… Every time we come down here I have to walk along the beach and clamber over the rocks each day.  This is one of my favourite places on Earth.

pinterestmail

the Zora Queen Rutela

OK, I’ve done some pretty involved and intensive projects in my time, in fact more often than not, lately! and this one definitely ticks that box too.

Quite a few months ago, Cassie mentioned that she wanted us to go to ComicCon together this year, and furthermore, she had already chosen a good costume for me to make…

source

source

This is Queen Rutela, the queen and elder of the Zora; proud, elegant and graceful aquatic-people who reside in the Zora’s Domain in the Zelda universe.  If you’ve never heard of Zora, it’s ok, that’s perfectly normal because this stuff is the very height of geekiness and so far from the mainstream it’s a little embarrassing …  However! you have now!  She is a rather tragic character;  the story is as follows: Queen Rutela was the wife of the late King Zora and mother to Prince Ralis.  During the events of Twilight Princess, Shadow Beasts invade the Zora village, so Queen immediately sent her son to Hyrule Castle for his own safety and to inform Princess Zelda of what was going on, prompting the invaders to make an example of Queen Rutela by executing her in front of her people.

I liked the idea of going as Queen Rutela for several reasons, partly because she’s a mother so I felt she was age appropriate for me, also her story moved me because it is so sad, she’s so protective of her son and so motherly, it tugged at my heartstrings a bit.  But mostly, well, let’s be honest, because her attire and bearing is just so beautiful and I relished the challenge of giving a good go to making it!  Also, the Zora have always been my favourite species in the Zelda universe  🙂

ANYWAY!  here we go…

Firstly, the dress.  More accurately it’s a 3-piece ensemble, I made an ankle length petticoat/underdress, a skirt, and a long tunic top; all using white polyester stretch stuff (some leftovers, some new, variously from Spotlight, Fabulous Fabrics).  The plain, strapless, ankle-length petticoat is one I made many years ago, so long ago I’ve completely forgotten the pattern I used.  I never thought I’d say that, because I tend to remember patterns FOREVER, but not this time!  The skirt has the other “skirt-y” layers on an elastic waistband, and the tunic top is a drastically modified Nettie bodysuit, basically my go-to Tshirt pattern.  The sleeves are in two parts, a close-fitting “under” sleeve that is wrist length, and the “over”sleeve has a very high sleeve cap and a bell-shaped bottom edge that is gathered and “pouffed” into the under sleeve, then point-stitched in place to get artistic-y folding.  At the shoulder edge, the extra fabric in the sleeve caps is pulled in with three sharp darts; making a jutty-out sort of shoulder cap… that’s a technical term there, btw.

I stitched frilly “gills” to the side underbust area.

Oh! I’m getting ahead of myself… those frills were formed in the following way; I clean-cut the eyes using my rotary cutter, then holding the edge just slightly and evenly stretched out, passed it over a candle flame; which melted the edges just a little and set them in a naturally curly frill.  I took a little bit of practise to get this just right, with the right degree of frill and with minimal scorching!  Fortunately, those bits that looked a bit charred black just crumbled off when I rubbed them between my fingers.

Once I’d made the three parts of the dress, I shrouded Bessie in plastic and newspaper, dressed her, masked off the bits that I wanted to remain white, and sprayed the skirt, then the top utra-carefully and judiciously with poppy red enamel spray paint (Bunnings)

The colour is a little brighter than ideal, I really really wanted a warm, dusky coral pink, but with spray paint you’re unfortunately stuck with whatever is in the VERY limited pre-mixed range…  🙁 /

Spraying was pretty scary, my application isn’t perfect, and there is a blotch on the R shoulder that is a bit heavy and which was pretty devastating for a while, but I had no choice really but to accept what I’d done.   As it turned out I shouldn’t have worried too much because you couldn’t even see the blob once my headpiece was on!

Next, the fin/wings… I cut four-layers in light grey polyester organza, and simply stitched all layers together by skinny zig-zagging around all edges, and slip-stitched it in places to the top of the sleeves.


Next, the jewellery; and this bit was lots of fun!  It’s a long time since I’ve played about with jewellry-making and I really enjoyed it  🙂 I used Super Sculpey modelling clay, jewellery wire and gold metallic acrylic paint (Spotlight) and some really lovely turquoise glass jewels (Fabulous Fabrics), and baked my pendants in the oven before painting them, and stringing them together.  It’s hard to see the exact details of the Queen’s jewels in the short footage of her that there is, and what’s more, the details seem to vary from picture to picture, so I took a little creative license and designed my own, closely inspired by what I knew of the Zora style, and the arrangement that I could see from the footage.

The body-lace fastens at the small of my back; the necklace is supposed to sit out very wide on her shoulders, and I managed to get this look by stitching rings halfway along my shoulder, and the necklace clips onto these, wide on each shoulder.  I also made a “beaten gold” collar/choker from interfaced gold metallic jersey (Spotlight), hand stitched radiating lines over it, and stitched the last pendant to it, then stitched white vinyl “petals” (Clark Rubber) around the lower edge.  This closes by press studs at the back.

Headpiece: it’s simply a long tail in the same polyester stretch, stuffed with Hobby Fill (Spotlight). I inserted fins of fabric-covered cereal-box cardboard into the side seams, and I took the precaution of spray-painting the cardboard ivory first because the polyester is kinda see-through, and stitched it to the rim of a red swimming cap, also catching into the stitching a white plastic face-mask (Spotlight)

Now for the hair!  This took quite a bit of nutting out…. I’d stretched the bathing cap/head-tail/face mask contraption to Mr ‘Ed, my foam head, above.

For the hair I used skinny foam noodle (Clark Rubber) and stitched the top bit of the hair through all layers.  This stuff is pretty bouncy with a mind of its own, but I damn well forced that sucker to be what I wanted it to be with firm and masterful stitching to get the folded part/hair at the centre top. Take that, foam noodle!!  BOW TO MY WILL…

The blonde “coral” hair was easier and actually lots of fun, like being in kindergarten again… I snipped it into lengths, and painted the bits with various mixed shades of pale yellow, shaded with addition of lilac and metallic gold.  I wanted the hair to be in shades because we all know a flat colour just looks fake and, well, flat, any painted thing always looks so much more vibrant and real and rich when it has several different shades in it.  Going to this much effort sounds complicated and maybe even unnecessarily involved, but I whizzed through making the hair, loving every paint stroke.  I strung them on yellow thread and stitched them to the cap through all layers, and painted part of the top layer of hair in the same way.  There is 35m of noodle in this thing… I can hardly believe that myself but yes, really!

One “strand” came off while I was pulling the thing onto my head, aaaaagh NOOOOOO! which was a bit of a worry, obviously! but I had plenty of “hair” and luckily every other bit stayed put.

The final step was to spray-paint the top side of the head-tail with the same poppy-red spray paint.  Scary!! but I was super SUPER careful… On another note, this picture below gave me a laugh! the head looks hideous, the stuff of nightmares!!!  Zoe “looks” terrified but of course she wasn’t… she’s knows what’s real and what’s not.  Even on Saturday morning when I emerged from the bedroom in full costume plus makeup, all the cats just looked at me, maybe a bit quizzically! but they still knew it was me.

Oh, wait… doing the make-up was the final step, of course!  I painted white dots around her brow line, just like in my inspiration pic, and then trimmed away the mask.  Cassie suggested a strip of Hollywood tape on my nose, which helped keep the nose piece firmly in place throughout the day.  Also, with amazing luck, Priceline had a 40% off all makeup sale in the days beforehand so I got some white translucent face-powder and rather horrible bright red rouge-y stuff for the matching poppy-red circles under my eyes and lips.


The photo at the top is my first attempt to photoshop myself into a fake background!  pretty good, huh?!  this actually took me aaaaaaages… hehe, #photoshopnoob Well, I felt like Queen Rutela just HAD to appear in Zora’s Domain or it would be, well, you know, just like an unfinished and half-done effort, so I decided I just had to do it!

I didn’t get any photos of me actually at ComicCon in Perth unfortunately; we were just having way too much fun! plus my gloves made it impossible for me to operate my phone!  However about a million people asked to take my picture, which is not as weird as it sounds, it’s just the done thing at ComicCon when you dress up; everyone does it!  Also it was highly gratifying when people recognised my character, totally made my day!!!  Every now and then I would hear a call; “Queen Rutela!!!!!” which was really nice!

pinterestmail

rows of little white cottages

I’ve made another skirt and top set for Cassie  :


Patterns; the Tshirt is the Named patterns Inari tee, and the skirt is Vogue 1170.  I’ve made several of these skirts now, and quite a few are now owned by Cassie.  The only alteration I made was to lengthen it by about 5cm, and leave off the pockets.  Oh, I also made a few fitting alterations… even though I’ve made the pattern several times and I really like it; however the fit is actually not very good.  Fortunately though it’s an easy fix, taking in each of the side/back seams… my alterations to the skirt seams are pictured with my original review of the pattern here, and basically I have to make very similar alterations for Cassie

Fabrics; both from Spotlight..  I spotted this cute cotton jersey with its wonky rows of houses during Christmas shopping, and while I’d already bought her Christmas fabrics I just couldn’t resist! Cheerful, cherry red background, and those cute little white cottages with pink and teal rooves! And by the way, what’s with me and pink and teal this year??  I’ve made four things so far this year and they have all been deep blue and/or pink.  Weird!  Anyway, the print is cute and young and fun and just right for her colouring, all round just perfect … and I knew she has lots of skirts and jeans that would be perfect with it…
Then I vaguely thought maybe a navy  blue skirt would make it a nicely complete set, and she desperately needs skirts for work too … and lo and behold what should be lounging languidly about in the very next aisle but this teal blue suedette, which is a PERFECT colour match for the rooves.  BAM!  DECISION MADE.  Lugged them both to the counter without a second thought, brought them home, tossed into the washing machine.

About this time, I saw that happylat had also made a Tshirt from this very same fabric. What can I say, but great minds think alike!

I lined the waistband with some of the house fabric… not because I had run out of suedette or anything, but I just thought it was cute and I wanted to tie the two pieces together!

this is on grain, I promise!! the print is just naturally, and charmingly wonky

The suedette “looks” nice and perfectly suede-y, but it frays like billy-o.  I finished all the raw edges on the overlocker, and the lower hem with a bias cut binding cut from a scrap of purple/blue micro fibre.  tutorial for this bias finish is here

The Tshirt is made up just like the pattern, except for the neckline… I’m lazy with my Inari necklines and have pretty much finished them all off like this!  Just overlocked the raw edge, turned it under and topstitched from the right side.  Since it’s quite a wide neckline and doesn’t stretch out when you put the Tshirt on and take it off, the stitches won’t snap and this kind of finish works perfectly well.

The lower hem is finished with my twin needle.  Lisa asked about channelling with a twin needle.. all I can say is that I’ve never had channelling and what’s more I have no idea how I’ve avoided it so far either!!  Only thing I can think of: I always finish the raw edge on my overlocker, then topstitch with the twin needle, and that’s it!  Maybe the overlocked edge stabilises the fabric and that’s what stops a channel forming?  That’s the only reason I can think of anyway.  🙂
red threads on top, white in the bobbin; white overlocker thread

So! New outfit for her.  I think it makes a really cute ensemble and will get lots of wear, both together, and also separately a lot too, probably.  See, in my experience deep blue skirts are just about the most useful things a girl can have in the wardrobe… and she practically squealed when I brought out the Tshirt! so I knew that was a winner too.  Truly, she’s happy, therefore I am too  🙂

Later edit; at the time of making, she was pretty adamant that she didn’t want it lined so it would be cooler to wear in summer… however! the suedette is a little clingy! so, to give her the option, at least, I quickly ran up a simple little half-slip for her to wear underneath.  Vogue 1247 with the pieces spliced to simplify it as much as possible, navy blue, polyacetate lining fabric. .  A skinny 1cm finished width, uninterfaced waistband, a finished slit at CB and no zip, and with one small snap for closure.  Easy peasy!


Details:

Top, Inari tee by Named patterns, cotton jersey
Skirt; Vogue 1170, lengthened, suedette
Petticoat; Vogue 1247, pattern pieces spliced, navy blue polyacetate lining fabric
Shoes; Melissa


pinterestmail

… some clothes for Cassie

… and finally, I made some clothes for Cassie for her Christmas pressies too.  At first I had wanted to make some luggage or a travel set for her too; but we were hanging out in Spotlight together, you know as you do… and I discreetly sounded her out about the particular fabric that I had in mind for her.  And she basically nixed it.  Aaargh!  So I had to change tack.  Realistically, she probably needs clothes more than she needs a travel set, anyway!

Particularly she needed little separates and dresses for work.

Et voila…

1. a little spotty top.  The pattern is the cap-sleeved crop top;  Burda 02/2015; 127 and is one I’ve previously made for myself, here.  This one is sized to fit her and lengthened by about 5cm too.  The fabric was a surprise goodie from Spotlight.  I prefer polka dots to be irregular in some way, either in size or arrangement.  When I spotted (hehe) this one, well I just couldn’t resist!  A lovely soft grey crepe, with ivory spots in a satisfyingly random, non-grid pattern, and feels very luxe, just like silk.  I don’t think it is actually silk but it does feel exactly like it; lovely, slippery and whisper-soft.

Funny story; I made this nearly two months ago… and risked posting it on IG for bpsewvember “spots and stripes”… I don’t know what I was thinking … that she might be too busy at work to notice it or something? but she did! and commented “thanks, Mum!” eek!  I proceeded to just keep quiet about it and hope she wouldn’t actually come around asking for it, and luckily she didn’t think to do that!

that IG pic… with my own striped skirt

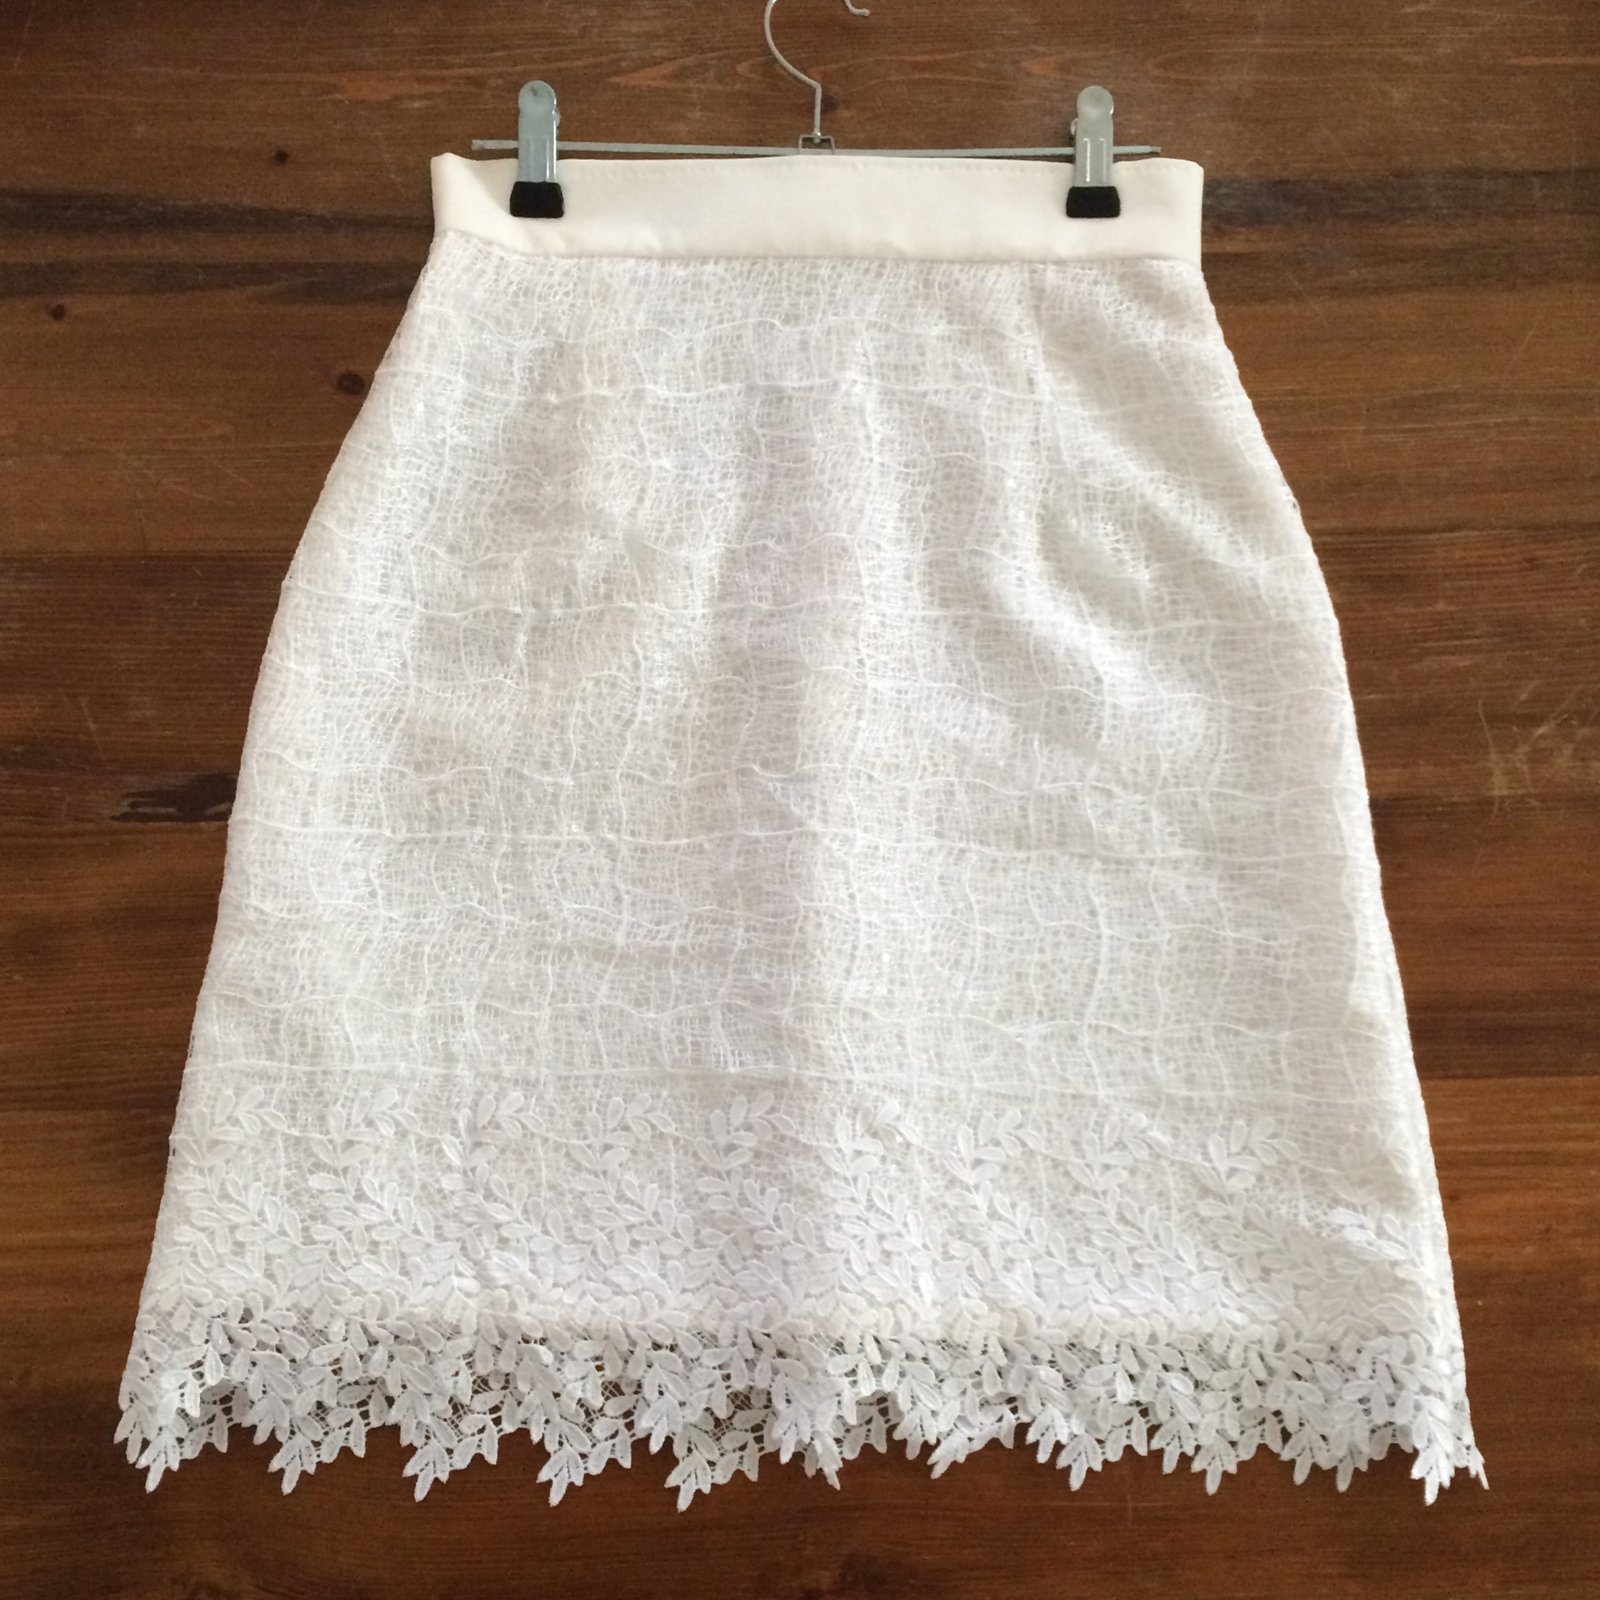
2.  a white cobwebby, lace-y skirt, with a very pretty border.  I used Vogue 1247… again! and spliced the pattern pieces together so there’s just one seamless front, and the two back pieces with one centre seam for the zip.  The white lace shell and cream suiting gabardine lining/underlining fabric are from Fabulous Fabrics.  The waistband is cut from the same cream fabric.  I like the cream peeping through from underneath the pure white lace, I think it makes a really nice, tonally subtle contrast.  The waistband looked a little bland by itself but I didn’t want machine topstitching, I thought it would look a little… I don’t know, like it would lower the tone of the skirt or something.  But it needed something.  So I did some hand-picksitching along the top edge… and really like how this looks; it adds a little bit of something, a certain handmade je ne sais quoi, and practically speaking achieves the stabilising effect of topstitching without the regimental look of machine topstitching.

note: shoes are Melissa

3.  finally a plain pink Tshirt. Looks boring, but she was over the moon with this!  This is my attempt to clone her favourite and beloved Cotton On Tshirt style and make a pattern from it for her… she has several of these and they’ve all been loved almost to rags!  I borrowed one that hadn’t been stretched out toooooo badly, and made a pattern from it; this was also a Christmas gift for her  🙂  I think it turned out pretty good , the fit and style is just about identical to the Cotton On one, so yay!  There’s nothing quite as valuable as an excellently fitting Tshirt pattern! and, bonus; they take barely an hour to whip up.

I finished the hems and sleeve edges with my twin needle, and since I was too lazy to wind up a new bobbin of pink, the double topstitching has one strand of pink, one of white.  You can only really tell if you look right up close! and I kind of like it.

And that’s it for my Christmas pressie making this year!

Oh! I almost forgot! not a Christmas present, but a few months ago I also made a Named pattern Inari tee dress for her.  This isn’t for work obviously, it’s just a casual, slop-around-at-home thing… the fabric was leftover from a hoodie that she made for herself previously, and she bought it in Tokyo during one of our holidays there.  I added a kangaroo pocket at the front because, well you know; pockets! and finished the neckline and opening edges of the pocket with a bias binding; left off the slits and finished the bottom gently curving longer at the back than at the front, mimicking the high-low hem of the original pattern.

It’s not a very exciting dress, but she likes to wear it on the weekend, or in the evening when relaxing, or to watch tv and stuff. An after-work, but pre-pyjamas thing.

Ok, now that’s really it.

Now, to make something for meeeeeeeeee!  she skips with a clear conscience to the sewing room, self-indulgent frippery in her heart… 

(btw; I apologise for the terrible quality pictures.  I just snapped most of these very quickly with my phone, on Christmas Day, as she tried everything on.  I’m hoping she will give me a little time for me to take some nicer pictures sometime… but she’s currently away and I reeeeeally wanted to get these blogged before the end of the year, to round all my “made” things off!  This post to be updated, in time!)  Update; DONE IT!!

pinterestmail

a family collaboration

mum

So Mum is up to stay with me, and she popped out the other day wearing this gorgeous, completely handmade ensemble… and it occurred to us that it was a tri-generational effort!  Mum made her skirt, Cassie made the scarf for Mum a few years ago, and I recently made the top for her.  I asked her if she minded if I took a picture to share on ye olde blog and she graciously said yes.

SO!  What have we here?!

skirtPride of place of course goes to Mum’s skirt… alabamachaninstudiobook a fully hand-embroidered and hand stitched Alabama Chanin skirt; with embroidery in the reverse appliqué method, and using the four panelled, mid length skirt pattern from the book Alabama Studio Sewing + Design by Natalie Chanin.    The cotton jersey fabrics were originally white and Mum dyed them herself in two different shades of grey and blue.  Mum traced and cut the stencil design June’s Spring from p116 in the book herself, enlarging by 300% as recommended, (also available as a pre cut stencil on the Alabama Chanin website here)  She printed the design in creamy-coloured textile paint, and hand-embroidered with a running stitch in double strand of cream Gutermann’s upholstery thread.

alabama-chanin-embroideryWhen snipping out the motifs she carefully left a very narrow border of the cream stencil round each one.
ac-embroidery

Exquisite, oui??  I adore everything about this skirt; the colours, the design, the workmanship; and it’s just slightly tempting me to get out the materials and get a-hand-stitching again.  Slightly  😉

scarf1

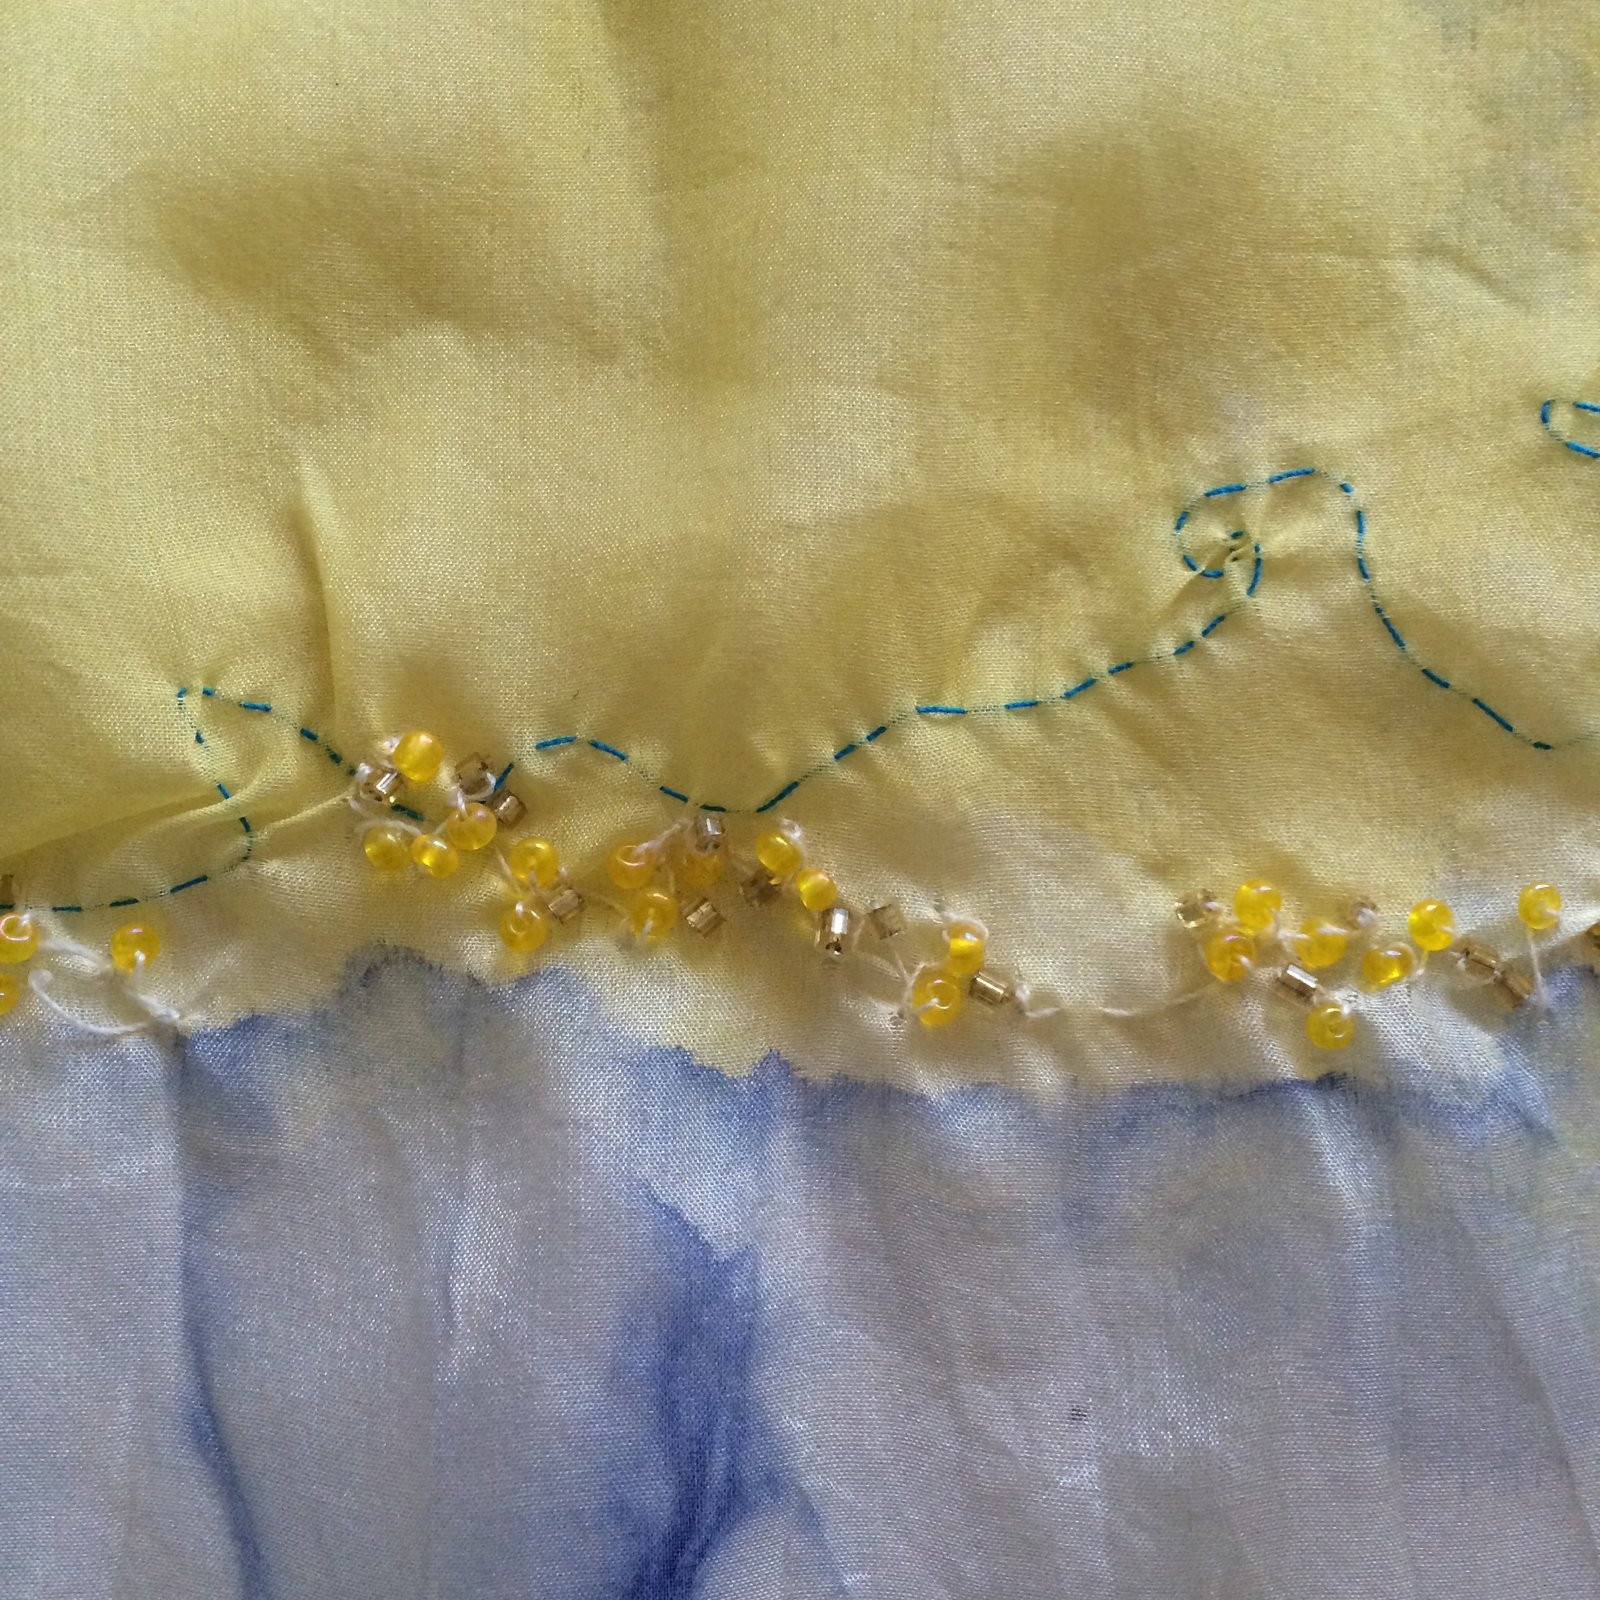
The scarf… Cassie made the this gorgeous seaside/beach-inspired silk scarf for an art project at school.  She hand-dyed and -painted white silk habotai in blue and yellow blocks and blobs, tying parts of it in the  shibori style, then stitched a wiggly row of blue stitching for the tide, and embellished with clusters of mini yellow glass and gold beads.  The hems are hand-rolled and -stitched.

beading

I can’t believe I’d almost forgotten about this beautiful piece of Cassie’s and feel so lucky and proud that I have two such talented and creative ladies in my life.

scarf2

esme-top

Mum’s top is made by me, and yes it is very plain… !  everyday-styleA month or so ago Mum mentioned how she specifically wanted an unobtrusive, very plain white top to wear with this skirt so I offered to run one up for her… I chose the Esme top pattern from Lotta Jansdotter’s book Everyday Style and a slubby plain white cotton from Fabulous Fabrics.  I measured Mum all over, secretly storing the measurements away for future use, mwahahaha… no one gets away from the handmade in my family!!    and drew the pattern so as to custom fit it or Mum’s measurements.  Instead of the neckline facings I finished the neckline with a bias cut strip, because I think it’s a much nicer and neater finish for a neckline edge.  Mum wants to know how to do this herself so I’ve promised to write a tutorial sometime.
neckline

Anyway.  She looks so chic and beautiful here, and it was so fantastic when we realised she was spontaneously wearing a collection of handmade family pieces… Such a fabulous and sentimental thing for the three of us.  Thank you so much for letting me share, Mum!

pinterestmail

blue roses *

v1247
* … Tennessee Williams…

Hello! I’ve made a new skirt. Hehe, hot on the heels of writing that I was a wee smidgeon tired of making Vogue 1247 skirts; what should I do? but immediately vogue1247make another one!!  Doh!!  Clearly there’s something terribly wrong with me… #madvogue1247addict

But wait, there is a perfectly good reason…. I’m doing One Week One Pattern again, and of course chose to use this pattern, well I’ve got so many of them!! lotsa skirts and I was kinda hoping that we would get at least ONE day warmish enough for me to wear the one top I have from it… but it’s been so freaking cold; officially the coldest and wettest winter and early spring we’ve have in like thirty years or something like that!  I’m getting to the end of the week, no motivation whatsoever to wear that thin little summery top, and only have 6 pocketed V1247 skirts.  Which are what I consider to be the only true V1247’s, all my ones without the pockets are kinda pretenders to that crown, and even though I love them all too I ruthlessly omitted them all from the line-up.  So what can a girl do? but get cracking and make for herself another true V1247, obviously, so I have a nice 7 to round the week off.  Yeah, I know; a normal person would have worn one of her existing ones, twice; but see I already had the fabric earmarked for the pattern anyway; and just decided go for it; whip it up, make it happen.

side

Fabric; pale teal denim, just very slightly stretchy, with a reverse print of smudgy roses.  This was a remnant given to me by my friend LW, who was cleaning out her stash.  Something funny/miraculous; the remnant was kinda oddly and awkwardly shaped, yet it was absolutely perfect for the pattern pieces! like it was cut just perfectly to fit them all on with the smallest of scraps leftover.  I freakingLOVE when this happens! it’s like the planets aligned for a pattern/fabric match made in heaven  🙂  Even if I was feeling a bit meh about V1247 to start with, when I laid out the pattern pieces and saw how perfect it was it totally galvanised me into excited pattern-love all over again.  I managed to cut my skirt about 10cm longer than the pattern, and I cut the pocket linings and waistband facing from a small piece of nani Iro quilting cotton, from the little bundle of pieces that Mum gave to me for my birthday, for my rag-doll Sally.  I used it for her tote bag.

waistband-facing

obligatory “waitress” pocket pic

pocketsaaaaaand, my week of exclusively wearing Vogue 1247 skirts, in a nutshell…!

owop16v1247

Back very soon, with something that is NOT Vogue 1247… I promise!!

Details:

Skirt; Vogue 1247, lengthened by about 10cm, teal denim
Top; Nettie, by closet case patterns with my own collar variation, ivory knit; details here
Cardigan; knitted by me, Audrey in Unst, wool bought in Paris as a souvenir, details here
Tights, my own pattern, black stretch, details here and my tutorial for making your own custom fit tights pattern is here
Socks (not seen); hand knit by me, details here
Boots; made by me, details here

back

pinterestmail

bananananananana BATMAN!!

batman

Oh hey-a!  I’ve been making some more stuff for Le Daughter…  recently I went around to her place on an important mission: Wardrobe Assessment and Consultation following the Winter Blahs.  She was feeling meh about all her clothes, so we went through EVERYTHING and worked out new combinations, identified tired stuff, rediscovered forgotten stuff, and dreamed up new stuff to fill some holes.  It was actually great fun! we did the same thing with my wardrobe too; so useful.  I reckon we could stand to do this every six months or so.  Keeps things fresh, and you know how you tend to wear the same things over and over and over again and sometimes don’t seen yourself how tired and ratty things are getting?  Just grab yourself a trusted friend/daughter/mum that doesn’t mind giving you the hard truth and have at it.  It’s SO worth it!


mannish style   vogue1247

Anyway, so we made a little list. Cassie wanted some more options to wear to work; she works in an office but in a very creative field, so along with the more professional stuff she sometimes likes to wear pieces that are fun, humorous and “arty” yet still city and office appropriate.  She had a small piece of Batman print fabric leftover from when she made some pj shorts for her brothers, and I still had some yellow corduroy leftover from my own yellow corduroy skirt… the yellow is a perfect match for the small blotches of yellow in the Batman print, and I just managed to squeeze the pieces out with only one bit of piecing inside the pockets (see composite picture below).  The Batman fabric… now it IS fun, but let’s face it; professionally iffy…  To twee, to not to twee, that is the question.  Then I thought of the black leather sleeves and we both went Oh yeah!!  I think they “adult” the print up a bit, make it kinda cool and ok.  Also; I like how from a distance the Batman print could just pass as a nice, blue/black/white nondescript print, and it’s only when you get up close you notice that it’s actually a cartoon.  The black pleather is leftover from my shoemaking adventures.  All fabrics are originally from Spotlight.

black pleather sleevesunderlining
Patterns: the skirt is Vogue 1247.  I do really love this pattern but to be honest, I’m getting a wee bit tired of making it?!  I’ve just made SO MANY, and even though I love all of them to bits I think I just need a little break…!!  Anyway, this was requested, and those pockets were the drawcard. I used some deeper gold cotton to bind all the seams; this is a leftover from Cassie’s Lucy Hartfilia costume… so in actual fact, her entire ensemble is a glorious mishmash of completely unrelated leftovers.  Amazing how things can come together, no?!

yellow skirt

Top is the epaulette cut & sewn top from “she has a mannish style”, by Yuko Takada.  I’ve only just made this pattern up for myself, here; and coincidentally also with black pleather sleeves!

I took this picture to send to her when I’d finished the outfit.  She was so pleased!
batman3

pinterestmail
Switch to mobile version
↓