Tag Archives: Skirt

Christmas pressies; a sewing marathon

Tim and Kelly…

As usual, I made Christmas presents for my family… I started late October, so I was giving myself plenty of time, or so you’d think!  I’m a fairly efficient seamster, and I still only just finished a few days before Christmas!  it’s been a little intense and stressful, actually; every year I underestimate how busy the lead-up to Christmas is and how I just don’t get as much time to devote to sewing presents as I thought.  Plus, I’m a lot more finicky and particular – maybe excessively so?! about my sewing now too.  I think this is a good thing, but I have to accept that I’m taking longer to make things, and should start sooner!  Or maybe make less?

Anyway, it got done!  *phew

Listing everyting in the order I made it…

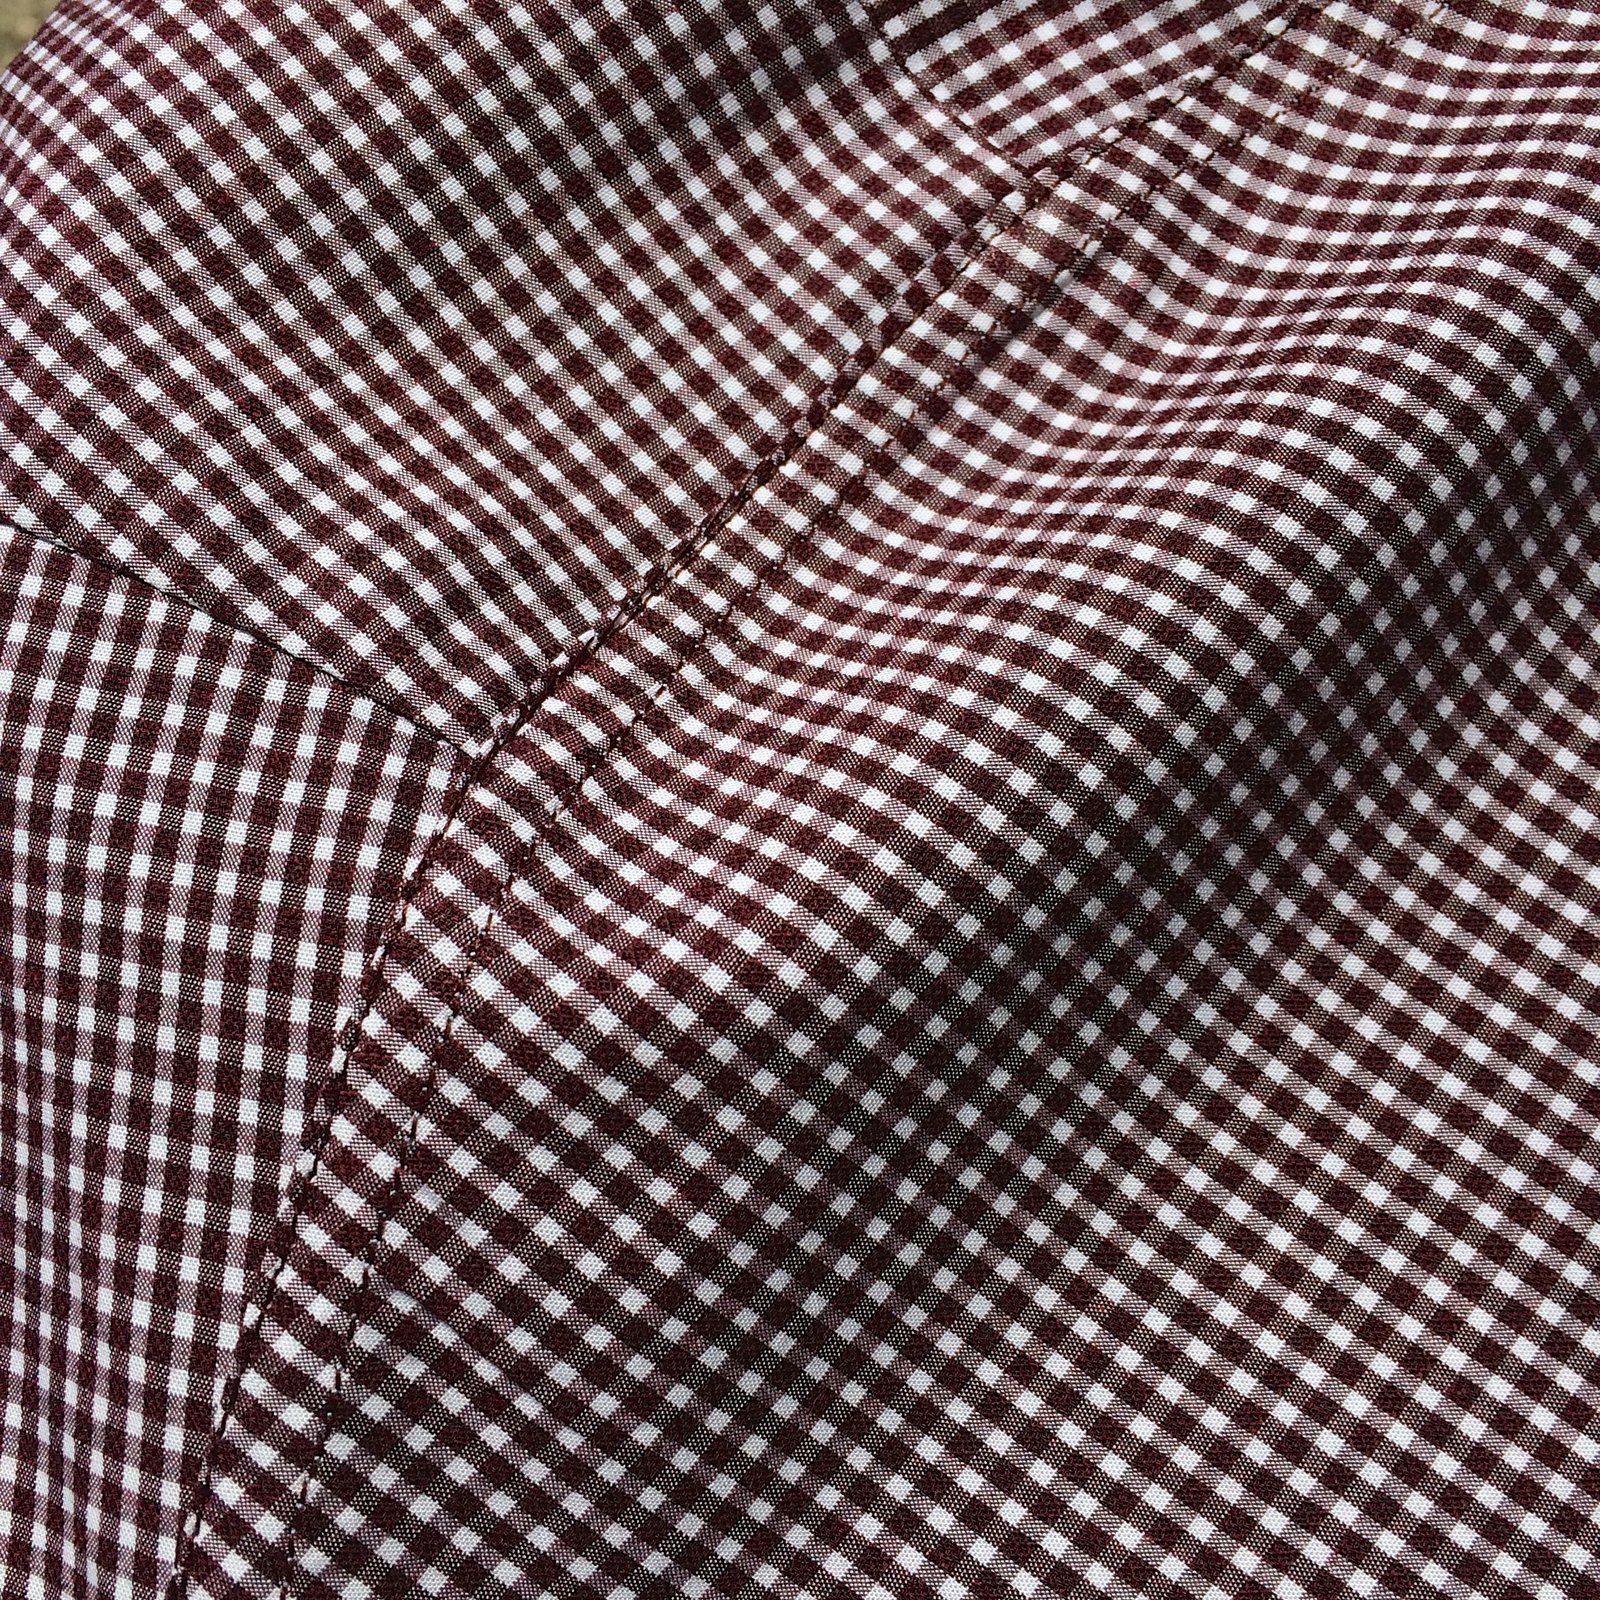
First thing to get made was a shirt for Tim… He has a job now where he has to look smart, so I decided to make a business shirt… I bought the really lovely deep maroon, mini-scale gingham cotton shirting from Tessuti’s in Melbourne, and used Burda 6874, my kinda go-to shirt pattern since I semi-retired Burda 7767.  d’you know I made that pattern 37 times… can you believe it?!  that tissue paper was wearing pretty thin in some places and in some other places I’d trimmed off the cutting lines altogether, woopsies!!

what sleeve placket…? of course I busted a gut matching those teeny little checks everywhere, took me two days before I could see straight again…

I made the buttondown version… see how the collar up there buttons down onto the shirt?  This is what qualifies it as a buttondown, folks!  I don’t wanna get all grumpy and pedantic here, being Christmas and all, but the number of times I’m reading about someone’s very lovely, but NOT A BUTTONDOWN shirt erroneously labeled as such and have to hold myself back, because we all hate a little lecture, right? I’m gonna stop right now otherwise I’m going to become that painful lecture-r.
this is the inside of the shirt… I’m pretty proud of my flat-felled seams… and I use the burrito method for the yoke so that’s all nicely enclosed too

All seams are flat-felled, using my own tutorials here and also this one here… yes you can flat-fell every single seam in a shirt! and it’s so much better and nicer… although I’m starting to realise that this is probably why what used to take me maybe two days to make a shirt…  now takes me double that time at the least! but anyway.  My guys appreciate the tailoring, so I’m happy that they’re happy.

Sam’s shirt…

I’m just SUPER happy with how my buttondown collars are looking nowadays!  It’s pretty hard to get that sitting just right and perfectly symmetrical; and I think after all the shirts I’ve made I’ve finally got it down…

Next up; I made a matching top for Kelly.  I’ve previously made matching tops for the two of them and noticed that they wear them together a lot! yes, it’s super cute…  I did a little bit of subtle inquiring as to whether matching clothes were still something they liked before I went there and got a positive response.  Alright then!

I had to be far less subtle about fitting it though!  I’d previously taken Kelly’s measurements for when I made a Kelly anorak for her… it’s impossible to do this without it being obvious! and made a block for her, using my Pattern Magic book to help me.  Yes, this is a pretty involved thing to do, requiring protractors and algebra and such-like! but honestly I’ve always found it to be a hugely worthwhile exercise when drafting new patterns.  Then I mocked up a quick plain bodice, and got her to try it on, and made the necessary changes.  In Kelly’s case, the block fitted but the armhole/bust dart had to modified considerably… the famous full-bust adjustment.  I regret now that I didn’t take any pictures of the mock-up bodice and the changes I made because it was a new learning curve for me that I wish I’d documented!

For Kelly’s top, I’d chosen the asymmetrical cowl top from Pattern Magic 2; the shape of the cowl is dictated by the shape of the facing.  It’s always a bit of a challenge to draft your own patterns, but well I love a challenge! and I knew the shape of this top would be super flattering for Kelly and suit her beautifully…  I cut the pieces on the bias and inserted a maroon invisible zip in the left side seam, so it zips down undone… however Kelly says she can squeeze into it without having to undo the zip which is cool.  I think the bias-cut is what gives it that little bit of stretch.

Next up! a business shirt for Sam! He has also started a new job which requires business dress everyday… I’d noticed a lot of young men wearing gingham shirts while we were in Melbourne… a good sign that gingham is super on-trend! so hot right now! which is basically why I bought gingham for both my boys in the first place.  It’s a bugger to pattern match though, even worse than stripes! gnnnnnnn  but oh well…

Again I used Burda 6874, flat felled seams throughout, same links as for Tim’s above… aaaaand so not much else to add.  Both Sam and Tim have been working out some lately, so I think I’m going to have to make some small adjustments to their shirts in the future.

Next up!  I made some little things for Cassie, she needs more work clothes so this was another practical gift really.  I made three things for her…. I just want to say here; it might seem unfair that I made one top plus TWO skirts for her, when compared to just one shirt for each of the boys, but it really does even out because the TIME I spent making these three little separates is actually the same as the time I spent on EACH of the boys’  shirts.  I know, crazy right?!  it’s all that tailoring bizzo that takes so much time…

Likewise, Kelly’s top needing a block made, plus the fitting muslin, plus drafting a pattern, also took about the same amount of time as making three tried and true things for Cassie!

Anyway; Cassie had already chosen this lovely crackle-y hand-painted cotton from the Fabric store in Melbourne while we were there, and I secretly bought the mustard gingham printed silk from Tessuti’s while she was looking elsewhere.  So the little top was a surprise!  The crackle print really is gorgeous, it is hand painted in Zambia and has that handmade naturalness to it…  LOVE this but pattern matching those hand-painted stripes was never going to happen!  of course they are all different widths and thicknesses which just adds to the charm of course.  I just shut down my inner-obsessive for a little while and did my best… at least I got the centre back seam to match!

The other little skirt is a cityscape print, maybe New York City by the looks of that Lady Liberty in there!  We’d seen the fabric in the upholstery section of Spotlight, so she’d known this one was coming too…

for both skirts I bound the lower hem seams using some leftover purple pin-striped linen, the leftovers from when I made this shirt for Craig a few Christmas’s ago.

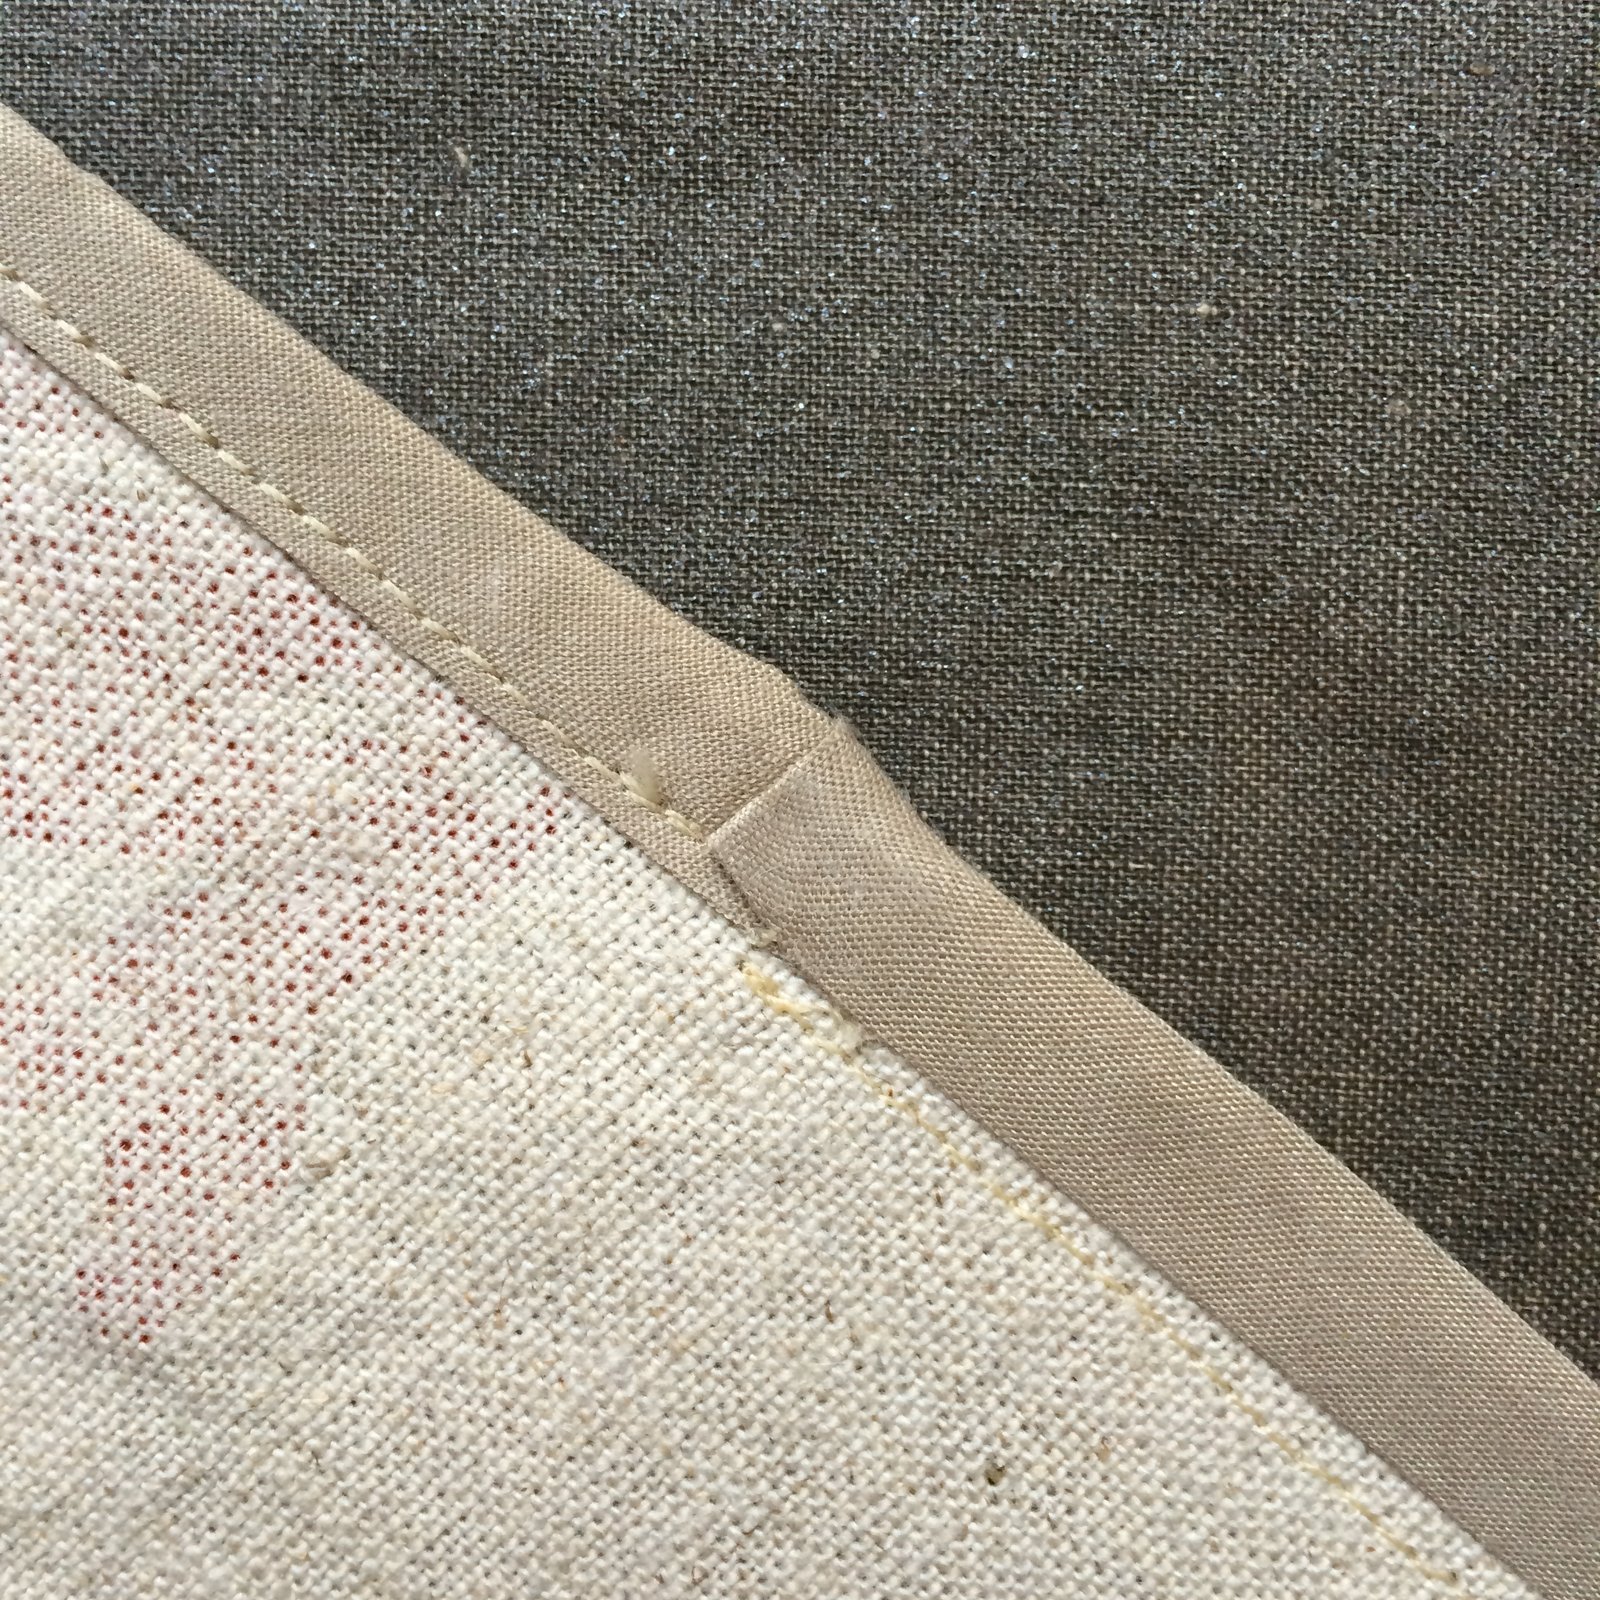
I have also taken to binding the bottom edge of the zip and stitching it down to the seam allowances… often the bottom edge of a zip has a slightly scratchy bit which can be extreeeeeemely irritating when you’re wearing it… so I’ve taken to doing this whenever I made an unlined skirt with an invisible zip.  Such a small thing that greatly increases the comfort factor when wearing the skirt!!!


Oh! patterns!  I used the Inari tee pattern for the little top and Vogue 8363 for both of the skirts, and since I’ve made both of these patterns for her several times already they were super quick and easy to run up. For both skirts I added belt loops so she can cinch in the waistline a bit; in self-fabric for the Zambia striped one, and in black denim for the cityscape one.

Next up! a short-sleeved white shirt for Craig! also using Burda 6874 and a white cotton broadcloth from Spotlight, this was intended originally to be the same as this little shirt that I made for him a few years ago and which happens to be his most worn shirt … then just before making this I’d whipped up my little yellow/black&white lingerie set and had the gingham ribbon sitting out, and suddenly had this brainwave as to how I could use a bit more of it! I stitched the gingham ribbon carefully down the button line of the button placket, and used a little bit to trim the pocket.

To match this gingham detail, I lined both the collar and collar stand with some cotton gingham that I’ve had for aaaaages, and used black buttons to finish the shirt.  Note; IT’S A BUTTONDOWN SHIRT!  Also, of course it’s nowhere near a clone of the other white shirt any more but I still think he’ll wear it a lot…

Next up! a pullover/sweatshirt for Craig!  truth now… I was running out of time, and steam! and this fair near killed me!

Craig with a much much smaller Sam and Tim…

So, once upon a time, nearly twenty years ago, we went on a summertime camping trip down south and it was blooming’ freezing, our tent nearly blew away, we got rained on, hailed on and fair near froze to death!  In pure survival mode, Craig drove to the nearest town bought a red sweatshirt that he has since LOVED and worn about a million times, almost to bits since it’s getting reeeeeeally worn and threadbare now.  At some point he asked me to make a clone of the famous sweatshirt…

Of course it’s easy to clone a sweatshirt, but the challenge is in finding suitable fabric! I found this blue marled French terry in Spotlight, and while the colour is a teeny bit blah and the texture is not as nice as his original sweatshirt, it’s going to make a reasonable stop-gap until winter rolls around, the winter fabrics come into the shops, and hopefully I can find something nicer.  I busted a gut finishing off all the seam allowances off beautifully inside though… imitating the exceptionally beautiful finishes that were in the original.  For the pockets and bias binding I used some of the leftover navy/white gingham that I used for Sam’s shirt, above.  The pockets are French-seamed and the rest of the seams have an interesting amalgamation of HongKong bound AND flat-felled seams… not sure if my method is the same as in the original but I worked out a way to do it and took a few pictures along the way.

First, stitch the seams, then figure out which way you want the seams to be stitched down and apply bias binding to the topside of the seam allowance… ie. to stitch along the same stitching as previously you will be pinning/stitching along the UNDERNEATH,

OR alternatively you can save yourself a step here and stitch the bias binding on at the same time as you’re stitching the seam; your choice.
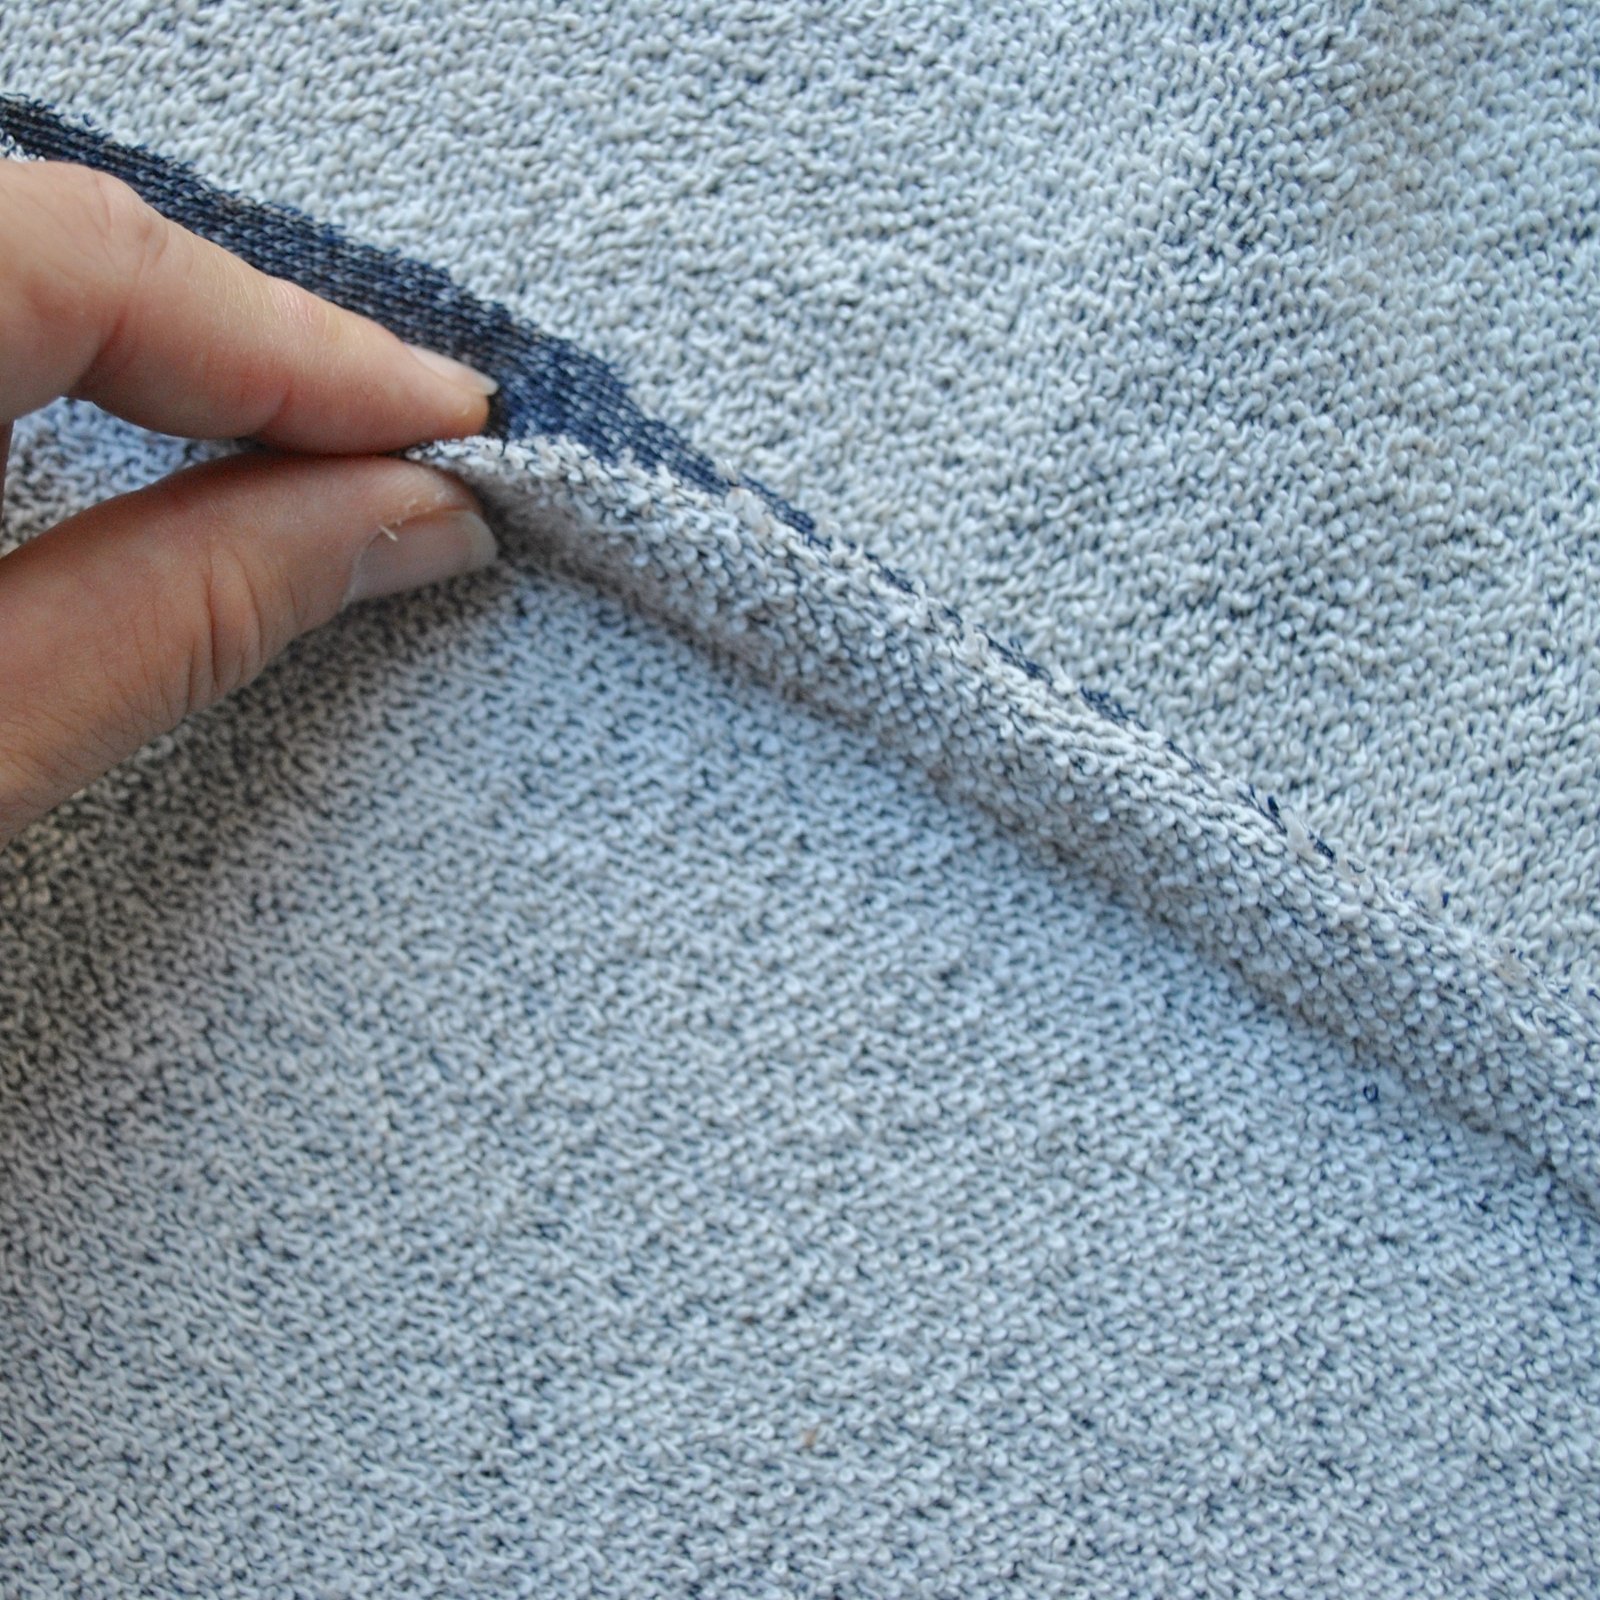
Press the garment seam allowances open, then press them to the side where they will be felled, with the bias binding on top.  From the other, right side, of the garment, pin through all layers.

With the right side facing up, topstitch the garment to the seam allowances plus binding, through all layers, just to the side of the garment seam…

view on the inside…

Keeping the bias binding free and clean, trim and grade the garment seam allowances…

Turn under and press the raw edge of the bias binding down so as to encase the seam allowances of the garment, pin in place.

With the bias binding facing up, and following the previous stitching as a stitching guide, topstitch the pressed edge of the bias binding down.  Since you’re using the previous stitching as a guide, the width of your double-topstitching will be nice and even from the outside.

Voila!  Such a nice neat finish!  at first I thought it might be overkill, but it is rather classy, if I say so myself; looks pretty good both inside and outside.  I will definitely be using this one again!

As seen above, I also applied bias binding all around the zip tape and stitched it down with double top-stitching the same way to match… this really does make a nice, neatly finished look when the zip is down.  Which it will be, most of the time.

And, last but not least!  I also made a few more little hardback notebooks… just fun little things, however I do know that the recipients do actually use notebooks regularly so I know they will be useful too!  I used mostly a mixture of leftover and old papers; from old scrapbooks, some with the children’s scribbles still on them!  I’m sentimental that way  😉 , various papers, musical paper, some pale coloured wrapping paper, writing stationery; just lots of different stuff.

The notebooks are covered variously with linen, velvet, printed cotton.  The one I made for Mum is covered with raw silk hessian.

So! Yes, it was quite a lot of stuff to make and I was working on it all like billy-o from touching down after Melbourne right up until I finished right on the wire only two days before Christmas…  I’ve been thinking about this… why am I taking longer to achieve less nowadays?  and I think it’s because I used to be happy and content with a slightly more unfinished approach… slapdash is maybe too strong a word? whereas now I am far more, possibly excessively? finicky and particular about perfect finishes on the insides.  I think I’m ok with this…  I feel like well-finished clothing is what I’m into right now.

However, to avoid the Christmas stress maybe I need to start making Christmas presents a LOT sooner!  Each year I start way ahead of time and think by doing so will relieve the stress, each year I get super stressed out and have at least one “I CANNOT DO THIIIIIIS!!” moment.  But I did.  And now for a break from deadlines!!

SaveSave

SaveSave

SaveSaveSaveSaveSaveSaveSaveSaveSaveSave

SaveSave

SaveSaveSaveSaveSaveSave

pinterestmail

kangaroo paws… and making a skirt with a side pocket opening; a tutorial

I made a new skirt using a pretty special piece of fabric… there’s a little story behind it.  It’s a handprinted organic cotton/hemp from Ink & Spindle with a really lovely kangaroo paw motif; designed by Lara Cameron and handprinted in Melbourne… mmmm everything in their range is SO yummy, it was reeeeeally hard to choose just one print…!  I bought a piece and sent half to my friend Lisa of Lisa’s Carolina… she had once shared a piece of lovely Dusk blue Alabama Chanin cotton jersey with me and we made something in the same fabric… and I thought it would be fun for us to do the same with some Australian stuff.  And it doesn’t get much more Australian than this!

Kangaroo paws are the state flower of Western Australian, so an apt pressie for an international sewing friend!  And I thought the colours so pretty and earthy; rich tomato-ey/paprika and warm dusky pink on a natural unbleached background… actually I’ve just checked the site and it’s called “desert red on sand”  Perfect!!  I cannot WAIT to see what Lisa makes with her piece!  🙂

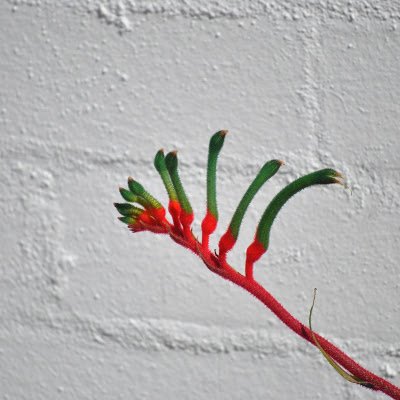
Anigozanthos manglesii… picture taken by me of a particularly nice specimen in our neighbour’s garden.  Kangaroo paws come in many different colours now, however this red/green is our state floral emblem

I got to mulling over what to make with my bit…  a skirt seemed like a good choice for this full-bodied canvas-sy stuff.  I wanted no seams on the front and the back, because I wanted to make the most of the random print, and hunted out an old favourite Vogue 8363, a pattern I’ve used loads of times before.  But I didn’t even want a side zip closure either… then I got the idea in my head to make it to have pockets that perform double duty as the closure of the skirt.  Meaning… NO ZIPS!  I’ve made a couple of skirts like this before and knew this pattern could happily be adapted pretty easily to have this feature…  I’ve written a little tute below in this post on how I did it  🙂

Because this is going to be a summer-y skirt, I left it unlined and enclosed all the raw edges with HongKong binding, using a pale coffee cotton voile from Spotlight.  I also used this for the pocket lining and the waistband lining…

This skirt has taken me the LOOOOOOONGEST time to write a blog post for it… I’ve even worn it a few times…  which is a kinda fail for me since I have this thing that I shouldn’t wear something until I’ve written a blog post about it.  Naughty!  Partly because of my plan for the pocket closure tute, about which I’ve been terribly procrastinate-y.  Well I’ve finally done it now, at last.  Please do let me know if you find this useful and/or helpful… and if you use it of course!


How to adapt a pattern to have a side-pocket opening… this is a good feature since it negates the need for a zip AND you get the bonus of pockets, naturally!

skirt map

The pattern I used here comes with a slant-edged pocket pieces and either a CB zip or button front closure so it’s pretty easy to adapt the waistband and method of construction to accommodate the pocket closure.   However, even if your skirt pattern doesn’t come with pocket pieces you can still draw your own pocket pieces and adapt any skirt pattern to accommodate them… as long as you remember this VERY IMPORTANT NOTE:  your skirt pattern MUST be roomy enough in the hips so that you can comfortably shove your hands inside without making the skirt too tight by doing so  i.e.. NOT a figure-hugging body-con pencil skirt.  Though you can of course start with a figure hugging pencil skirt pattern; keep the waistline and just grade the side seams out at the hips to give you the pocket room you need… allow around 12cm at least of extra ease at the hips from a pencil skirt starting point.

My pictures demonstrate a skirt opening at the LEFT hip… for a right hip opening just flip sides!

The pocket (below, at right) has the same top and side edge as your skirt front piece, and the pocket bag (at left) has the slanting opening edge.  This slanting edge should be cut identically on the each of the topside edges of the skirt front itself also… If you’re drafting your own just ensure it has the width to accommodate your hands.  Also, the waistband is going to overlap at the top of the pocket… so cut the waistband piece long enough to go around your waist, plus at least the width of the pocket bag top edge.

For the L pocket only: mark with a pin a point A on both pocket and pocket bag pieces as indicated here, roughly 12cm (5″) from the top edge.

Finish the raw edge above this point.  I have finished mine with a bound HongKong finish, however a skinny hem or overlocking is perfectly fine.

Stitch pocket bags to each side of the skirt front along those slanting opening edges.

Press seam allowance open, grade seam allowances, re-press all seam allowances towards pocket bag, under stitch, press pocket bag under.  At this point, pocket bag and skirt can be basted together along the top edge.

Pin under-pocket piece to pocket bag piece along unfinished curve edge.  Stitch from point A to the side edge.  Note: the R pocket is pinned in the same way, and stitched along the entire pocket edge to the top edge.

Finish seam allowances. R pocket edge can be finished along the entire seam, L pocket must be left open above point A

For a HongKong finish, leave a little tail which can be turned under and enclosed within the binding as shown in the following pictures…

Stitch a bar tack at point A to reinforce and strengthen the pocket opening,

Align the skirt front/pocket bag over the under-pocket, keeping the finished edges together. … and baste all three pieces together along the side seam below the slanted pocket opening. This is the skirt front, finished, at this point join skirt fronts and backs together along the side seams.  Above the slanted pocket opening, the skirt back is stitched only to the under pocket piece for both R and L sides.

Attach waistband to the top of skirt, commencing from the skirt front/L pocket bag edge, encircling the waist and extending past the L side seam taking in the top of the LH pocket piece also.

Hand slipstitch the waistband facing inside in the normal way, and stitch press studs and/or a wide hook and eye on the waistband overlap…

Ta da!!


Details:

Skirt; modified Vogue 8363, upholstery fabric; worn with:

(at top)

Drape-y top; the loose draped top from “drape drape”, by Hisako Sato, details here
Hat: Vogue 8844, ivory corduroy, details and my review of this pattern here


(below)

Tee; modified Nettie, Closet Case patterns, details here
Cardigan; my own design modifications of Nettie, Closet Case patterns, details here
Raincoat; Kelly anorak, Closet Case patterns, details here
Shoes; made by me and my own design, details here

the skirt is a little longer here… This was its first length and is how I wore it for its maiden voyage… and then I took one look at my pictures and thought, hmmmmm.   I don’t know if it’s just on me, but I find knee length skirts are an instant frumpify-er… I like them to be EITHER a few inches above my knee OR to be full midi length, halfway down my calves, every time I’ve gone for a middling length I’ve regretted it.  Like, it’s gotta be one extreme or the other… but NEVER in between!  I think it’s just right now!

SaveSaveSaveSave

SaveSave

SaveSave

SaveSaveSaveSaveSaveSave

SaveSave

SaveSaveSaveSaveSaveSaveSaveSave

SaveSave

SaveSave

SaveSave

SaveSave

SaveSaveSaveSaveSaveSave

SaveSave

SaveSave

pinterestmail

a tartan mini, and a blue hoodie

o hey!  Spring is definitely springing around here at last! but we did recently have one last gasp-y blast of winter in the last week which inspired me to make just one last little winter-y thing… I haven’t actually worn this new mini yet as per se, apart from taking these pictures! but well, you know, it’s nice to have a brand new thing waiting in the wings for when the next season doth roll back in.

Pattern; ye old fave, Vogue 1247, modified so that nearly all the interesting bits and style lines are removed and leaving it with a bare bones one piece front and two backs… Boooooring!  I know, sorry, but honestly, even without the famous waitress pockets, which I LOVE, the core shape of this skirt is what makes it a great basic pattern… for me, it is the perfect winter-mini silhouette.  Also, the fabric is quite thick, so pockets would have made it all too bulky really  🙂

 extreme pattern matching is my kinda sport…

Also, the usual lengthening by 12cm and full lining.

Fabric; I bought this lovely, pure woollen tartan in Japan of all places… I know! not really a place you associate with tartan, I mean, it really seems like the kind of thing you’d wait for a trip to Scotland to buy.  But I saw it, in a divine little shop called Check & Stripe, instantly fell in love and thought a little mini skirt would be nice.  It was a little price-y, so I only bought 80cm, which is just enough length so I could cut the waistband and then the mini with a substantial hem, just in case I should ever want to add some length back one day.

At first I thought I’d make it unlined and make a separate slip, for versatility in case I should want to wear it without tights… but common sense prevailed, obviously it’s a winter skirt and I would always be wearing it with tights…  so even though I went to the effort of HongKong seaming everything inside I still put in the lining after all.  It is a rather nice lining; a thin, black silk charmeuse remnant I discovered in my stash, during a recent sort through… but I have absolutely zero memory where it came from, though I have a feeling it was a cast-off from Mum.

I used all my own skirt-lining tips, here.

the inside is quite fuzzy and a little felty…

I made the bias-cut binding for myHongKong seams using an olive green cotton poplin from Spotlight, and busted a gut getting all the plaids and everything lined up and matching to the nth degree… it’s funny, once upon a time I mightn’t have been too excessively obsessive about getting the most perfectest of perfect pattern matching that the naked human eye can detect, oh well OK.  I have always been a bit like that! But I do think the advent of blogging and the thought that EVERYONE CAN SEEEEE!!  has ramped it up some, so that even a couple of mm has me hauling out the seam ripper and redoing seams.  THE PRESSURE!!!


Details:

Skirt; modified Vogue 1247, wool tartan and fully lined
Top; drape-y top a, from drape drape by Hisako Sato, linen knit, details here
Tights; voodoo
Boots; Roberto del Carlo, from Zomp shoes

OH! and I almost forgot about this dark blue hoodie… I actually made it months ago for our holiday to Alaska/Canada, but when packing I decided two fleece hoodies was overkill and I ended up only taking the hot pink one and leaving this one behind.  I shoved it to the back of a drawer and immediately forgot all about it.  Well, it’s pretty boring, so no wonder…  Recently I found it again and was like O hey! this thing!!  I’d already given the hot pink one to Cassie…well, she looks about a thousand times better in it! and so I’ll keep this one for the unglamorous things in my life like car- and dog-washing, gardening, camping etc…

Just like the hot pink one; this is made using Burda 8042, all materials from Spotlight.  Differences, I made the pockets as patch pockets, and the only matching separating zip I could find was a bit short, so it only zips up about two thirds of the way up.  I really like this partially-zipped look, so that’s ok with me.

The patch pockets; I overlocked the raw edges and then simply top-stitched them on, so there’s less bulk than the welt pockets I put in the pink one.

Here I’m wearing it on its very first outing, which also happens to be Clara’s very first outing to the beach!  She was so cute; growling and pouncing upon the odd patch of old smelly seaweed, being all amazed by the surf, and very excited at the seagulls.  She bravely got a little wet in the shallows and generally bounced about joyfully in her usual puppy way.  I’ve got high hopes that she is going to love beach walking just as much as I do!  Yay!!


Details:

Hoodie; Burda 8042, blue fleece
Tshirt; modified Nettie, Closet Case patterns, white cotton mix stretch, details here
Jeans;  Closet Case patterns Ginger jeans, dark blue denim, details here
Socks; knitted by me, details here
Shoes; Francesco Morichetti, from Zomp shoes

location; Eagle Bay, Western Australia

Now that’s all very well, we all need basics blah blah blah, but I got my latest Vogue magazine the other day, which always gets me revved up to MAKETH YE NOT BORING STUFF BUT INTERESTING STUFF… and I’m like, well, how does Vogue magazine make boring things not-boring?

And of course… dramatic pose!  Hoodie equals kinda sporty, so; random piece of sporting equipment!  Socks with heels!!  now that’s more like it… ha!

what would Vogue do??  #wwvd

Wearing it here with my “she wears the pants” trousers, hand-knitted sockies and Pedro Miralles heels… what’s that? am I actually gonna leave the house like this??  I’ll never tell… 😉

SaveSaveSaveSaveSaveSaveSaveSaveSaveSave

SaveSave

SaveSave

SaveSaveSaveSave

SaveSave

SaveSaveSaveSave

SaveSave

SaveSave

SaveSave

pinterestmail

suits me to a tee

So, a new year, a new Refashioners challengelast year we did jeans, this time the thing to be updated is A SUIT.

Most disappointingly, I could find no one in my family or circle of friends to donate a suit to the cause. 😉  Well of course not…  let’s see; these things are a) expensive and b) made to last a lifetime.  It takes a lot for a man to give up his suit. And let’s not forget to mention the biggie; c) suits are usually beautifully tailored things and the very thought of giving one to somebody who is just going to take the scissors to it is a pretty big ask.  I know I wouldn’t give one up either!!

before…

So I went along to the the opshop and bought one.  It was $22.  Even then, I still felt pretty bad about chopping it up, and found myself mentally apologising to the unknown tailor the whole time.  My suit is a Sax Altman: Sax Altman has been making high quality, traditionally tailored suits in Australia using fine Australian wool since 1977.

Just so you know, this is a pretty good innings by Australian standards… It’s actually pretty difficult to find suits in opshops here, men hang onto them forever.  Lots of orphaned sports jackets and some suit pants, but not many matching sets.  I initially honed in on this suit just because it wasn’t black! it is a deep charcoal-y/chocolate brown with subtle blue and grey pinstripes.

the fabric is pretty beautiful…

Once I got it home and had got a good look at it I could appreciate its quality; it’s beautifully made and let me tell you it was pretty darn hard to make that first snip… I’d decided already that I would make something that would honour the original tailoring, and keep as much of the important bits as I could, this one had it all; the interlined padded fronts with hand-padstitching, horsehair interlining, bias cut strips of organza everywhere on the inside to stabilise various areas, taped fronts, and tonnes of inner tape everywhere; sometimes bias cut organza, sometimes a sturdy cotton, sometimes strips cut from the selvedge… these were variously used as stay tape in different spots, hidden inside.  It was all pretty heavily and exquisitely engineered and one thing’s for sure; I could never produce something like this myself!!

What I did: I wanted for the jacket to be quite close-fitted to my shape, so I opened up the lining at the lower back hem and took in the suit jacket through ALL the seams here… the centre back seam, the back princess seams and the side seams, at the same time, I took in the jacket lining through the seams inside too..  I didn’t touch the front darted seams because they ran into the front pockets and altering them would have ruined the integrity of the pockets.  Oh, I’m pretty pleased that I managed to keep EVERY SINGLE POCKET of the original suit… I really didn’t want to sacrifice any, I thought if I absolutely had to I would…  but I managed to keep them all.  THE SANCTITY OF THE ALMIGHTY POCKET MUST BE UPHELD!!!  (kidding)

I removed the sleeves and trimmed several inches off the shoulders, and cut off the lower half of the legs to use for new kimono sleeves, binding the lower armhole with bias-cut wool harvested from a sleeve.

The leg hemline had a really nicely turned up cuff, which I liked, and kept for the new sleeve hem.  I love the new bracelet-length sleeves! if I did have to nit-pick, in an ideal world I think I would have preferred a wider sleeve but you know refashioning, sometimes you just gotta make it work with what you have!

I turned in and stitched a new front opening line for the jacket, making it a long, diagonal straight front coming to a point with a single button closure (above).  I cut so as to remove the lower two buttonholes, keeping the original upper button hole and repositioning the upper button over a bit to give the front more of a “wrapped” kimono-inspired look.

That’s the jacket!!

The new skirt nearly drove me mad…. men and women are not built the same (duh); we women want width for our hips and hemline, and a narrow waistline… men’s clothes are made to be the total opposite.  And also, the CUT! because of course the legs and the fly of men’s suit pants are cut differently against the grainline to how a skirt is cut, this makes it extremely difficult to transform them into a skirt!  Fortunately the trousers were big enough I had a bit of extra width to play with here….  first of all, I took off the waistband and unpicked nearly everything except for the side seams where the side hip pockets were attached.

I removed the old zip which had gotten a little rickety over the years, and installed a new black dress zip.  This entailed truing up the grain lines at centre front and creating a completely new fly and fly shield.

you can just see at the top; a strip of organza that was used to stabilise the waistline… I kept as much of these superb “hidden” structural details as I could, too

I wanted a flat-fronted look to the skirt, so made wide long darts at the front waistline to pull in the extra width there, these I topstitched down on the outside, continuing the topstitching down seamlessly to become stitched pin-tucks down the full length of the skirt front.  This is exactly where the pressed line was for the trousers.

The skirt front is straight, but those back trouser legs are cut so as to curve IN, just where you don’t want them to when cutting a skirt, so I’d cut a triangular godet from the jacket sleeves, taking in the sleeve cuff buttons/buttonholes and the original sleeve hem.  I was a little disappointed that these were fake button-cuffs and can’t be opened… but they still look pretty nice you know, you can’t win ’em all  😉

I inserted the godets in the lower skirt side seams along with a long inverted pleat so the skirt back kicks out over the godet.  I actually love this little detail.

I don’t even want to say how many pinnings and bastings it took me to get this silhouette that I wanted; a flatt-ish skirt front and a slightly flippy skirt back.   LOTS

Finishing up… shortened the waistband, reinstalled it stitched the belt tabs down again… oh and still managed to maintain that little coin pocket that sits right beneath the waistband… pretty proud of myself that I finagled that, hehe: and BAM! finally done!!  A fresh new womanly suit made from an old discarded men’s suit, albeit a rather nice one.  I’m very happy with the long-line jacket with slightly kimono-y vibes and a short, structured-yet-flirty skirt.  I feel like it’s very very me  🙂

And I still had a few leftovers from a sleeve… so I made a bandanna for Clara, and a new little zipped pouch to hold her poo-bags.  *

*it’s the law in Australia that if you are walking a dog, you MUST be carrying  little placky bags so you can pick up after your dog, there’s a hefty fine if you’re caught without them! I just used to tie them on to Sienna’s lead and then for blog pictures would try to hide them because they’re so ugly…   or take her off her lead for a bit… you can see them in an earlier picture here…  anyway I don’t know why I didn’t make a little bag like this aaaages ago!

I used an old zip and attached a jump ring and a little swivel clip so it can clip onto her lead.  The swivel clip was a leftover from when I made my winter boots… they’re not terribly robust so I plan to replace it with a mini carabina when I can get hold of one.

The only new things I used for this refashion were: thread, the zip in the skirt, and the zip, jump ring and swivel clip in Clara’s bag.  Not too bad!

Details:

Jacket and skirt; my own design, finagled from an old mens’ trouser suit
Bodysuit; the Nettie by Closet Case patterns, from paprika stretchy stuff, details here
Shoes: Misano, from Labels boutique

SaveSaveSaveSave

SaveSave

SaveSave

SaveSave

SaveSave

SaveSave

SaveSave

SaveSave

SaveSave

pinterestmail

caramel corduroy skirt; 6 different ways

So, this is one of the things Craig picked out during our “their choice” challenge and said “this is horrible”  *sob*  Oh dear, but I could see it was true… the last few times I’ve worn it I’ve subconsciously hidden it under a long tunic because yep, it’s got pretty darn shabby.  But I loved it so and it was so useful!!!  It’s been thoroughly appreciated and loved to death in fact, I’ve already done a 6 different ways post on this very same skirt in its previous life as a yellow skirt!

You know what though, I don’t actually mind getting rid of things, even old favourites! because you do get into a bit of a rut and get to wearing the same old same old over and over and over … it’s a stagnation of sorts and one should shake it up every now and again, get rid of the old and force oneself to wear other, newer things.  Also, it’s spring and I’m in the mood for spring cleaning.

Speaking of that! I finally updated and wrote something in my “about me” page!!  it’s only taken me, like 8 years or so… hehe.  Have a read and please let me know what you think..

OK, my favourite ensembles with this skirt…

at left: worn in a 100%self-made outfit, with my triangles jumper, my navy blue tights, and my handmade winter boots… and there is my dear old Sienna of course.

This jumper is one of those wardrobe prima donnas that actually goes with but a mere select few things, so the caramel skirt, which went so nicely with it, is going to be a big hole in its life  🙁

at right; in anther 100% self-made outfit…worn with my forest green twist top, mustard cowl, piped trench coat, charcoal knitted gloves, black tights and again my handmade boots

at left; another 100% self-made outfit… with my ivory sweater, my caramel suede jacket, black tights and the same handmade boots.  This outfit was part of my third time joining in the one week one pattern thing, where I chose Vogue 1247, of course!  I’ve made up this pattern STACKs of times!

at right; wearing it with my olive suedette Burda tunic, my over dyed Nettie Tshirt, a scarf knitted by Mum, my over dyed tights, my olive green knitted socks, and rtw olive desert boots, long term favourites  Actually I really love this outfit A LOT

at left; in a 100% self-made outfit, worn with my snuggly chocolate jumper, bright green knitted hand-warmers, my ivory infinity cowl, my black tights, and once again, my handmade boots.

at right, this is probably one of my all time favourite ensembles with the skirt, worn with my mustard Miette hand knit, my raspberry scarf, black tights… no doubt I had a self-made Tshirt on underneath but I can’t remember now!  Those boots are my rtw ones though…   😉

SaveSaveSaveSaveSaveSaveSaveSaveSaveSaveSaveSaveSaveSaveSaveSaveSaveSaveSaveSaveSaveSaveSaveSaveSaveSaveSaveSaveSaveSaveSaveSaveSaveSaveSaveSave

SaveSave

SaveSave

pinterestmail

chilli-red paprika jade skirt

Oh hello, fellow needle-wielders!

Recently I decided I wanted, nay needed, a new colourful Jade mini-skirt; since my purple one was tragically taken too soon… *a minute’s silence, please*

Well, ta da!

I’d gone back to Knitwit in search of the same purple knit… why the same colour? perhaps because I’m a boring unoriginal creature of habit? but unfortunately they had sold out of the purple.  So I chose this chilli-red instead.  Rather nice, hmmm?

Every time I try to take any pictures in the full-on blasting sun, I regret it… however this does show off the lovely vibrant fiery-ness of this intense red rather well

For the lining, I cutup an old black Tshirt, one of Sam’s toss-outs, it’s quite a nice, sturdy, not-very stretchy and robust 100% cotton black knit, so should work really well as a lining. .  I’d given some thought into the lining this time, since the tragedy of too-much stretchiness of the purple one… that was a 100% polyester whereas my other stretch mini skirt, my self-lined charcoal one is a cotton jersey, quite stiffish with only a one-way stretch and that is holding up very nicely.  The black Tshirt fabric I used for this is very like that…

obligatory lining picture is pretty boring, sorry

With this version, I fitted and reinforced the waistband with stretch interfacing so it is quite firm and minimally flexible…

… AND put in an exposed black/brass jeans zip into this skirt.. I’m hoping these two factors will help keep that waistband firm and strong, so it suffers minimal stretching out and extend the life of the skirt…  Just for looksie’s alone, I just love the brassy glint of the zip, I think it looks really cool.

Going from my past jade skirt AND my past red skirt experiences, I KNOW I’m going to wear this a metric tonne.  Can’t wait to mix and match this  one to bits!

Details:

Skirt; Paprika patterns Jade skirt, red silk/linen knit from KnitWit
Top; the twist top from Pattern Magic, in ivory ponte also from KnitWit, details here
Tights; my own design, black polyester stretch from Spotlight, details here and my tutorial on how to make your own custom tights pattern here
Boots; made by me and my own design, all details here

location; the bush in south western Western Australia

SaveSave

SaveSave

pinterestmail

…getting a Brazilian…

Olá!

Soooo, I mentioned my brother’s BIG birthday? well to go with it he had a BIG birthday bash! with a Brazilian theme.  I stupidly procrastinated about my costume, ended up going shopping for fabric the day before the party and had to cut n’ sew like a madman to get it done on time. #sewingmachineonfullblast

I’d first googled “Brazilian women” and what came up was nothing but women in bikinis.  NO.  Even if this were the very height of summer… still no.  So then I googled Brazil women’s national costume, and oh yes, that’s more like it!

These lovely ladies are wearing the traditional dress for Bahian women, and I thought the white lace and broderie anglaise tops and headscarves and full, brightly coloured skirts so very lovely.  So I set about making something like that…

For simple yet voluminous skirt that you can whip up quickly, you can’t go past a circle skirt… I bought 4m of red polyester taffeta from the $4 table at Spotlight… it is very stiff and very silk dupion like and I knew it would stick out nicely with a good amount of volume.  I cut out my circle skirt and divided the remainder to make a waist sash and a scarf for part of my headgear.  The skirt is a full 2m in diameter, and I thought about making it rush rush rush but nah. I just can’t do that sort of thing, even in a costume.  So it’s got a proper interfaced waistband, and closes with an invisible zip and a press stud in the waistband.  Hehe, while I was making my costume, Tim sent around a snapchat re it being National Doughnut Day, and I was like HA!  I’m fitting right in!  This is MY kind of doughnut!!

Oh, I have a little tip!  I usually hand-slipstich the ends of my invisible zips to the seam allowance with a few quick stitches, but lately I’ve taken to just doing a few quick back-and-forths on the sewing machine.  It’s so much quicker since you’re not having to thread a needle, and actually more stable too.

Speaking of rush rush, I admit I did not hem that giant circle skirt… it’s just overlocked along the edge there!  I figure that if/when I ever decide to wear it “for realz” then I’ll go to the effort and hem it properly.  Probably seems funny that I did the waistband properly when it’s not even “seen” in my costume, whereas the hem, which is fully visible, I didn’t finish properly… but you know, some things are easy to re-do later and some are not.  The waistband is the kind of a thing you’ve got to do it right the first time.

The blouse is made from an old lace curtain that was originally had hanging in an upstairs window… I took it down when we re-did our floors up there and have just never hung it up again! Lazy? the view was too nice? Both really  😉   A bit off one end was sacrificed for my top, hehehe.  I had also bought a length of white cotton/linen for the lining, there’s quite a few bolts of this in Spotlight at the mo’ selling for very cheap; I’ve actually bought quite a lot of it lately, for other projects yet to appear here…

My pattern is very loosely the epaulette top from She Has a Mannish style, cut to flare out more in the body and sleeves…  the lining is cut straighter in the sides.  The shell and lining have separate side seams, but are sewn together at the shoulders and armscye.  I pinned and stitched a square neckline, cut and overlocked the edge, and then stitched a length of white cotton bobbin lace around to edge it, part of a large stash that I’ve had for many, many (many, many) years.  It’s funny, I kind of threw this together just for the costume, but you know what?? I actually love it and will definitely be wearing this again, in real life!
Waist sash:  22cm x 3.8m, I wrapped it twice around my waist and finished off with a giant pouffy bow.  Head scarf:  30cm x 2.4m of white,  21cm x 2.3m of the red;  I’d cut the white wider to be the main colour with the red to be more of an accent, like how the Bahian ladies that had popped up in my google search have their headscarves.  I’d also googled “how to tie a Brazilian head scarf” and found this video which was sooooorta helpful, I kind of based mine off her first example… but my scarf is much much longer and I obviously tied and tucked and folded extra knots in mine so as to be a much higher and more complicated affair… I’d also made two “ropes” of the white and red and twisted them to tie around my headscarf to help keep it in place.

after this photo, I redid my headscarf and I think it was a lot better the second time!  but didn’t have enough time to take another pic 🙁

For footwear, I’d noticed that the ladies tend to wear low, flat, open sandals; very comfortable things like birkenstocks but not anything specific.  I got out a few of my sandals, and Mum voted for my little white sandals, that I made last summer.  I danced the night away in these things, and they’re still holding up great!

So that’s it!  We had a blast… I wish I could show you a picture of my son Tim, who went as Gisele Bündchen in a blonde wig, bikini top, boy leg shorts and full on wings a la Victoria’s Secret.   And clonking boots on his feet.  It was hilarious.  Absolutely he was the belle of the ball!

just use your imagination…

Another funny little moment of the evening’s preparations… Craig used this picture as his costume inspiration… we’d bought red, blue, green and yellow feather boas from Spotlight to customise the black pants and black shirt that he already had in his wardrobe.. we also bought yellow satin for a sash and a yellow velour fedora from Spotlight too…

Well, he’d cut and tied together lengths of the feather boas to make the leg and arm bands… and there was like masses of feather fluff and debris all over the floor.  So he’d got out the vacuum cleaner to do a quick tidy up.  Well, he was vacuuming quite perilously close to the little pile of carefully tied together feather boa bands… and I was literally just about to say “you might want to move those feather things” when FWOOOOOOOP! this quite long string of feather boas just disappeared! right up the vacuum cleaner in a flash!!  Like, literally a split second and they were gone, like a garishly coloured, feathery snake zooming at top speed into a burrow, …  well, Kelly and I burst out laughing and just couldn’t stop, haven’t seen anything so funny in aaaages!  Panic!  Don’t worry, we opened up the vacuum cleaner and rescued the furry beast from its lair, I mean, the feather boa, fortunately none the worse for wear.

SO much fun.  EEEEE, I LOVE costume parties!!

pinterestmail

purple-y Jade mini skirt, 6 different ways

During another of my sometimes brutal wardrobe clean outs, I parted ways with this little purple skirt… I have to admit it was a little gut-wrenching to get rid of this one because it had only been in existence for one sad little winter, albeit a glorious one, since I wore it at least once every week!  Aah! little purple mini skirt, the light that burns twice as bright burns but half as long… and your light has burned so very very bright…  *

I made it in a purple wool/silk knit from KnitWit, using the Paprika patterns Jade skirt… and it was such a devastatingly useful, mix-and-match-tastic item of clothing! actually as all sludgy coloured little mini skirts are.  Sadly, the knit, while a gorgeous colour, of a lovely weighty thickness and with a magnificent “quality” feel and texture to it, didn’t have a huge amount of recovery… and I’d used a VERY stretchy black poly for lining it, some leftovers from my tights! if I recall correctly!  Definitely not sturdy enough to give the purple knit the backbone it needed, so the whole thing got floppy quite quickly.  Toward the end of winter I actually worried a bit that it would at some point slide slowly and gracefully south down my smooth, black-tights clad legs to my ankles and become a rather gorgeous purple hobble…. haha wouldn’t that be glamorous/fabulous/amusing… NOT.

Anyway, because it’s been that good I thought I’d give it a little farewell party… the fact that I only wore it for one winter and still found six outfits where it is paired with almost totally different items of clothing in each one is testament to its versatility!  Also, since these were all taken during my Year of Handmade; you know, that year in which I wore ONLY clothing and shoes made by myself, ahem…I made every single blinking thing I am wearing in each of these photos, which is why the black boots appear in so many outfits, sorry…

Links to all construction posts provided  🙂

Below: at left; with its matching top, charcoal gloves, black tights, black boots
At right; with ivory top, blue cardigan, navy cardigan, purple scarf, charcoal glovesnavy tights, black boots

Below, at left: with charcoal twist top, raspberry tights, black boots;
At right; with pink jumper, green scarf, lime green hand warmers, black tights, black boots

Below at left: with ivory top, grey coat, raspberry scarf, black tightsblack boots
at right: with coffee Tshirt, striped jumper, black tights, black oxford shoes

Ok, so it’s awff to the sewing room… because clearly I need a new one …

* Blade Runner, after Lao Tzu

pinterestmail
Switch to mobile version
↓