totally local, totally natural, from head to toe

A person could be forgiven for thinking that I had abandoned my totally local, 1 year 1 outfit project, since there has been no mention of it here for months!… *blush* however, it has been plodding along, slowly but surely, and is now FINISHED!!!!  Hurrah!  At last!

The concept: last year Nicki from this is moonlight conceived the very interesting 1 year 1 outfit project and invited me to take part with her… the idea was that you make an outfit using ONLY local materials and primary supplies grown and/or sourced in your own area.  Well you know how weak at the knees I go for a dressmaking challenge! and the more difficult the better!  Several of us here in Perth took part last year; Nicki, Sue, Megan and me.  Sue, Megan and I met up for a hilarious photoshoot in our outfits one day last February; it was so much fun! and we all had plans for this year too.

from left: Megan, Sue, and me… the links in this post go to everyone’s individual posts about their outfits

So yes, I was all enthusiastic… however!  It really is a difficult challenge, far more difficult than you might think! and though I made a good start with dyeing some yarn early, my other challenge, my Year of Handmade, has consequently swept me away with its even higher degree of difficulty … I’m not whinging, ’cause I really do like challenges honestly! however I’ve struggled with everything this year a bit and it’s taken a while for me to get my groove on.  Fortunately Nicki announced a March deadline recently, which lit a fire under me.  I got cracking, and got finished!!!!

Thoughts going in: I loved my first 1 year 1 outfit project from last year; although I confess I’ve barely worn it at all!  Reason being that while I think my embroidered felt is ethereally beautiful, at the same time it is fairly fragile and can only stand up to light wearing on special occasions.  So my major priority for this year’s outfit was casual wearability; something that I could toss on and wear on a daily basis without fear of ruining it.  I also wanted it to try out some natural dyeing techniques.

What did I make: a simple knitted dress and a matching beanie, showcasing my dyeing experiments in stripes.  I just wanted my hard-won colours to shine on their own merits equally without competing with each other, and individual stripes separated by the blankness of the natural undyed ivory just seemed a good way to accomplish this.

My shoes, bag and underwear were all made for last year, and also comply with the rules of the challenge.

Sources; I obtained all my handspun merino yarn from Bilby Yarns, which is an absolute treasure trove for West Australians interested in local wool products and supplies.  My yarn is from Western Australian Merino sheep; born, grown and shorn right here in the south-west of WA.  The raw fleece is transported to Bilby Yarns in Willagee, where local spinning enthusiasts can purchase it, spin it in their own homes, and sell it to people like me back through Bilby Yarns.  It’s such a great scheme!!  All my yarn was spun by the talented Beverley L. whose yarn I also used last year!  Some of my yarn this year was leftover from last year, and I managed to buy some more of her’s this year…. I’m so pleased I was able to purchase so much of her gloriously lovely handspun!  I bought mostly undyed natural white, and some natural grey.  The grey is quite rare, and I was lucky to get hold of this!  I used the grey to highlight each colour; I like how the grey stripe adds a bit of trompe l’oeil 3D-ness to the coloured stripes, like a shadow underneath each one.

So! I had my natural ivory and grey yarn, now for the colours!  All my dyeing experiments are outlined in this post here.  I didn’t end up using all the colours I produced… leaving something for the next 1year1outfit maybe??  The colours I chose from my experiments are, from the hemline going up, are:

Orange, from Coreopsis flowers;

Acid yellow; from sour grass stems and flowers,

Blue, from Japanese indigo, and I’m so grateful to Nicki for the use of her dye vat,

Pink, from avocado pits,

and that lime-y green colour at the neckline, and seen in closeup a few pictures down, was the result of over-dyeing, soaking some of my spare indigo yarn in a sour grass (oxalis) dye bath and then with just a single coreopsis flower (orange) tossed in to give it a bit more oomph when I realised the yellow was a bit weak.

The design: is my own!!  I did about a million calculations first but even then there was plenty of unravelling and re-doing bits until I was satisfied with it!   I wrote down my final pattern below, just in case I ever want to revisit this pattern, or if anyone is interested in knitting an entire dress for themselves!  It’s ok, I wouldn’t blame anyone who didn’t but still…  The only thing is that it’s only got the one size.  That lower hemline with slightly forward slits?  yes, it’s pretty obvious that my hemline is totally inspired by the Named patterns Inari tee dress, a pattern I have made five times now and unequivocally LOVE.   I just really like the way the Inari dress slits do the job of a walking vent, but is visually more interesting and obvious than your regular, garden variety, centre-back walking vent … and I really like the terraced high-low look of that longer back and shorter front.

The dress is mostly stocking stitch, with the lower edges, the sleeve edges, and pocket opening welts highlighted with various width rows of garter stitch.  Those sleeves!  OK, I’ll confess these almost did me in  … initially I had other ideas, resulting four false starts on the sleeves before the final design decision.  Four!! It was a bit gut-wrenching, each time I would be chooffing merrily along with a sleeve, before the dawning realisation that my previously thought-to-be cool idea was actually going to look really really stupid.  Gut-wrenching!  SO MUCH UNRAVELLING!!  But I refused to give up, I kept reminding myself that this HAD to work, I’d put so much into it already and I just could not abandon it in its hour of need.  Finally I hit upon this sleeve, a very simple, and plain, , unadorned long-sleeved style , which worked out just right, I think.

Pockets; of course it has pockets!!  the dress is knitted in the round, so there are no side seams, but I left openings at the front hip to knit in the pockets later.  There are little extension “flaps” at the pocket openings, for a continuous look when you’ve got your hands in the pockets and may catch glimpses of the pocket insides; and the pockets are just little “bags” made by picking up stitches along this edge, knitting a simple rectangular strip and folding it in on itself.  The garter stitch “welt” was knitted on before stitching the pocket piece closed.

The neckline; just wanted something really simple and streamlined, so I did one single row of chain stitch embroidery around the neckline edge.

The beanie: is a slightly loose and slouchy beanie, as I love this look and have decided this style of beanie suits me quite well, I think… hope!  The arrangement of the stripes is the same as the dress, just on a smaller scale.  This got unravelled and re-knitted only once before I worked out just exactly how I wanted it to look.

Le Whole Shebang, with accessories and all:


Shoes and bag; I’m wearing the same shoes and bag I made for last year’s project.  At first I worried that they wouldn’t “go” but well; I reckon they go just fine.  I carved my shoe bases from Manjimup pine and made the felted tops in natural white and black merino fleece and handspun, as described here.  The matching bag is of the same felt.

Underwear: yep, same as last year.  Well, I’m not going to make a new pair when I never wear this set at all!  However, it is totally 100% local so I’m counting it as part of my totally local outfit again for this year, hehe.

So that’s it!!  Am I going to take part in the “1 year 1 outfit” project again next year? well I do have ideas, but confess I’m a little exhausted, by, well…  everything, at this point.  Maybe, maybe not.  The truth is that I actually do have enough totally local materials still, to produce something… so maybe…  yes?! We’ll see!

fun fact; the small tree with bright green leaves behind and to the right of me in the picture, is called a Snottygobble.  Yes, really!! #weirdAussienames

Following is my free pattern for this knitted, slightly A-line dress with inset, welted pockets, split hem, long sleeves.  Includes pattern for optional beanie also.  Please link back to me and credit me if you use this pattern, thank you so much  🙂

Knitted dress + beanie
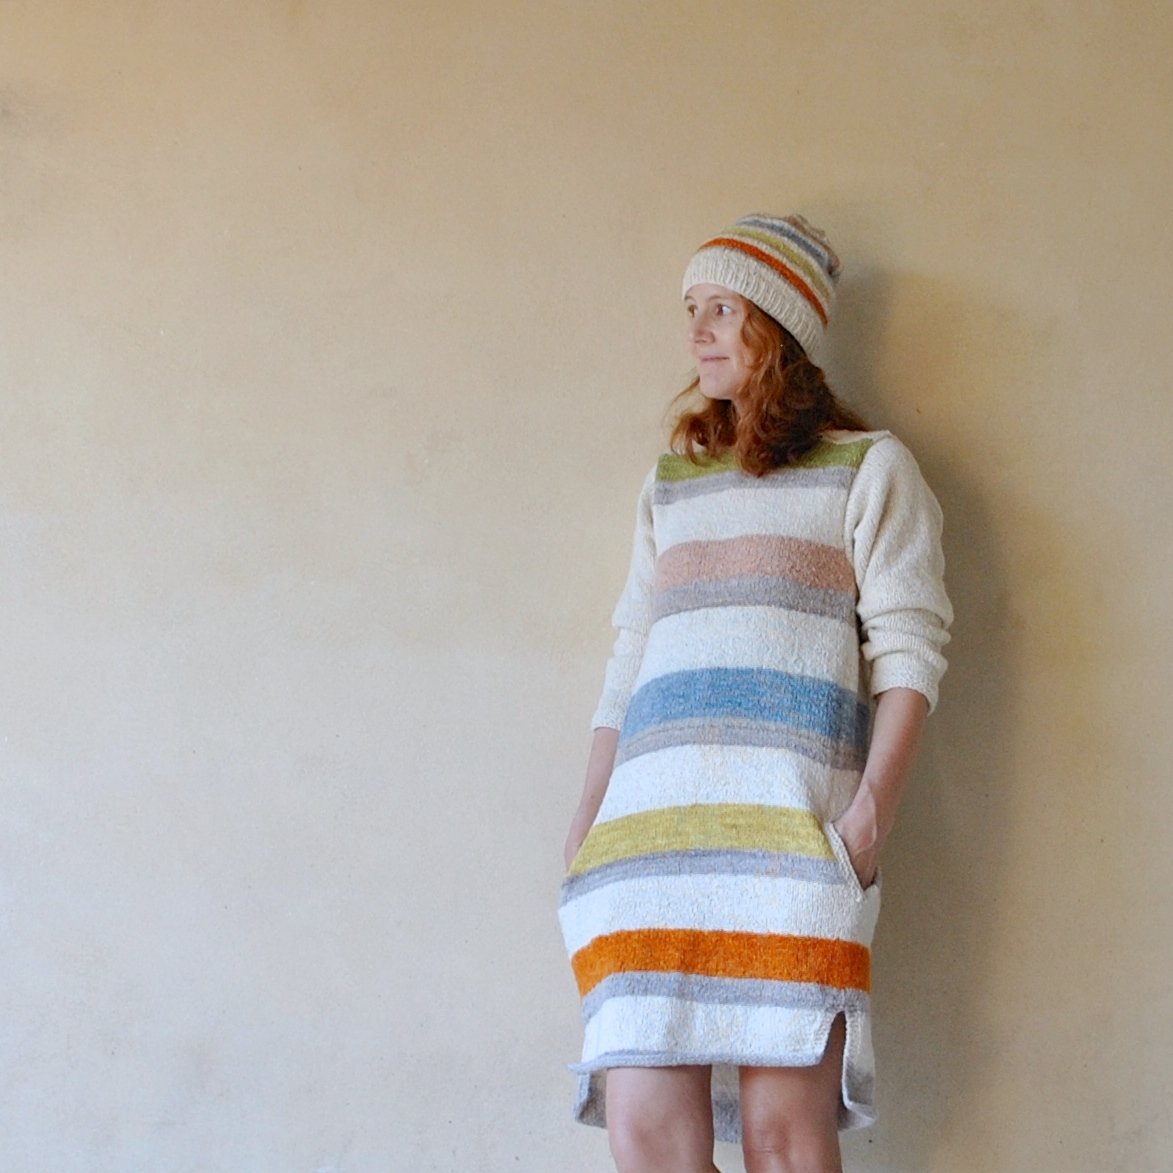
Location;  Leeuwin National Park, in the south-west of Western Australia… although the picture immediately below is actually taken in our own garden, since I forgot to take my bag with me when I went to the park, doh!!
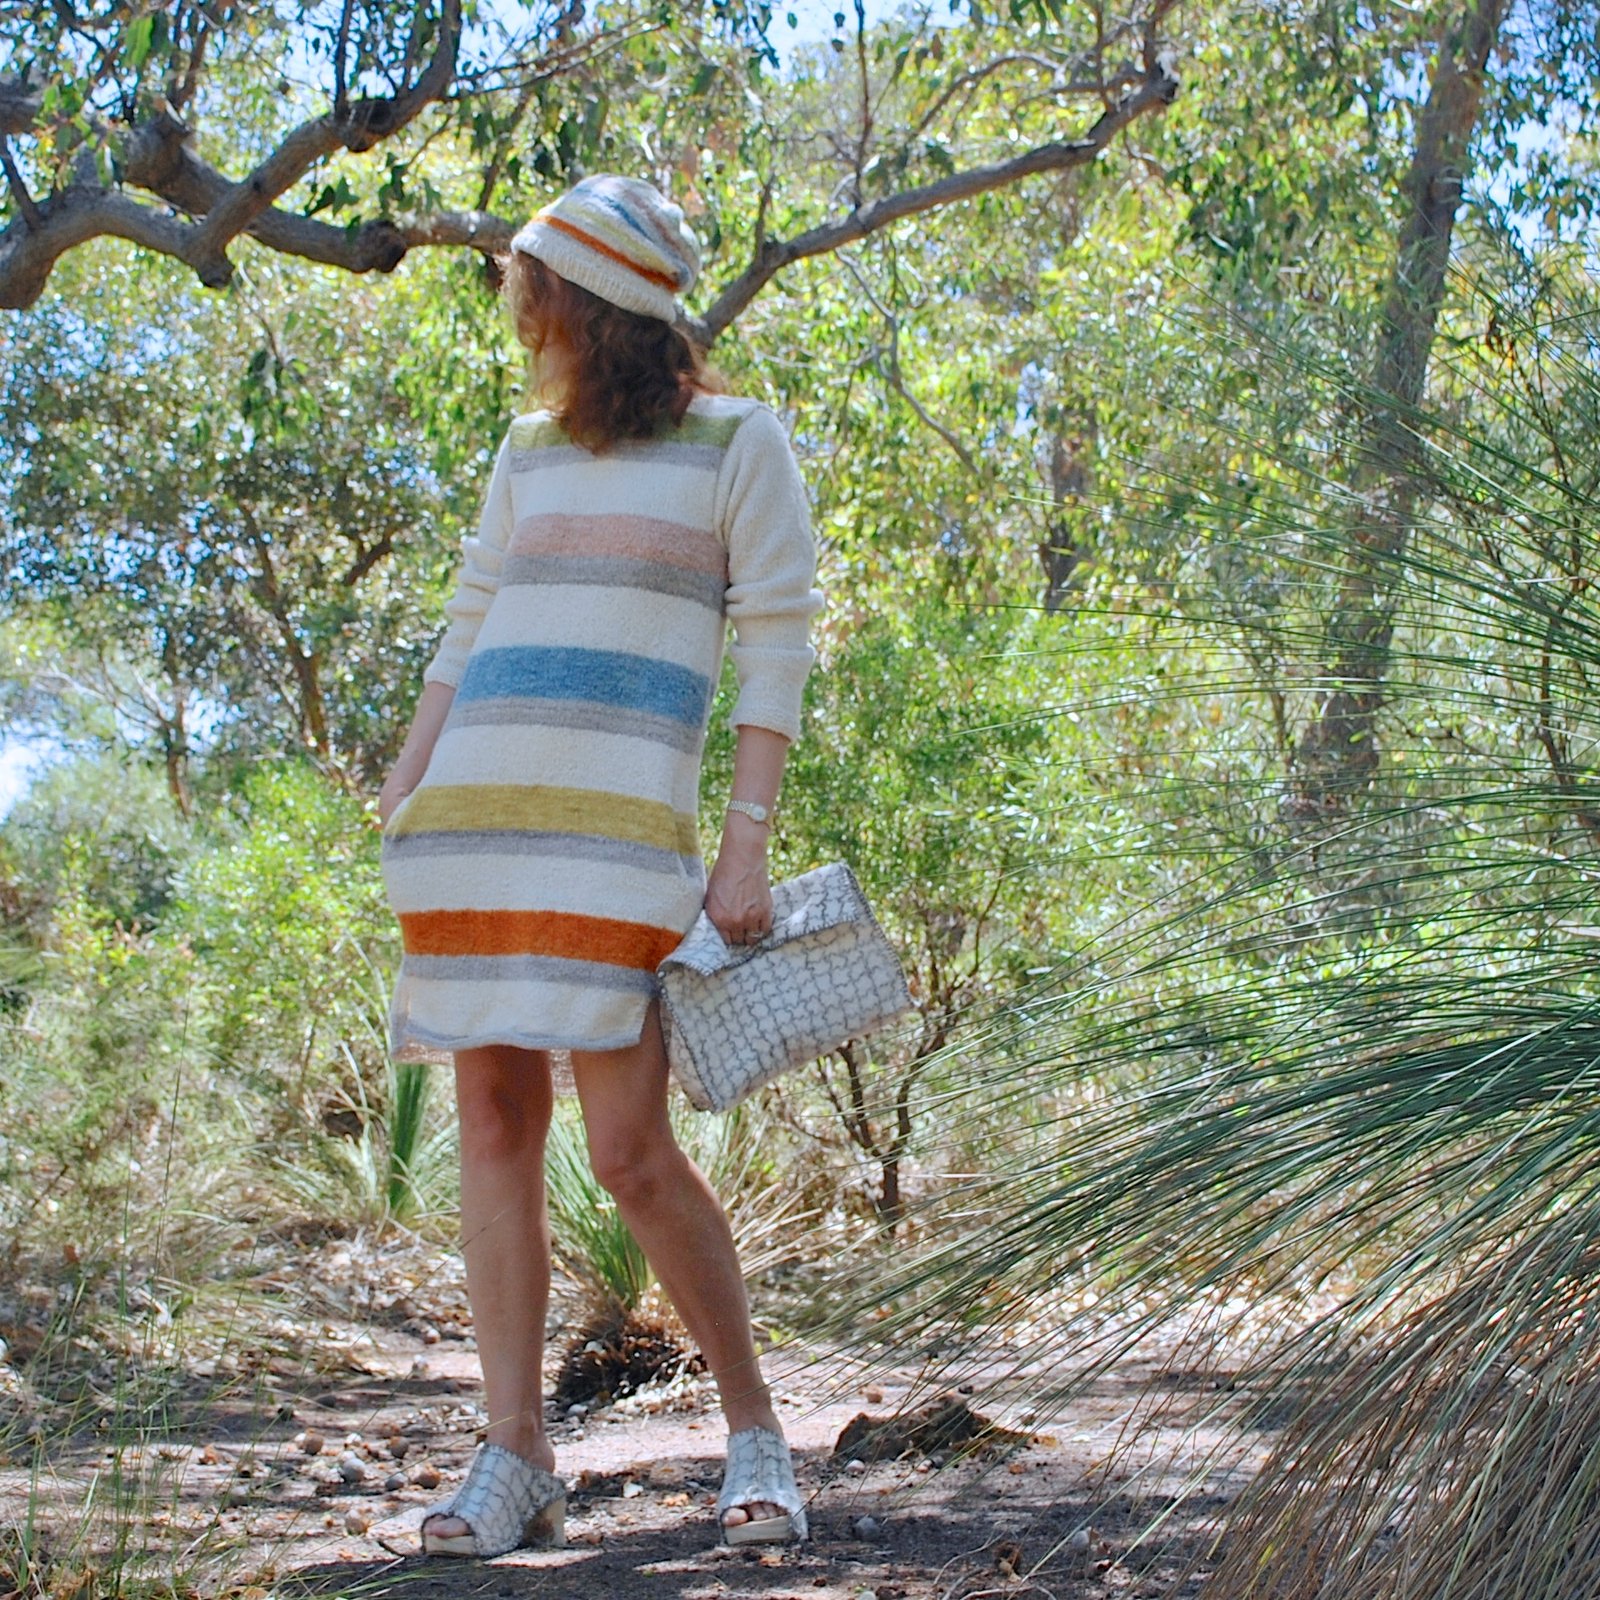
Now, you may be wondering… Carolyn, isn’t it the height of summer?  Aren’t you absolutely roasting alive like a broiled lobster in that warm and ultra-cosy-looking woollen ensemble??  The short answer to those questions is; yes, and again, yes.  Ahem.   The maestro of Seasonally Inappropriate Sewing strikes yet again.

pinterestmail

red thongs (shoes)


Hello!  I’ve made a new pair of um, “shoes”…??  although I’m embarrassed to even consider giving them that lofty title; they’re so basic.  Also; yes I know my year of handmade is all but over and I don’t have to make any more footwear, but I just can’t help myself!  I’ve even got some OTHER new shoes in the works too!  😀

I’d bought a sheet of this foam from Clark Rubber; it’s matting designed to slot together to make a kiddies’ playmat or shock absorbent flooring for gyms.  My straps are red corduroy, the same fabric I used for a previous pair of long-gone sneakers.  I made the hole in the foam with a sharp pencil, which I also used to push the straps through said hold.  The straps ends are sewn securely to a piece of linen that will be glued between the top and bottom layers.  Liquid nails was deployed.

The bottom layer is thin cork-covered, contact paper, cut to size, stuck on – more liquid nails, yo!!  and then three layers of clear, enamel varnish to seal and strengthen.

aaaaand, done!

Details

Dress; Vogue 2900, indigo dyed linen, details here
Hat; Vogue 8844, ivory corduroy, details here
Red thongs; made by me

random outfit shot intended to feature the thongs and they’re barely visible, ha!

location; Eagle Bay, Western Australia

pinterestmail

Japanese linen-gauze shirt dress

My dear friend Yoshimi sent to me a beautiful birthday present last year; some really beautiful, deep indigo blue linen gauze…   The colour is quite glorious, not a solid colour but mottled and variegated with plenty of depth and character; and the texture is ultra light and sheer, quite breezy and with a slight stiffness very similar to organza.  It’s utterly lovely.


It’s taken me quite a while to decide what to make with this precious stuff…  I would take it out and pet it, thinking of a million options.  I layed out several different patterns onto it, only to pack them all up again… obviously it had to be perfect, also I really wanted to make the absolute MOST of every little bit using a pattern resulting in as little waste as possible!  I finally settled upon this Burda pattern, Shirt Dress 03/2016; 112B, The pattern pieces fitted on my piece of precious fabric PERFECTLY!!

However.. modifications happened along the way.  Of course they did.   My dress has the same bones, but the original is actually a very boxy design, with quite a pronounced dropped shoulder.  I’m sure it’s a lovely design for the right fabric; as in, something with plenty of natural “flop” that allows those shoulder seams to drop gracefully down over your upper arm.

My fabric doesn’t want to flop in the slightest; while super-breezy it stil has quite a bit of oomph and structure.  It works beautifully in the tailored details of a shirtdress, but really the shoulders did not drape in the desired manner at all…  So I ended up taking quite a bit of width off from each shoulder and side, and slimming down the sides of the dress bodice too, so my final dress is more like a gentle A-line shape.  I couldn’t say I “self-drafted” the armholes, that just sounds terribly pompous when it was basically just tonnes of super careful pinning and multiple tryings-on.  I’m so so happy with the final result though.  I think the more fitted, yet still loosely relaxed shoulders, the slimmer bodice and A-line shape is perfect for the fabric.

Other alterations: I inverted the pleat the other way in the centre back, also left off the placket to hide the buttonhole band.  Fun fact; my pattern is the German version, and while I plugged the instructions into Google translate I actually couldn’t make head nor tail of them, haha!!  I think I’ve made enough shirts that I managed to put it together ok though  🙂

I LOVE the sleeves which are unchanged from the pattern, they’re only very slightly gathered at the top, and blouse-y at the elbow, with deep pleats taming that blousiness into the bands.  I also love the petite little collar.  The collar stand is the tiniest I’ve ever made, so skinny and narrow, only about 1.5cm deep.  I was slightly terrified how this would go, fortunately, the linen gauze was an absolute delight to sew and eased beautifully everywhere I asked it to.  Like sheer heaven.

I found these awesomely cool yet delicate brass buttons at Fabulous Fabrics.  I’ve previously used these very same buttons before, on my khaki linen “army” shirt; five and a half years ago!!  I’m so glad they still are stocking these; they’re quite old-fashioned-y, a bit dinged-up and antique-y looking, so very much to my taste!

I also made a little matching belt, which is basically an interfaced waistband with just one button and two buttonholes.

With the fabric being the divine will o’ the wisp that it is, my new dress needed a slip; so I hemmed it so as to work well with my ivory crepe Ruby slip.  You can see the slip when I’m wearing it, but hey; you were going to see any slip I wear with this ultra-sheer dress! so it may as well be a nice one!  I really love the way the ivory underneath lightens and brightens and highlights the variegated blues and really brings them to life.

I absolutely adore my new dress; thank you so much, Yoshimi!!


Details:

Dress; Burda Shirt Dress 03-2016;112B slimmed down a bit, Japanese indigo linen gauze
Slip; pattern scissors cloth Ruby Slip, a free pattern available here; ivory crepe, details of mine here
Shoes; made by me and my own design, details here

Location, the Crawley boatshed, Crawley, Western Australia

yes; it was blowing a freaking gale, not really ideal but I had the photo opportunity so *shrug*…

Funny story; this is a very popular spot for wedding parties and also for tourists to stop and take pictures.  I rocked up and there was a Chinese man taking pictures, so I waited at a little distance for him to finish… once he had I went over and put my camera on the steps.  However he hung around for a bit, then came back and started gesturing to his camera and at me; at first I thought he was asking if I wanted assistance with my pictures and I assured him that I was fine, gesturing that I had my remote, etc.  However, no! what he wanted was for me to be in his pictures!!  eeeek! he demonstrated where he wanted me to stand and how he wanted me to pose, gazing up into the sun and beaming like a stereotypical sun-worshipping Aussie.  He took quite a lot of pictures, so if you ever see me popping up in some Chinese guy’s holiday photos, that’s why!!!

pinterestmail

Jungle-y underdaks

Can you even see my latest creations…?  Not really?  Well, that’s because it’s all so perfectly and beautifully camouflaged in the deepest, darkest, greenest depths of my garden I mean… the jungle, of course!!

So it’s January, and I’d begun to notice a few jungle-y things popping up on my IG feed… oh, it’s that time again…? well alrighty then!!!  hurrah!  Jungle January!  the brainchild of Anne of Pretty Grievances  I LOVE sewing challenges!

I’m continuing on with my tradition of making a new set of bra plus undies for my thing.  The last two years I’ve taken the humble frog as my inspiration, firstly here and secondly here… this time I wanted something different, and by that I meant a creature other than a frog.  I had a few different ideas…  but nothing jumped out at me… finally I just thought; I’m going to google “jungle” and select the top rating picture as my inspiration, no further argument.  I did, it, held my breathe, what creature was I going to have to “interpret”…?  and this is what came up…

source, kingofwallpapers.com/jungle

THE JUNGLE ITSELF.  OF COURSE!!!  #facepalm

Truly magnificent, yes?  Nature at its most glorious.

First impression; well, just GREEN.  How extravagantly, intensely, and totally green it was.  Fabricwise, I was immediately reminded of a length of stretch stuff that Mum had tossed out and that I had immediately squirrelled away, it has a random painterly print on it; predominantly green with some blobs of other colours subtly melting all together; I think it was originally from Fabulous Fabrics.  I dug it out, positioned my pattern pieces on it strategically so as to include as much of the greenery bits as possible, emphasise the “jungle-y” parts of it as much as I was able.

There are even a few, almost snake-scale-y bits, ranging from mossy, yellow-y green…

right though to an almost aqua green

…and can you almost imagine here the golden sunlight breaking through the high-up leafy canopy, and maybe a bright scarlet flash of parrot’s wings, or a single jungle bloom…?


Patterns; my old favourite MakeBra bra pattern, and the two pairs of matching briefs are both cloth habit Watson.  I used the makeBra instructional video on how to make a foam-lined bra to make mine; it’s a brilliant video, completely foolproof.  Some of my materials like the foam and some of the elastics are from the MakeBra basic kits that I bought last year, though the underbust bra elastic is from Homecraft Textiles because the stuff in the MakeBra kit is not such good quality this time, unfortunately.  The lingerie elastic on the undies is from Spotlight.  I bought up a huge amount of this during a sale one time and am still using it up!


pinterestmail

white Issey Miyake shirt

Self-explanatory, really.  #endblogpost  😉
Pattern; Vogue 1384.  It’s a vintage pattern, hailing from 1984, sorry. Yeah, it’s annoying when people make things in vintage patterns that you can’t get a hold of anymore.  But I’m sure this is not particularly aspirational actually, it’s a little weird in that 80’s way.  That high, slightly floppy collar combined with a billowing pirate-y blousiness is giving me serious Duran Duran vibes.  That’s sort of a good thing btw HUGE Duran Duran fan, once upon a time… only you know, dating myself here  #woops  On a side note; watching that clip again, wow I think I’ve suddenly identified the genesis of my lifelong white shirt obsession…   Also, haha, I totally dance just exactly like that, to this day still, lol.

I’d actually vaguely planned to make this shirt for quite a while, then Anna of blogless Anna proposed an IG #sewjapaneseinjanuary sewing challenge; prompting a jump to the top of my queue… sewing challenges are such fun!

I’ve previously made the skirt from this pattern too; here.  That now resides in Cassie’s wardrobe.  Thing is; the pretty floaty pink-ness, while lovely, I’ve decided is just not really ME.  Not to mention that she put it on one day and obviously it looked only like about 999999 times better on her than it ever did me (sob)   I’ve got to stop giving her my clothes to try on!!   Just kidding; I wore it a few times but tired of it quite quickly and I don’t miss it, not one little bit.  Though I do still really like that design and am thinking of making it up again, just in a more me-friendly fabric and colour.

Fabric; a thin, sparsely-dotted swiss cotton voile with ever so faint and equally sparse paisley embroidery on it in bits.  Very very subtle.  I bought it in Potters Textiles a few years ago, when it was in its other location.

The top looks at its best when it’s either tucked in or belted-n-blousy, and while I have a small collection of self-made belts… like, four maybe?  none of them looked very right with this sheer-ish white top, so I quickly whipped up a thin white one in the same fabric to wear with it.  Kt-chaaaaaaa!! *whip-crack sound effect*  Sorry, I simply cannot read “whipped something up” with regards to sewing without hearing a crack o’ the whip sound in my head.  Craaa-aack that whip!  *  (Devo, and a warning, do not click that link unless you WANT to be subjected to some really random and classic 80’s, madness.  Yep, I was a fan of that too, *blush*)

The belt is basically just a waistband really.  A poor, bereft and lonely little waistband, with no skirt to call home…  *sad violins*  It’s exactly the same deal as the one I made for my tartan dress.  Just two buttonholes, and one button, and you wear it so the button is on the inside.

Also, interesting pocket tab/flap detail.  You can’t really see it on the outside, which defeats the purpose a bit really, but oh well.  It’s kinda cute when you notice it!

I flat-felled all seams throughout, as usual.  Btw, you CAN flat-fell all sleeve and armscye seams too… my tutorial for flat felling the armscye seam is here… and the sleeve seam itself can be flat felled by starting from the middle of the seam and stitching OUT.  Be sure to have the sleeve RIGHT SIDE OUT, so that you are sewing inside the sleeve… this will ensure that you are in no danger of stitching down the other side of the sleeve underneath…

In the case of this shirt; I stitched the sleeves to the shirt, and flat-felled that armscye seam before stitching up the sleeve and side seams…
First, stitch the sleeve and side seams in one fell swoop.  Press seam open and trim one side.  If you are flat-felling the seam towards the back of the garment, trim the back edge of the seam.

Press the front edge back over the back edge, turn under the raw edge, and press in a neat even width.

Turn sleeve RIGHT SIDE OUT  (v. important) and from the wrist end of the sleeve; bundle the tube of the sleeve up to locate a point roughly midway up the sleeve.  Position the bundled up sleeve tube behind your machine and pull the wrist end of the tube through until this midway point is under the needle.  Take it nice and slow, and stitch the flat-felled seam from here out to the wrist.

To complete the seam; just repeat the same process as above only bundling up the sleeve from the armscye side… locate that same midway point of the sleeve, and stitch the seam from there, to the underarm, and keep going in one long continuous seam down the side seams to the bottom hem of the shirt.

Done!

Details:

Blouse; Vogue 1384, white swiss voile
Skirt; Vogue 1247, striped stuff, details here and my original review of this pattern here
Sandals (above): my own design, made by me, all details here


Denim shoes (below); my own design, made by me, all details here
location at top: Preston St overpass, Como, Western Australia

Replicating the 80’s pattern envelope pose,  just because…. the 80’s.

pinterestmail

the year of handmade, 11

above are just a small selection of some of my favourite outfits for the last month, the entire collection for the year so far can be viewed in my Year of Handmade flickr album, here

So, a mere 30 days to go…   Wooooooweeeee!

Honestly, I’m now just like, yeah, whatever no biggie.  Coasting.  Yep, counting down the days; One.  At.  A.  Time… but y’know, otherwise pretty chill  ;P

All my clothes are of course holding up perfectly fine, clothes are a piece of cake.  Obviously I’m going to keep on wearing my self-made wardrobe, forever probably.  Can’t see that changing, in the foreseeable future anyway.  Shoes-wise, gawd… definitely counting down the days there…  my white thongs; well I have to admit I’m quite looking forward to hurling  them off a 1000ft cliff with great force  I mean, gracefully retire them as soon as I possibly can.  These have been my summertime walking shoes all last summer and this one too, they’ve done haaaaard duty and are looking pretty rough.  Those snowy-white straps are not so snowy now, I can tell you!  But unfortunately they are essential to my wardrobe, mostly because they are kinda rough now.  In my lifestyle where I do a lot of walking/gardening/spending time in the country; I really need rough-and-tumble, grunge-y footwear.  I was fairly devastated when we were at our beach house recently doing a weekend of heavy duty gardening (as seen here), and some of the cork underneath finally wore through and one wing of one thong pulled through.. aaaagh!  I still need those tacky things!!  So, a few blobs of liquid nails and new heels made of furniture felt later – it’s all I had! – and they’re mcgyver-ed together enough to see out the last month.  They look awful but I just don’t care…  I’m sure my walking friend E thinks I’m completely bonkers, persisting in wearing them whenever we get together for a walk.

Not going to complain now; it’s summer, I LOVE summer… dressing for summer is easy, and making summer sandals is very easy.  I have actually been toying with the idea of making a new pair.  It’s funny, the end is in sight, and I’m actually dreaming of making new shoes!!  I must be crazy, boom! proof right there…

pinterestmail

rows of little white cottages

I’ve made another skirt and top set for Cassie  :


Patterns; the Tshirt is the Named patterns Inari tee, and the skirt is Vogue 1170.  I’ve made several of these skirts now, and quite a few are now owned by Cassie.  The only alteration I made was to lengthen it by about 5cm, and leave off the pockets.  Oh, I also made a few fitting alterations… even though I’ve made the pattern several times and I really like it; however the fit is actually not very good.  Fortunately though it’s an easy fix, taking in each of the side/back seams… my alterations to the skirt seams are pictured with my original review of the pattern here, and basically I have to make very similar alterations for Cassie

Fabrics; both from Spotlight..  I spotted this cute cotton jersey with its wonky rows of houses during Christmas shopping, and while I’d already bought her Christmas fabrics I just couldn’t resist! Cheerful, cherry red background, and those cute little white cottages with pink and teal rooves! And by the way, what’s with me and pink and teal this year??  I’ve made four things so far this year and they have all been deep blue and/or pink.  Weird!  Anyway, the print is cute and young and fun and just right for her colouring, all round just perfect … and I knew she has lots of skirts and jeans that would be perfect with it…
Then I vaguely thought maybe a navy  blue skirt would make it a nicely complete set, and she desperately needs skirts for work too … and lo and behold what should be lounging languidly about in the very next aisle but this teal blue suedette, which is a PERFECT colour match for the rooves.  BAM!  DECISION MADE.  Lugged them both to the counter without a second thought, brought them home, tossed into the washing machine.

About this time, I saw that happylat had also made a Tshirt from this very same fabric. What can I say, but great minds think alike!

I lined the waistband with some of the house fabric… not because I had run out of suedette or anything, but I just thought it was cute and I wanted to tie the two pieces together!

this is on grain, I promise!! the print is just naturally, and charmingly wonky

The suedette “looks” nice and perfectly suede-y, but it frays like billy-o.  I finished all the raw edges on the overlocker, and the lower hem with a bias cut binding cut from a scrap of purple/blue micro fibre.  tutorial for this bias finish is here

The Tshirt is made up just like the pattern, except for the neckline… I’m lazy with my Inari necklines and have pretty much finished them all off like this!  Just overlocked the raw edge, turned it under and topstitched from the right side.  Since it’s quite a wide neckline and doesn’t stretch out when you put the Tshirt on and take it off, the stitches won’t snap and this kind of finish works perfectly well.

The lower hem is finished with my twin needle.  Lisa asked about channelling with a twin needle.. all I can say is that I’ve never had channelling and what’s more I have no idea how I’ve avoided it so far either!!  Only thing I can think of: I always finish the raw edge on my overlocker, then topstitch with the twin needle, and that’s it!  Maybe the overlocked edge stabilises the fabric and that’s what stops a channel forming?  That’s the only reason I can think of anyway.  🙂
red threads on top, white in the bobbin; white overlocker thread

So! New outfit for her.  I think it makes a really cute ensemble and will get lots of wear, both together, and also separately a lot too, probably.  See, in my experience deep blue skirts are just about the most useful things a girl can have in the wardrobe… and she practically squealed when I brought out the Tshirt! so I knew that was a winner too.  Truly, she’s happy, therefore I am too  🙂

Later edit; at the time of making, she was pretty adamant that she didn’t want it lined so it would be cooler to wear in summer… however! the suedette is a little clingy! so, to give her the option, at least, I quickly ran up a simple little half-slip for her to wear underneath.  Vogue 1247 with the pieces spliced to simplify it as much as possible, navy blue, polyacetate lining fabric. .  A skinny 1cm finished width, uninterfaced waistband, a finished slit at CB and no zip, and with one small snap for closure.  Easy peasy!


Details:

Top, Inari tee by Named patterns, cotton jersey
Skirt; Vogue 1170, lengthened, suedette
Petticoat; Vogue 1247, pattern pieces spliced, navy blue polyacetate lining fabric
Shoes; Melissa


pinterestmail

finishing an edge with bias binding

Now, I promised to write this tutorial to show my Mum how I applied this finish to her top… and others expressed an interest too; thank you so much to everyone else who did… I finally did it, yay  😉

Mostly I would use this finish for a neckline that is wide enough to need no zip or button opening, as pictured above. Another example of its use is for a hemline such as the skirt demonstrated here.  I’m making this in a totally inflexible fabric with about zero give, PLUS the design has such a sharp curvature around the bottom edge a regular turned-up-twice hem is quite difficult to execute neatly.  The bias binding finish is a good solution for this 🙂   It results in a clean, banded finish on the inside of the garment, with one row of 1cm (3/8″) topstitching visible on the outside of the garment.

This method is just one of several ways of doing this kind of finish, I prefer this way because I find it the quickest and easiest, results in minimal fabric bulk, and minimal mucking around.

Firstly, make a strip of 2.5cm (1″) wide bias cut fabric long enough to fit the opening to be finished, plus at least 20cm (8″) extra.  Best fabrics to use are something woven that is very thin, fine and lightweight, like cotton voile, silk or handkerchief linen; in an unobtrusive colour toning in with the fabric.  For Mum’s cotton top above I used the self-fabric because it is quite light; for the blue suedette skirt I used a scrap of leftover silk-like microfibre.

Right sides together, pin around the edge to be finished, and stitch in a 6mm (1/4″) seam, leaving a gap between start and finish of around 15cm (6″) and ideally tails of at least 20cm (8″) 

Fold and press the strips to meet together on the bias.  I find it best to leave a very tiny gap, like 1-2mm or so, between the pressed edges.  Don’t have any explanation for this, just that it works better when it can stretch into it just a touch.  Keeping everything straight and right sides together, pin along the folds, stitch, and trim.  Press seam open.

Stitch up the gap to complete the bias strip attachment to the edge.  Press the bias strip, bias strip seam allowance, and garment seam allowance away from the garment.  Understitch these three layers together close to the seam line, keeping just the garment layer free.

Turn the garment wrong side up and press the bias strip back onto the garment, keeping the seam line just inside the pressed edge.

Turn under a 6mm (1/4″) seam allowance on the bias strip, press and pin in place.  Topstitch 1cm (3/8″) in from the garment edge.  Done! and the nice thing is that you won’t ever be able to see where the strip starts and ends  🙂

pinterestmail
Switch to mobile version
↓

























