Monthly Archives: November 2023

You are browsing the site archives by month.

our newest pattern, the Meelup skirt!

above; I’m wearing Meelup view A, made in a lightweight cotton canvas originally from Spotlight stores.

Hello!  Cassie and I are very happy to announce the release of the latest addition to our Carolyn & Cassie Pattern Co family; please give a warm welcome to the Meelup skirt!

above; a Meelup view B that I made last year; in a truly stunning cotton drill bought from Ikuntji Artists… this is a skirt that never fails to attract admiring comments, which is very nice!

The Meelup is a design I refined from my own skirt block quite a while ago now, and one I’ve subsequently made over and over again; twiddling the details… yes like our Pinjarra twinset from earlier in the year, this is definitely a tried and true style that both of us wear all year long, for any and all occasions.  I suppose you could say that this year has been the Carolyn & Cassie Year of Reliable Basics 🙂

below; Cassie wears Meelup view B; made in a mint green raw silk inherited from my Mum’s stash…

The Meelup pattern is for a straight fitted skirt in two lengths, with a waistband and satisfactorily deep, slanted hip pockets.

The skirt requires no zip! instead ingeniously buttons closed over the left hip pocket.  This is fair dinkum my absolutely favourite feature of the pattern.  Well, maybe a close second to the pockets, maybe, which are seriously decent pockets if I say so myself.  The silhouette is slim, but you will find you still have plenty of room to shove your hands comfortably in the pockets, no problem.

below; Lainey wears Meelup view A, in a very denim-like cotton duck in a lovely lush floral print.  She is also wearing our Booragoon top in blue cotton jersey, and my Pinjarra cardigan in pink merino knit…

styled a bit more summer like

You can line the skirt if you like; we have provided separate pattern pieces for the lining, and instructions cover both making the lined skirt and the unlined skirt as well.  I’ve made both lined and unlined versions for myself, but mostly lined for the versatility of them.

below; one of my own Meelups, view A, made in deep raspberry red cotton corduroy… 

You can line the skirt if you like; we have provided separate pattern pieces for the lining, and instructions cover both making the lined skirt and the unlined skirt as well.  I’ve made both lined and unlined versions for myself, but mostly lined for the versatility of them.

below; a recently made Meelup in quite heavy white linen.  The length of this was was dictated by my length of fabric and falls about midway between views A and B

The new Meelup is now listed in our Etsy store here.  To celebrate the release of our new pattern we ore offering a special, celebratory offer of 20% off for one week only.  In fact, we are currently running a 20% off sale on ALL of our patterns, because why not…  I guess we’re just feeling it this weekend!  Please do enjoy and take advantage of this special price!

And we hope the Meelup becomes as much a loved and very well-used item in your sewing repertoire, just it has become one for us!

below; the Meelup view B features splits in the side seams to facilitate striding

below: another recently made Meelup, this one is a sort of mid length between size A and size B… made in a lightweight cotton canvas in a fun Batman print

pinterestmail

pretty blouse, handbag, wallet, underthings, baby things and pink books

I’ve been checking out all my as-yet unblogged things, and there are so many!  I guess I’ve been in a real blogging slump this year.  Anyway, apologies for the overloaded, as well as overdue! blog post, and here we go…!

Item 1: a pretty lingerie set.  This is of course the Watson pattern by cloth habit, one I’ll be making for the rest of my life, I’m sure… just such a goodie.  Same modifications I’ve always made. (see here)…

I had all the elastics and bits and pieces already, and a quite short length of bright neon yellow elastic, leftover from this set… it was fun incorporating a length of it in each piece!

Item 2; a pretty blouse.  This is actually my most recently made thing… well, apart from a few samples for our new pattern, to be announced very soon, I hope!

This design is the new Nova pattern by Fibremood. It has a very interesting fluted neckline, that attracted me to it in the first place.  I dunno, but I can’t resist a unique twist to a thing! and simply must try it out.

I used a length of pretty slightly brushed cotton, given to me by Mum when she cleaned out her stash.  It’s lovely, isn’t it?!  I added one pocket, just for fun, and threaded a length of elastic through each sleeve hem, a look that I really like lately.

The back has a centre-back seam with an invisible zip.  Quite unnecessary, since I found you can pull it over your head quite easily.  Something I like to do with the end of an invisible zip is to wrap the end with a little piece of fabric, since a lot of invisible zips seem to have almost imperceptible sharp bits at the end, that will torment you without pity if you don’t do something about it first.

The back has a centre-back seam with an invisible zip.  Quite unnecessary, since I found you can pull it over your head quite easily.  Something I like to do with the end of an invisible zip is to wrap the end with a little piece of fabric, since a lot of invisible zips seem to have almost imperceptible sharp bits at the end, that will torment you without pity if you don’t do something about it first.

Item 3; this cute little bag… I made this earlier this winter, using a kit from JT Tanner bought during lockdown actually!

It was an exceptionally beautiful kit and I really enjoyed putting it together, in spite of breaking all three of the provided needles!  however I finally figured how to stitch through that tough tough leather without putting too much strain on the needles… :D. and am super happy with the quite profesh look of the final product!

I wore it a few times, but it had one small problem which ultimate led me to my next project…

Item 4; a little wallet.  My new bag is awesome, but my current purse doesn’t fit into it at all, and since the bag is such that a loose credit card or cash would easily fall out of the gaps,  I decided that I needed a customised purse! Yes, I’m admittedly weird about not immediately shopping for things at the moment and I also I do like to challenge myself, ergo; I decided to have a go at making one.

There was one failed version before this final one, failed only because I cut the zip too short and it couldn’t flip out open completely; but this one is nearly perfect, I’m happy to report.


I didn’t want to use any of my precious leather just yet! although I might be ready to go there soon; instead I used charcoal felt, that I bought to make a stuffed toy at some point (still unblogged, whoops!). Fortunately I still have a huge number of oddly coloured zips that Mum gave me at some point, and found two matching ones.  The wallet took a bit of very careful measuring and lining up, and I am pretty proud of the final precision.

It has a whole lot of card slots, a zipped coin compartment, one separate car slot that I was initially intending to have a clear plastic window in it, but couldn’t found the right plastic on hand and didn’t want to go out and source any either.  C’est la vie!  Oh, and also a bellowed pocket for bills/notes.  This time I carefully made sure the wallet could flip open fully and lie flat.

 I agonised on how to put in the zip, finish the raw edges, and eventually bound the edges with matching charcoal linen – the same stuff I used to line the card slots and coin pocket. I hand stitched the linen binding down inside, and then finally glued the outer layer over the top.  I wasn’t sure how the glueing would work out, but it has nicely stiffened up the final product in a very satisfactory way.

And it fits into the bag perfectly!

Item 5; I’m not sure if I’ve posted this before? if not here tis… a baby onesie for our friend’s baby.  Design is my own, and yes, I used the leftovers for my Watson set, above!

Item 6, 7, 8, 9

some new little books.  I always save and cut up the leftover paper from paper patterns and make little books from them.  It’s fun to do this and makes me feel virtuously zero waste.  All materials are waste scraps and leftovers from other projects.  I have one in my handbag all the time and use it all the time, and they make nice gifts too, I think!

I think that’s enough for now?  Anyway, I’ll be back with more soon!

pinterestmail

a patchwork dress

Oh my gosh, I can’t believe I haven’t blogged this dress yet… this post (sans any text at all, ahem) has been in my drafts for over a year now!  I feel so neglectful of this thing… it spite of the fact that it’s something I’m very proud of!

Quite a few years ago now, I bought a whole lot of lovely linens from Tessuti Fabrics in Melbourne, while over there on a visit with Mum and Cassie.  Aren’t the colours gorgeous?!

I always planned a patchwork thing pretty much exactly like it finally turned out… !  So lucky!


I cut a whole bunch of squares; the ones closest to the top of the dress are quarter the size of the squares in the middle, which themselves are a quarter the size of the biggest squares around the hemline.  Piecing them so as to have the colours arranged randomly was a minor but very enjoyable challenge.

Early on I posted the above picture to instagram, to which someone (kindly and without ill-intent) commented that the shaping could all be done in the seams keeping up the appearance of perfect squares everywhere.  And I knew straight away that that was a borderline impossible task.  I’m perfectly aware that this commenter meant really well but the comment still somehow left me totally paralysed with the weight of expectation.  I know, it’s silly; but I guess it’s my fault for sharing progress shots of things I’m making.  Somehow doing so seems to frequently lead to a similar outcome.

Anyway, as a result; the project spent the next few months in limbo.  I did finally pick it up, left it again, picked it up again, and finally managed to limp through to the finish line, all the time painfully aware that I had failed to achieve aforementioned shaping while keeping the squares perfectly square.  I shouldn’t have felt like a failure, but you know.  Such a feeling can’t be helped sometimes…


But I am very happy in the end, and even I wore it to Frocktails one year too.  It was actually a freezing cold night and it had to be covered up with a warm woolly cardigan most of the night, more’s the pity!

The halter neck design with rather complex, uber swishy skirt is my own, of course; custom fit to my dummy Bessie.  It even has pockets, which were actually kind of a nightmare in the patchworked side seams.  It also has a side zip, so as to disturb the patchwork as little as possible.  The above picture is the initial, unhemmed version, which looks kind of cool but was unfortunately impossible to walk in from being too too long.   The final look is a good compromise between a good length, and being able to walk without tripping.  A nice balance!

Final take; I am so so proud of this dress, so am kinda bewildered at my complete failure to blog it before now.  Well, at least I finally got this, final step finished too.  It’s been a fun dress to wear , so beautifully swishy and comfy, and it never fails to garner lots of attention and compliments.  So in conclusion; I cannot be happier with it!

pinterestmail

Original Digby Julie tunic dress/ tops

Hello!

Finally posting some other new things I’ve made this year…

Item 1; a love floaty top for summer.  Actually to be specific, I think this is the dress version of the pattern! however it’s kinda short on me thus I am wearing it with a skirt here.  And I will probably choose to wear it with shorts or a skirt over summer.

The pattern is the new pattern by Original Digby patterns, the Julie blouse and dress… it’s so pretty isn’t it? I absolutely love it!  I kinda want to rush out and buy prettier fabric in like a softer colour, or even something printed, like a floral or something; but you know.  Stash busting is still going on over here.  Anyway.

So, this is  the longest version of the pattern. I added inseam side pockets, just because I like to have them in everything nowadays and am not readily prepared to go without.  My fabric is a very lightweight cotton, I think originally from a Morrison seconds sale.  It’s quite good for the design, but maybe not strictly “flowy” enough for those lovely softly gathered panels.  I think in a very lightweight chiffon or crepe the gathers would fall and flutter beautifully.  However I am still very happy!

I hand-stitched the button loop as instructed, and think this looks really nice; however to be honest I’m able to just slip the dress straight over my head, with no need to unbutton.  It’s ok thought, because I can appreciate the long slit and button makes the back yoke look more interesting.  The instructions for constructing this bit was really good and I enjoyed the lovely clean finish both inside and out that you get at the end of it.

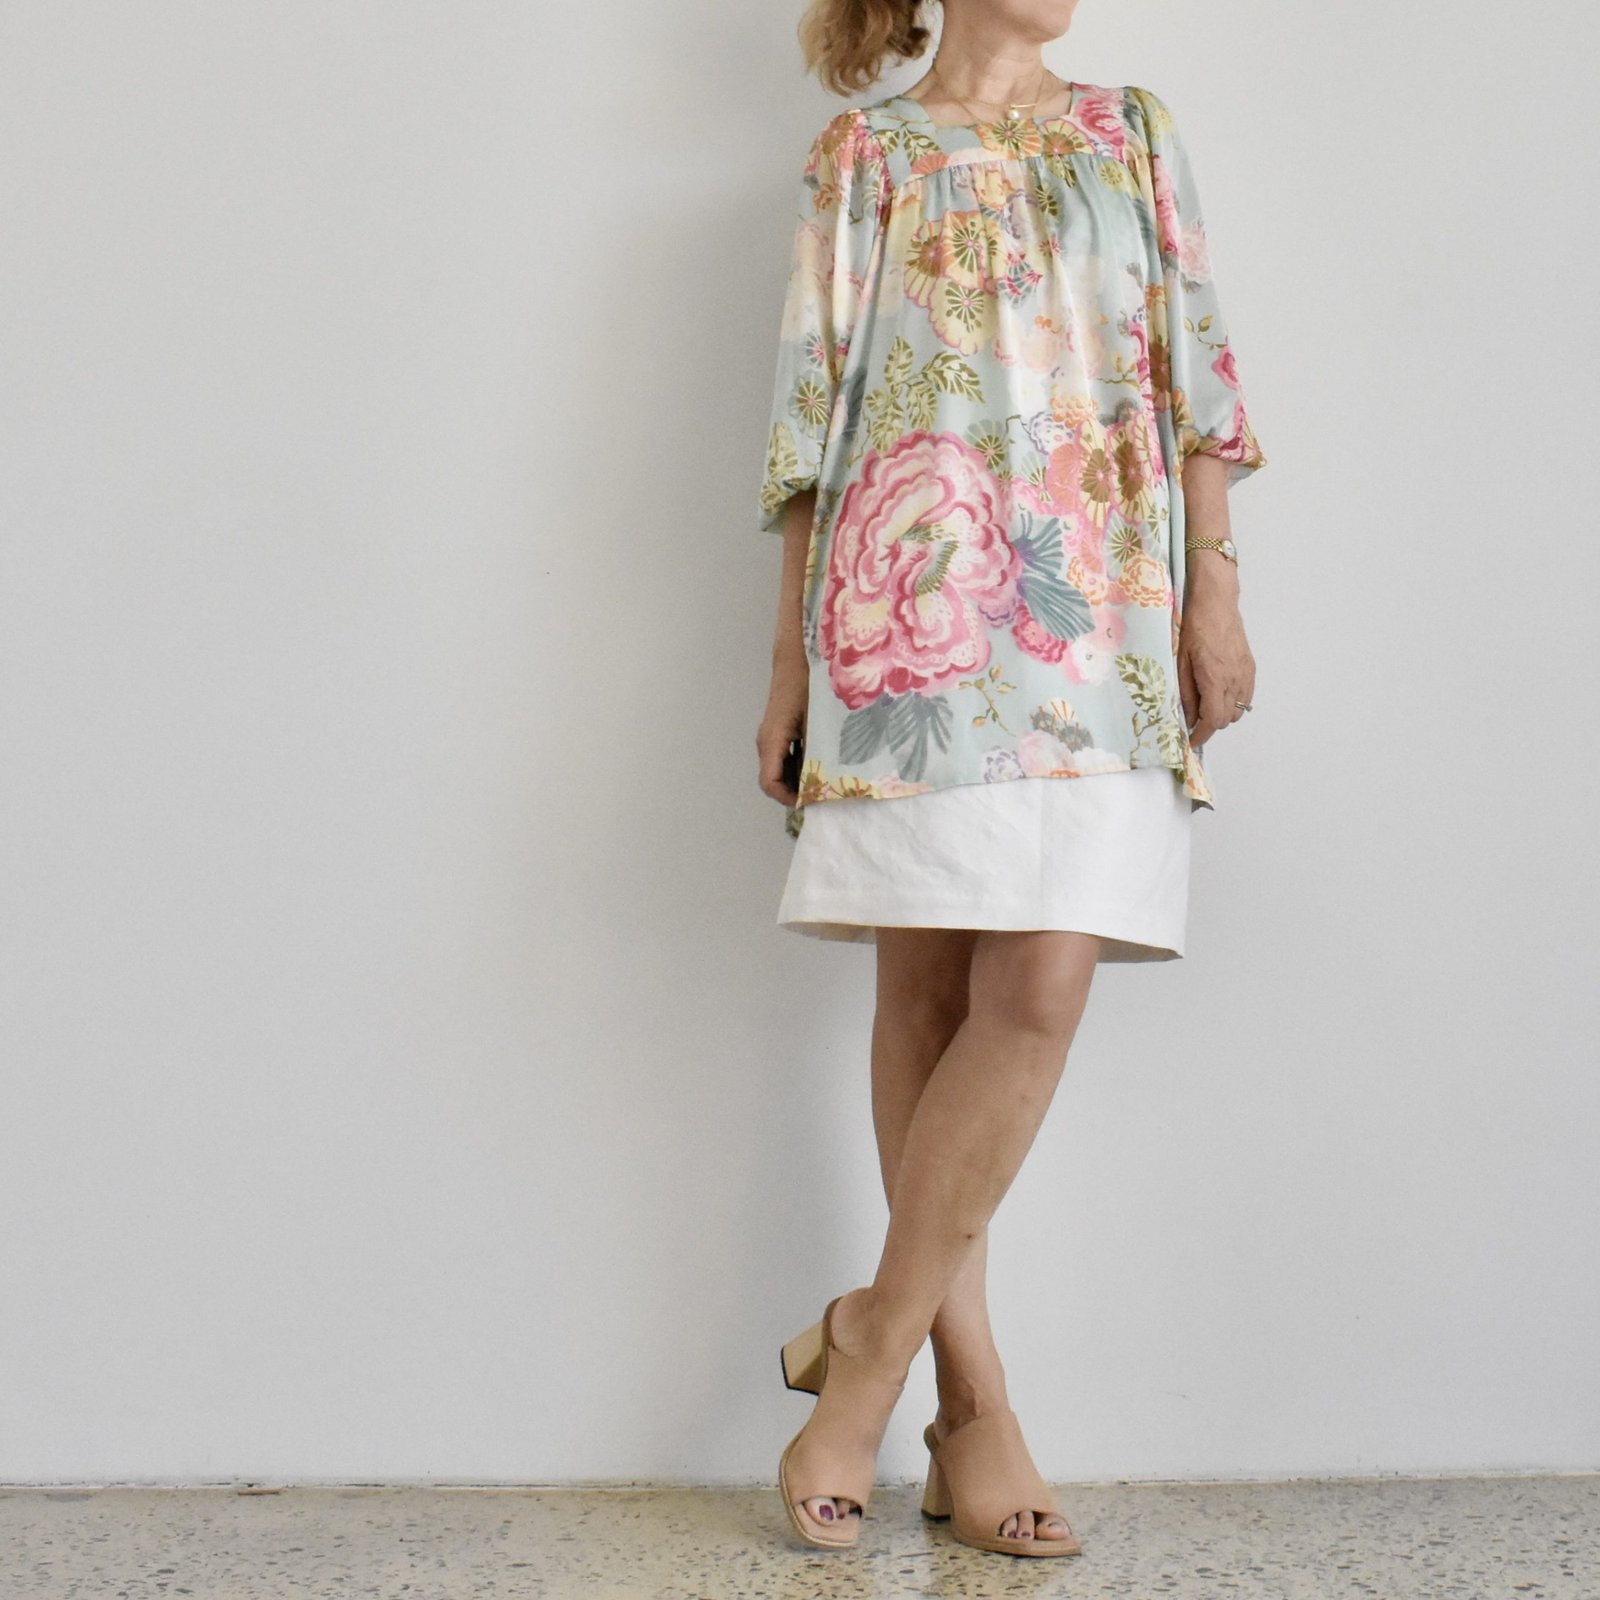
The sleeve pieces are absolutely massive and the result is lovely in my opinion! a very pretty, half pirate-y, half mediaeval sort of effect!

Just secretly, although I am putting this out on the internet, hehe, for the whole world to read should they so choose! but still; just secretly…. I have started doing some embroidery on the yoke.  I saw this embroidery design on Etsy and got inspired enough to purchase, ahem.  I’ve made a small start.  Hmmm.  This might take me a while.

Item 2; hehe, I just realised the skirt I’m wearing is as yet unblogged too!  It’s just one of the test runs for our new skirt pattern, due to be released very soon, we hope!  The Batman cotton drill is from Spotlight, and was leftover for a cushion I made for Theo when he was a tiny bub.

The skirt is fully lined and is a joy to wear.  More on our new pattern in a very short space of time, I hope!  I think it’s a terrific basic and one I’ve made and wear a lot.

I’m wearing it with a very old T-shirt made absolute yonks ago…


Finally, I made a second version of the Original Digby Julie blouse… hoo yes I managed to find some prettier and silkier and flowy-er fabric…. IN LE STASH what’s more!  Whatup?!  I knew I could dig up some more appropriate fabric if I really tried.  One was just not trying hard enough, that’s all.

This is a silky stuff inherited from Mum’s stash.  It’s absolutely gorgeous and feels beautiful against the skin but I have a sneaking suspicion it’s not precisely “pure” silk.  Most likely spun from the sloughed off cocoons of the Plasticus Bottleus variety of silkworm, ahem.  Anyway, how pretty is it? that’s all that counts really.  I’m wearing it with yet another new skirt, white linen, fully lined; also our new pattern, hehe.  To be revealed soon!

It’s hard to believe, but I STILL have as yet unblogged things to share here!  Until then,  mwaaah!

pinterestmail
Switch to mobile version
↓